Everyday Mom's Meals: October 2014
_____

Friday, October 31, 2014

Early, Upon Request

If you follow me on Facebook, Twitter or Instagram, you know I'm notorious for posting "preview" pics or ones with new recipes I'm trying with the caption of "coming soon." It's just a little something I give my audience to keep ya'll coming back for more.  Like the really good previews at the movies. You know they suck you in. You just spend an arm and a leg to see this movie, and you start planning your next trip before the popcorn is even half gone! But I know many of you see something you like and have a hard time waiting, so this time I'm offering up the goods early!

So many of you commented on the preview I shared of this recipe I felt like I just had to adjust my normal schedule to accommodate. I can't say I blame you either. It's a great one. A mouth watering, filling, but still super simple meal your family will come running for.

Oh, and if you are feeding a crowd, this would easily do that too. Plus, it's so easy to adjust for even more people if need be. Remember, the holiday season is quickly approaching, and all of us are looking for ways to feed those out of town guests in an easy and budget friendly way!

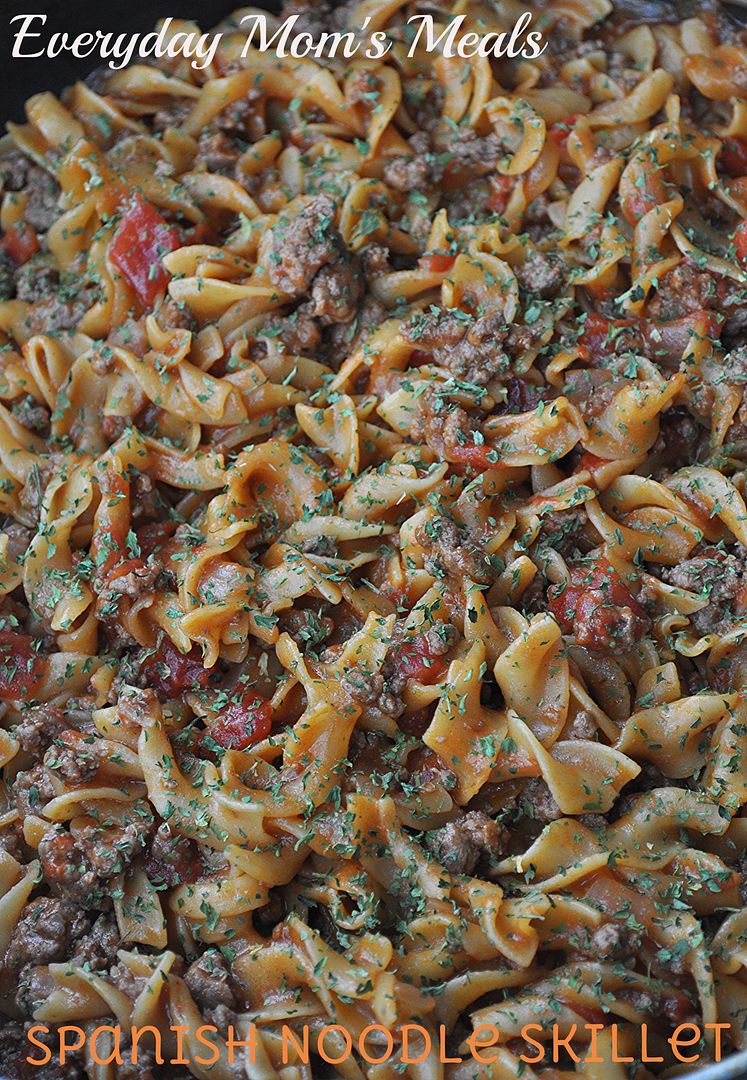
This is what I like to call a pasta plus dish. Sure, it's a pasta, but it's so much more too. Plus, the flavor isn't the typical Italian flare you think of when you think of pasta. It's like what would happen if spaghetti and chili got together for a one night stand and had a baby...two favorites rolled into one.

I can't always share recipes as quick as fans would like me to. I have a schedule I like to keep. But rules have to bent every now again, especially for something this delicious. So, by request, here it is early. You're welcome!

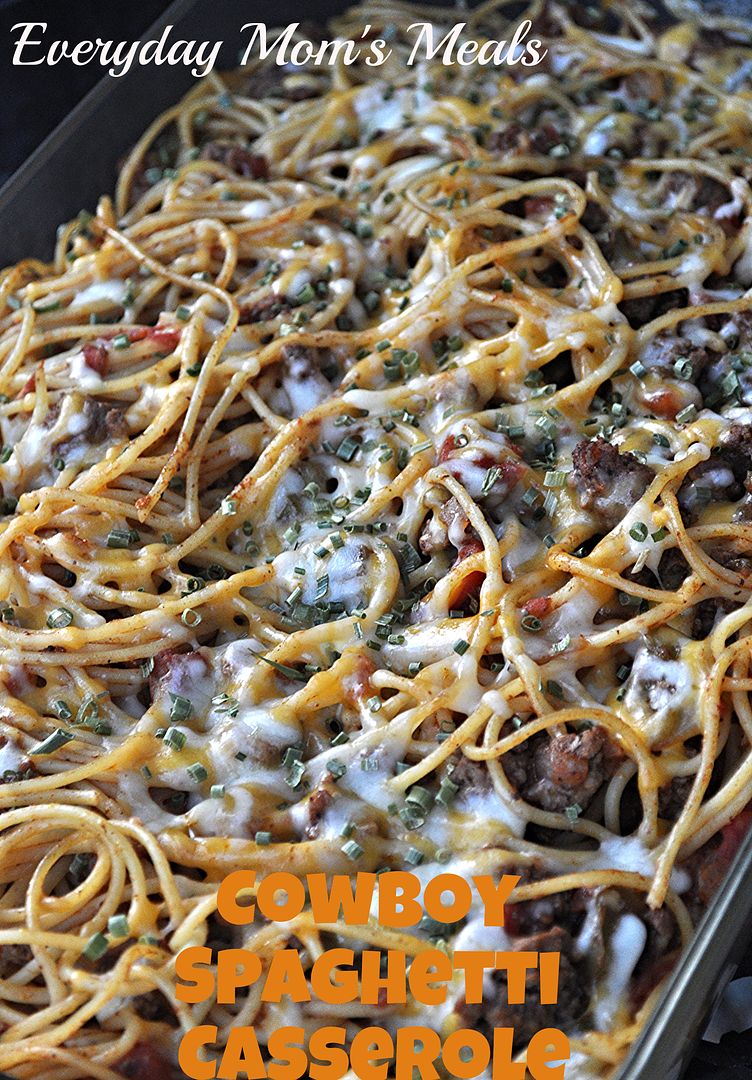
Cowboy Spaghetti Casserole 
12 oz. spaghetti, cooked to al dente
1 lb. ground beef
1 green bell pepper, chopped
1 medium white onion, chopped
1 TBS brown sugar
1/4 tsp. garlic salt
1 tsp. chili powder
1 (15 oz.) can diced tomatoes, with juice
1 ( 8 oz.) can tomato sauce
3/4 c. colby jack cheese
Salt and Pepper to taste
Chives for top

Preheat oven to 350. While pasta is cooking, brown ground beef, green pepper and onion in a large skillet until no longer pink. Season with garlic salt, salt and pepper. Add tomatoes, tomato sauce, brown sugar and chili powder. Stir to combine. Bring to a boil, and then reduce heat to simmer, stirring often until slightly thickened. When pasta is cooked, drain well. Add to ground beef mixture. Mix well. Transfer to a greased 9x13 pan. Cover with foil. Bake for 30 minutes. Remove foil. Add cheese. Bake for an additional 5 minutes until melted. Garnish with chives.


Shared on The Country Cook Oct. 31, 2014

Spaghetti at Very Good Recipes

And from our family to yours.....


Disclaimer: As a Field Editor of Taste of Home, I share my own thoughts and opinions of this recipe. I am not a paid employee.

Wednesday, October 29, 2014

I Can't Help Myself

No matter how hard I try, I can't stay away from the potatoes. They call out to me in the produce section. Even if I have something else planned on the menu, the taters sense me walking by and entice me with their wicked ways.

Okay, I can't lie. That scenario only takes place in my mind. (In case you hadn't figured that out for yourself!) And honestly, I don't really try that hard to stay away from them. In fact, I don't try at all. They are a staple in the Marshall diet, and we can't get enough!

I think one of the reasons I gravitate towards them so much, besides the delicious factor, is no matter when it is, I can almost always find them on sale at one store or another, especially red potatoes. From the regular size to the "baby B's", they are budget friendly year round.

This recipe came about after I had once again purchased some red potatoes out of the bulk bin that were on sale for $.99/lb. I had them. I had supper to make. It was time to figure out what to do; and this is what happened. A little of this. A little of that and wah-lah a new potato recipe is born.

One of my favorite things about this preparation, is you can easily split the work into two stages. Precook the potatoes in the morning before work, or even the night before. Then you have a great head start at the end of the day. Plus, you can easily add whatever herbs and spices you feel like at the moment. Just be sure not to move them around too much in the beginning. This will give you the brown "crusty" edges you see in my picture, which is most definitely the best part!

If you have an addiction to potatoes like me, don't make apologies. Embrace it! Love it! Enjoy every single bite! 

Skillet Red Potatoes
7 medium-large red potatoes, cooked and cut into 3/4 inch cubes
4 TBS canola oil
1 tsp. garlic powder
1 tsp. onion powder
1 tsp. paprika
Salt and Pepper to taste
Dried Parsley, for garnish 

Heat oil in large skillet over medium-high heat. Add potatoes in single layer. Do not move. Allow to cook/brown for 3-4 minutes. Stir. Season with salt, pepper, garlic powder, onion powder, and paprika. Continue to fry and stir for 15 minutes until browned on all sides. Remove to serving platter, and sprinkle with parsley *NOTE* To precook my potatoes I microwaved them for 10 minutes, until just fork tender. 


Shared on The Country Cook Oct. 31, 2014


Monday, October 27, 2014

Easy Dinners with McCormick {A Sponsored Post}

What if I told you dinner could be on the table in about 15 minutes? Think I'm crazy? Are you saying "NO way." Well, I wouldn't lie to you! It's a reality, thanks to my good friends from McCormick and their new line of Skillet Sauces


That's right, a trusted name in our kitchens for years, has recently launched their new Skillet Sauces, now available at your local Walmart.

And in case you are wondering where in your store to find them, start in the baking aisle. I found mine next to the other sauce and gravy mixes.


With 7 varieties to choose from, the possibilities are endless. Plus, each one comes with its own unique and tasty recipe, right on the package. From Sloppy Joe, to Tacos, to Chicken Fajitas, there are so many delicious options to choose from!

So, you might be wondering which one I chose to try. Well, the minute I saw the Smoky Applewood BBQ Chicken I knew it would be coming home with me. But imagine how excited I was when I read the directions, and discovered this one came with slow cooker directions too! Talk about a match made in heaven! Sure, a meal that is ready in 15 minutes in the skillet is hard to beat, but one that can cook in my crock pot while I am busy doing other things is even better in my book! Many of the sauces come with this slow cooker option, so just be sure to read the directions carefully! 


These are a terrific weeknight meal when time is of the essence, or would also be fabulous to feed a crowd! I'm thinking tailgating while you cheer on your favorite team. Or...remember, that holiday rush is just around the corner, and we are all in need of simple meals when family comes to town!

If your dinner plans must include the words "quick, easy and scrumptious", then you need look no further than McCormick's Skillet Sauces for your answer. And be sure to stay up on all the great products they offer by connecting with them on Facebook, Instagram, Pinterest and Twitter

Slow Cooker 
Pulled BBQ Chicken Sandwiches
3 large boneless chicken breasts
1  ( 7 oz.) pouch McCormick BBQ Chicken Skillet Sauce
1 white onions, cut into wedges
Garlic Powder
Salt and Pepper
Pretzel Buns
Sweet n Spicy Pickles

Spray slow cooker with nonstick spray. Season chicken liberally with garlic powder, salt and pepper. Place in slow cooker. Add onions. Pour sauce over the top. Cook for 8 hours on LOW or 4 hours on HIGH. An hour before finished, remove and shred using two forks, or a stand mixer. Place back in slow cooker and stir to combine with sauce and cooked onions. Reduce heat to warm setting until serving. Serve on pretzel buns with pickles. *NOTE* My chicken was done in about 5 hours on LOW.


Shared on The Country Cook Oct. 31, 2014

Disclaimer: I was compensated for this post by McCormick. All thoughts and opinions are my own.

Saturday, October 25, 2014

Soul Food Saturday


Now that the kids are busy in school and our work schedules seem to run together with our daily activities; we are on the look out for ways to let our grocery store help us out. Not to mention the holiday rush is around the corner! Yep, I said it out loud. Take the help folks! Those bags of precut bagged salads and roasted meats save time! I know what you’re all thinking though, Mrs. Soul Food that is so boring! Fear not, this idea is fun, fresh, and flavorful! And even better than that it’s really quick! Grab a fork, this one is good enough to eat out of the pot.
 
 
Rotisserie Chicken 
and 
Garden Veggie Stir Fry
 1 tbs. olive oil
8 oz. sliced baby Bella mushrooms
2 medium tomatoes, diced
1 c. leek, green part, chopped
1 whole rotisserie chicken, skin and bones removed, chopped
1 bag broccoli slaw salad mix (no dressing)
2 Anaheim chilies, chopped finely
3 garlic cloves, minced
Salt to taste
 
In a heated large skillet add oil, leeks, mushrooms, chilies, garlic, and salt to taste. Sauté, until veggies have softened, stirring often. Add slaw mix, tomatoes, and additional sprinkle of salt to taste. Stir to combine. Allow veggies to wilt slightly and warm through.
Add chicken and check for seasoning. Add additional salt if desired. Stir to combine, allow chicken to warm through, check once more for seasoning and add any additions if necessary.
Can be served with rice, warm tortillas or alone as a one pot wonder. Enjoy!


Meal Plan Oct. 26-31

*New Recipe
Links to Recipes on Blog

Sunday
We are going to a fall festival at Mr. E's work. 

Monday
Cream of Broccoli Soup*
Cran-Apple Chicken Salad Sandwiches*

Tuesday
Crock Pot Orange Beef*
Fried Rice

Wednesday
Southwest Casserole*
Garlic Toast

Thursday

Friday
Happy Halloween!!
Steak Fries
Jello Parfait Salad


Friday, October 24, 2014

It Doesn't Have To Be Fancy

A couple weeks ago my mom and I were browsing one of our favorite little grocery stores when we stumbled upon a brand new display. We were elated to find they are now carrying an entire line of products from our favorite Amish store. One stop shopping! Which is great, because we never get to the Amish store as much as we would like! 

Well, the first thing my eyes traveled to were the homemade Amish noodles. Yep, there I stood, in  the middle of the store, drooling. I love noodles. Plain noodles, noodles with sauce, noodles in soup...it doesn't matter to me as long as it includes noodles. 

I was looking at all the varieties, and I found a bag of the thinnest egg noodles I had ever seen. They were beautiful. (Yes, I love noodles so much I find beauty in them!) My brain immediately goes into food blogger mode and I start brainstorming what I could do with them. And that's when mom comes into the story. 

I was staring at them, the gears in my brain turning, and she asked what I was doing. "I'm trying to think of something special I could do with these. A new recipe for the blog." Here comes mom's infinite wisdom..."Why? Do something simple. It doesn't have to be fancy. They would be perfect in chicken noodle soup." Talk about a huge "Duh!!" moment! For it was in that instant I realized I had never blogged my classic, go-to chicken noodle soup recipe! Sure, I had shared my Lemon Chicken Noodle Soup forever ago, but never my "ordinary, every day" one! Sometimes you just need a little perspective; and in my life, that usually comes from mom! 

So, here it is. The chicken noodle soup recipe I've been making since we were first married. It's a classic in our house, but you might notice a couple nontraditional things about it. First of all, I don't boil the chicken with the veggies. Sure, this leads to a delicious broth, but for me, I think it also leads to chicken lacking in flavor. Instead, I roast mine, locking in all the juice and flavor. Secondly, I start my veggies by sauteing them. Why? Two reasons really. One, it helps to get them cooking, so this can be ready as soon as possible. And two, it's about flavor again. To me, veggies cooked in butter taste a whole lot better than just boiling them. Sure, it's an extra step, but one that can be done while the chicken cooks, so the soup is moving forward while you wait! 

This is a classic soup recipe for a cold day, or perfect to take to someone who is under the weather. It's one of those soups that eats like a meal. It's simple, but delicious. Easy, but filling. 

See, it doesn't have to be fancy. It just has to be yummy!

Roasted Chicken and Noodle Soup
3 boneless chicken breasts
Olive Oil
2 (32 oz.) boxes chicken broth
2 chicken bouillon cubes
1 lb. fine egg noodles
3 TBS. butter
2 c. water
5 carrots, diced
3 celery stalks, diced
1 medium white onion, diced
1/2 tsp. garlic powder
1/2 tsp. ground thyme
1 TBS dried parsley
Salt and Pepper to taste

Preheat oven to 375. Line a baking sheet with foil. Drizzle chicken with olive oil. Season with salt and pepper. Roast for 30-45 minutes until juices run clear. Allow to slightly cool and shred. Set aside. In a large stock pot over medium heat melt butter. Add onions, carrots, and celery. Saute' until veggies are beginning to soften. Add chicken to mixture. Season with garlic powder and thyme. Saute' for 2 more minutes. Add broth, water and bouillon cubes. Stir to combine. Cover and bring to a boil. Reduce heat and simmer for 20 minutes to allow flavors to develop and veggies to cook through. Bring heat back up to a hard simmer. Add noodles and cook about 5 until tender. Add parsley. Stir and serve.


Shared on The Country Cook Oct. 24, 2014


Wednesday, October 22, 2014

Yep, Another Tater

If you're a long time reader of EMM, you've heard me refer to our family as "tater lovin' people" too many times to count. Yep, we've got a reputation. What can I say? It's one we accept and even celebrate like a badge of honor.

And in that spirit, I have yet another potato side dish recipe to share today. These are so easy to make, but so packed with flavor. You might not guess it from the simplicity of the ingredients, but they will make your taste buds sit up and take notice!

I think this would be a great one to keep around come the holiday rush too. Maybe not for the actual holiday meal, but for all of those "extra" holiday parties that come up between Thanksgiving and New Year's. Especially if there are ones you have to travel with a dish for. These would take a car ride beautifully!

If you enjoy other herb/spice combinations, you could easily adapt these to fit those, no problem. However you make them, they are going to be easy and yummy...two things I love almost as a good tater! 

Zesty Red Potatoes
6 large red potatoes, thinly sliced, about 1/4"
1 stick butter, melted
1 small onion, thinly sliced
1/2 tsp. red pepper flakes
1 tsp. dried parsley
Salt and Pepper to taste
Chives, for garnish

Preheat oven to 400. Spray a 9 inch square baking dish with nonstick spray. Layer potatoes and onions, seasoning each layer with salt and pepper. End with potatoes on top. Mix butter with red pepper flakes and parsley. Pour over potatoes. Cover with foil. Bake 25 minutes. Remove foil and bake an additional 20-25 minutes until browned and potatoes are tender. Sprinkle with chives. 


Shared on The Country Cook Oct. 24, 2014

Disclaimer: As a Field Editor of Taste of Home, I share my own thoughts and opinions of this recipe. I am not a paid employee.

Monday, October 20, 2014

2 for 1 Special

Yep, that's right. If you are a bargain hunter like me, you're going to be so happy you dropped by today. Why? Because I'm running a 2 for 1 special on EMM today. You will walk away with two recipes for the price of 1. (That's just a saying. Don't worry, I'm not charging you for either.) 

I guess to be accurate, one part isn't really a recipe, but more of an idea that you can take and run with...customizing them to fit your family tastes. But they are definitely a great idea for a simple supper, when life is too busy to chew, let alone cook. Or for a kid's birthday party...both to eat, and for an activity to keep them busy! 

But the second part is definitely a recipe, that I think could easily become a go-to for you like it is for me. I don't know about you, but the variety of canned/jarred pizza sauce in the stores is kind of underwhelming to me. I've tried several, and each one seems to be missing a little something, and doesn't quite taste "right." So, I decided it was time to attempt to make my own, but in true EMM style, it couldn't be complicated or fussy! Easy is the name of the game, and if I'm making something fun for dinner, I don't need any part of it ruining it by being too time consuming.

So here is the answer. A simple, ready in about 5 minutes, homemade pizza sauce that has the exact flavor I've been looking for; which can then be used to make some adorable mini pizzas the kids (And who are we kidding? The adults too!) will love. Toss a salad together, and dinner is done! Heck, take a few minutes in the morning and mix together the sauce, put it in the fridge, and that's one less step you have when you come home.

I'm happy to give you easy recipes, but I get really excited when I can double up and give you more "bang for your buck!" Since it's Monday, and I know you were swearing at the alarm clock this morning, why not treat yourself to knowing supper could be as easy as this! 

English Muffin Pizzas
English muffins, halved
Pepperoni
Canned Mushrooms
Mozzarella Cheese
 Pizza Sauce

Sauce:
1 (15 oz.) can tomato sauce
1 ( 6 oz.) can tomato paste
1 TBS dried oregano
1 1/2 tsp. garlic powder
1 tsp. paprika

For sauce, combine all ingredients and stir well, until smooth. Preheat oven to 375. Lay opened English muffins on large baking sheet. Spread with sauce. Sprinkle with cheese and top with pepperoni and mushrooms. Bake for 15 minutes until cheese melts and edges are crispy. *NOTE* This was enough sauce to make 12 halves, and freeze the rest. 


Shared on The Country Cook Oct. 24, 2014

Saturday, October 18, 2014

Soul Food Saturday


Anyone interested in family movie night? Well in this house we love evenings like these! Is the best part that you don’t have to cook, but take out? Or is it the one evening you plan on cooking together? For us we really enjoy cooking together, so this recipe fits these types of nights perfectly. How about home made pizza dough? Yes, one you made at home, together with all your favorite topping combinations.
Grab your favorite movie, its pizza night!
 
Homemade Pizza Dough 
Adapted from Center Cut Cook
 1 packet rapid rise yeast
1 c. warm water
2 ½ c. all purpose flour
2 tsp. honey
1 tsp. salt
2 tbs. olive oil
Pizza Sauce
Mozzarella/ cheddar cheese blend
Turkey pepperoni
Thin sliced onion, green bell pepper, tomato 
 
In a large bowl, add water and yeast. Stir until the yeast is dissolved. Then add flour, honey, salt, and olive oil. Stir to thoroughly combine. After all ingredients have combined then use your hands to knead the dough for several minutes. Shape the dough into a ball, and allow it to rest for 10 minutes.
Pre-heat your oven to 375 degrees
This is where you decide if you want one large pizza or 2 small ones. If you’d like 2 small, divide the dough ball in half and set one aside covered. Roll the second half into an 8 inch circle. Spray your 9 inch pie plate and place rolled dough in the pie plate. Repeat with the second. If you’d prefer one large spray your pizza pan, and roll out dough to 16 inch circle. Place onto the pizza pan.
Add sauce, cheese, and toppings. Place the pizza into the oven for 12-15 minutes, or until the crust is crispy and the cheese is melted. Cut into slices and enjoy!


Meal Plan Oct. 19- 24

*New Recipes
Links to Recipes on Blog

Sunday
Mashed Potatoes
Winter Squash

Monday
We're meeting Daddy after work for supper!

Tuesday
Crock Pot Barbecued Pulled Chicken Sandwiches*
Mac n Cheese
Fruit Cocktail

Wednesday
Grilled Steak
Parmesan Red Potatoes*
Roasted Carrots*

Thursday
Crock Pot Orange Beef*
Fried Rice

Friday
Confetti Spaghetti*
Garlic Toast


Friday, October 17, 2014

Enchiladas Turned Soup

Are you a chili lover? Is it one of the meals you look forward to most this time of year? Are you willing to switch it up and try new versions? If you answered yes to any/all of those, then you've come to the right place today!

Is there anything better on a crisp fall day than a piping hot bowl of chili? Is there anything more appropriate to enjoy while watching the game on football Sunday? Is there anything tailgating crowds crave more? If you answered yes to any/all of those, then you've come to the right place!

Okay, no more questions. Oh wait. I fibbed. Sorry. Have you tried my Chicken and Green Chile Enchiladas? If so, then you're going to l.o.v.e. this recipe!

Okay, now I'm done for real this time. I love chili, but I also love a good chicken enchilada in a cream sauce. So, this is a match made in heaven for me. Not to mention the fact, it's made in one pot, totally stove top and can be on the table in under an hour. A busy mom's dream!

Now I will tell you, this isn't quite as thick as a normal "red" chili tends to be. Or at least, it's not as thick as mine. It's more of a soup consistency, but if it has beans, meat, and a little heat, I think we can still refer to it as a chili; and it's my blog, so I am.

Step outside your chili comfort zone this fall and try something a little creamier and with an unique flavor profile all it's own! This could be what's for dinner tonight!

Creamy White Chili
1 lb. boneless chicken breasts, cut into 1/2" cubes
1 ( 7 oz.) can chopped green chilies, slightly drained
2 (15 oz.) cans great northern beans, rinsed and drained
1 TBS canola oil
1 medium white onion, finely chopped
1 1/2 tsp. garlic powder
1 tsp. dried oregano
1 c. sour cream
1/2 c. heavy cream
1 (14 oz.) can chicken broth
Salt and Pepper to taste
Cilantro, chopped for garnish

In a large pot or dutch oven, saute chicken and onion in oil over medium heat. Season with garlic powder, salt and pepper. When no longer pink, add broth, chilies, beans and oregano. Stir well to combine. Bring to a hard simmer. Reduce heat to low, and simmer uncovered for 30 minutes. Remove from heat. Stir in sour cream and heavy cream until well combined. Garnish with cilantro before serving.


Shared on The Country Cook Oct. 17, 2014


Disclaimer: As a Field Editor of Taste of Home, I share my own thoughts and opinions of this recipe. I am not a paid employee.

Wednesday, October 15, 2014

A New Twist On An Autumn Classic {A Post for Earth Fare}

It's that time once again. Time for me to head into my local Earth Fare store and find inspiration for a yummy recipe to share with all of you; and this time around, I was looking for something to celebrate the season. 

We love squash. Year round. We will eat it any time, any way we can get it. In fact, my son has loved squash since before he could say "squash". It was his favorite baby food, and I always had to make sure we had plenty of jars on hand because he always wanted more and more! 

We love squash so much, I have many different ways I cook it, and I'm constantly trying to come up with new ones. This time I used inspiration from another autumn classic...apple cider! Is there anything better on a chilly fall day than a big mug full of warm spiced cider, ladled from a big pot on the stove or even the slow cooker? I think not. It's my favorite warm drink this time of year, so why not combine it with a loved fall veggie? 

This is simple enough for a weeknight meal, but honestly, I immediately started thinking Thanksgiving when I smelled the amazing scents coming from the kitchen. So, you might want to keep it in mind for later use as well. 

If you love squash as much as we do, or you're just looking for something to add to your menu that screams "autumn", this is what you've been waiting for, and I hope you enjoy every delicious bite!

Cider Spiced Acorn Squash
2 acorn squash- halved and seeds cleaned out
1/2 c. apple cider
1/4 c. packed brown sugar
1/8 tsp. cinnamon
1/8 tsp. ground nutmeg
Salt and Pepper to taste

Preheat oven to 350. Place squash, cut side up in a 9 x 13 baking dish. Season the squash with salt and pepper. Pour cider down over evenly. In a small bowl mix brown sugar, cinnamon and nutmeg. Sprinkle over squash. *The size of your squash is going to determine cooking time* If they are small, they should be done in about 45 minutes. As you can see, mine were huge and took about 90 minutes. Just check periodically to see if fork tender. To serve, give each person a half, and spoon some of the juice from the bottom of the baking dish down over the top. This way, with each spoonful, they get all the flavors. Or, if feeding a large crowd, scoop out the flesh and mix with a bit of the pan juices. Either serve, or save and reheat. I like to add a little butter to mine as well.


Shared on The Country Cook Oct. 17, 2014


Disclaimer: I received a gift card in exchange for this post. All thoughts and opinions are my own. 

Tuesday, October 14, 2014

Amazing Fall Fun

I am so blessed to have this career that brings my family fun days to spend together making memories to last a lifetime. The most recent adventure of ours? The Amazing Corn Maze and Pumpkin Patch.


Just about 30 miles north of Fort Wayne, nestled in the little town of Waterloo, Indiana is the most wonderful family farm where the whole family can enjoy a day of autumn inspired fun! 

This isn't your typical corn maze. We're talking about 12 acres of twists and turns in a maze that is like a work of art, this year celebrating Indianapolis Colts kicker, Pat McAfee!  


Plus, within the maze you will find games to play, quizzes to answer, and much more!

This way folks! 

Don't worry about getting lost! They have "corn cops" patrolling the maze to answer any questions and help you find your way. Although, little man, did enjoy the "warning sign" the beginning.

The 10 year old found this hilarious!

And throughout the maze you will find checkpoint so you can see your location on the map, and decide your next move!

He was a very good guide!

But even the best of guide, will find a dead end or two in this maze...it's unavoidable! 

The first dead end. He wasn't happy. Lol

Oh, and be sure to stop by Checkpoint #6 where you will find a super fun slide, and amazing lookout bridge where you can get an incredible view! 

Hi Mom!!!


When you have found your way through the maze, be sure to stop by the activity center for fun farm games!

His favorite was the mountain of straw to climb!

Wheelbarrow races with Daddy! 

Barrel Roll!! 

After your hay ride (Yep, they have those too!), be sure to stop by their concession stand for a yummy snack before you grab a wagon and head out to their HUGE pumpkin patch! Home to one of Indiana's largest patches, it has over 75 varieties of pumpkins and gourds to choose from!  Big to small, round to oblong, white, orange and in between, there is something for the whole family!


We had such a fun time, I can't thank the folks at the Amazing Corn Maze enough for having us out!! Be sure to check them out on Facebook and Twitter to plan your visit soon! 

Disclaimer: I received free admission for my family in exchange for this feature. All thoughts and opinions are my own. 

Monday, October 13, 2014

Woe is Monday

Yep, it's Monday. Ugh. I'm sorry,  I just can't excited about it. I really respect those out there who can have the outlook of  "Yay! It's another day! Jump up and make the best of it." I really, really do. And while I agree with the notion of the day will be as good as you make it; and your attitude is everything, when Monday morning rolls around I groan. The rest of the day is great. I am usually with my mom, having lunch and shopping, but those first moments after the alarm rings, I struggle. 

But the one part of Mondays I think we can all agree on, from the woeful to the cheerful, is that when the day is over, and supper time rolls around, we don't want or need anything complicated. We need simple. We need easy. We need yummy. We need to be eating as soon as possible so we can relax and unwind.

So what better day to share my newest one pot wonder than today??!! Yep, a meal that can cook entirely in one pan, on the stove, in about a half hour. Oh, and it just happens to be absolutely delicious too! Your family is going to be asking for this one again and again.

If you dread Monday mornings as much as I do, I'm glad I'm not alone. And if you also agree that Monday night supper must be as easy as possible, then you've come to the right place! Heck, this might even be supper tonight!

Spanish Noodle Skillet
1 lb. ground beef
1 (15 oz.) can diced tomatoes, undrained
1 medium white onion, chopped
1/2 tsp. garlic powder
2 tsp. dried parsley
1 1/4 c. water
1/4-1/3 c. chili sauce
12 oz. egg noodles
Salt and Pepper to taste

Preheat a large skillet or dutch oven over medium heat. Add ground beef and onion. Season with garlic powder, salt and pepper. Cook until no longer pink. Drain if necessary. Return to skillet. Add water, chili sauce to taste, tomatoes and egg noodles. Stir to combine. Reduce heat to low. Cover and cook, stirring often for 15-20 minutes until liquid is absorbed and noodles are cooked. Sprinkle with parsley before serving. 


Shared on The Country Cook Oct. 17, 2014


Disclaimer: As a Field Editor of Taste of Home, I share my own thoughts and opinions of this recipe. I am not a paid employee. 

Saturday, October 11, 2014

Soul Food Saturday


There is something I can't quite put my finger on about beer bread. It tastes so good I want to have it all the time. So what do you do on the days "your favorite mix" is out of stock? I found a candidate, that worked out great!
Grab a napkin, you've gotta taste this!

 Beer Bread
3 c. All purpose flour
3 3/4 tsp. baking powder
1/4 c. Brown sugar
1/2 tsp. salt
1 (12 oz.) can beer
1/4 c. butter, melted


Preheat oven to 375 degrees. Spray 9x5 lightly with non stick cooking spray. Set aside. In a medium bowl add flour, sugar, baking powder, and salt. Stir to combine. Add beer and mix until just moistened. Add to prepared pan. Top with melted butter. Bake 45-55 minutes until toothpick inserted into the center comes out clean.
Remove from pan and cool on a rack. Serve hot or room temperature.

Whether you serve this with a bowl of chili or a pot of soup, this one is sure to be a winner!


Meal Plan Oct.12-17

New Recipe*
Links to Recipes on Blog

Sunday
We are celebrating my in-law's birthdays at their house.

Monday
Pork Burgers
Steak Fries
Sliced Beets
Cottage Cheese

Tuesday
Roasted Chicken Noodle Soup*
French Bread

Wednesday
Garlic Bread

Thursday
Slow Cooker Ginger Orange Beef*
Fried Rice*

Friday
Hashbrown Cakes


Friday, October 10, 2014

No Ham?

Yep, that was my husband's response when he sat down to eat this. Why? Because to him, beans in soup should only be accompanied by ham. The end. Black and white. But for me, there is a vast grey area that says you can have a delicious bean soup that is just beans and veggies. In fact, it can be completely vegetarian, using no chicken stock either. It's possible and I'm happy to show you how today.

Now, if you tend to agree with Mr. E., don't click away quite yet. I'll tell you a secret. I love ham and beans. (Which I originally posted 10-10-10...on this exact day 4 years ago...kinda freaky, huh??!!) It's one of my favorite chilly weather dishes. So, I can understand why he thinks you can't have one without the other. I really do. (Don't tell him I said that though, okay? I will deny is all the way!) And I'm positive if you wanted to throw in a ham bone or diced leftover ham to this for extra flavor, it would only make it more delicious. But I was simply in the mood for beans sans pork, and since I'm the one cooking, that's what we ended up with.

I will also tell you that this still has two of the things I love about my original ham and beans. It's thick and creamy. Two aspects I feel adamant any good bean soup recipe must be. So for me, I didn't miss the meat. Not one bit. This was still comforting on a rainy, cool day. It still tasted like a warm hug with every bite. It was exactly what I was looking for.

If you think you can handle a bean soup with NO HAM...*gasp*, then you will love this. But like I said, if you decide to add some, the food police won't come find you. Either way, it's a delicious meal after a long day, that will fill you up and thaw you out!

Slow Cooker White Bean Soup From Budget Bytes
2 TBS olive oil
1 lb. dried navy beans, rinsed
4 cloves garlic, minced
1 medium yellow onion, finely chopped
4 medium carrots, diced
4 celery hearts, chopped
1 dried bay leaf
1 tsp. dried rosemary
1/2 tsp. paprika
6 c. water
Salt and Pepper to taste

Preheat slow cooker to LOW. Drizzle olive oil in the bottom. Add onions, garlic, celery and carrots. Stir. Add beans, rosemary, bay leaf, paprika, water, salt and pepper. Stir well. Cook on LOW for 8 hours. Remove lid. Using a potato masher, mash up beans, until desired thickness occurs. Reduce heat to WARM until ready to serve. Adjust salt and pepper.


Shared on The Country Cook Oct. 10, 2014


Wednesday, October 8, 2014

Sandwich Night

Do you do sandwich night at your house? If not, you're kinda missing out. I don't mean to be that blunt, but it's true. I love a good sammy; and they can be a such a simple, comforting meal at the end of a tiring day. I find myself planning them about once a week; and am constantly on the lookout for new ones! 

If you don't think of sandwiches as a substantial meal on a weeknight, let me explain. I'm not talking about the run of the mill peanut butter and jelly, or turkey on wheat. The kind of sandwiches I love to serve for supper, are hearty...filling...eat like a meal!! But they are still simple. That's a must. When I know I have sandwiches planned for dinner, I look forward to it because that means I get to somewhat relax during meal time. So if little effort is part of the goal, I don't want something that takes a lot of time, or is complicated. In fact, many times the sandwiches I fix are more of an assembly process than a recipe; and this is one of those.

I'm guessing some of you might even have everything you need for these already in your kitchen. Don't you love when that happens? That just makes simple sandwich suppers even better! Plus, these are totally adaptable to your favorites. Like a different kind of ham? Okay. Maybe honey mustard? Fine. Enjoy provolone instead of Swiss? Great. You can totally make them to fit your tastes. But however you plan on making them, make sure you have big plates because this aren't skimpy sammies! They are B.I.G.

If you don't usually think of sandwiches as a filling, appropriate supper after a long day when the family is starving and it's your job to satisfy their hunger, this just might be the recipe that changes your mind! 

Baked Ham and Cheese Sandwiches
12 slices Texas toast, buttered on both sides
24 slices black forest ham
6 slices Swiss cheese
1/4 c. Dijon mustard
1 1/2 c. finely shredded Monterrey Jack cheese
1-2 TBS dried parsley

Preheat oven to 350. In the bottom of a 9 x 13 dish, spread mustard evenly. Place 6 slices of bread, butter side down in dish. Top each slice with 2 slices of ham and 1 slice of cheese. It's okay if they overlap a little. Top each with another slice of bread, butter side up. Sprinkle with shredded cheese, liberally. Press cheese down slightly to adhere. Bake for 25 minutes until golden brown. In the last 5 minutes, sprinkle with parsley. Press slightly. When finished baking, allow to sit for 5 minutes before removing from pan. 


+


Shared on The Country Cook Oct. 10, 2014

Tuesday, October 7, 2014

Bake Better with Kitchen Executive Chef {A Giveaway}

Have you tried silicone baking mats? If not, then I have quite the treat for you today!!

I love mine, and honestly I don't know how I ever made a decent batch of cookies without them! I'm so excited to introduce you these from Kitchen Executive Chef!!


With so many options out there, you might be asking what makes these so special? 

1. Mat thickness – Silicone baking mats currently sold to the public vary in thickness from 0.4mm to 0.75 mm, these are 1.0 mm which means they are a lot more durable

2. Width of the colored edge – All Silicone Baking Mats come with a border that is 1-inch wide, this means that you lose over 20% of the area on a mat that could be used for baking. Their mats have an edge that is just under 1/2" wide (11 mm to be exact). While a minor thing that most people would not think about, this thinner edge increases the usable area of the mat by at least 20%! 

3. All of their silicone baking mats are FDA approved for with constant contact with food. They are BPA free, and are also anti-microbial.  Use them in your freezer down to -40 degrees F (-40 degrees C) or in your oven up to 480 degrees F (248 degrees C). !

And the great folks at Kitchen Executive Chef have offered up (1) set of (2) mats for one lucky EMM fan!!! Or if you don't want to try you luck at winning, you can use the promo code EDMM2X20 get 20% off when you order them from Amazon

Change the way you bake forever with these awesome baking mats today!!


To Enter: Leave a comment telling me what you want to bake on these mats if you win. Be sure to leave an email address so I can find you. 

Contest Ends. October 14, 2014