Everyday Mom's Meals: Cheese
_____
Showing posts with label Cheese. Show all posts

Monday, July 1, 2024

On The Blackstone Wagon

You know that moment when you see the new "it" thing and you say "What's all the hype? We don't need one." And then you find yourself jumping on the bandwagon and have to eat your own words? Yeah, that was recently us! 

We knew people who had a Blackstone. We had seen them on tv and net, but we had a grill, in fact we had two grills, so we didn't see the need. 

But then Mr E. stumbled upon the Blackstone smoker/griddle combo and the next thing we knew Lowe's was delivering it to our backyard. 

Well, a few smoked pork butts, beef brisket  and breakfasts cooked on the griddle later, we now understand all the fuss, 100%. I would even say Mr. E's a tad obsessed since his new moniker is "oooo could we smoke that?" (No, honey, we aren't putting fish sticks on the smoker....lol!)

Last weekend he was smoking another pork shoulder on a hot and steamy day. I was planning the sides and when I decided on macaroni and cheese I figured why not? So I read a few recipes online to get tips for the temperature and time and then got to cooking!

 Oh people! This mac and cheese is super ooey and gooey thanks to a homemade cheese sauce with not one, not two, but THREE cheeses! It has a rich, creamy texture with just a slight smoky flavor in the background. It comes together on the stove quickly and then the smoker takes care of the rest. 

We had a meal that could have come from our favorite barbecue joint, it was that tasty. Plus, we did it all without heating up the house! 

The next time you see the latest food trend, don't dismiss it right away because you never know when you will be joining in and wondering what took you so long! 

Can I use different cheeses?

Of course! I think a sharp white cheddar or pepperjack would be great! 

Why stir in a figure-8 pattern? 

This was a tip I learned from Rachael Ray years ago and it has never failed me. She said adding cheese and stirring this way would result in the smoothest sauce and it always does!

Can I use a different pasta?

Sure! Any of the smaller shapes will work best. Shells or rotini maybe! 

What if I don't have a smoker?

Don't worry, you can still make this. Follow the recipe, but bake in a 350-degree oven for about 20-25 minutes! 

Do I have to use heavy cream?

You could try swapping it out for half-and-half, but I don't know if it will be as creamy.

Smoked Macaroni & Cheese

Best Tips

Don't skip the step of warming the milk and cream. It will result in the smoothest sauce with no clumping. 

I used 2% milk. I don't recommend anything with a lower fat content.  

You want a blonde (light brown) roux for this, don't let it get too dark. 

Try adding in some green chilies or diced jalapenos for a Mexican flare. 

Any leftovers should be transferred to a container with a lid and refrigerated for 2-3 days.

Smoked Macaroni & Cheese

1 lb. elbow macaroni

2 cups 2% milk, warmed

2 cups heavy cream, warmed

1 stick butter

1/2 cup flour

1 TBS ground mustard

8 oz. shredded sharp cheddar cheese, 1/3 cup reserved

8 oz. shredded Monterey Jack cheese, 1/3 cup reserved

8 oz. shredded Gouda cheese, 1/3 cup reserved

Salt and Pepper

Dried Parsley

Lightly grease a 9x13 foil pan. Preheat smoker to 250. Boil macaroni until al dente, Drain well. Meanwhile, in a large skillet melt butter over medium high heat. Whisk in flour and mustard until smooth. Cook 2-3 minutes. Slowly whisk in milk and cream until smooth and combined. Season with salt and pepper. Bring to a light boil. Reduce heat to simmer and cook until thickened, about 5 minutes. Remove from heat and add cheeses, stirring in a figure-8 pattern until smooth. Add macaroni to cheese sauce and stir well. Transfer to foil pan. Top with reserved cheese. Cook on smoker for 1 hour. Remove, sprinkle with dried parsley and allow to sit 5 minutes before serving. 

Smoked Macaroni & Cheese

Inspired by Chiles & Smoke


Sunday, March 6, 2022

Easter Planning

Have you started to brainstorm your Easter menu yet? I am well on my way to being done with mine, but I realize not everyone is totally OCD  when it comes to planning like me. Regardless if you've begun, or just groaned at the thought, I have a terrific recipe that could easily be added to your menu...or be a tasty side dish this week for supper! 

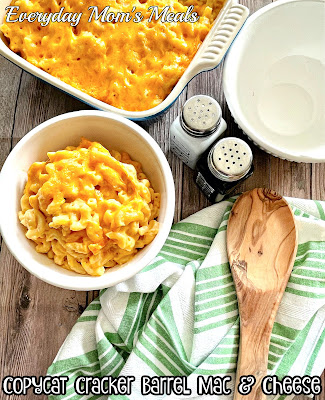
I have mentioned before my boys are mac and cheese connoisseurs. They like it any way they can get it, from the blue box to my homemade no-boil baked version passed down from my grandma. But when it comes to restaurants, the #1 choice for my oldest has always been Cracker Barrel's. Since he was little, he has proclaimed it to be his favorite and the best one he can find when we go out to eat...and believe me he has tried many! 

He loves the thick, creamy texture, but hands down, his favorite part is the little bits of browned edges that you get with every portion. While others might think these crispy pieces are burnt or a mistake, he has always coveted them like they were gold! "Mom! I got extra brown pieces!" 

I don't know why it took me so long to make a version at home, but I was a rock star with this one! The funniest part is I had never had it myself, so I had to wait for the teenager to taste it to tell me if it was right. According to him I nailed it!

I use extra sharp cheddar in my baked mac and cheese recipe, but this one calls for Colby, giving it a milder flavor. Cooking it both on the stove top and then baking it produces that creamy texture plus the browned edges he loves. I scored some major mom points the night I made this! 

I know so many families who love to have macaroni and cheese on their Easter table, specifically if ham is served,  and this Copycat Cracker Barrel version would be perfect! This recipe is perfect for 4, but could easily be doubled or even tripled! Honestly, if it was me, I would make 2 or 3 batches, but in separate 8x8 pans for even cooking. 

I can taste the cheesy goodness next to a slice of sweet and savory glazed ham right now. I *might* be starting to drool at just the thought of it!

I would be honored if you add this to your Easter menu, making it a new tradition. Or if you just need another idea for a simple weeknight supper, I'm totally here for that too! 

Oh, and if you really want to get a big jump on that Easter menu, I've got a great collection of 100 side dishes perfect with ham over on Parade you should check out! 


Copycat Cracker Barrel Mac & Cheese

1 lb. elbow macaroni

3 cups shredded Colby cheese, divided use

2 cups milk

5 TBS butter

1/3 cup flour

1/2 tsp salt

1/4 tsp pepper

Preheat oven to 350. Lightly grease 8x8 baking dish. Cook macaroni to al dente. In a large skillet melt butter over medium heat. Whisk in flour until smooth and cook for 2-3 minutes until a light roux forms. Slowly add milk, whisking constantly. Cook for 3-5 minutes until thickened. Add 2 cups cheese in small batches, stirring constantly until smooth cheese sauce forms. Season with salt and pepper. When macaroni is cooked, drain well. Add to skillet and stir well. Transfer to baking dish, sprinkle with remaining cheese and bake for 15 minutes until bubbly and slightly browned.  


Shared at Weekend Potluck

Sunday, February 6, 2022

Snow Days

Old Man Winter decided he wanted to make a dramatic entrance here in Indiana this past week. Dumping over a foot of snow between Wednesday and Thursday, forcing schools to close for 3 days and the city to kind of shut down for a good 24 hours. We are still digging out as of today- If the city plows are reading this-I'm looking at you and would love if my housing addition could be on your list soon!

The minute the forecast threw out words like Winter Storm Warning, the grocery stores became mad houses. Oh, and the gas stations! They were 4 cars deep when I stopped in on Tuesday! But the stores definitely took the brunt of the panic buying. Add that on top of the already bare shelves we've been dealing with for weeks now, and it was definitely a "take what you can get" situation. 

Soup aisles were emptied quickly, and who can blame us? When the flakes are falling, school is cancelled and it's a good ole fashion snow day, nothing tastes better than a big pot of soup! Something warm to come inside to after building that snowman, sledding or just shoveling for the umpteenth time. 

We love broccoli cheese soup and I have a few versions I make, including a terrific copycat of Panera's. This one has quickly become a favorite with it's use of fresh broccoli and the Crock Pot doing it's magic. 

I feel like this is where I need to add a disclaimer to this for you. We all know the price of everything is up these days, and fresh produce is something I've noticed costing more every single week. The 4 crowns of broccoli I used in this cost me close to $8- and that was at Aldi! For someone on a strict grocery budget that can take your breath away. Add in the cream and shredded cheese, I completely understand if you can't just swing this shopping list right now; but maybe watch for sales and treat yourself when you can! 

Crock Pot Broccoli and Cheese Soup is creamy, delicious and makes a great half in a soup and sandwich combo supper on a cold night, especially if you're having a snow day!


Crock Pot Broccoli Cheese Soup

5 cups chopped broccoli, about 4 large crowns, finely chopped

1 medium yellow onion, diced 

2 celery ribs, diced

5 cups chicken broth 

1/4 cup cornstarch

2 TBS butter

1/2 tsp. garlic powder

 1 1/2 cups heavy cream

4 1/2 cups shredded cheddar cheese

salt and pepper

Add chopped broccoli, butter, celery and onion to Crock Pot. Season with garlic powder, salt and pepper. Mix cornstarch with chicken broth and pour into Crock Pot. Stir well. Cook on LOW 4-6 hours. Add cream and stir well. Add cheese in batches, stirring between each. Cook on HIGH for 30 minutes until cheese is melted and incorporated. Garnish with extra cheese if desired.

Shared at Weekend Potluck


Sunday, January 2, 2022

20 Minute Side Dish and New Floors

 As of November, we have owned this house for 19 years. What started out as our "starter home" we would only be in for a few years, has become the place we've built our life. We came here as newlyweds after our honeymoon, where both of our boys came home from the hospital to, and the place Adam recovered after PE in both lungs almost took him from us 7 years ago. These four walls have seen countless birthdays, holiday celebrations, special moments, tears from sorrow...the list goes on and on. 

So why did we end up staying here so long? The simple answer is life. I could go deeper, but we will just leave it at that. But we are finally at a place where we can start to do some things we've wanted to for a very long time, as far as fixing things up a little goes. 

Back in September my dad, along with the hubby's help, laid new vinyl flooring down in our kitchen, forever covering the circa 1970's green linoleum. As I told someone, after almost two decades, I finally had a kitchen floor I loved. 

Then in November, just before Thanksgiving, it was the bathroom's turn. My dad spent a week replacing the tile flooring with beautiful vinyl plank wood; and it is beautiful! 

I can't tell you how much I love walking into both of these rooms now, not only because they are gorgeous, but because they are filled with love. They were truly a family project and I am so grateful dad could take the time and execute what I had dreamed of.

So what does new flooring have to do with this recipe? The day I tested this simple side dish, my dad was knee deep in flooring, trim and paint in the bathroom. I offered him some for lunch, and without any words I knew the dish was 100% successful. His eyes and noises as he chewed said it all. 

Take advantage of the frozen pierogies and this delicious side dish can be on your table in about 20 minutes! I served it with smoked sausage, but it would be so tasty with pork chops, ham, chicken, or burgers. 

Pierogies have quickly becomea favorite dish in our house, after I first started making them just a couple years ago. We love them as is, just sautéed in a little butter, in casseroles or finished off with yummy toppings like this dish.

These are inspired by what we all love on a loaded baked potato. Bacon. Cheese. Green onions. Did I mention bacon? Served with a little sour cream on the side and all the flavors are there!

Loaded Pierogies are not only a simple weeknight side dish, but you could absolutely put out a big platter of them at your next party or game day bash. The Super Bowl will be here before you know it and any football fan would love some pierogie nachos! 

My new flooring is beautiful and makes me smile daily. I share this story with you to show even if things take years to get done, keep working towards the goal. Don't lose sight. Try not to get discouraged. Sometimes the best things come to those who wait! 


Loaded Pierogi Skillet 

1 (16 oz.) box frozen cheese pierogi

1 cup shredded sharp cheddar cheese

1 (2.5 oz) bag real bacon bits

2 green onions chopped

2-3 TBS butter 

In a large skillet over melt butter over medium high heat. Saute pierogies in butter for 3-4 minutes on each side until golden brown. Sprinkle with cheese, bacon and onions. Cover. Reduce heat to low for 5 minutes until cheese begins to melt. Serve immediately.

Shared at Weekend Potluck


Sunday, July 25, 2021

Summer Time Retro Take Along

 I distinctly remember the first time I had this salad. We were at a potluck in the church I grew up in. I can see the basement, the kitchen, the tables set up. I can smell the aroma of all the dishes brought in by church ladies. Those potluck dinners are some of my fondest memories of the church I spent so much time in when I was a little girl. 

In fact, to this day whenever I think of certain dishes, those memories are what I associate with them. This salad being at the top of the list. I even remember the sweet lady who used to bring it every single time, and how excited all of us kids were for it! Simpler times when the little things meant so much!

If you've never had this salad (and yes, it does happen, my husband wasn't familiar with it until me!) think taco salad, but taken to a new level with nacho cheese chips and a sweet, tangy dressing. 

It's funny because I don't think us kids who were wolfing it down back then even thought about what dressing was on it. I would still happily eat it like that today, but for my boys, I left the dressing on the side. They are very particular about what dressings they like, and I didn't want to ruin in for them. In fact, they topped theirs with salsa instead! (YUM!)

There is another advantage of leaving the dressing on the side. If you're taking this to a cookout...it won't get soggy! The chips stay nice and crisp. In fact, if you do need this to travel, I would make the base salad, take the chips, cheese and dressing with you, and finish it off right before serving! 

Classic recipes never go out of style. We just need to be reminded of them now and again. Once those memories come rushing back, every single bite is as delicious as the very first one!

 Doritos Taco Salad

1 lb. ground beef

1 large head iceberg lettuce, chopped

2 bell peppers, finely chopped, red and yellow 

1 (15 oz.) can black beans, rinsed and drained

1 packet taco seasoning

2/3 cup water

5 Roma tomatoes, seeded and chopped

1 (9 oz) bag nacho Doritos, crushed

1 cup shredded sharp cheddar cheese

1 (16 oz.) bottle Catalina dressing

Assorted toppings

In a large skillet, brown beef until no longer pink. Drain if needed. Add water and taco seasoning. Bring to a boil. Reduce heat and simmer for 5 minutes until thickened. Remove from skillet and allow to cool. In a large bowl mix lettuce, tomatoes, pepper, beans and beef. Stir well. Gently fold in chips and cheese. Serve immediately with dressing on side. *NOTE* Many people serve this already dressed. Simply add dressing and mix well. I like serving it on the side so it doesn't become soggy. 


 Shared at Weekend Potluck


Sunday, June 6, 2021

Summer Time Dining

From packing up the picnic basket to dinner time on the deck, summer gives us so many reasons to eat outside. Cookouts, backyard barbecues and let's not forget all the holidays we enjoy this time of year too. We've already had Memorial Day, but Father's Day and July 4th are knocking on the door. Any one of these is reason enough to add another fantastic pasta salad to your recipe box, so keep reading for one that's gonna knock your socks off!

Spinach and artichokes go together like peanut butter and jelly. They were just meant to be mixed. I have no idea who the first person to think "hey if we take some of this green spinach a lot of people think is gross, mix it with this funny looking vegetable and add some cheese, bake it and we've got a great dip" was but he/she deserves a medal. 

The hot appetizer is of course the most well known way to enjoy spinach and artichoke but they are delicious in pasta bakes, salads and now this summer inspired pasta salad. 

I love making a big bowl of cold pasta salad for supper on a hot night. It's still hearty enough to fill us up, but when it's still sweltering at dinner time, a hot meal just doesn't sit well. I add some fresh fruit and crusty bread on the side and dinner is done! 

Spinach and artichoke pasta salad is perfect for your next picnic in the part, bring a dish cookout or July 4th bash! We only have a few months to get outside and dine al fresco, so let's savor it while we can! 

 Spinach Artichoke Pasta Salad

1 lb. penne pasta

2 (15 oz.) cans whole artichoke hearts, rinsed, drained and coarsely chopped

3 cups fresh spinach, stems removed and coarsely chopped

1/2 c. shredded Parmesan cheese

3/4 c. sour cream

1/3 c. mayonnaise

1 1/2 tsp. Italian seasoning

1 tsp. dried parsley

2 TBS fresh lemon juice

1 garlic clove, minced

Salt and Pepper 

Cook pasta until al dente. Rinse with cold water and drain well. In a medium bowl combine sour cream, mayo, Italian seasoning, dried parsley, garlic, salt and pepper. Stir well. When pasta is drained, transfer to a large bowl. Pour dressing over and toss to coat. Add spinach, artichokes and cheese. Stir well to combine. Chill until serving, at least two hours. 

Shared at Weekend Potluck


Monday, May 31, 2021

Got Beer?

 We are a house of mac and cheese lovers. From the blue box to homemade, if it's pasta covered in cheese you can count us in! And in our family, one of the reasons why we love macaroni and cheese so much is the versatility. It can go from side dish to main dish, depending on the type it is. I know there are strong feelings about if it's a side or main, and it depends on where you're from, or how you grew up, which side of the debate you land on. But one thing is for sure, no matter how you decide to eat it, macaroni and cheese is a beloved comfort food most of us can't get enough of. 

This macaroni and cheese has a little something that takes it over the top. BEER! Yep, as if a simple weeknight meal couldn't get any better, we find a way! This version is one I serve as a main dish with a salad on the side and it's a meal that disappears as quick as I can spoon it up. 

Oh, and this one comes with a homemade cheese sauce that is as creamy as it is delicious. If you read the directions and think it might be too complicated with the roux...don't stress! I promise if you follow it step by step, it's as easy as can be! If I can do it, so can you! 

If you enjoy the flavor of a darker beer, go ahead and try it. I used the light so it didn't overpower the cheese sauce, and if I'm being honest, I'm not a huge beer fan, so I didn't want a ton of that distinct flavor. Just a little in the background to enhance an already amazing recipe. 

With summer time cookout season upon us as well, this would be a great addition to any backyard spread. Serve it with some grilled burgers and dogs for a new twist on a classic meal. I guarantee it will make you a rock star at your next "bring a dish to share" party too! 

Pub style mac and cheese is now on our favorites list and not just because it has beer in it...but hey, it doesn't hurt either!  


Pub Mac and Cheese

1 lb. elbow macaroni

1 cup evaporated milk

1 cup light beer

2 cups shredded sharp cheddar cheese

1 cup shredded monterey jack cheese

1/4 tsp. paprika

1/2 cup panko breadcrumbs

1/4 cup butter

1/4 cup flour

2 tsp. dried parsley

Salt and Pepper 

Preheat oven to 375. Grease 9x13 baking dish. Boil macaroni in salted water according to directions. In a medium pot melt butter over low heat. Whisk in flour and cook for 2-3 minutes until no lumps remain and a light brown roux has formed. Slowly whisk in milk and beer. Increase heat to medium and bring to a slight boil. Reduce heat down to low and cook for 5-7 minutes until thickened, stirring often. Add both cheeses, stirring constantly until melted and smooth. Cook 3-5 minutes until thick and incorporated. Season with paprika, salt and pepper. When macaroni is cooked, drain well. Add to cheese sauce and mix well. In a small bowl combine breadcrumbs and parsley. Transfer pasta to baking dish and top with breadcrumbs. Bake for 30 minutes until browned and bubbly. 


Shared at Weekend Potluck


Sunday, February 7, 2021

When My Boy Asks

 My kids are so used to me planning diverse menus with many of their favorites every week, it isn't often they feel the need to request something, unless I ask them for input. But every once in a awhile, Alex will ask for me to make something he is craving, rather it be a beloved favorite or he wants me to try a new recipe. Such was the case when it comes to the new pasta bake I'm sharing today and boy am I glad he asked because it lead to something delicious and a recipe I am quite proud of! 

We are going on month 302 of this pandemic...or so it seems...and while I do think our family has adjusted to the things are the best we can, there are still moments I find us whining about things we miss. And that's okay. We all deserve to have a little whine now and again after what we have endured over the past year! Even my kids have truly stepped up to the challenge of "the new normal" better than I could have ever expected. 

My 4 year old will gladly wear his mask if I allow him to go into a store with me (which isn't often, and it helps the mask has either a panda or Baby Yoda on it!). My teenager goes to school every single day, in a mask, for 7-8 hours, without much complaint. He only gets to take it off when he eats lunch, which by the way is no longer with his friends, but in an assigned classroom where the food is brought to them and they eat at their desks. (I'm not complaining, our school has done an outstanding job at protocols this year and I'm so pleased we've been in-person with only a couple weeks of preventative remote since August!) But everyone is human, and sometimes a "oh I miss ___" will come out of one of our mouths. 

Alex's most recent lamenting was about buffets. Yes, we were a buffet loving family. We enjoyed a tasty Asian buffet, seafood buffet and the dinner buffet at our local Pizza Hut. In this case, it was the last one Alex was missing. No, not because of the all you can eat pizza, but instead the pasta they always served on it. He could eat plate after plate of their cavatini. I don't blame him, the other one they always had, a spaghetti with a white, cream cheese sauce makes me drool just thinking of it. (In case you're wondering, no it wasn't Alfredo. It was completely different, and it will be the next one I master!)

So when my oldest baby was sad because he had a hankering for this cavatini, and asked if I thought I might be able to come up with something similar, this mama had to try! Well, I don't want to pat myself on the back too much, but even I have to admit I hit it out of the park! 

This copycat is spot on! Both Alex and his dad couldn't get over just how close to the original it tasted. The boys was thrilled and I scored major mom points! 

This pasta casserole is sort of like a pizza, pasta combo so your kids will probably love it as much as mine! Maybe they have been asking you to try something new, and now you have your answer!

 Copycat Pizza Hut Cavatini

1 lb. rotini pasta, cooked to al dente

1 lb. mild Italian sausage

4 oz. pepperoni, chopped

1 medium white onion, finely chopped

1 red bell pepper, finely chopped

1 clove garlic, minced

1 TBS olive oil

2 (24 oz.) jars tomato and basil spaghetti sauce

1 1/2 c. shredded pizza blend cheese

2 TBS grated Parmesan/Romano cheese

1/4 tsp. dried red pepper

1 tsp. Italian seasoning

Salt and Pepper

Dried Parsley

Preheat oven to 350. While pasta cooks, brown sausage in large skillet. Drain well. Set aside. Wipe out skillet and add olive oil over medium high heat. Saute onion, bell pepper and garlic in oil until tender, about 5 minutes. When pasta is cooked, drain well. In a large bowl combine sauce, sausage, onion mixture, pasta, dried red pepper, Italian seasoning, salt and pepper. Stir well. Transfer half pasta mixture to a greased 9x13 baking dish. Sprinkle with Parmesan cheese, half pizza blend cheese and half pepperoni. Add other half pasta mixture, rest of pepperoni and top with pizza blend cheese. Bake for 45 minutes until brown and bubbly. Sprinkle with dried parsley before serving. 


Shared at Weekend Potluck


Sunday, January 24, 2021

New Year, New Side

 Which part of your daily dinner do you struggle with the most when planning? Main dishes are usually pretty quick to think of for me, and then the sides are sometimes where I stumble. Certain meals will always have the same sides included (If we're having spaghetti, a salad and bread are sure bets) but other times I want to switch things up. Find new side dishes to keep the menu plan fresh and new. 

So when I find a way to take an old favorite veggie and serve it in a new, tasty, and in this case, super cheesy way, I score major wife/mom points! 

We are big cauliflower fans, but I will fully admit I'm not very creative with it. If it's fresh, it's usually on a veggie tray. And if it served alongside our dinner time meal, it's a bag of frozen that has been steamed, with a little butter on it. I know, boring. But this recipe changes all that! 

Perfect with pork, chicken, or steak, this dish is super versatile. You could even double the recipe and make it a meat free main dish! 

Let's talk about the cheese for a second. I am the queen of pre-shredded bagged cheeses. I use them in almost all of my cooking. But this time I took the extra few minutes to shred my own; and it makes a huge difference! When you shred your own block of cheese, it melts more evenly, and has richer flavor. In no way am I dissing the convenience of the other, and will certainly continue to use it, but for certain dishes, it is definitely worth the extra effort! 

Since the beginning of the new year, I have been in new recipe recipe mode, and this is most definitely one of the favorites I've made. All three boys raved about it and have already requested it again! If you decide to switch up your next menu plan, and include this ooey,gooey veggie, I hope yours love it just as much!

 Cheesy Baked Cauliflower

2 large heads cauliflower, cut into florets

8 oz. block extra sharp white cheddar cheese, shredded

1/2 c. heavy cream

1 c. grated Parmesan/Romano cheese

1 tsp. dried thyme

5 TBS butter, diced

3 cloves garlic, minced

1 tsp. dried parsley

Salt and Pepper

Preheat oven to 400. In a large pot of boiling, salted water, cook cauliflower for 8 minutes until just tender. Drain well. In a large greased casserole dish, place half of the cauliflower. Sprinkle with 1/2 tsp. thyme, salt and pepper. Pour half the cream over. Dot with half the butter. Add half the garlic. Add half the Parmesan and white cheddar cheeses. Repeat layers.  Sprinkle with dried parsley. Cook for 30 minutes or until brown and bubbly. Allow to sit 5-7 minutes before serving.


Shared at Weekend Potluck
 

Sunday, January 17, 2021

Winter Blues

 I don't know about you, but this time of year is VERY hard on me. I love the holidays so much, and there is always so much anticipation and lead up to those special weeks. Once the decorations come down, and the cold, dark, dismal days of winter set in, I tend to get a little blue. I have a birthday to look forward to in February, but not until the next to last day, so those weeks between always seem like the longest ones of the year. 

If you live in the Midwest, but don't enjoy the cold or snow is there any upside to winter at all? Not much, but one of my salvations this time of year is definitely the fact that it is soup season

I never tire of finding new soup recipes. We have favorites that are go-tos of course, but any time I can try a brand new one (at least to us) I am always game. 

A friend and I were talking about how much take out we've done since the pandemic began. As I've said before, I feel like helping the restaurant industry is one small thing we can do to help keep people and businesses afloat, so we've really stepped it up in the last 10 months. Anyway, she was telling me there isn't a Panera close to them so she started making her version of their broccoli cheese soup. Well, you know I had to have that recipe. 

This bowl of deliciousness can be on your table in about 45 minutes, so it is perfect after a long day when you are starving but don't have the energy. Add some crusty bread and your favorite salad on the side and call it dinner! Or make it a soup and sandwich combo night! 

If you love copycat recipes as much as me, you will be so pleased with how close to the original this one tastes. Plus, it's yet another soup to help us get through this winter and give us a little happy in the bleak that is January!

Copycat Panera Broccoli Cheese Soup

3 medium broccoli crowns, chopped

1 small white onion, diced

1 cup matchstick carrots

2 c. half and half

4 c. chicken broth

5 TBS butter

1/4 c. flour

1/4 tsp. ground nutmeg

8 oz. shredded sharp cheddar cheese

Salt and Pepper 

Shredded Marbled Cheddar, for serving

 In a large stockpot over medium heat saute onions in 1 TBS butter until soft. Remove. Melt remaining butter. Whisk flour into butter and cook about 5 minutes. Slowly add 2 cups broth and half and half. Stir well. Bring to a boil. Reduce heat and simmer about 15 minutes. Add onions, broccoli, carrots and remaining chicken stock. Stir. Simmer for 15-20 minutes, until veggies are tender crisp. Add nutmeg, salt, pepper and shredded sharp cheddar. Stir until cheese is melted and serve. Serve with marbled cheddar and crusty bread if desired. 

Inspired by Recipe Critic

Shared at Weekend Potluck


Sunday, August 9, 2020

Where Did Summer Go

For many of us, our kids have been home since March; and while I know many households struggled to juggle working from home, virtual learning, and extra time with the kids home 24/7, our house relished in the fact that we got Alex home for an extended period of time.

I can not put into words what a blessing it's been to have him home for almost 5 months. It was a gift I didn't know I needed, but one I am so grateful for. I didn't think the bond he shares with his baby brother could get any stronger, but over these past few months, oh it has. 

But now, it's the second week of August, and our world, that means back to school. And while yes, it's going to look very different this year, Alex's high school is only offering an in person option, and we support it. We feel confident in their ability to follow the protocols they have laid out, and do their best to keep this kids safe. We feel very fortunate to have him enrolled in a smaller, private high school where they can implement things and hopefully control the "new ways" in a way the kids and teachers will feel comfortable and everyone healthy. 

This is one teenager who is READY to go back to school too. He is looking forward to seeing his friends again, being in an actual classroom and something feeling somewhat normal. But we are going to miss him. Oh so much. 

This week just so happens to also be Max's 4th birthday. (For those of you who've been long time followers, you might recall, I went into labor on Alex's first day of 6th grade and Max was born the next day!) So we've got lots of celebrating to do, and then we will be sending Bubbie off to his sophomore year. 

Alex and I had quite a few mom/son lunch dates over the summer, and one of our favorite places to go is always Chili's. We love their food, and one of Alex's most requested items is their chips, salsa and queso. So, you can imagine the mom points I earned when I learned to make this cheesy goodness at home.

Oh, and I decided a slow cooker recipe would be even better because fall game days are coming fast, hopefully of course, and we love a great dip kept all day in the Crock Pot. 

For your next Mexican Night, Taco Tuesday or sitting around watching football Sunday, you will love this simple, delicious dip. 

I can't believe it's back to school time already. It is definitely bitter sweet this year. I pray it goes well, and they can stay in school. But I also know if the day comes he has to come back home, what a treat that would be too!

Crock Pot Copycat Chili's Queso
16 oz. Velveeta cheese, cubed
1 (15 oz.) can chili without beans
1 c. milk
1/2 tsp. dried cayenne pepper
3 tsp. chili powder
2 tsp. cumin
2 tsp. paprika
1 tsp. salt
Juice of 1 lime

Put all ingredients in Crock Pot. Cook on LOW 2 hours stirring occasionally. Keep on warm while serving. 


Sunday, April 5, 2020

Grocery Shopping Today

Quarantine...Day....I don't even know. I've stopped counting. One day runs into the next. Every morning when I wake up, for just a second I find myself asking "what day is it and what do I have to do"...and then I remember. I'm not going anywhere. I'm not doing anything. Well, nothing of excitement that is. There is always stuff around the house to do.

Have you ventured out to the grocery store since this all began? We are weekly shoppers in this house. We don't have the space to have tons of stuff on hand. Yes, we have 2 chest freezers with our beef supply, which I'm so thankful for, but not a lot of cupboard space, and no pantry at all. So, I have always done a weekly store run.

Thus, we are those people who have to go out for essentials. Well, I say we, it's not. Adam goes. See, he works in healthcare, so he is already exposed daily, so we decided it was smartest for him to do the shopping as well. But we have a good system. I help him over the phone. I keep the list at home, and I guide him. Or we even Facetime so I can shop with him. It cuts down on him getting the wrong thing and/or adding things to the card he finds "necessary" that are in fact, not.  LOL

I planned on posting this recipe this week, because while I used deli ham for these tasty biscuit sandwiches, they would be super tasty with that leftover ham many of us will have in the fridge after Easter. But when I sat down to type this out, I almost decided not to because I know many of you are struggling to find things at the grocery, or aren't shopping at all.

After going back and forth for a while, I decided to still post. See, I need some normal in my life; and I assume most of you do as well. So I figure, even if some of you can't make these right now due to these crazy circumstances, you can always save the recipe for post quarantine as something to look forward to.

We are actually still having our big Easter dinner. Well, kind big. After we had to cancel our trip to Pennsylvania to visit my grandma and aunt, we were planning an Easter dinner here with my parents. But since Adam works where he does, we all decided that wasn't safe either, plus our governor extended our shelter in place order, so it will just be the 4 of us.

I'm making a spiral cut ham, mashed potatoes, noodles, hearts of palm salad, deviled eggs and a new lemon dessert. I'm looking forward to it, and I know my boys are too.

These are a terrific breakfast or brunch while you're working from home, or heck, maybe add these to your Easter menu. A simple brunch might be the holiday pick up you need! And if you don't have all the ingredients, use the recipe as a template and create something with what you do have!

However you're coping with these uncertain, sometimes scary, sometimes boring times, I hope you're staying safe and healthy. We wish you a very Happy Easter from our family to yours!

Everything Ham & Cheese Biscuits
8 count jumbo flaky biscuits
16 thin slices honey ham
8 slices Provolone cheese, cut into quarters
1 stick butter, melted
1 1/2 TBS Dijon mustard
1 TBS everything bagel seasoning

Preheat oven to 350. Bake biscuits for 10 minutes. Carefully split. Grease 9x13 baking dish. Place biscuit bottoms in dish.  Top each with 2 pieces ham, folded if necessary, 4 quarter pieces of cheese and top biscuit. In a medium bowl whisk together butter, mustard and seasoning. Pour over biscuits. Bake for 15 minutes until golden on top. *NOTE* Each biscuit is getting 1 piece of cheese, but cut into 4 smaller pieces to fit better. The bottoms of the biscuits are going to be extra brown and crispy, if you don't like them that way, reduce cooking time by a few minutes. 


Sunday, March 8, 2020

Breakfast, Brunch or Supper


Many of you are planning those Easter brunch menus. Others might be wanting an idea for breakfast for supper this week. Or maybe you like to make a big family breakfast every weekend. If you fall into any of these categories, today's recipe is going to the top of your grocery list!

Imagine tater tots mixed with all the things we love about tasty loaded baked potato, baked together in one simple casserole Are you drooling yet?

Perfect with eggs and bacon, or as a side dish for your next burger night, this is as versatile as it is yummy. Plus, it's pretty wallet friendly too, so if you've got a big Easter guest list, this will help you stay on budget.

 Come home from sunrise Easter service, pop this in the oven and it can be done by the time the kids find all the eggs! Whip up some scrambled eggs, a fresh fruit salad and toast...and you've got a holiday brunch that is easy on you and delicious for your guests.

Loaded Tater Tot Casserole is the potato dish the kids will gobble up and the adults will want the recipe for.

Loaded Tater Tot Casserole
2 lb. frozen tater tots
16 oz. sour cream
1 can cream of chicken soup
1 envelope ranch dressing mix
2 (2.5 oz.) pouches real bacon bits
2 c. shredded mild shredded cheese
1/2 c. shredded fiesta blend cheese
1 TBS chopped green onions (green only)
1 tsp. dried parsley

Preheat oven to 350. Grease 9x13 baking dish. In a large bowl combine soup, sour cream, bacon bits, 2 cups mild cheddar, and ranch mix. Stir to combine. Add frozen tater tots. Stir gently, to coat evenly. Transfer to baking dish. Sprinkle with 1/2 cup fiesta cheese and parsley. Bake for 45 minutes until bubbly and heated through. Garnish with green onions. 


Shared at Weekend Potluck
Shared at Meal Plan Monday

Sunday, March 1, 2020

Another One From Amish Country


When I posted my Amish Casserole back at the beginning of the year, it was a huge hit. Both here, and on the Parade site, people couldn't get enough of it. With such success, my editor suggested I try my hand at a breakfast version as well. Challenge accepted!

If you tried the dinner variety and loved how simple it is, with on-hand ingredients, you will feel the same about the morning time one too! Nothing fancy here, just a hearty all in one meal perfect morning, noon or night!

I love having my eggs, sausage, and potatoes all in one bite! Add in some cheese and it's a bite made in heaven! Plus, this recipe is a great stepping off point. Maybe you have frozen shredded potatoes instead. Great. Feel like bacon instead of sausage? I think that would be delicious! Family doesn't groove on cottage cheese? Swap it out for some mozzarella, Swiss for even white cheddar! Got extra veggies in the fridge that need used? Throw those in too! See...the possibilities are endless!

With Easter coming next month, brunch is going to be a hot button topic! This would be fantastic to come home to after church, as the kids dig into their baskets! I would serve it with a fresh fruit salad, toast and call it a meal!

Oh, and those of you who love "brinner" like we do? (You know, breakfast for supper!) That's exactly when I made this, and the boys loved it! A great comfort casserole after a long day!

If you're looking for simple ideas for any breakfast, brunch or dinner, Easter or any other day, this definitely needs to go to the top of your list!

Amish Breakfast Casserole
6 large eggs, beaten
1 medium white onion, diced
4 c. frozen diced potatoes, thawed
2 c. shredded cheddar cheese
1 1/4 c. monterey jack cheese
1 1/2 c. large curd cottage cheese
1 lb. pork sausage
2 tsp. dried parsley
Salt and Pepper

Preheat oven to 350. Grease a 9x13 baking dish. In a skillet on medium high heat, brown sausage and onion until no longer pink, breaking meat up into small pieces. Drain well. In a large bowl whisk eggs. Add potatoes, 3 cheeses, sausage mixture, salt and pepper. Mix well. Transfer to baking dish. Sprinkle with parsley. Bake for 40-50 minutes until toothpick in center comes out clean. Let sit 10 minutes before cutting.  


Shared at Weekend Potluck
Shared at Meal Plan Monday


Sunday, November 10, 2019

Full Holiday House

Last week I gave you a recipe to help you get supper on the table for those holiday house guests that are about to descend! This week? I've got a delicious breakfast or brunch dish to do the same thing!

This is one of those side dishes I make morning, noon or night! It's great for a big holiday breakfast or brunch, but just as delicious for dinner too. We love it with everything from eggs to ham! In fact, I started making it after going to my husband's aunt's holiday party every year...where a huge ham and this were the main attractions!

Sure the big holiday meals are what everyone looks forward to, but you've got to eat other times too! Your full house will love waking up to this, or even coming home to it after that 4am shopping run on Black Friday.

And if you happen to be a planner, this would be amazing on Christmas morning too!

One of the best things about the holidays is having a house full of those people we love most in the world; but it can be one of the most stressful too. It's okay. It doesn't mean we love them any less, it just means we have to be creative when it comes to meal times...and make sure we've got some yummy, simple dishes in our back pocket, just like this!

Hashbrown Casserole
32 oz. bag frozen diced potatoes
2 c. shredded sharp cheddar cheese
1 can cream of chicken soup
1 c. sour cream
1 tsp. onion salt
Salt and Pepper
Dried Chives

Preheat oven to 350. Grease 9x13 baking dish. In a large bowl mix frozen potatoes, soup, sour cream, 1 cup cheese, onion salt, salt and pepper. Transfer to baking dish. Bake 40 minutes. Sprinkle with remaining cheese and dried chives. Bake 5-7 minutes more until cheese is melted. Allow to sit for 5 minutes before serving. *NOTE* No need to thaw the potatoes. Just break up any large chunks before mixing. 


Shared at Weekend Potluck

Sunday, October 20, 2019

Not My Kid

By now anyone who has been reading this blog for any period of time knows I don't produce picky kids. My boys will eat pretty much anything I put in front of them. They both had sushi at a young age, Alex at 5, Max at barely 2. Alex talked about calamari in Kindergarten. One of Max's favorites is my tuna salad.

And yes, before you say it, I know exactly how lucky I am. I don't have it in me to deal with picky eaters. (props to all the parents who struggle every single day) and I think God was merciful to me.

But everyone has likes and dislikes. And even kids are allowed to genuinely not enjoy the flavor of something. That is being picky. That's being human. From an early age Alex hated ranch, and anything flavored with ranch. He would come home in 1st grade and talk about all the kids dipping their pizza in ranch dressing and tell me "Mommy, that's just gross. They are ruining perfectly good pizza!"

As he grew older, he did find some things with a ranch flavor to enjoy. My Ranch Bacon Pasta Salad and Cool Ranch Doritos at the top of that list. But the creamy white dressing? To this day, and he just turned 15, he will not touch the stuff!

Thank goodness his palate grew with him because had it not, these potatoes would have never come to be. And Oh. My. Word. are they good! Seriously, we were fighting over them. All three boys asked for seconds and told me over and over how I needed to make them again soon!

I love serving them right off the pan, kinda like potato nachos. Perfect for parties or game day! No matter what you serve them with, I guarantee they will be a huge hit at your house too! Plus, if you have kids who do love ranch...they won't complain one bit about dinner that night!

Loaded Ranch Potatoes
3 lbs. red potatoes, quartered
3 TBS vegetable oil
3 tsp. ranch dressing mix
3/4 c. shredded cheddar cheese
1 (2 oz.) package real bacon bits
Dried Chives
Salt and Pepper

Preheat oven to 450. Lightly grease a large rimmed baking sheet. In a large bowl combine potatoes and oil. Stir well. Sprinkle with ranch mix. Stir well. Transfer to baking sheet and spread into even layer. Season with salt and pepper. Roast for 35-40 minutes until fork tender and lightly browned. Sprinkle with cheese and bacon bits. Roast for 5-7 minutes until cheese melted. Sprinkle with chives. Serve straight from pan.  

Sunday, July 7, 2019

Gnocchi Fans


Anyone that knows us knows we are a family of pasta lovers. From mac n cheese to baked pasta casseroles, we can't get enough. I think I might have been Italian in another life.

And now I can honestly say, we are quickly becoming fanatics about pasta's little cousin gnocchi. I've mentioned before how my local Dollar Tree store has really decent packages of them, 1 pound for $1. What a deal...and you know I can't pass that up! So on those weeks when the budget might be a little tighter than normal, I like to keep those little gems in my back pocket!

This actually came to be because of another great deal when Kroger had spaghetti sauce dirt cheap. I actually bought a couple jars and then had to think "great, now what can I do with it?" Well, I had to run into DT anyway, so why not grab a couple packages of my new friend?

If you're looking for an economical, hearty, feed a hungry crowd meal, this is it! Terrific Italian flavors with soft, pillowy gnocchi are sure to please every single time!

Cheesy Gnocchi Casserole
2 lbs. gnocchi, cooked to package directions & drained
2 c. shredded mozzarella cheese
1/4 c. grated Parmesan cheese
1 tsp. onion powder
1 tsp. garlic powder
1 tsp. Italian seasoning
3/4 c. heavy cream
2 (24 oz.) jars spaghetti sauce
Salt and Pepper to taste 
Dried Parsley

Preheat oven to 350. In a large skillet heat 1 1/2 jars sauce over medium heat. (Save other half jar for other use) Add cream, garlic powder, onion powder, Italian seasoning, salt and pepper. Heat until bubbling and reduce heat to low. When gnocchi are cooked and drained, add to sauce and stir to combine. Grease 9x13 baking dish. Add half gnocchi mixture. Sprinkle with 2 TBS Parmesan cheese and 1 cup mozzarella. Repeat layers once more. Sprinkle top with parsley. Bake for 20-30 minutes. Allow to rest 5 minutes before serving. *NOTE* This does not set up like a normal pasta bake. It will be very saucy. I do this because gnocchi can be very dense and dry. They need extra sauce! 


Shared at Weekend Potluck

Sunday, April 28, 2019

One Month

One month. 4 weeks. 20 days. Of what? SCHOOL! We have almost made it. We've been checking those 180 days off the calendar and it's almost time to put our Sharpie away.

I know many of you will actually see your school year come to an end before us, but I am okay with going until May 31st. Why? Because come August, we get an extra week of fun!

While we can see the light at the end of the tunnel, we can't shift into coast quite yet. There is SO much to do. Let's see, Adam and Alex just got back from a week in DC for the 8th grade class trip. Next week Alex will be confirmed into our church. There is Mother's Day. Alex's first school dance. An award ceremony for an academic award he's received (YAY!!!) Memorial Day and then finally Graduation. Whew...I'm tired just thinking of it all. And that's not to mention the every day homework, finals to study for, and you know, life.

Time for mommy to bust out some easy meals so supper time doesn't become ham sandwiches every night. And for me, that means casseroles! I have a hundred of them, and would love a hundred more. This one has three of our favorite things included. Sausage. Mushrooms. Rice.

Seriously. These boys I live with could eat rice every single day. From the oldest to the baby, it is basically a food group to them. Hence why I knew this would be a hit; and boy was I right.

If you're winding down the school year, but it is busier than ever, maybe you can use a simple casserole supper too! 

Sausage & Wild Rice Casserole
1 lb. bulk pork sausage
8 oz. white mushrooms, sliced
1 red bell pepper, diced
2 celery ribs, diced
1 medium white onion, diced
1 tsp. dried thyme
1/2 tsp. garlic powder
1 (6 oz.) box wild rice mix
1 can cream of mushroom soup
1 3/4 c. chicken broth
1 c. finely shredded cheddar cheese
Black Pepper to taste 
Dried Parsley

Preheat oven to 375. Spray a 9x13 baking dish with nonstick spray. In a large skillet, brown sausage until no longer pink. Drain off excess fat. Add veggies, thyme, garlic powder, seasoning packet from rice and pepper. Cook until veggies are crisp tender, about 5-7 minutes. Add broth, soup, rice and 1/2 cup cheese. Stir well to combine. Transfer to baking dish. (It will be wet!) Cover tightly with aluminum foil and bake for 1 hour until rice is tender. Add remaining cheese and parsley. Cook for 5 minutes to melt. Stir well before serving.


Sunday, February 24, 2019

24 Days


What is the count down for? Spring of course! Wednesday. March 20th. That is when the sun will shine, the thermometer will rise and the flowers will bloom!!!

Wait, you mean it doesn't work like that? Well, now I'm disappointed. Denial...it's not just a river in Egypt!

Let's face it, even when the calendar tells us Spring is here, it more than likely won't feel like it outside. At least, that's how it is here in northern Indiana. In fact, we will probably still have some down right cold days in the forecast...and yes, even more of the white stuff. (Anyone else remember hunting Easter eggs in flurries last year in April??!!)

So while yes, it does give us something to look forward to, and puts a light at the end of the long winter tunnel, we can still use some warm, delicious meals to come home to!

Weather it be on a snowy freezing day, or even a dreary rainy one, soup is my go-to. Sitting down to a piping hot bowl of something warm truly warms me inside out and helps to wash the day off me.

If you like broccoli and cheese soup, this will make you smile! It's basically that classic pumped up with even more veggies, and flavor! I have a feeling it will become part of your regular meal rotation. 

Spring is coming folks. If we can just hold out a little longer, we will feel the sun on our faces, see the birds again and maybe, just maybe, be able to step outside without 25 layers!

Crock Pot Cheesy Vegetable Chowder 
8 gold potatoes, cubed
3 large carrots, chopped
4 celery ribs, chopped
1 medium white onion, chopped
2 crowns broccoli, chopped
6 c. chicken broth
1 c. water
1 chicken bullion cube  
4 TBS butter
1/2 c. flour 
3 TBS mustard
2 c. milk
3 c. shredded sharp cheddar cheese
Salt and Pepper to taste

Put all vegetables in Crock Pot. Add broth, water, bouillon, salt and pepper. Cook on LOW for 6-8 hours until tender. About 30 minutes before serving, melt butter over medium high heat in a skillet. Add flour and cook until combined about 2 minutes. Slowly pour in milk and whisk constantly until smooth with NO lumps. Add mustard. Cook for about 5 minutes until thickened, whisking a lot. Pour into soup. Mix well. Add cheese in small batches, stirring between each. Cook until combined and slightly thick.


Shared at Weekend Potluck

Monday, February 4, 2019

Dollar Store Delight

A couple weeks back there was a convo on Facebook about buying food at Dollar Tree and how 99% of what they sell is pre-packaged, processed junk. Now, I will no dispute that much of it is exactly that, but I also know there are some things I can find at me that not only are exactly what I would find at my major super market, but a whole lot cheaper, helping me stay on budget.

One of the things I mentioned in the thread was gnocchi. I discovered my local Dollar Trees (yes, we have 4 within just minutes of our house) carry 1 lb. packages of gnocchi. They are a fine quality, and taste the same as the $4 packs I can find elsewhere. I can honestly say every single gnocchi recipe you can find on this blog was made with $1 gnocchi.

So the next time I was in there I decided to create a new recipe around those; and see what else I could find too. In this recipe alone, the gnocchi, Italian seasoning, and pepperoni came from DT. I would have been able to get the marinara sauce there too, they just happened to be out of it the day I went. But...and here is the funny part...I got the sauce at Kroger...for $1 and the 2 cans of mushrooms at Aldi for $1 total. The only thing in the recipe that cost me more than a buck was the bag of mozzarella cheese, and I actually had a coupon for that too!

I guess this is my point. Do I want my family eating cheap, processed food every night of the week? Absolutely not. But there are some things to be found at the dollar store that you can turn into something delicious, yummy and stay on a pretty strict budget. This casserole fed our family of 4 (and I've got big eaters) plus enough for a lunch the next day, for around $7. That is less than $2 per person!

In my opinion, there just needs to be less judgment all around when it comes to where we buy our food, and what we are buying. We all do what we can, in the way we can, and I refuse to turn my nose up at something just because it came from a discount store! After all, look what you can do with it!

Pizza Gnocchi Bake
2 (1 lb.) packages potato gnocchi, cooked to directions
1 (24 oz.) jar marinara sauce
2 (4 oz.) cans mushrooms
1 (4 oz.) package pepperoni, chopped, reserve a few whole for top
2 c. shredded mozzarella cheese
Italian Seasoning

Preheat oven to 400. Grease a 9x13 baking dish. When gnocchi are cooked, drain and return to warm pan. Add chopped pepperoni, mushrooms, sauce and 1 cup cheese. Stir well to combine. Transfer to baking dish. Cover with foil and bake for 15 minutes. Remove foil, sprinkle with remaining cheese, top with pepperoni slices, sprinkle with Italian seasoning. Bake for 10 minutes more until cheese melted and bubbly. Rest for 5 minutes before serving.