Welcome to 2023! I hope your holiday season was magical, filled with love, laughter and some yummy food!
It's hard to believe it is all over. All the planning, decorating, wrapping, baking, and anticipation were 100% worth it though. Our family has been very blessed.
When I was deciding what the first recipe I wanted to share with you this year would be, it really was no contest.
Maybe you've seen this all over your social media feeds lately. I know the Pioneer Woman has a version, so you know if Ree is making it, its gonna be good!
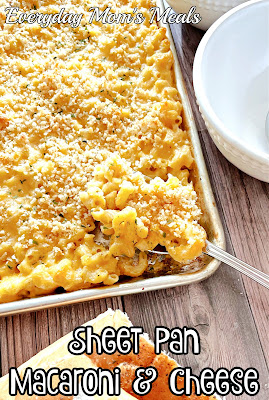
If you're feeding a crowd, this is the mac and cheese recipe you need to be using! It's only a pound of pasta, but it makes enough to feed an army!
Let's stop here for a minute and talk baking/cookie sheets. I only use large, rimmed baking sheets in my kitchen. You might have heard them called "jellyroll pans." Mine are commercial grade, half sheet 13x18. No matter if I'm baking cookies, roasting veggies or now mac and cheese, this size can do it all.
This macaroni and cheese comes with a thick, homemade cheese sauce and a crunchy panko topping too. In our house we have both creamy and baked mac lovers, and this one satisfies both!
I
hope nothing but wonderful things for you and your family in 2023. And
if this happens to be the first new recipe you try this year, that makes
me smile so big!
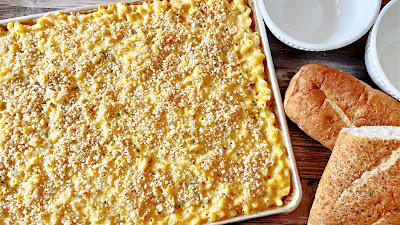
Sheet Pan Macaroni & Cheese
1 lb. elbow macaroni, with ridges
4 cups shredded extra sharp cheddar cheese
2 cups shredded mozzarella cheese
1 stick butter
2 TBS olive oil
1/4/ cup flour
1/4 cup grated Parmesan/Romano cheese
1/2 cup Panko breadcrumbs
4 cups milk
2 tsp. dried parsley
Salt and Pepper to taste
Preheat oven to 375. Combine breadcrumbs, Parmesan and olive oil in a small bowl. Season with a little salt and pepper and set aside. Cook pasta according to directions for al dente. When pasta is cooked, drain well. In the same pot, melt butter over medium heat. Add flour and whisk constantly until smooth. Cook for 2-3 minutes until golden. Slowly add milk and whisk until smooth. Bring to a simmer and cook 5 minutes until thickened. Season with salt and pepper. Remove from heat. Add both shredded cheeses in batches, whisking constantly until smooth and thick. Add drained pasta to cheese sauce and stir to combine. Transfer to a large rimmed baking sheet. Sprinkle with breadcrumb mixture. Bake 25 minutes until set and golden brown. Let sit 5 minutes. Garnish with parsley and serve.