Everyday Mom's Meals: February 2015
_____

Saturday, February 28, 2015

Soul Food Saturday


There are some many things that my Mom cooked for our family growing up that I
believe I could write a book full of just those recipes, and food stories. We weren't picky kids by any sense of the word, but Daddy on the other had his favorites and wanted nothing more than those things, most of the time. 

So to get us excited about whatever new recipe she decided to try she'd come up with a fun way to describe it to us all.

I haven't made this recipe many times on my own, only because I never asked what the recipe actually consisted of. Until now. I hope you'll love it as much as we still do, she calls them Little meatloaf stuffed peppers.

Little Meatloaf Stuffed Peppers
1 1/2 lbs. ground beef
1 small onion, chopped finely
1 c. dried bread crumbs
2 tsp. granulated garlic
1/4 c. Parmesan cheese
salt and pepper to taste
1/4 c. ketchup plus 8 tsp.
1 14 oz. can sweet corn, drained
8 bell peppers, reserve tops
1 tsp. red pepper flakes
2 c. cheddar jack cheese

Preheat oven at 400.
Take each bell pepper and cut off only the tops. Remove seeds and ribs. Remove stems from the tops, and chop finely. Place peppers in rimmed baking pan cut side up, then set aside.In a large bowl add ground beef, chopped onion, chopped bell pepper, bread crumbs, garlic, Parmesan, red pepper flakes,  salt and pepper, ketchup, and corn. Mix to thoroughly combine all ingredients.Take meat mixture and form into 8 balls. Fill each bell pepper leaving a little room on the top.Top with 1 tsp.. of ketchup and cover with foil. Bake for an hour or until juices are bubbling, and peppers are tender.Remove from oven, carefully remove foil, then top generously with cheese. Return to oven, and allow cheese to melt completely.Approx 5-10 minutes. Serve hot, with your favorite side or a salad for a lighter meal. Enjoy!


Meal Plan March 1-6

* New Recipes
Links to Recipes on Blog

Sunday
Leftover from previous menu
French Fries
Cottage Cheese

Monday
Green Beans
Pineapple

Tuesday
Slow Cooker Creamy Chicken and Wild Rice Soup*
French Bread

Wednesday
Breakfast Sandwiches
Hashbrown Patties
Fruit Cocktail

Thursday
Ham Steaks
Applesauce

Friday
Leftovers


Friday, February 27, 2015

My Dirty Little Secret

It's confession time. And believe me, it's not easy for me to admit this to you. Are you ready? Okay, here I go. Before I became this really cool food blogger (Look, it's my birthday today, so if I want to call myself cool, I get to. ) and was as comfortable in the kitchen as I am today, something used to show up on our dinner table that I am not proud of....Hamburger Helper.

Stop the gasping. Pick your jaws up off the ground. It's going to be alright. Let me start by saying, if you read that and said "Yeah, so, I still do!" don't feel bad. I'm not being critical of anyone who does. Ya'll know how much I believe in taking a little help from the store now and again if it makes life easier. I'm simply saying for me, looking back on it, I can't believe just how much I made it. That's all.

I feel like I have to defend my younger self. See, when were first married, I was still a working girl, and didn't get home until almost supper time. So anything I could make that we could be eating quickly was at the top of my list. Then Alex came along, and I was a new mother just trying to find my way. Then he got a little older, and he tasted it, and it was instantly a favorite. So then, I kept making it because he asked me to.

Such was the case a few weeks ago. We haven't had the stuff in years, but we happened to walk by it in the grocery store and he spotted it. Realized he hadn't eaten it in ages, and once again pleaded with me to make some. Now, do you want to know what my biggest problem with it is at this point? To feed this mutant child of mine (He's 10 and 5'2"), and still have enough for Mr. E and I to have some, I would have to make 3 or 4 boxes. That's just not economical unless I can find the stuff on sale.

So I decided I would trick him. Yes, I dupe my child. It's called creative parenting. I figured if I made something similar, that would satisfy him. I basically needed meat, pasta and cheese. Then I had a delicious brainstorm. What if I made all of that taste like another one of his favorite foods...a cheeseburger? Genius, I know.

His request and my ingenuity is your gain, because this stuff is YUMMY! He could not eat it fast enough and even had me freeze the leftovers so he could have it again. It really does taste like a big ol' juicy cheeseburger! Not to mention being a quick, simple meal you can have on the table any night of the week.

So, there you go. My dirty little secret has been revealed. I have to admit, I do feel better having that off my conscience. 

Skillet Cheeseburger Pasta
1 lb. elbow macaroni, cooked and drained
1 lb. ground beef
1 small yellow onion, finely chopped
1 1/2 tsp. steak seasoning
3 TBS ketchup
3 TBS mustard
3 TBS dill pickle relish
1 (14.5 oz.) can diced tomatoes, undrained
3/4 c. shredded sharp cheddar cheese
1 bunch green onions, chopped, whites only
Salt and Pepper to taste

While pasta cooks, cook beef and yellow onion in a large skillet over medium heat until no longer pink. Drain if necessary. Return to skillet. Season with steak seasoning, salt and pepper. Add ketchup, mustard, relish and diced tomatoes. Stir well to combine. Cook 1-2 minutes for flavors to develop. Reduce heat to low. When pasta is cooked, drain well. Add to skillet. Stir well to combine. Sprinkle with cheese. Cover and keep on warm until cheese melts. Sprinkle with green onions and serve. 


Wednesday, February 25, 2015

Winter Woes

So...anyone besides me totally and utterly sick of winter?! Thought so. Between the mounds of snow and the arctic cold temps. I. Am. Done. I'm not one to usually wish time away. I like to enjoy every day. Live each minute. But at this point, winter can leave, we can skip over spring and head right into summer as far as I'm concerned.  And I know those of you up in the Boston/New England area have to be ready to "tap out" at this point, so it's not just me.

One of the few ways I can even attempt to ease my pain during these brutally cold months is to find as many ways to make soup as I can. Old tried and true recipes. Twists on classics. New ones I find. I use them all to warm us up, comfort our souls and feed us a meal that makes us feel better at the end of the a long, cold day.

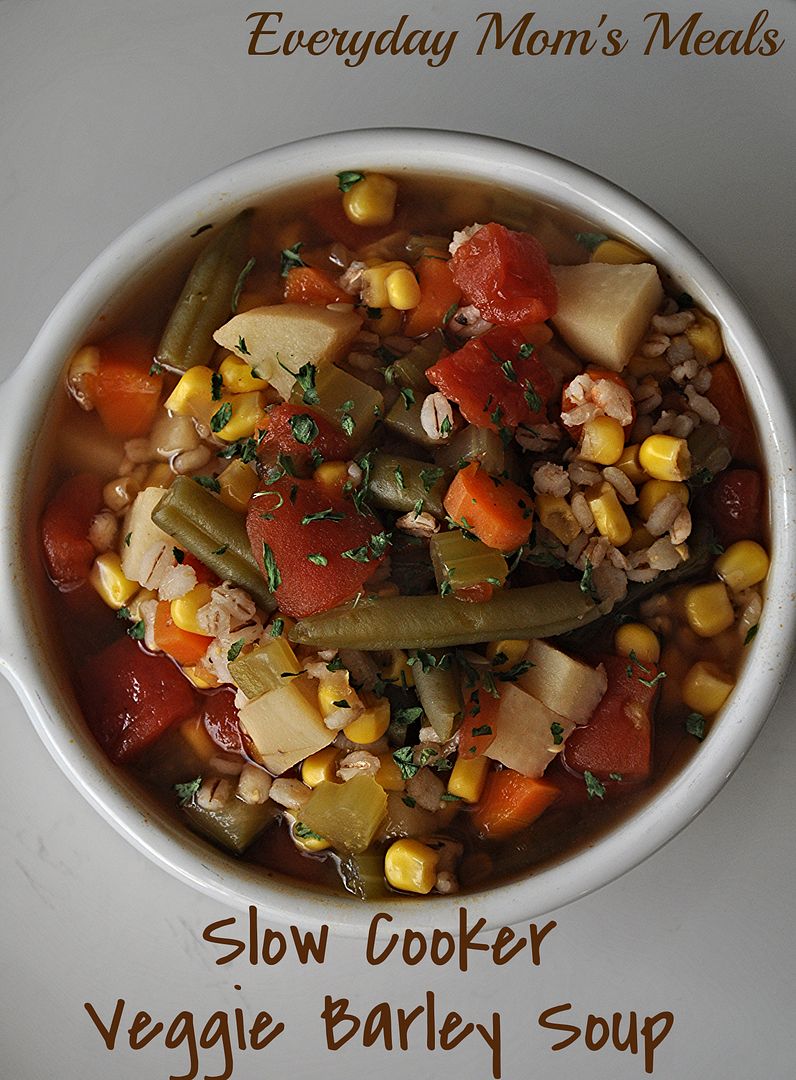
How about a new one made in your slow cooker? Filled with veggies and more veggies? Yeah, I have your attention now. This would be so easily adaptable with veggies you already have on hand, or find on sale in the produce aisle, or just ones that are your favorites. Plus, even though I used beef bullion and broth for extra flavor, you could easily substitute vegetable stock instead, making it a completely meat free meal, perfect for Lent. I know many of you are always looking for more recipes for Fridays this time of year.

If you are ready to say goodbye to Old Man Winter as much as I am, this new soup is the best way to make yourself feel better about warmer weather still being too many weeks away. Feed your family and thaw them out at the same time!

Slow Cooker Veggie Barley Soup
Adapted from Taste of Home
2 small potatoes, peeled and diced
1 1/2 c. frozen corn
1 1/2 c. frozen green beans
1 c. finely diced carrots
2 stalks celery, finely diced
1/2 c. frozen chopped onion
1 medium zucchini, diced
1 (32 oz.) box beef broth
2 1/2 c. water
2 beef bouillon cubes
1 tsp. garlic powder
1 dried bay leaf
1 (14.5 oz.) can Italian diced tomatoes, undrained
1 c. quick cooking barley, cooked according to box directions
Salt and Pepper to taste
Dried Parsley for garnish

Combine all ingredients except barley in slow cooker. Cook on LOW for 8-10 hours until veggies tender. In the last 30 minutes, cook barley separately on stove top. When done, stir into soup. Garnish with parsley if desired. *NOTE* You can also use medium pearl barley, and cook with rest of soup. If you choose to, only add tomatoes in the last 10 minutes of cooking. The acid in them will not allow the barley to cook correctly. I prefer to cook it separately to avoid any mushy texture.


Disclaimer: As a Field Editor for Taste of Home, I share my opinions of this recipe as a volunteer, not a paid employee. 

Monday, February 23, 2015

A Twist On Mexican Night

Do you love making Mexican food at home? Yeah, me too. Do you find yourself falling into a little bit of rut with what you make? Yeah, me too. Tacos, burritos, enchiladas....they seem to get into a rotation at our house, and I have to remind myself to switch things up now and again.

Back at the beginning of the month, the night of the Super Bowl in fact, we were getting dumped on with a foot of snow. Yep, over 12 inches in 24 hours. Needless to say, any plans we had to go to a big game day party were put on hold due to treacherous roads.

So, we were at home, just the three of us, watching the game, and I promised little man I would still make it fun for him since he was bummed we couldn't go anywhere. Well, one way I can usually put a smile on his face is something yummy to eat, especially with a Mexican flare! Add in the fact that it has crushed Doritos on top and I'm going to score extra Mommy points!

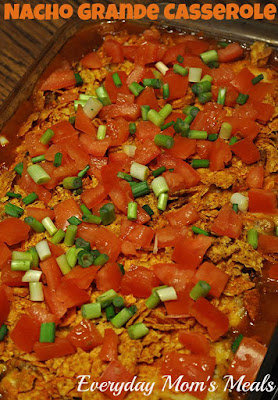
However, this night I didn't want to put too much effort into supper. After all, it was supposed to be a party night for me too, and while I was taking some snacks to share, I was going to be off full kitchen duty, so in a way I was kind of protesting cooking a big meal. What to do? Find a way to give him his Mexican meal, in a simple to make casserole! Done!

This is a great weeknight meal, potluck take-a-long, or party food. It's going to feed a crowd, taste great, and oh, be totally budget friendly too!

Don't fall into a rut when comes to Mexican night at home, Switch it up. Put a twist on it. Give them something new, but with so many familiar flavors they will gobble it down! 

Nacho Grande Casserole
2 lbs. ground beef
1 medium white onion, chopped
1 packet taco seasoning
2 (15 oz.) cans chili beans, mild or spicy, undrained
1 (15 oz.) can tomato sauce
16 oz. frozen corn, thawed
3 c. shredded Monterrey Jack cheese, divided 
3 Roma tomatoes, seeded and chopped
1 bunch green onions, finely chopped
1 1/2 c. Doritos, crushed
Salt and Pepper to taste

Preheat oven to 350. Lightly grease a 9 x 13 pan. In a large skillet brown beef and onion until no longer pink. Season with salt and pepper. Drain if necessary. Add chili beans, corn, tomato sauce and taco seasoning. Stir well to combine. Reduce heat to low and simmer for about 10 minutes. Add 1/2 ground beef mixture to bottom of dish. Top with half the cheese. Repeat layers. Top with crushed chips. Bake for 30 minutes until hot and bubbly. Top with tomatoes and green onions before serving.


Saturday, February 21, 2015

Meal Plan Feb. 22- 27

*New Recipes
Links to Recipes on Blog

Sunday
Leftover from previous menu
Biscuits

Monday
Cabbage Stew*
Cornbread

Tuesday
Toast
Bacon

Wednesday
Fruit Cocktail

Thursday
White Castle Sliders
French Fries
Cottage Cheese

Friday
Happy Birthday to Me!
My parents are taking us out to celebrate!


Friday, February 20, 2015

Snowmageddon 2015

Oh look, more snow. Yep, that's what we were saying Super Bowl Sunday, February 1st. In fact, we got so much of the white stuff, our party plans had to be rescheduled due to nasty driving conditions. I can't say we were thrilled, but hey we had to make the best of it.

We ended up with about a foot of snow, and after playing outside, it was time for some indoor fun, so that meant one of our favorite things to do on snowy days...bake!

Oh look....another muffin recipe. Yeah, it seems these days snow and muffins go hand in hand in our house. With the first flakes, I start to crave them, and it won't subside until I have some warm from the oven to munch on. Plus, we needed something sweet to go with our party spread during the game.

If you love coffee cake, you will enjoy these as much as we did. Moist cake, a hint of apple and a crumb topping that's out of this world. In fact, I could eat an entire bowl of that topping by itself. Seriously. Just hand me a spoon.

Make a batch of these on the weekend when you have more time, and you have breakfast all week long. They are great for on the go too. Mr. E took them to work several days after I made them. They go perfectly with your cup of morning coffee, or a tall glass of milk for the kids.

I can't say I enjoy snow. But I do love the yummy things that come out of the days when it shows up. But I can bake during the Spring and Summer too....so those can show up any time soon! 

Apple Coffee Cake Muffins

Muffin Batter
2 c. all purpose flour
3 tsp. baking powder
1/2 tsp. salt
3/4 c. packed brown sugar
1 egg
1 c. milk
1/4 c. vegetable oil
2 apples, peeled and finely diced

Cinnamon Swirl Filling
1/4 c. packed brown sugar
1 1/2 tsp. cinnamon

Crumble Topping
2 TBS cold butter, finely diced
1/4 c. packed brown sugar
1/4 c. flour
1/4 tsp. cinnamon

Preheat oven to 400. Line a muffin tin with papers. In a small bowl prepare cinnamon swirl filling, mixing well. In another bowl, make crumble topping. Mix flour, brown sugar and cinnamon well. Then using fork, cut in butter until crumbles form. Set both aside. In a large bowl combine flour, baking powder, salt and brown sugar. Mix well. In another bowl, whisk together milk, egg and oil. Add to flour mixture. Mix to combine, but don't over mix. Fold in apples. Add 1 small scoop (about 1 TBS) of muffin batter to each well. Sprinkle in 1 tsp. cinnamon swirl mix. Top with another scoop batter. Sprinkle with crumb topping. Bake for about 20-22 minutes until tooth pick comes clean. Cool on wire rack. Make 1 dozen.


Shared on The Country Cook Feb. 20, 2015

Wednesday, February 18, 2015

Have A Ton, One More Won't Hurt

Do you have a few foods that your recipe box is over flowing with recipes for? One food that you can make a thousand different ways and never tire of, and always find ways to make new again? Yeah, me too. Potatoes happen to be one of those for me. Chicken and pasta are too, but those aren't what we are talking about today.

Today we are discussing my love for the potato. Any way. Any how. We are some tater loving people in our house. I love their versatility, how budget friendly they are, and let's face it, they are just darn tasty.

I find myself making home fries, or breakfast potatoes, a lot. We are also big breakfast for dinner people, so they get included in my menu many times. Plus, I love making them as a side for non-breakfast meals too. They go great with all kind of things from burgers to sloppy joes to steak! But indeed, these were made for an eggs and sausage kind of night, and I knew my newest creation had to be one I shared with you.

These can be adapted to fit whatever potatoes and seasonings you have on hand. However, if you can get your hands on some Yukon Golds, do so. You won't regret it. I love their buttery flavor, and they really lend themselves to this method really well.

Although I have a ton of recipes for potatoes, every which way from Sunday, one more won't hurt. After all, there is no such thing as too much of a good thing...right?? 

Baked Breakfast Potatoes
2.5 lbs. Yukon Gold Potatoes, cut into 1 inch cubes
2 TBS vegetable oil
2 TBS butter, melted
1 tsp. garlic powder
1 tsp. seasoning salt
2 heaping tsp. dried parsley
1 medium onion, chopped
Salt and Pepper to taste

Preheat oven to 425. Combine all ingredients in large bowl. Mix well to combine. Spread out evenly on large baking sheet. Bake for 25 minutes, stirring once.  Turn heat up to 500. Bake 25 additional minutes, stirring again.

Monday, February 16, 2015

Sometimes Change Is A Good Thing

I am not a fan of change. I don't like a wrinkle in my schedule. I wish I could be more laid back and "go with the flow", but alas, it just isn't in my nature. In fact, when a wrench gets thrown into my plans, it tends to effect my mood in not so great ways. It's one of those things about myself that I don't necessarily like, but I know I'm that way, so I try to accept me for me. But even I have to admit sometimes change is indeed a good thing.

See, during the holiday time, we were supposed to have dinner and celebrate Christmas with our good friends and their kids. It's something we do every year, and we look forward to it so much. And luckily, my friend is a planner just like me, so knowing how busy that time of year gets, we always find a date early on to make sure we have it on the calendar before it gets full. Seriously, we had this year's date picked out in mid-November!

This is where out little story goes off track a bit. We found out we had a family obligation the same day we had planned our little get together. So, I had to scramble to get with my friend and try to find another date we could do it. Thankfully, we were able to, and the schedule moved on as planned. Well, then as it turned out, the original date happened to be the same one little man ended up coming down with a nasty case of the flu...so we wouldn't have been able to do it anyway. As it turns out, changing the date was a blessing in disguise. It worked out exactly how it was supposed to and we were able to celebrate with our friends and have a lovely evening.

I was in charge of the main dish that night, and this amazingly delicious pasta casserole is what I came up with. I love serving pasta casseroles when I entertain, or have to take a meal with us. They are so easy to assemble and either keep hot or bake off when you get there. Plus, with the change of date, I had a few more weeks to tweak this and get it just right. I've since made it a couple more times and it just keeps getting yummier and yummier.

If you are one of those people who don't let change bother you, I admire you. I try really hard, but it's just not in my nature. So, I will continue to like my schedule, my order, my routine and if something does happen to interfere with it, I will try to remember this case and how it was actually a good thing.

Three Cheese Baked Spaghetti
1 lb. angel hair pasta
1 lb. ground beef
1 (24 oz.) jar spaghetti sauce
4 oz. cream cheese, softened and cubed
1 c. shredded mozzarella cheese, divided
1 c. shredded Monterrey Jack cheese, divided
1/2 c. grated Parmesan cheese, divided
Garlic Powder to taste
Onion Powder to taste
Salt and Pepper to taste
Dried Parsley for garnish

Preheat oven to 350. Cook pasta according to package directions. While it's cooking, in a large skillet brown beef until no longer pink. Drain. Season with garlic powder, onion powder, salt and pepper. Add sauce and stir to combine. Stir in cream cheese cubes and stir until melted and combined. Keep warm. When pasta is cooked, drain well. Spray a 9 x 13 dish with nonstick spray. Add enough sauce mixture to bottom of dish to cover. Add half the pasta, and half of each of the 3 cheeses. Repeat layers, ending with sauce. Cover and bake for 25 minutes. Remove, uncover and add remaining cheeses. Bake for 5-7 minutes more until browned and bubbly. Sprinkle with parsley. Allow to sit 5 minutes before cutting and serving.


Shared on The Country Cook Feb. 20, 2015

Saturday, February 14, 2015

Meal Plan Feb. 15- 20

*New Recipe
Links to Recipes on Blog

Sunday
Cheeseburger Pasta Casserole*
Cantaloupe

Monday
Pasta Salad

Tuesday
Slow Cooker Beef Stew*
Rolls

Wednesday
From Previous Menu
Spicy Thai Peanut Noodles with Shrimp*
Hot and Sour Soup

Thursday
Pork Chops
Baked Potatoes
Applesauce
Stuffing

Friday


Friday, February 13, 2015

Happy Valentines Day!!

Almost that is. Yep, tomorrow is that one day a year we can set aside to make sure those we love most in the world know it. And before you say it, yes, I realize we shouldn't do this only on the 14th day of February, but instead show those whom mean the most to us, each and every single day just how much. I agree with that. But I also think in the hustle and bustle of life, it's nice to have a little friendly reminder on the calendar. 

I try to make Valentine's Day very special for both of my boys, big and small. It's really a family love fest in our house. That usually means some sort of sweet treat coming out of the kitchen too. And this year, it's one that I know you will love and your little sweethearts are going to be so excited for! In fact, these are so easy, and kid friendly, they could even help you make some tomorrow! 

When I was a child I didn't really enjoy Rice Krispie treats. I can't tell you why. They just weren't my favorite; and yes I was definitely the minority of every single classroom party in elementary school. But that's okay because I'm making up for it now because I can't get enough of them! I am totally addicted! So I figured I could do something super fun, super yummy and super lovable for my little man this year. 

If you are allowed to take homemade treats to your school, these would be great for a classroom party. Or really, any time kids are over! Birthday parties. Sleep overs. The possibilities are endless. And they can be adapted for each holiday so easily. I can't wait to do some in pastel colors for Easter! 

However you're spending the day tomorrow, I hope it's with someone you love. 

Mini Rice Krispie Cupcakes
Makes 36
1 (10 oz.) bag marshmallows
4 TBS. butter
6 1/2 c. Rice Krispie cereal
1 tsp. vanilla
Cooking Spray
Frosting 
Sprinkles

In a medium saucepan, melt marshmallows and butter over LOW heat, stirring constantly. Add cereal to a large mixing bowl. When melted, remove from heat and stir in vanilla. Pour over cereal. Using a silicone spatula sprayed with nonstick spray, stir until combined. Spray a 24 count mini muffin tin generously with nonstick spray. Using your hands, or a cookie scoop, also sprayed, fill each well and pack down. Allow to cool. Remove carefully. Frost and add sprinkles. 


Shared on The Country Cook Feb. 13, 2015


Wednesday, February 11, 2015

A Snow Day With No Snow

Yep, that's right. Here in Indiana, we are so lucky (She says...dripping with sarcasm!) to get snow days with no snow! Unfortunately, that means there is ice instead, and that can be even more treacherous! That's exactly what happened a couple weeks ago. Not a flake of snow was on the ground, but we had gotten soaked with freezing rain/ice, and the morning commute wasn't safe for man or beast, so no school for us! 

As you know by now, when school gets cancelled, I am just as happy as little man is. I don't know which of us gets a bigger thrill when we hear our school system announced with all the others, me or him! I love having an unexpected day with him at home with me. Plus, it usually means we are going to get in the kitchen and make something extra yummy. Baking is one of those things a snow day was made for. 

This particular snow ice day we didn't know what we were in the mood for, but we knew it had to be something sweet, and we didn't have a lot to work with. See, it was towards the end of the week, and the grocery store trip was just around the corner, so we were going to work with what I had. Thankfully, I do keep basic baking things on hand at all times, so we weren't at a total loss. In fact, I bet if you go to your pantry right now, you probably have everything to make these. Okay, the maple extract might not be something you have laying around, but if that's all you need, you're doing pretty good! 

We ate these as a snack...later on that same evening for dessert...and then for a few days after for breakfast. Honestly though, Mr. E is lucky there were any left when he came home because Alex and I could have eaten the entire dozen in a blink of an eye. (And probably not felt that bad about it!)

These are super sweet, so beware! If you want to cut down on the sweetness a little bit, omit the maple flavoring. With Valentines Day being this Saturday, they would be a perfect treat for the sweet hearts in your life. 

Snow days are a simple pleasure in life that I for one, am so thankful for. My favorite little guy, at home, in the kitchen, safe and sound...pure bliss. 

Maple Frosted Spice Doughnuts
Makes 1 dozen
2 c. flour
1 tsp. baking soda
1/4 tsp. ground nutmeg
1/2 tsp. salt
1/2 tsp. cinnamon
2 eggs
3/4 c. white sugar
1 tsp. vanilla
1/2 c. milk
2 TBS butter, melted

Maple Frosting:
1 c. powdered sugar
2 TBS butter, melted
1-2 TBS water
1/2-1 tsp. maple extract

Preheat oven to 325. Grease a doughnut pan and set aside. In a large bowl combine flour, baking soda, nutmeg, cinnamon and salt. Mix well. In a small bowl whisk together eggs, white sugar, vanilla and melted butter. Add liquid mixture to dry mixture 1/3 at a time, stirring after each, until combined. Spoon mixture into doughnut pan, about 2/3 full for each well. Smooth tops with back of spoon. Bake for 10-15 minutes until firm to touch, and toothpick comes out clean. Rest on wire rack for a few minutes in pan. Using a silicone spatula, remove doughnuts to wire rack to completely cool. 

To make frosting, add water to powdered sugar a little at a time until desired consistency. I like it a little thick. Add butter and maple extract. Mix well. 

To frost doughnuts, dip each into frosting and let set on wire rack. 


Monday, February 9, 2015

Fingers Crossed

Recipe contests. They aren't something I enter a lot, but when I do, I want to make sure of two things. One, the sponsor is a company I respect and/or use in my every day life. Two, I am confident I can create a recipe to be proud of, so that even if it doesn't win, I can know I did my very best.  And this time you actually get to take this little journey with me.

I've worked with Healthy Solutions Spice Blends before. In fact, you can read all about them in my original post, here. So when I was contacted about entering their Blogger Recipe Challenge, I immediately said "Sign Me Up!"

It was really quite simple. I got to pick out one of their terrific spice blends to create a dish around, and then share it with all of you, and them.

Having already tried a couple varieties for my original review, I wanted to use a different one this time around. While browsing their product line when I saw the word Italian, I knew I had found my winner ! Ya'll know what a sucker I am for great Italian food, so I knew I could do something yummy and unique with this one.

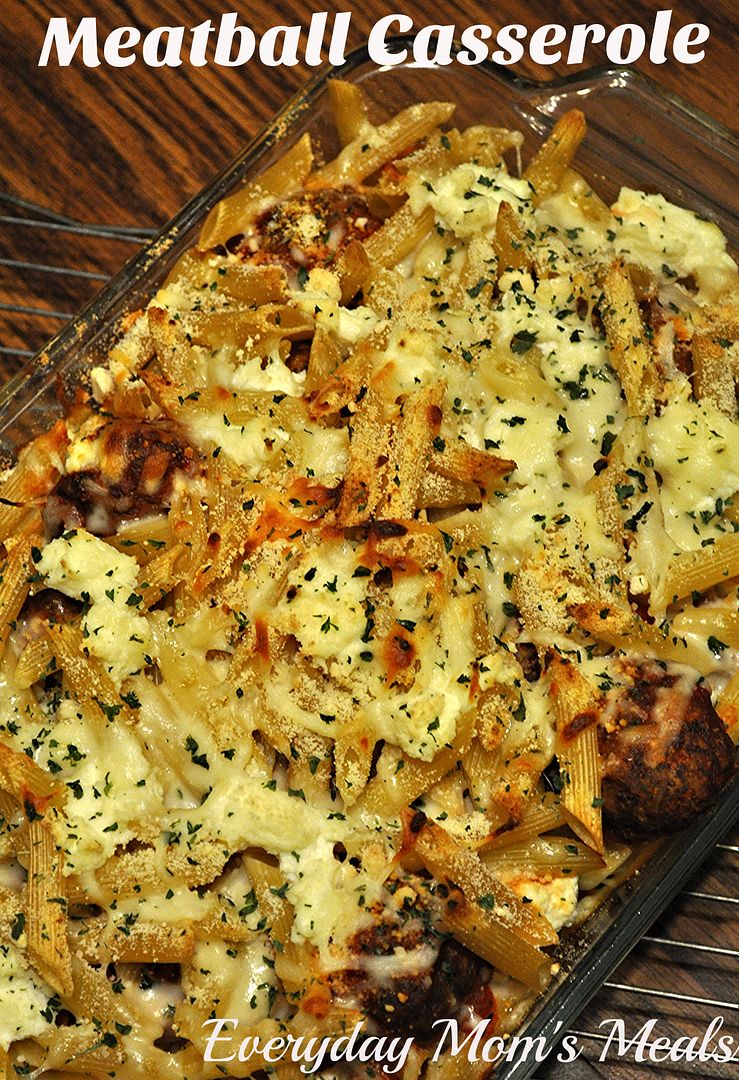
Sure, this blend of spices is made to enhance the flavor of both meatballs and sauce, but I wanted to take that idea and turn it into a simple weeknight meal. And with that decision one word came to mind. Casserole. Yep, a scrumptious pasta and meatball dinner turned into every busy mom's best friend!

This one would travel well too, so keep it in mind for your next family or church potluck! Oh, and if you wouldn't mind, please keep your fingers crossed for me and I will let you know if I win! 

Meatball Casserole
1 lb. penne pasta, cooked to al dente
1 lb. ground beef
1 egg, beaten
1/2 c. bread crumbs
1/2 c. plus 1 TBS grated Parmesan cheese, divided
1 TBS Healthy Solutions Italian Meatball Seasoning
3/4 c. shredded mozzarella cheese, divided
1 (24 oz.) traditional pasta sauce
2 tsp. Italian seasoning
1 c. ricotta cheese
Salt and Pepper to taste
Dried Parsley

Preheat oven 375. In a large bowl combine ground beef, egg, bread crumbs, 1 TBS Parmesan cheese, meatball seasoning, salt and pepper. Using hands, mix well. Form into 1 inch meatballs. (You should have about 20.) Lay wire racks on a large baking sheet. Spray with nonstick spray. Lay meatballs on. Bake for 25-30 minutes until done through. 

While meatballs cook, warm sauce and Italian seasoning in a large saucepan over low heat. And cook pasta.  When meatballs done, transfer to skillet and stir to combine with sauce. When pasta is done, drain well. 

Spray a 11 x 5 baking dish with nonstick spray. Layer in half the meatball mixture. Top with half pasta, half the ricotta, half the remaining Parmesan and half mozzarella. Repeat layers. Sprinkle top with parsley. Reduce heat to 350. Bake for 20-25 minutes until browned and bubbly. 

*NOTES* You can make the meatballs ahead of time and chill in fridge until ready to use. I actually prefer to do this because they seem to "set" and stay together better. Also, don't be alarmed if the ricotta cheese doesn't melt and "spread out" entirely. As soon as you scoop the casserole to serve, it will mix together very well and become creamy. Also, you can also substitute Italian seasoning for the spice blend and achieve the same result, for those of you not entering this contest with me! 

Saturday, February 7, 2015

Ice Cream For Breakfast??!!!

Did you know today is National Eat Ice Cream for Breakfast Day!! Yep, February 7th is a day to be celebrated! 

And my good friends over at Post Foods are combining this special day with some great recipes including both ice cream, and the breakfast staple...cereal!


Chocolate Toffee Ice Cream Sandwiches

Cocoa Pebbles Cookies:

2 cups all-purpose flour

  • 1/2 cup unsweetened cocoa powder
  • 1/2 cup Cocoa Pebbles cereal
  • 2 teaspoons cream of tartar
  • 1 teaspoon baking soda
  • 1/2 teaspoon salt
  • 1 cup (2 sticks) unsalted butter, room temperature
  • 1-1/2 cups sugar
  • 2 large eggs
  • 1 teaspoon vanilla
  • 3/4 teaspoon sea salt
Filling and Garnish:
  • 3/4 cup toffee bits
  • 3/4 cup Cocoa Pebbles Cereal
  • 6 cups (1 1/2 pints) salted caramel ice cream
  • Preheat oven to 350 degrees F.

  1. In a food processor, grind cereal into a fine powder. In a medium bowl, combine flour, cocoa powder, ground cereal, cream of tartar, baking soda, and salt. In a large bowl, using an electric mixer, beat butter and sugar on medium speed until light and fluffy, about 2 minutes. Scrape down side of bowl. Add eggs and vanilla and beat to combine. With mixer on low, gradually add flour mixture and beat until combined. Chill dough for 1-2 hours.
  2. Divide dough and roll into 48 1-inch balls. Place on parchment-lined baking sheets, about 2 inches apart. Press down lightly with a glass and sprinkle with sea salt. Bake until cookies are set about 8-10 minutes. Transfer cookies to racks to cool completely.
  3. When ready to prepare the sandwiches, combine the toffee bits and 3/4 cup cereal in a small bowl. Scoop 1/4 cup of ice cream and spread on the underside of one side of the cookies. Top with another cookie and roll the edges in toffee-cereal mixture. Continue with remaining cookies, placing each completed ice cream sandwich in the freezer immediately. Freeze ice cream sandwiches for at least 2 hours until firm.


Meal Plan Feb. 8-13

*New Recipe
Links to Recipes on Blog

Sunday
We're having dinner at my in laws.

Monday 
Leftover from previous menu
Fish Sticks
Mac n Cheese
Broccoli

Tuesday
Skillet Chicken with Artichokes and Mushrooms*
Parmesan Herb Egg Noodles*

Wednesday
Beef Roast 
Mashed Potatoes with Gravy
Green Beans

Thursday
Leftovers

Friday
Egg Rolls
Spicy Thai Peanut Noodles with Shrimp*


Friday, February 6, 2015

Eight Dollars??!!!

Woo hoo! Gas prices are way down lately around us. How about you? Now, they actually have gone back up a tad compared to a few weeks ago, but it's still cheaper than it has been in a long time, so I won't complain. However, I have noticed something interesting. Even though the cost of fuel has gone down, grocery prices, at least on some items, have continued to go up.

Now, to me, if the fuel it takes to haul them from Point A to Point B, is cheaper, than the price should reflect that. I'm not talking about things that are out of season that have to come across the country. I know to get a good tomato or orange in Indiana in the winter I'm going to pay a premium. These items are ones that don't really have a season per say, and just continue to go up.

One in particular? Chicken. It's not cheap. And it just keeps getting more not cheap. In fact, in our house, with the budget I set for myself, if chicken isn't on sale, I don't buy it. Thankfully at least one store around us usually has a sale about once per week, or every other, so I am lucky.

But a couple weeks ago I wanted a whole roasting chicken. Nothing fancy, just one I could slap some garlic and lemon on and throw in the oven. I couldn't find any in the sales ad, but I figured I would look in store since sometimes there are unadvertised specials. Well guess what! There weren't. In fact, the cheapest roasting chicken I could find was over $8!! And there are only three of us, so it's not like I was trying to buy some huge bird to feed an army. I'm talking about a 4.5-5 pound one...so you can see why $8+ was a little crazy to me.

So, there I stood, looking around in the poultry case trying to figure out what I could do instead. I'm sorry, I just refused to spend that kind of money. While what I wanted wasn't on special, they did have leg quarters at a great price, so they went in the cart instead...and this yummy recipe came to be.

If you aren't a skin lover, I'm sure this would be just as delicious on boneless skinless too, just with less of a crispy result. For me, I am a skin fanatic, from way back. In fact, others in the family, including my husband will relinquish their skin to me without even asking because they know it's a sure bet I want it.

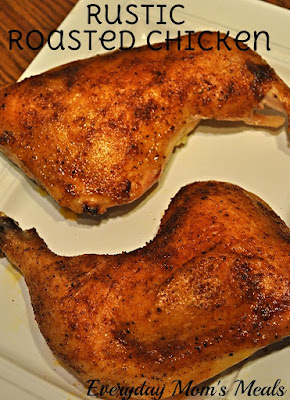
The combination of seasonings lead to a rich flavor, with a crispy outside and tender and juicy on the inside.  A terrific oven chicken dinner perfect for any weeknight! Plus, with only a handful of ingredients, it's very budget friendly too...rather you can find the chicken on sale or not!

Rustic Roasted Chicken
4 chicken leg quarters, trimmed
3 TBS vegetable oil
1 tsp. paprika
1 tsp. seasoning salt
1/4 tsp. dried thyme
1/4 tsp. garlic powder
Salt and Pepper to taste

Preheat oven 400. Pat chicken dry with paper towels. Season with salt and pepper. In a small bowl whisk together oil, paprika, seasoning salt, thyme and garlic powder. Lay chicken on a rack in a large roasting pan. Baste liberally with marinade. Bake for 60-75 minutes, until juices run clear. Half way during cooking time, spoon some pan drippings over the chicken, and then again right before serving.
*NOTE* If your chicken doesn't give off much liquid, simply whisk together the same marinate ingredients in HALF quantities and baste during cooking. And if you do choose to use boneless skinless, I would mix up the marinade and let the chicken sit in it in the fridge for a few hours before cooking. Then mix up a second batch to baste while cooking. 


Shared on The Country Cook Feb. 6, 2015

Wednesday, February 4, 2015

A Gadget Makes All The Difference

So, I might have a new obsession. Well, I guess when it comes to food, I have quite a few, so I better narrow it down. The latest addiction I have to add to my list is muffins. I am constantly looking for new flavors, and a lot of this new infatuation has to do with one small thing. A cookie scoop.

See, until last year about this time, I had to use a normal, every day spoon to transfer the muffin batter to the muffin tin. But then something magical happened. I received a cookie scoop for my birthday. Do you know what I'm talking about? The kind with the spring loaded handle that when pressed, allows whatever is in it, to be removed quickly and easily. Nothing special, nothing fancy. But absolutely life changing.

Oh, and the funny part? I've never made cookies with it! For almost a year now, it has been used exclusively for muffins. I'm sure it would be fabulous for cookie dough too, believe me. It makes scooping anything so much easier. I can literally fill a 12 well muffin tin in almost no time at all! Plus, it helps to keep the mess down too! (I'm all about less clean up when I'm done!)

If you love banana bread, you're going to love these as much as we did. Plus these come with a glaze that banana bread usually doesn't, so they are that much sweeter! Perfect for breakfast, brunch, an after school snack or dessert.

Do you have a great kitchen gadget that makes all the difference in your life? Share it with me in the comments! I'm always looking for new ones!

Banana Nut Muffins
1/4 c. butter, softened
1/2 c. sugar
1 egg
1/2 tsp. vanilla
3/4 c. mashed banana (about 3)
1 c. flour
3/4 tsp. baking powder
1/4 tsp. salt
1/8 tsp. cinnamon
1/8 tsp. baking soda 
1/2 c. chopped walnuts
1/4 c. powdered sugar
Milk

Preheat oven to 350. Line muffin tin with papers or grease. Cream together butter and sugar. Beat in egg, vanilla and banana until smooth. In a separate bowl combine flour, baking powder, salt, cinnamon and baking soda. Mix well. Pour into moist mixture and combine just until moisten. Fold in walnuts. Fill muffin cups 2/3 full. Bake for 20-25 minutes until tooth pick comes out clean. Cool on wire rack. Mix together powdered sugar and enough milk to make glaze, usually about 2 tsp. When muffins are cool, drizzle with glaze.


Shared on The Country Cook Feb. 6, 2015

Disclaimer: As a Field Editor of Taste of Home, I share my own thoughts and opinions of this recipe. I am not a paid employee. 

Monday, February 2, 2015

I'm Krista and I Love Carbs

If you are an avid reader of EMM you know my one food addiction is pasta. Lots. And. Lots. Of. Pasta. Seriously, I could eat it every meal, every day...forever. If I was stranded on a deserted island and could only have one food in my picnic pasta, eh, basket, it would be pasta. See, I can't even get through a sentence without my mind wandering. (Oh and my keyboard is a little damp from the drool too!) But there are only so many pasta recipes out there, and while I haven't made them all, sometimes it starts to feel that way.

So, when my craving once again set in, I thought what if I take a dish I already make, use the same ingredients, but switch up the way it's prepared?? Like, taking my Mushroom Fettuccine Alfredo and transforming it into casserole form? Genius, I know!

Now, if you started 2015 with the resolution to eat lighter, this is not the recipe for you. I'm not even trying to hide the fact this is rich with a capital R. But just as I said in my original post, we all have to indulge once in awhile. And our family's philosophy when it comes to food, is all things in moderation. We don't deny ourselves any one food or dish. I think if you deprive your body of one food group, you end up compensating with others, and the balance of things is thrown off. It's a personal philosophy, and I respect others have their own. But for us, this is best.

This is layer after layer of YUMMY. If you aren't a mushroom fan, simply substitute with another veggie you do love. Broccoli would be good. Oh, I might have to try that myself! Oh, and spinach too. See, I just can't concentrate this is so good.

Pasta. It's a love. It's an addiction...so if there is a Carb Lovers Support Group...that's where you'll find me!

Mushroom Alfredo Pasta Bake
1 1/2 lbs. penne pasta, cooked until just al dente
1 lb. button mushrooms, sliced
1 stick plus 2 TBS butter, room temperature
2 c. heavy cream
1/2 c. grated Parmesan cheese, plus more for layers
8 oz. mozzarella cheese, divided
3 cloves garlic, minced and divided
Salt and Pepper to taste
Dried Parsley 

Preheat oven to 350. While pasta is cooking, melt 2 TBS butter in large skillet. Add mushrooms and 1 clove minced garlic. Saute until browned. Season with salt and pepper. Remove and drain off extra liquid. Set aside. Wipe out skillet. Melt 1 stick butter over medium low heat. Add cream and remaining garlic. Bring to a simmer, stirring constantly. Add 1/2 c.  Parmesan cheese and continue simmering for 8-10 minutes, stirring often, until thickened. Add 3/4 c. mozzarella cheese and stir until combined and smooth. Season with salt and pepper.  Keep warm. When pasta is done, grease a 
9 x 13 baking dish. Ladle enough Alfredo in bottom of dish, just to cover. Then do the following layers: pasta, mushrooms, Parmesan, mozzarella, Alfredo. Repeat layers three times. Sprinkle with dried parsley. Cook for 15-20 minutes until heated through and browned on top. Remove from oven and cover with foil. Let stand for 10 minutes before serving. 


Shared on The Country Cook Feb. 6, 2015