Everyday Mom's Meals: Dill
_____
Showing posts with label Dill. Show all posts

Sunday, May 10, 2020

Summer Time Cookout Season

I know, I know, many of us across the country are still social distancing, and not planning any get togethers for a while. However, I am the type that can plan a cookout when it is just the 4 of us; and we have been seeing grandparents again, after 8 weeks. Many don't feel comfortable visiting relatives yet, and I respect that. I think we all have to do what we are most comfortable with at this point. Things are starting to open back up, and with as much caution as possible, we can start to live a little again.

With Memorial Day just around the corner, it's time to start thinking about our first backyard barbecue of the summer! Even if it's just your family, with no extra guests, you can still make it as delicious as always and ring in the season on a yummy note!

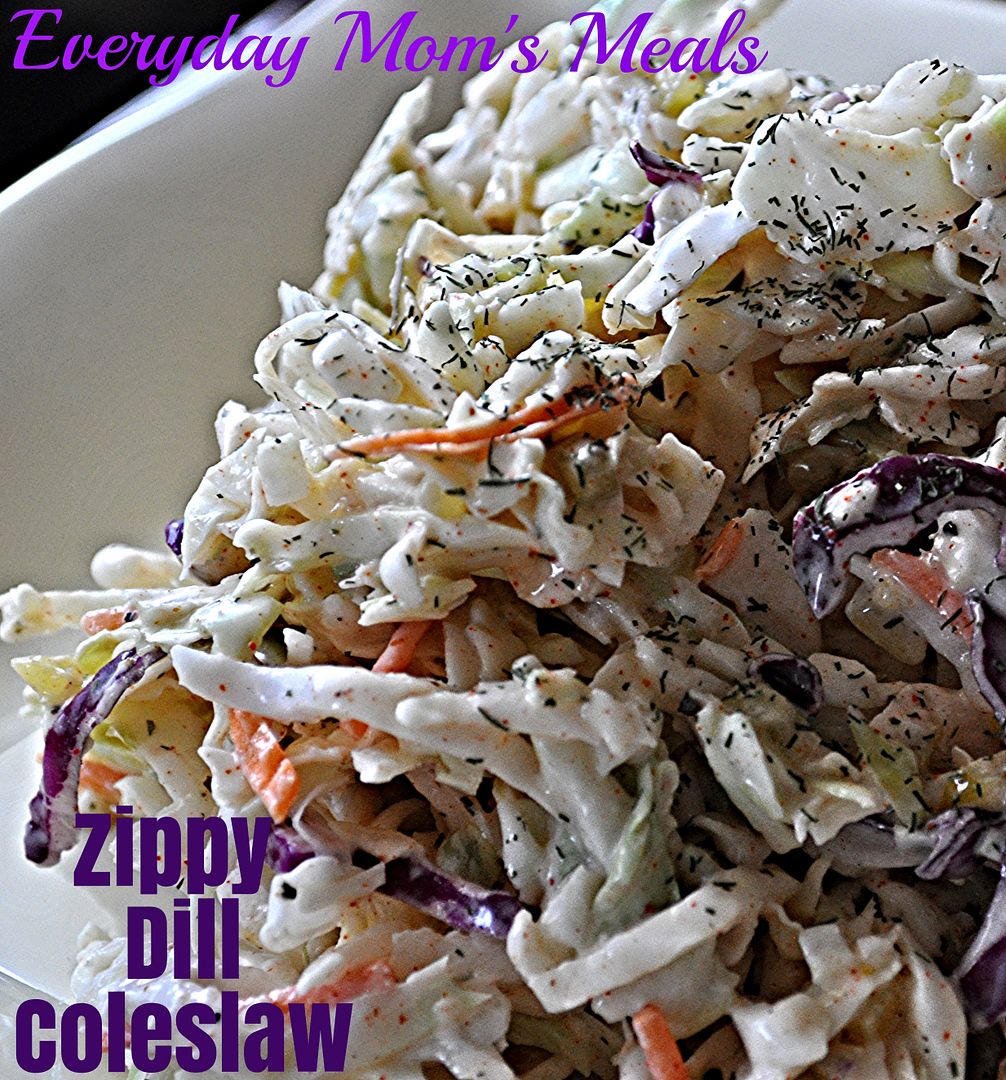
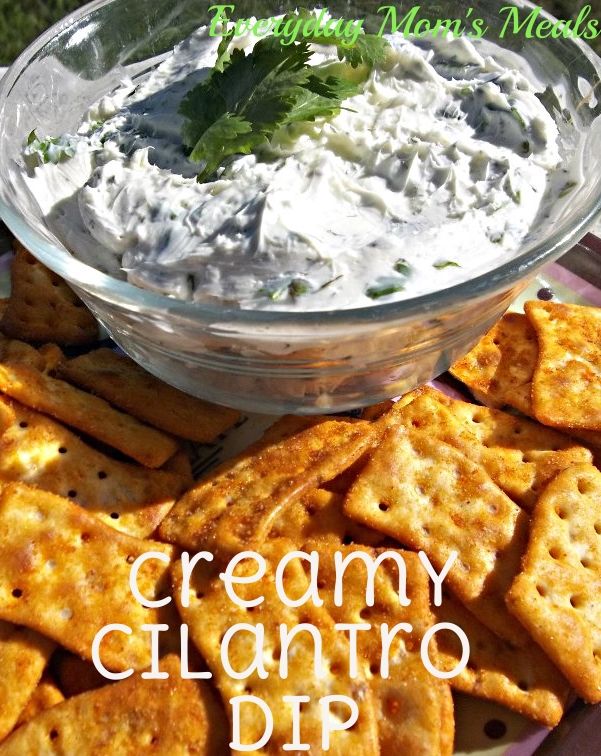
I love a great dip! I will eat it with veggies, crackers, chips..heck, just pass a spoon! Seriously, I am a dip connoisseur from way back, and at any party, you will find me filling my plate multiple times. Add in the fact that I am a dill fanatic, and this is a dream come true!

I've been making this for years, most of the time on a whim because I always have the ingredients on hand! You can easily double or even triple it for a big crowd, but I enjoy the fact I can make a small batch when I'm craving it!

The weather might not feel like summer is on it's way, but I have faith. I am counting the minutes until these chilly temps are gone, the warm sun shines and the thermometer hits 80.

Summer cookout season is one of my favorite things in the world. Grilling, eating on the deck and enjoying great company, big or small is truly one of life's simple pleasures.

Dill Veggie Dip
1 c. sour cream
1 c. mayo
2 TBS dill weed
2 TBS dried minced onion
1 TBS dried parsley, extra for garnish
1 tsp. garlic powder
Salt and pepper to taste

In a medium bowl combine all ingredients and mix well. Chill several hours before serving. Serve with fresh veggies, chips, crackers, etc.  


Shared at Weekend Potluck

Shared at Meal Plan Monday

Wednesday, June 24, 2015

What I Won't Do For Him

When I was a kid, one of my favorite meals was my mom's salmon patties. I used to ask her to make them all the time. Then when Mr. E and I started dating, they became one of his favorites for her to make also. So, it shouldn't be a big deal for me to make them for him now, right??!! I should jump at the chance, right??!! Wrong. Very wrong.

See, some years back, we went to a local seafood restaurant, which shall remain nameless, and I ordered something I knew I would love. Salmon. A nice piece, with a sweet glaze and grilled. Mmmm....yummy. Right? Wrong again. Because by that night, I realized food poisoning wasn't my friend and I was so, so sick.

Now I don't know about you, but once something makes me sick, it takes a very long time for me to allow it back into my mouth again. And sometimes it is simply never welcome back. That was the case with salmon. I was so sick and have such vivid memories of it, even the smell of it can make my tummy not happy, so I've avoided it for years.

But then a couple weeks ago, while making out my meal plan, I asked my hubby what he was hungry for. "Your mom's salmon patties." Really? Seriously? Did you just say that. Well evidently I was feeling generous that day, or maybe he had done something nice for me, I can't remember, because I actually agreed to this.

Thankfully, since it was a different texture, a different flavor and something that actually brought back happy memories of eating it, I did just find. Whew...I'm so happy! I've missed not eating one of mom's best recipes!

These are super simple and come together much quicker than you might think. I like to serve them with a fresh creamy dill dipping sauce and some rice, for a supper filled with good protein!

I am so happy I made it through this meal and now know I can enjoy these once again, just as much as I did when I was a kid. Well, almost...they are never as good as when mom made them!

P.S. Today just happens to be my parents wedding anniversary too. Happy Anniversary, Mom and Dad! We are so blessed to have you as parents and wish you many more blessed years to come!

Mom's Salmon Patties
2 (14.75 oz.) cans salmon, drained and bones removed
1 egg, beaten
1 c. bread crumbs*
1/2 c. finely chopped onion
1 TBS dried parsley
Salt and Pepper to taste
Vegetable Oil for frying
Lemon slices for garnish

Dill Sauce
1/3 c. mayo
1/3 c. sour cream
1 tsp. dried parsley
1 1/2 tsp. dill weed
1 tsp. lemon juice
1 tsp. horseradish
1 TBS minced onion
1/4 tsp. garlic salt
Pepper to taste

Combine all ingredients for dill sauce in a medium bowl. Stir until well mixed. Chill until ready to serve. Place drained salmon in a large bowl. With hands, break up and recheck for bone pieces. Add egg and onion. Add bread crumbs, a little at a time until mixture starts to bind. Add salt, pepper and parsley. Mix well using hands. Using hand, make patties about 1/2" thick. Heat oil until 350 degrees, or medium-high. Fry on both sides until browned. Serve with sauce and lemon on the side. *NOTE* I used about a cup of bread crumbs. You will need to eyeball it to see how much you will need, depending on how wet your salmon is. We like them extra crispy on the outside, because mom always made them that way. If you don't want them quite as brown, fry at 325 and watch very closely.


Friday, April 17, 2015

Spring Break Sandwich Supper

A couple weeks ago, during our spring break from school, I was kind of on vacation too. There was one night when little man was having a sleep over with grandma, another he and I had a date night, and then on Good Friday we had supper at my parents. So...out of 5 days, I only cooked 2. It was kind of amazing. Even we food bloggers need a break from the kitchen now and again.

This happened to be one of the things I actually did make. A new chicken salad. I have quite a few versions of it already, but with the sun shining and the temps almost up to 70, I was really craving something with summer time flavors. And one of the things that screams warm weather to me is cucumbers! They are one of the few things we can actually get to grow in our garden, and I always have an abundance in the crisper drawer during the summer.

This is both simple and sophisticated. It gives you the familiar creamy texture of chicken salad, with some extra crunch from the cuke. If you are planning a bridal or baby shower, serve it up on some cocktail bread, or small rolls. It really tastes like springtime on a plate!

Rather it be for a special occasion, simple sandwich supper or weekend at the lake, this new twist on a classic will be just the answer! 

Cucumber Dill Chicken Salad
2 lbs. boneless chicken thighs
2 TBS olive oil
2 TBS steak seasoning
1/2 c. mayo
1 1/2 tsp. dill weed
1 medium cucumber, peeled, seeded and diced
Salt and Pepper to taste

Preheat oven to 375. Combine chicken, olive oil, steak seasoning, salt and pepper in a medium bowl. Mix well. Let sit at room temperature for 10 minutes. Transfer to baking sheet. Cook for 25-30 minutes until done. Allow to cool for 5 minutes and shred. Add cucumber to chicken. In a small bowl combine mayo and dill weed. Add to chicken mixture and stir well. Chill for 30 minutes before serving. 


Shared on The Country Cook April 17, 2015

Monday, June 16, 2014

Most Kids, But Not Mine {A post for Earth Fare}

Long time readers of this blog know most of my life is inspired by my son. Everything I do somehow comes back to him; and my time in the kitchen is no exception to that rule. Most of you also know that my kid is not a picky eater, whatsoever. I mean, how many other 9 year old boys do you know that will gobble down sushi, fried calamari and frog legs? But even when a kid isn't picky per say, he/she does have things they like and don't like, just like adults. And I believe if he is a great eater 99% of the time, I can respect the small list of things he truly doesn't have a taste for. For my child it just so happens one of his top ones is something most other kids, even the pickiest of eaters, will gobble down...ranch dressing

Yep, that's right. My kid is the one at school, that while the other munchkins are demanding ranch to dip their veggies and chicken nuggets into, is saying "no thank you." I'm not sure where his aversion came from, but it's not going away any time soon. But guess what! I recently tricked him, and he has no idea! 

See, I was making a new pasta salad recipe and it called for a bottle of ranch dressing. Well, I knew my little man well enough to know if he saw it in the grocery cart, or in the fridge, or even on the counter as I was cooking, his radar would go up, and there would be no fooling him. But, if I bought the ingredients to make it from scratch...he would never know! Yeah, I know. It's a little devious, but a mommy's got to do what she's got to do! 

So, for this, my latest post for Earth Fare, I'm happy to share this homemade version of every child's (well, most anyway) favorite condiment. Now, the recipe I'm sharing is the perfect consistency for dip, or if using as a dressing for pasta salad; but if you're looking for something a little thinner to top a salad with, be sure to read the note before. Honestly, I like a thicker ranch for my salad though, so I would probably use it as is. 

If your kid is a ranch fool, you're going to be so happy you logged on today. If yours is like mine, first off, I'm shocked, and secondly, trick him/her...believe me, it works!

Homemade Ranch Dressing
1 c. mayo
1 1/2 c. sour cream
1/2 tsp. dried chives
1/2 tsp. dried parsley
1/2 tsp. dill weed
1/4 tsp. onion powder
1/4 tsp. garlic powder
Salt and Pepper to taste

In a medium bowl, whisk all ingredients together. Chill at least 30 minutes before serving. *NOTE* For a thinner consistency, simply add milk a teaspoon at at time, and adjust seasonings.


Shared on The Country Cook June 20, 2014


Disclaimer: I was provided with a gift card from Earth Fare in exchange for this post. All thoughts and opinions are my own. 

Wednesday, May 28, 2014

Grilling and Campfire Cooking Day 1 {A Review and Giveaway}

I'm back with yet another fantastic Gooseberry Patch cookbook for ya'll! I'm super excited to share this one. One, because it's filled with delicious recipes just in time for summer grilling and camping; and two, because I just so happen to have a couple included in this one! It gives me such great joy to know the great folks at GP love my food enough to include my recipes in their amazing publications! (If you're interested, my Kansas City Pork Chops can be found on page 10 and Mini Parmesan Corn on page 97!!) 


We love to grill. In fact, we enjoy it so much we do so year round. Yep, we're the people who have been known to throw some t-bones on the grill during a blizzard. (True story! Ask our neighbors. They were so jealous!) But I will admit, during the warm, sunny months is when I absolutely enjoy it the most. There is just something about firing up the grill that screams summer to me; and this book is full of tasty recipes to celebrate all things barbecue season. Everything from salads to main dishes to desserts and beverages, it has something for everyone. 

The first recipes I'm sharing is one I know you're just going to love. What says cookout or barbecue more than a creamy, cool, crisp, coleslaw? I have many different versions I make, but the thing that caught my eye about this one right away was the dill

I am a huge dill fan, and any time I can add it to a favorite dish, it just takes it over the top. This is so simple to make and so delicious, I know it will be a great addition to your next backyard get together! Grab the charcoal, or maybe the propane tank, and get grilling all summer long. Oh, and Gooseberry Patch is giving (1) lucky winner a change to bring this book home to your kitchen. Just scroll down below the recipe to enter!  

Snippy Snappy Coleslaw AKA Zippy Dill Coleslaw
Found on Page 173, Contributed by Brenda Mclancon McComb, MS
1/4 c. mayo
1/4 c. sweet pickle relish
2 TBS ranch salad dressing
2 TBS sugar
1 TBS white wine vinegar*
1/2 tsp. dry mustard
1/2 tsp. paprika
1/4 tsp. dill weed, extra for garnish
1 (16 oz.) package 3-color shredded coleslaw mix

In a large bowl, combine all ingredients except coleslaw mix. Whisk until smooth. Add coleslaw mix; stir until well combined. Cover and chill at least one hour before serving. *NOTE* I substituted white distilled vinegar since I have that on hand.


********Giveaway********
Rules:
1. This contest is open to US Residents 18 and older ONLY.

2. The winner will be chosen by Random.org 

3. The winner will be notified by email and Facebook. He/she will have 48 hours to respond or another winner will be chosen. 

4. When leaving comments for entries, they MUST BE SEPARATE ones AND include an email address so it's easy for me to find the winner. If entries are together, it will only count as (1) and if no email, entry will not be considered.

5. If any of the extra entries are items you are already doing, please just remind me!


6. Contest Ends: June 10, 2014

(1) Lucky Winner will receive:
(1) copy of


Mandatory Entry:
1. Leave a comment telling me your favorite grilled meal!

Extra Entry:
1. Become a Gooseberry Patch fan on Facebook. Leave me a comment when you have. 

2.  Follow Gooseberry Patch on Twitter. Leave a comment saying you've done so.


3. Follow Gooseberry Patch on Pinterest. Leave me a comment when you have. 


GOOD LUCK!


Disclaimer: I was given a free cookbook and one to give away to a fan for this review. All thoughts and opinions are my own.


Monday, December 30, 2013

Bitter Cold

Has the deep freeze of winter found it's way to your neck of the woods yet? I can honestly say, it found us in Indiana, and much sooner than what we are normally used to. Sure, we live in the Midwest, and during winter we know it's going to get cold...very cold, but when the wind chill factors are in the negative digits 2 weeks before Christmas, before the first official day of winter, they seem even more harsh to our bodies that are trying to adapt.

We're talking the kind of cold that takes your breath away the second you step out into it. The kind of cold that you feel like you have to squint when you're outside. Not because the sun is too bright...there is no sun...but you're afraid your eyes are going to freeze open! That kind of bone chilling cold is exactly what we were dealing with the day I made this soup.

We love soup, anytime, but no other time more than when we are freezing. When the thermometer can't get above zero, it just makes the soup taste better. It fills you up, thaws you out, and helps your body to feel more human-like again.

Now, if you're like my husband and after reading the recipe ask "Um, where is the protein?", don't worry. You won't miss it! Yep, it's all veggies, of every color you can think of, hanging out to make something so delicious I guarantee you will be making it again and again during these cold winter months. Plus, you can add other veggies, substitute others out, the possibilities are endless!

If you feel like you will never be warm again, think about hot sunny days spend on the warms sands of a beach somewhere. Go to that happy place in your head; and then make this soup!

Slow Cooker Veggie Soup Adapted from Hometown Christmas
3 (14 oz.) cans chicken or vegetable broth
3/4 lb. fresh green beans, trimmed and cut into 1-inch pieces
1 (14 oz.) can diced tomatoes, with juice
2 medium zucchini, diced
2 medium yellow squash, diced
8 small red potatoes, diced
3 medium carrots, diced
1/2 TBS dill weed
1 TBS dried oregano
1 TBS dried parsley
Salt and Pepper to taste
Green Onions, for garnish

Place all ingredients, except green onions in Crock Pot. Stir to combine. Cook on HIGH for 1 hour. Reduce heat and cook on LOW for 6 more hours. Garnish with green onions before serving.


Soup at Very Good Recipes

Wednesday, August 28, 2013

A Hand In The Kitchen Part 2 {A Review of Cooking Planit}

Monday I introduced you to my new favorite assistant in the kitchen, Cooking Planit! Their site and their app are a home cook's best friend. (If you missed Monday's post, click here to read all about it!)

Today I'm sharing a delicious sandwich that if it weren't for the step by step instructions provided by Cooking Planit, might seem a little over whelming to an inexperienced cook. Or heck, even one like me who spends a lot of time in the kitchen! But I promise you, it's very simple, and the end result is very worth it.

Now, just like the Bowtie Pasta Salad I shared the other day, I made a few adjustments to this recipe to better suit our taste buds. To see the original, click here. One of the things that caught my eye about this sandwich was the avocado mayo...but then I remembered Mr. Everyday does not care for avocados in the same loving way I do, so I decided to substitute my herb mayo that I've been making for years.

Also, while I love arugula, I was already buying the spinach for the pasta salad, so I thought why not get double duty out of it, and include it as the green in the sandwich instead. That's just my budget conscious self shining through. I think the arugula would be 100% yummy too.

But without a doubt, the star of this sandwich, and the one thing I knew I could not mess with, is the Pickled Red Onions. Talk about taking a simple ingredient and with almost no effort transforming it into something new, unique and delicious! Once you make them, you will find a hundred more ways to use them, I know it!

A simple sandwich supper is always welcome in this house. If it is in yours too, try this one tonight, and maybe that scrumptious pasta salad too. Oh, and don't forget to check out Cooking Planit, and scroll down for the fabulous giveaway they are offering EMM readers too!

Roast Chicken Sandwich with Pickled Red Onions and Herb Mayo Adapted from Cooking Planit
1 (1.25 lb.) package chicken tenders
1/2 tsp. garlic powder
1/2 tsp. onion powder
1 TBS olive oil
1 c. baby spinach, stems removed
1 small cucumber, peeled and thinly sliced
Salt and Pepper to taste
4 Hoagie buns

Preheat oven to 375. Place chicken on baking sheet. Drizzle with olive oil. Sprinkle with garlic powder, onion, powder, salt and pepper. Stir to coat. Roast for 20-30 minutes until cooked through. Spread each bun with herb mayo. Layer spinach, cucumber and chicken. Top with pickled onions.

Pickled Red Onions:
1 medium red onion, thinly sliced
1 c. apple cider vinegar
1 tsp. mustard seed
1 dried bay leaf
1 tsp. salt
3 black peppercorns
2 TBS sugar

Fill a small saucepan 2/3 with water. Bring to a boil. Cook onions for 1 minute to soften. Drain. In the same pot, combine vinegar, mustard seed, bay leaf, salt, peppercorns and sugar. Stir well. Bring to a boil. Cook onions for 8-10 minutes until pink in color. Drain and reserve.

Herb Mayo:
1/2 c. mayo
1 tsp. dried basil
1 tsp. dried oregano
1 tsp. dill weed
1/2 tsp. dried parsley

Mix all ingredients well and chill until ready to use.


Shared on The Country Cook Aug. 30, 2013
Sandwich at Very Good Recipes


a Rafflecopter giveaway

Monday, March 11, 2013

Old Family Favorite

I have shared my extreme love for casseroles many times. But what makes that love grow even more is when a casserole takes a dish that I already love but makes it easier and quicker because it's in one dish. A good example of this is my Unstuffed Pepper Casserole...stuffed peppers aren't difficult, but sometimes they can be a little time consuming for a weeknight, so putting the ingredients together in a casserole form gives you the flavors you love with the ease you need. And today's recipe is another perfect example of this same idea. 

I've been making this since Alex was just a baby, which is essential to why I started making it in the first place. I was a stay at home mom with an infant, and some days I was lucky to get a shower, let alone slaving away in the kitchen all day. So when I got it in my head I wanted to try my hand at Cabbage Rolls, I began researching the Internet and my pile of food magazines looking for a good recipe. Well, what I discovered was they are another recipe that can sometimes need a little extra time; and to be honest, I just didn't have it to give, so the idea got tabled. But then not too long later, I found this! The description even said "Do you love cabbage rolls, but don't have time? Then this casserole is perfect for you!" It was like someone read my mind! This quickly became a "go-to" meal for me that my boys love. It's something I can make after a long day and feel good about giving my family to fill them up and satisfy them. Plus, it makes great leftovers for lunch the next day too!

If you love cabbage rolls, or have been wanting to try them, but simply don't have the time (Or let's face it, the energy) take my lead and try this instead! You won't be disappointed!


Cabbage Roll Casserole 
1 lb. ground beef
1 small head cabbage, chopped
1 medium onion, chopped
2 cloves garlic, minced
1 (15 oz.) can tomato sauce
8 oz. shredded mozzarella cheese
1/2 tsp. dried thyme
1/4 tsp. dried sage
1/4 tsp. dill weed
1 c. cooked brown rice
Salt and Pepper to taste

Preheat oven to 375. Grease a 9x13 pan. Sauté beef, onion and garlic over medium heat. Drain fat if necessary. Stir in 1/2 tomato sauce and seasonings. Bring to a boil. Reduce heat, cover and simmer for 5 minutes. Stir in rice and heat through. Remove from heat.

Layer 1/3 of cabbage pan. Top w/ 1/2 meat mixture. Repeat layers. Top w/ rest of cabbage and tomato sauce. Cover w/ foil and bake for 45 minutes. Uncover and top w/ cheese. Bake 10 more minutes.


Adapted from Taste of Home

Thursday, January 3, 2013

Really?

I have had this dish a thousand times. I always get so happy when I see it at graduation parties, bridal or baby showers, and wedding receptions. But honest to goodness, I had never made it until this week. And even more so, I had no idea how easy and truly uncomplicated it was! I think because it was something I enjoyed long before I became more proficient in the kitchen, it was filed in my brain under "Eat only when others prepare." This can be made with so many different veggies, you can truly make it your own but adding and subtracting those you enjoy the most. And to be honest, appetizer or not, I can totally eat this as a light lunch! In fact I went to a baby shower/luncheon recently where the entire meal was planned around this dish, making it the "main staple" of the meal; and it worked perfectly! It's also a fantastic make ahead dish too. I actually prepared the crust earlier in the day, and after cooling, covered it and set it on the counter top until I was ready to finish. Plus, you can make the sauce, and chop the veggies ahead of time too, so when your party guests are arriving, it's simply assemble and eat. I'm so happy I finally made this for myself, because I guarantee I will be many, many, many more times in the future!

Veggie Pizza
2 (8 count) cans crescent rolls
8 oz. whipped cream cheese
1/2 c. sour cream
2 tsp dill weed
1/8 tsp garlic powder
Salt and Pepper to taste
1 small cucumber, peeled and diced
1 small head of broccoli, florets chopped
2 small carrots, peeled and thinly sliced
1 medium green pepper, seeded and diced

Preheat oven to 375. Remove crescent rolls and separate into rectangles. Place on ungreased 15x10 baking sheet and using your fingers, push together seams up sides and edges forming crust. Bake for 13-17 minutes until golden brown. Set aside to cool for 30 minutes. In a medium bowl combine cream cheese, sour cream, dill, garlic powder, salt and pepper. Stir well to combine. Chill until ready to use. When crust is cool, spread evenly with cream cheese sauce. Top with chopped veggies. Place in refrigerator for 1 hour before serving. Cut into small squares to serve.


Shared on Miz Helen's Country Cottage Jan. 3, 2013
Shared on The Country Cook Jan. 4, 2013

Wednesday, December 26, 2012

A Penzey's Treat

Have you ever heard of Penzey's Spices? To be completely honest I never had until a few years ago when my dear friend was raving about them to me. She swears by all of those herbs, spices, spice mixes...all of their products. While I was very intrigued, I was never able to try them for myself, until now! Why? Because she is such a sweetheart she treated me to a few of their things for Christmas! It was the perfect gift for a foodie, and I was so excited to start experimenting. The first one I wanted to try was the Shallot Pepper Seasoning. A pepper based seasoning with the flavors of shallots and tarragon, it was listed as being great on fish among other things. So it got me thinking about what I could do with fish seasoned with it. I've been wanting to try my hand at fish tacos for a while now, and this was the perfect opportunity. If you are a lime lover, you will love these too because it's in the fish and the sauce! These are light, yet bursting with flavor and the crunch of the cabbage marries so well with the fish. They remind me of something I would eat in New Smyrna Beach, FL every summer when we vacation, but I can enjoy them in my warm kitchen watching the snow flakes fall in the middle of an Indian winter! Thank you my dear friend for treating me to such a wonderful, thoughtful, and absolutely delicious gift!


Fish Tacos with Lime Caper Sauce
1 lb. cod fillets
Olive Oil
1 tsp. lime zest
1 tsp. Shallot Pepper Seasoning
Salt to taste
1/2 c. Plain Greek Yogurt
1/2 c. mayo
1 TBS capers, finely chopped
1/2 tsp. oregano
1/2 tsp. dill weed
1 lime, juiced
1 (12 oz) package coleslaw mix
Flour Tortillas


In a medium bowl combine fish, olive oil, lime zest and Shallot Pepper seasoning. Allow to marinade at room temperature for 30 minutes. In a small bowl combine yogurt, mayo, capers, oregano, dill weed and lime juice. Stir well. Chill until ready to use. In a large skillet cook fish, about 4 minutes per side until meat flakes with a fork. Remove and chop into bite sized pieces. Place about 1/4 c. fish into each tortilla. Top with cabbage mix and caper sauce.


Pin It


Disclaimer: This is NOT a paid post, and not endorsed by Penzey's at all. All thoughts and opinions are my own. 

Monday, October 15, 2012

Cracker Cool Down

When it comes to spicy food, I am a complete wimp, and I fully admit that. I can stand a little heat, and enjoy a tad spice, but unlike my husband, I do not think good food should be eaten with tears running down my face. Yep, he's the guy who will order the hottest wings, or add the hottest hot sauce he can find to a burrito. He eats jalapenos raw and doesn't flinch. And now we've discovered he has passed the "spice gene" onto Monkey. With each passing year, little man has become more and more adventurous with spice and working towards higher tolerance levels. He's to the point that he can eat the hottest salsa at one of our favorite Mexican restaurants, and let me tell you, he thinks he's pretty "hot stuff" when he does. (Pun intended!) So when I first saw Pepperidge Farm new cracker, Jingos!, in the flavor Lime and Sweet Chili, I thought maybe all 3 of us would like them. I've told you before how they also love lime, so I figured it with some spice would be perfect. And with the "sweet" I figured I could handle them too. Well, I was right...kind of. They are delicious, and the boys do love the flavor, I do too, and I can take the heat level, for awhile. But after about a handful, my tongue is a little warm and ready for a cool down. So I figured a cool, creamy dip would be perfect for these crackers with a bite. With the bright flavor of cilantro it tastes fresh while cooling you down. Let's face it, I will pretty much find any reason to make and eat another dip! This would be great with any chip or cracker, spicy or not!

Creamy Cilantro Dip
1 (8oz) tub whipped cream cheese, at room temperature
1/3 cup cilantro, finely chopped
2 garlic cloves, grated
2 tsp dill weed
Salt and Pepper to taste

In a medium bowl combine all ingredients. Stir well to combine. Chill for at least an hour.


Shared on Make Ahead Meals Oct. 15, 2012
Shared on Mandy's Recipe Box Oct. 16, 2012
Shared on Lady Behind The Curtain Oct. 17, 2012
Shared on The Country Cook Oct. 19, 2012


Disclaimer: This is NOT a paid post. All thoughts and opinions are mine and not endorsed by Pepperidge Farm.

Cilantro at Very Good Recipes

Friday, October 5, 2012

A Kid At The Deli Counter

When I was a little girl one of the highlights of the week was going to the grocery store with my mom. And this was before we had a Walmart, Meijer or Kroger close to our house, so it was a food only trip. And one of the reasons I loved going with her was because it usually meant a treat for me! Believe it or not, one of the most special treats she used to get me was the Seafood Salad from the deli counter. It was something I only got once in awhile, as to not blow the grocery budget, and each time I loved it more and more. I would sit down with the container and a fork and for me it was a meal! I still remember feeling so fancy and grown up every time she would get it for  me. Well, this summer when we were at friends for a cookout, there was seafood salad sitting on the buffet. Now while I have had it many times since those childhood treats, this was the exact same! It tasted just like it did back them; and I asked our host for the recipe. Here to find out, he had gotten at the deli counter...at the same grocery store from when I was little! Coincidence? I think not! It's nice to know some things really do stay the same, or maybe just a little better with time. I came home, researched the recipe and discovered an ingredient I would have never guess was in it, but explained that "mmmm what is this" reaction my tongue had for all these years. This makes a great snack, appetizer or even a meal. Serve it with some crackers and you have a light lunch or even a nice supper for a busy night. I'm so thankful for those grocery store trips with my mom. Not only were they yummy, but look at what my early introduction into food turned into!

Seafood Salad 
2 (8oz) packages imitation crab, chunk style
1/2 c. mayo
2 celery hearts, finely diced
3 green onions, finely chopped
1 tsp dill weed
1 TBS lemon juice
1 1/2 tsp horseradish
Salt and Pepper to taste
Dried parsley for garnish

In a medium bowl using a fork, slightly break up crab meat. Add mayo, celery, green onions, dill weed, lemon juice, horseradish, salt and pepper. Stir well to combine. Chill until serving. Garnish with parsley. Serve with crackers.


Shared on The Country Cook Oct. 5, 2012
Shared on Make Ahead Meals Oct. 8, 2012
Shared on Mandy's Recipe Box Oct. 9, 2012


Tuesday, August 21, 2012

Veggies and Kids

I can't tell you how many moms out there ask me weekly "How can I get my kids to eat more vegetables." As I've told you before I try to help and give as many ideas as I can, but I'm the luckiest mom in the world when it comes to my son eating his vegetables, and eating habits in general. Monkey has never met a veggie he doesn't like, and that leaves me wide open to serve them anyway I can as often as I can. But I sympathize with the moms out there that have a nightly battle getting their little ones to eat their vegetables. So when I was lucky enough to enjoy the bounty from someone else's garden in the form of a huge zucchini, I was totally inspired to attempt to help those of you who need as many ways to get anything green you can into your child's stomach! How about some zucchini fries? And better yet, oven baked zucchini fries? And since kids can not resist anything you can "dip", some homemade ranch on the side? These remind me the fried veggies you can get at any street festival or county fair but better for you, and the kids, because the are baked not fried. I will admit I don't have that many recipes that use zucchini either, so I'm excited to have another one. If your kids turn their noses up at anything green, trick them with a new kind of fry. After all, tricking them is just another form of creative parenting!

Baked Zucchini Fries
1 large or 3 medium zucchini
1/4 c. flour
2 eggs, beaten
2 c. panko bread crumbs
Cooking spray
Sea Salt

Ranch Dip
1 c. mayo
1/2 c. sour cream
1/2 tsp dill weed
1/2 tsp parsley flakes
1/2 tsp garlic powder
1/2 tsp onion powder
Salt and Pepper to taste

To make dip mix all ingredients together and chill until serving. Preheat oven to 425. Line a baking sheet with aluminum foil and spray with cooking spray. Slice zucchini in half lengthwise. (The easiest way is to cut off each end, stand it up and slice down.) Cut each half into 1/4 inch "planks" and then each plank into 4-5 slices to make "fry" shapes. Place zucchini fries in large plastic bag. Add flours and shake. Dip each fry into the egg and then breadcrumbs. Place on cooking sheet and spray lightly with cooking spray. Bake for 12 minutes. Flip and continue baking for 12 minutes more. Turn broiler on and broil until golden brown, about 5-7 minutes. Be careful--they will burn easily! Season with sea salt. Serve with ranch dip.

 ~Join me for Tasty Tuesday on Formula Mom~


Shared on Mandy's Recipe Box Aug. 21, 2012
Shared on Lady Behind The Curtain Aug. 22, 2012 
Shared on Miz Helen's Country Cottage Aug. 23, 2012 
Shared on The Country Cook Aug. 24, 2012

Thursday, August 9, 2012

Simple Reasons

Many EMM fans ask me weekly how I come up with my meal plans, and/or new recipes. As I've said before, there are so many different things I consider when planning our menu, and many different sources to for inspiration. And sometimes, the most simple of reasons can lead to a yummy meal that I then get to share with you. This sandwich came to be simply because I had a coupon I wanted to take advantage of and save some money on our grocery bill. Now I'm not being critical when I say this, but frozen fish products aren't something I buy a lot of. Yes, every once in a while Alex will pick fish sticks for supper, and I will appease him, but for the most they are not on the top of our "must eat" list. However, I had a coupon for the frozen fillets, and since we have eaten them before and they weren't too bad, I figured I could save some cash, and use them in a yummy fish sandwich. Since I was using a pre-cooked product, I wanted to add something fresh, so I figured a homemade tartar sauce would be quick, and make them extra special. These make a nice weeknight meal, especially when you want to take a little extra help from the store. Sometimes the most simple reasoning leads to great things!

Fish Sandwiches with Dill Tartar Sauce
4 frozen battered fish fillets
4 lettuce leaves, washed and trimmed
4 slices tomato
4 hamburger buns

Sauce:
1/2 c. mayo
1/4 c. dill relish, drained well
3/4 tsp. dill weed
1/8 tsp. celery seed
1/4 tsp. Worcestershire
1 TBS lemon juice
Salt and Pepper to taste

Bake fish fillets according to box directions. Mine were at 425 for 25 minutes. In a small bowl combine ingredients for sauce. Chill until ready to use. When fish is cooked, pat any excess grease off with a paper towel. Spread tartar sauce on both sides of bun. Place lettuce leaf on bottom (acts as a nice guard to moisture) fish fillet, then tomato. Serve w/ lemon wedges if desired.

Makes 4 Sandwiches

Shared on Miz Helen's Country Cottage Aug. 9, 2012 
Shared on The Country Cook Aug. 10, 2012 
Shared on Lemon Sugar Aug. 11, 2012

Fish at Very Good Recipes
Pin It

Monday, July 16, 2012

Cracker Inspiration

I know I can't be the only person this has ever happened to. You take a bite of something new and you immediately think "I have to eat this as much as possible and find as many ways to use it as I can." That is how foods become obsessions! This is exactly what I experienced a couple weeks ago when I bit into the newest flavor of Triscuit crackers~ Dill, Sea Salt and Olive Oil. If you love dill, these are the crackers for you. They are bursting with dill flavor! You can actually see it baked right into the cracker. It was love at first taste for me. And while I was looking at the box I saw a couple suggestions for ways to use them in appetizers. Well, that makes sense b/c I already use them in an appetizer I shared with you at Thanksgiving time, Turkey Bites, that were instantly a favorite in this house. So I immediately started to plan how I could use these ones too. I can always use new appetizer ideas, especially when they involve something like a cracker b/c it makes them so easy to put together, even at the last minute! Calling all fellow dill lovers, you've got to see these!

Dill Cucumber Bites
Triscuit Crackers~ Dill, Sea Salt and Olive Oil
1 medium cucumber, only peel 1 strip from each side, leaving rest of skin
Chive Cream Cheese, softened
Dill Weed

Slice cucumber very thin. Spread cream cheese onto crackers. Place1 cucumber on each cracker. Sprinkle with dill weed. Chill until serving.


Shared on Make Ahead Meals July 16, 2012
Shared on Bobbi's Kozy Kitchen July 16, 2012 
Shared on Mandy's Recipe Box July 17, 2012 
Shared on Lady Behind The Curtain July 18, 2012 
Shared on The Country Cook July 21, 2012 
Shared on Gooseberry Patch July 25, 2012
Appetizers at Very Good Recipes
Pin It