Everyday Mom's Meals: Earth Fare
_____
Showing posts with label Earth Fare. Show all posts

Friday, October 16, 2015

Just Around The Corner {A Post for Earth Fare}

I'm going to go out on a limb here and say most of you haven't even though about your Thanksgiving menu. Of course not. We are just now creeping up on Halloween, and you've got candy and caramel apples on the brain. I get that. I really do. 

But see, as a food blogger, it's my job to think ahead like that. I've got a few Halloween themed posts under my belt, so now my brain moves on to the next "big" thing on the calendar, and here in the U.S. that is most definitely Turkey Day. And truthfully, it really is only a little over a month away, so with the way time sees to fly, we will blink and it will be here.

This recipe didn't even start out as something I would be featuring as an idea for your Thanksgiving holiday meal. I was simply cooking some squash for us to have as a side dish on a random Tuesday night. But then I started thinking. What if I could cook it in new way, and be able to utilize one of my favorite "big holiday meal" tips? Those two ideas came together and this genius dish was born.

While I usually am not the one in charge of our elaborate holiday meals, due to having family so close, I am done it before, so that means I do have some tricks up my sleeve. And one that I share each year is to free up oven/stove space as much as you can. If you can find a way to cook something you traditionally would be doing in the oven, or on the stove, either in your slow cooker, or maybe even head of time, DO IT! You will be so happy you did when your work level, and stress level, the day of is reduced! 

Such was the case with my squash. I also roast it in the oven, remove it, scoop it out, (while trying not to burn my skin off) season it, and serve it. But not this time! This time, it spent some time in my slow cooker, and then I could handle them cool, and reheat at meal time. 

Translated, this would make a terrific dish for your holiday meal! Make it the day of, or even a couple days before. If you've go some traveling to do, make it at your house, but take it scooped and seasoned with you. Using the slow cooker really gives you so many more options, all while the same flavors you love!

Slow Cooker Acorn Squash
2 medium acorn squash, halved and seeded
2 TBS butter, cut in half
2 TBS packed brown sugar
Salt and Pepper to taste

Place squash in slow cooker, stacking if necessary. Put 1/2 TBS butter and 1/2 TBS brown sugar in each. Sprinkle with salt and pepper. Add a splash of water to bottom, around squash. Just enough to cover bottom of cooker. Cook on HIGH for 3 hours. Take lid off, and allow to cool to handle. Scoop out flesh, add more butter, salt and pepper. Reheat when ready to eat. 


Shared at Weekend Potluck


Disclaimer: I received at gift card in exchange for this post. The recipe and all thoughts are my own. 

Monday, September 14, 2015

Classic Cut in Half {A Post for Earth Fare}

I love meatloaf. Wait, let me start over. I love my mom's meatloaf. It is the best, and one of my favorite things on the face of the Earth. (Really only topped by her Beef n Noodles.)

For a long time, I could never make it to the level of perfection she does, but I finally mastered it, thank goodness. (But it still always tastes better when she makes it!) It is a favorite of my husband and son as well, so it shows up on our dinner table as much as possible.

Unfortunately though, it hasn't been able to make an appearance in a while. Why? Because of our crazy schedule! We are so busy there are days I don't know if I am coming or going; and days like that don't lend themselves to the time I need to give mom's perfect recipe the attention it deserves.

However, now I can take that recipe and cut the time by over half and have the flavor I adore in an even easier meal! Kids will love these, they are just their size! I think they would be fantastic at a party too, or even tailgating at the big game!

Nothing will ever take the place of mom's meatloaf in my heart. The original will always be the best, but at least this way I can enjoy it more often in today's busy world!

Meatloaf Muffins
2 lbs. ground beef
2 eggs, beaten
1 medium white onion, finely minced
1 cup. bread crumbs*
Salt and Pepper to taste
1/4 c. ketchup
Dried Parsley for garnish

Preheat oven to 350. Spray a muffin tin with nonstick spray. In a large bowl combine beef, eggs, bread crumbs, onion, salt and pepper. Using hands, combine well. Fill each well of muffin tin to top with a meat ball. Press down a little to obtain muffin shape. Place ketchup in plastic bag. Snip one edge. Pipe ketchup on top of muffins. Bake for 25 minutes. Increase heat to 400. Bake 10-15 minutes more until internal temp reaches 165. Let sit 2 minutes before removing. Garnish with parsley. *NOTE* If mixture doesn't seem to be coming together with 1 cup breadcrumbs, feel free to add more. It will depend on the moisture level of your mix. 


Shared at Weekend Potluck


Disclaimer: I received a gift card in exchange for this post. All thoughts, opinions and the recipe are all mine.

Friday, June 19, 2015

Too Hot To Cook { A Post For Earth Fare}

So lately I've become a little obsessed with eating things I can serve in lettuce. Call them boats, call them cups, call them wraps...however you describe them, I've been on a total kick lately.

It's the weather, I know it is. Sure, I love the healthier aspect of it, like swapping out shells for Romain leaves in my Taco Boats, but deep down I know the soaring temps are what is leading me back to this idea again and again. Light, flavorful meals we can eat later in the evening and not feel like we are going to bed with a brick in our stomachs.

Take that idea and combine it with another warm weather classic, chicken salad, and you have a party on a plate! For this one I wanted more of a mustard flavor than mayo to give it extra tang. The added grapes are like a little burst of freshness in every bite.

I served these with some crusty bread and fresh fruit on the side for a simple supper; but they would be perfect for a poolside or lake party too. Simply put out a big bowl of the chicken salad, and a platter with the lettuce leaves separated, so your guests can fill their own!

Summer time means lighter meals for us. Salads, fresh fruit, veggies, sandwiches...and apparently anything and everything I can find to stick inside a lettuce leaf!

Dijon Chicken Salad Cups
2 lbs. boneless chicken tenders
3 ribs celery, diced
1 c. seedless red grapes, halved
1/4 c. mayo
1/4 c. Dijon mustard
1 TBS lemon juice
1 TBS dried parsley
1/3 c. sliced almonds, reserve a few for garnish
1 head bibb lettuce
Garlic Powder, to taste
Salt and Pepper to taste 
Olive Oil

Preheat oven to 375. Drizzle chicken liberally with olive oil, and season with garlic powder, salt and pepper. Roast for 30-40 minutes until cooked. Allow to cool for a few minutes and then shred. Allow to finish cooling. In a small bowl combine mayo, mustard, lemon juice, parsley, salt and pepper. Mix to combine. In a large bowl combine cooled, shredded chicken, grapes, celery and almonds. Toss to combine. Add dressing. Stir well. Chill for at least an hour. When ready, fill leaves of lettuce with chicken salad. Sprinkle with extra almonds. *NOTE* In my store, the bibb lettuce is also marked "living lettuce" and has the roots still attached. Any lettuce will work, I just like the shapes of these leaves the best.


Friday, March 20, 2015

A Re-Do From Mom {A Post for Earth Fare}

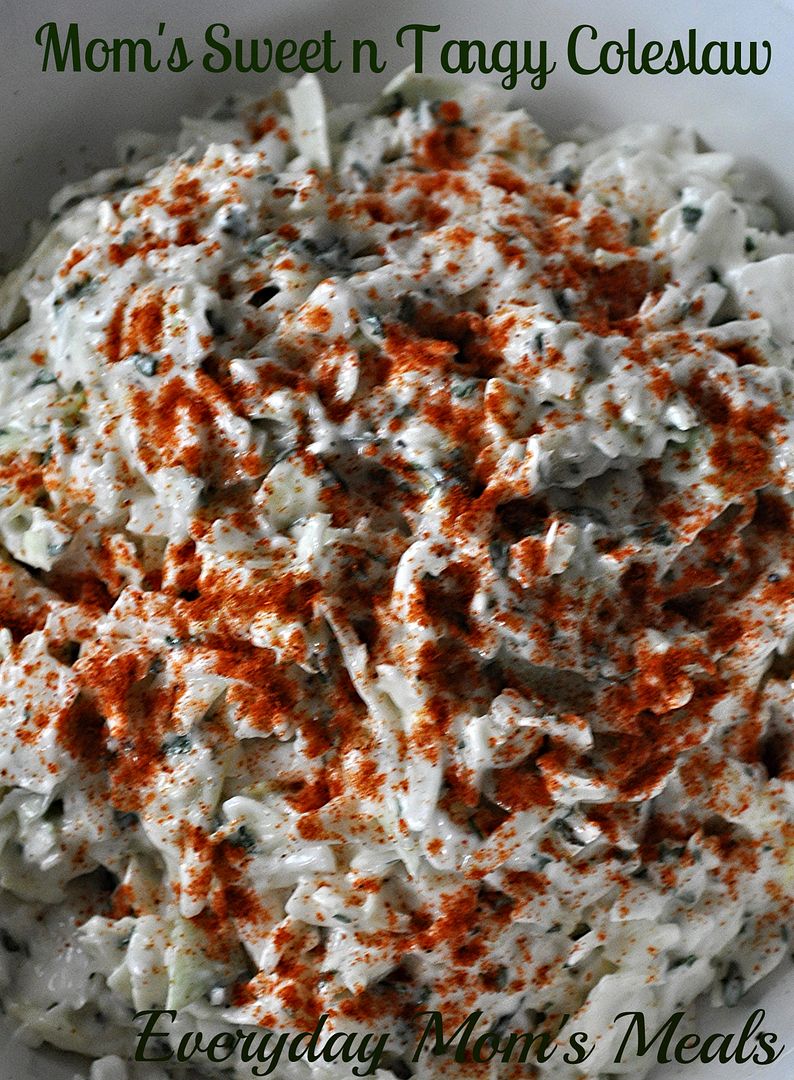
I first shared this recipe a few years back, and have been wanting to "re-do" it ever since. The picture wasn't pretty at all, and it is so incredibly yummy, it deserved better!

Since today is the first official day of spring, I thought it would be the perfect time to debut it once again. After all, if spring is here, that means grilling season is within reach and barbecues and picnics aren't far behind.

This is mom's recipe, but before it was hers, it was grandma's. No wonder it is so good! Tried and true for three generations, you can't argue with success like that! In our family, no picnic is complete without it, and it doesn't stop there. I have requested this for so many birthday suppers, I've lot count. Even when I was a kid, I wanted mom to make it, in the dead of February, every single year.

This is probably the easiest coleslaw recipe I have, and any time anyone asks for it and tries it, they become instant fans too. Creamy, cool, crunchy, sweet, tangy...it goes with everything from burgers to steak, ribs to hot dogs.

Summer grilling season is just around the corner. After a long horrendous winter, I am so ready! But I'll be honest, I'm not even waiting until summer. It's above freezing which means the grill is getting fired up ASAP! 

Mom's Sweet n Tangy Coleslaw
1 small head cabbage shredded, or 1 (10 oz.) bag pre-shredded cabbage
3/4 c. whipped salad dressing
1 tsp. sugar
1 1/2 tsp. apple cider vinegar
1 TBS dried parsley
Salt and Pepper to taste
Paprika for garnish

In a small bowl mix salad dressing, sugar, vinegar, parsley, salt and pepper. Stir until well combined. Pour over cabbage.  Mix well to combine Sprinkle with paprika. Chill until ready to serve. *NOTE* You are more than welcome to use mayo in place of the salad dressing, but mom never has. I have no idea how it will taste. 


Shared on The Country Cook Mar. 20, 2015

Friday, November 21, 2014

Day After Bite {A Post For Earth Fare}

 Less than a week people. That's right, by this time next week all the menu planning, eating and football watching will be over. And we will have moved onto all those leftovers and tree trimming! 

Today I've got a great idea you can either serve before the big Thanksgiving meal, or wait and put some of those leftovers to good use with. 

Let's face it, while we all look forward to the huge Turkey Day meal, the entire day is really about eating, and even when dinner isn't served until 3 pm, you find yourself looking for things to snack on all day long. You're sitting on the couch, watching football, or the Macy's Parade, and you just have to have something to munch on. It's just part of the Thanksgiving aura. 

The first time I made these years ago, I wasn't sure about the flavor combo because of the addition of the cheese (after all, turkey and cranberry are a no brainer together) but they are like the perfect bite every time you put one in your mouth. 

If you need some ideas for the pre-feast snacks, let this be the first on the list. Or you know you will be in desperate need of ways to use the pounds of turkey you have left come Black Friday, this is the answer to either!

Cranberry Turkey Bites
Snack Crackers
Deli Turkey or Leftover Roast Turkey, sliced thin
Whole Cranberry Sauce
Sharp Cheddar Cheese, sliced tin to fit crackers

Lay cheese on crackers. Top with turkey and cranberry sauce. Serve immediately. 


Shared on The Country Cook Nov. 21, 2014

Cranberry at Very Good Recipes

Disclaimer: I received a gift card in exchange for this post. All thoughts and opinions are my own. 

Wednesday, October 15, 2014

A New Twist On An Autumn Classic {A Post for Earth Fare}

It's that time once again. Time for me to head into my local Earth Fare store and find inspiration for a yummy recipe to share with all of you; and this time around, I was looking for something to celebrate the season. 

We love squash. Year round. We will eat it any time, any way we can get it. In fact, my son has loved squash since before he could say "squash". It was his favorite baby food, and I always had to make sure we had plenty of jars on hand because he always wanted more and more! 

We love squash so much, I have many different ways I cook it, and I'm constantly trying to come up with new ones. This time I used inspiration from another autumn classic...apple cider! Is there anything better on a chilly fall day than a big mug full of warm spiced cider, ladled from a big pot on the stove or even the slow cooker? I think not. It's my favorite warm drink this time of year, so why not combine it with a loved fall veggie? 

This is simple enough for a weeknight meal, but honestly, I immediately started thinking Thanksgiving when I smelled the amazing scents coming from the kitchen. So, you might want to keep it in mind for later use as well. 

If you love squash as much as we do, or you're just looking for something to add to your menu that screams "autumn", this is what you've been waiting for, and I hope you enjoy every delicious bite!

Cider Spiced Acorn Squash
2 acorn squash- halved and seeds cleaned out
1/2 c. apple cider
1/4 c. packed brown sugar
1/8 tsp. cinnamon
1/8 tsp. ground nutmeg
Salt and Pepper to taste

Preheat oven to 350. Place squash, cut side up in a 9 x 13 baking dish. Season the squash with salt and pepper. Pour cider down over evenly. In a small bowl mix brown sugar, cinnamon and nutmeg. Sprinkle over squash. *The size of your squash is going to determine cooking time* If they are small, they should be done in about 45 minutes. As you can see, mine were huge and took about 90 minutes. Just check periodically to see if fork tender. To serve, give each person a half, and spoon some of the juice from the bottom of the baking dish down over the top. This way, with each spoonful, they get all the flavors. Or, if feeding a large crowd, scoop out the flesh and mix with a bit of the pan juices. Either serve, or save and reheat. I like to add a little butter to mine as well.


Shared on The Country Cook Oct. 17, 2014


Disclaimer: I received a gift card in exchange for this post. All thoughts and opinions are my own. 

Friday, August 1, 2014

A Re-Do Courtesy of Earth Fare

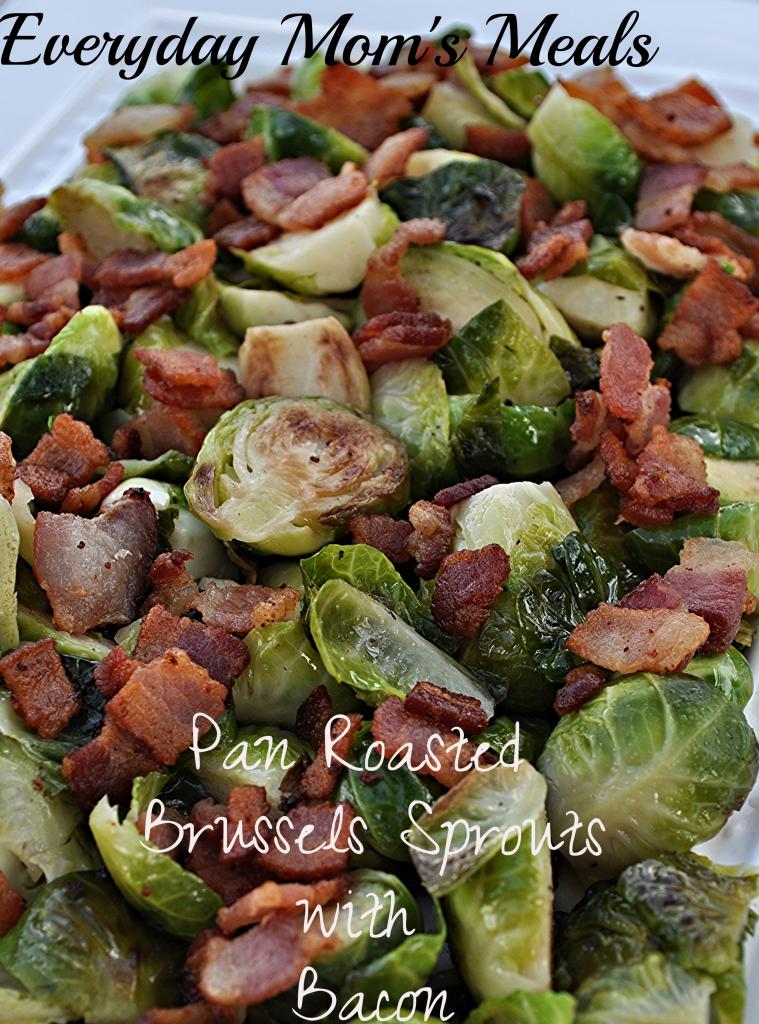
I have been wanting to bring this recipe back to the blog for months now. And thanks to my good friends at Earth Fare, the time is finally here. See, I was wandering their aisles a few weeks back, trying to decide what my next post for them would be, when I stumbled upon the most gorgeous fresh Brussels Sprouts. I couldn't resist, and I knew it was time for this re-do to happen. 

If you think you don't like Brussels Sprouts, I'm here to change your mind. This recipe is going to change all that. How? Well, let's see. First off, these aren't your mama's sprouts that are frozen, and then boiled until they are basically dead with no color and/or flavor left. Secondly, we're adding bacon; and let's face it, you could add bacon to a piece of shoe leather and most people would eat it! 

I'm not kidding when I say if you think you hate Brussels Sprouts, I bet money you will love these. If you can't get your kids to even try them, these will change your life. They taste nothing like the sprouts of old. They get almost a nutty flavor from browning, are a little crisp on the outside and tender inside. Roasting in the chicken broth allows the flavor to become deep and taste like something that has cooked a lot longer. Then top them off with crispy bacon and you have a winner! 

Plus, if you have never cooked with fresh sprouts, I highly encourage you to. They are a totally different experience than frozen ones. They are right there in the produce section, maybe you've never seen them before. Look for them the next time you're grabbing celery, carrots or cucumbers! 

I'm so glad I was able to re-share this fantastic recipe with all of you. I'm grateful to Earth Fare for having such amazing produce I just couldn't resist bringing some home that day. If you think you don't like sprouts, think again!

Pan Roasted Brussels Sprouts with Bacon
1 lb. Brussels sprouts, trimmed and halved
4 sliced thick cut bacon, diced
1 (14.5 oz.) can chicken broth
1-2 TBS canola oil
Salt and Pepper to taste

Cook bacon in a large skillet until crisp. Remove with slotted spoon onto paper lined plate to drain. Add oil to bacon drippings. (Adjust oil depending how much fat the bacon rendered) Heat back to medium-high. Add Brussels sprouts. Season with salt and pepper. Saute' for about 10 minutes until golden on all sides. Add chicken broth. Bring to a boil. Reduce heat to low and simmer for another 10-15 minutes until Brussels sprouts are fork tender. Remove with slotted spoon to serving dish. Sprinkle with crispy bacon. 


Shared on The Country Cook Aug. 8, 2014


Disclaimer: I was provided with a gift card from Earth Fare in exchange for this post. All thoughts and opinions are my own. 


Wednesday, July 2, 2014

Nothing Better {A Post For Earth Fare}

There are many ways you could finish that title. Too many to count in fact. But what I'm talking about is the fact that in the summer time, there is nothing better than fresh sun kissed produce. Rather it be from a local farmer, picked yourself from the backyard garden, or the grocery store produce section, finding fresh, in season produce is just one of the many things I love about summer so much. 

On busy, warm nights, basic, simple salads are such a great thing to keep in mind. Quick side dishes made of summer's bounty that go with any meal. I have so many of these, and each is a go-to on those evenings when I'm too hot or tired to cook and my taste buds are screaming for something cool, crisp, refreshing and delicious.

Grilling some steaks or chicken? This would go with them perfectly. Having a cookout? This is a great non mayo salad for outdoor fun. Need something to take along to a potluck? Mix the veggies and take the dressing separately to dress when it's time to serve. It's so versatile, you'll find yourself making it all summer long.


Fresh veggies are one of the things I longed for during those loooonnnngggg winter months of snow and the hateful Polar Vortex. I'm so happy to have them ready and available to enjoy now. I wonder how many more yummy things I can create before the first golden leaves of fall? 

Balsamic Cucumber and Tomato Salad
2 medium cucumbers, peeled and thinly sliced
1 large tomato, cut into thin wedges
1 small red onion, thinly sliced
3 TBS balsamic vinegar
2 TBS canola oil
2 tsp. dried basil
Garlic Powder, to taste
Salt and Pepper to taste

In a small bowl whisk together vinegar and oil. Add basil, garlic powder, salt and pepper. Stir well. In a large bowl combine all veggies. Pour dressing over. Stir to coat. Chill at least 30 minutes before serving.


Disclaimer: I was provided with a gift card from Earth Fare in exchange for this post. All thoughts and opinions are my own.