Everyday Mom's Meals: Vanilla
_____
Showing posts with label Vanilla. Show all posts

Monday, April 3, 2017

Middle of the Night Hunger

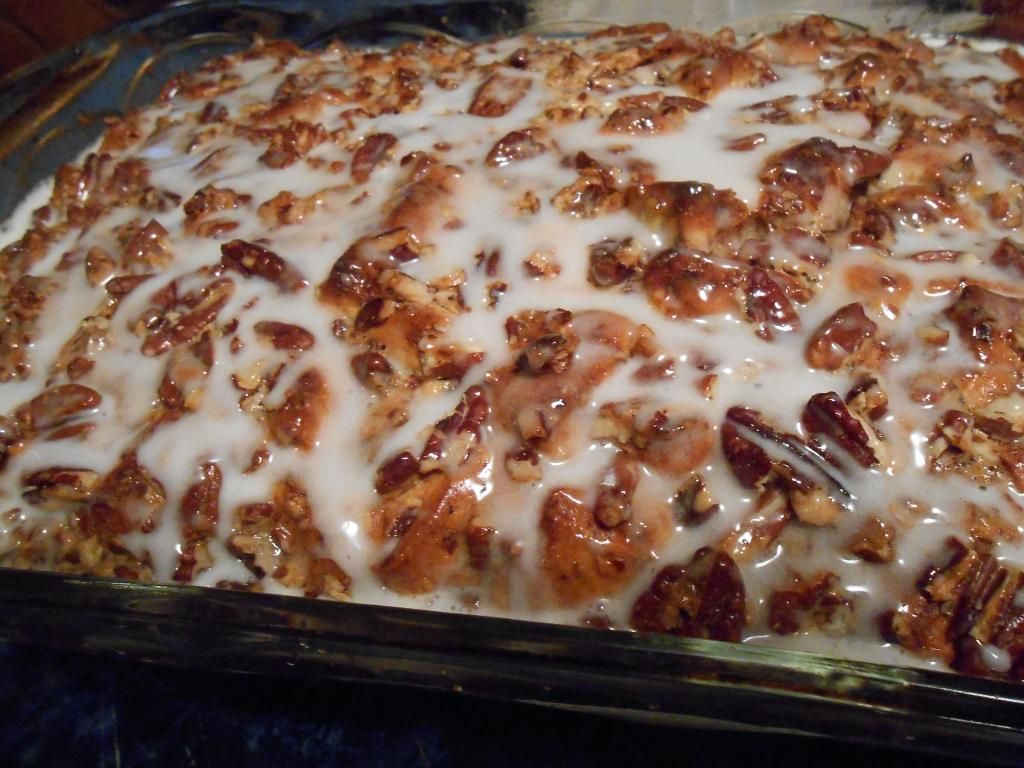
We've all heard the saying "It's a stick to your ribs kinda meal." Most of the time it is usually in reference to a big meal at supper time, or when talking about sending the kids off to school, a hearty breakfast that will keep them going. But what happens when those worlds collide? This is what happens.

See, we are big breakfast for supper fans. I plan it at least a few times a month. And the meals vary. Eggs, potatoes, meat, pancakes, waffles, quiche, toast, biscuits n gravy...I come up with all sorts of combos to indulge our preference for morning food at night.

But the one thing I find myself having an issue with is ending up hungry later in the night. Now, I know it's not the meal itself because I've got two "boys" with big appetites eating the same thing, and they don't end up with grumbling tummies, so it must just be me. Many times when we have these types of meal, I find myself waking up in the middle of the night starving. Or at least I think I'm starving.

When I saw this recipe, my first thought was "Wow. What a stick to your ribs kinda breakfast." What? Wait a minute...that means if I made it for supper, it would have the same effect and maybe I wouldn't wake up chewing on my pillow!

I was right! This will stay with you! It's perfect for a hearty breakfast to get your day started right, or a weekend brunch. Maybe even Easter Sunday after sunrise service. It makes a pretty good dinner too. I served it with some sausage links on the side, and we were all full and satisfied. And I stayed that way all night long!

This tastes just like a warm oatmeal cookie straight from the oven. And I can tell you, neither me or Alex are huge oatmeal fans, and we gobbled this down. This was the perfect amount for the 3 of us, so if you're making it for a bigger crowd, be sure to double the recipe. (See note below)

Waking up in the middle of the night feeling like you haven't eaten in hours is no fun. Laying awake counting cows instead of sheep, just so you can think about steak isn't normal. But now I've found a way to enjoy our little tradition and keep those pangs of starvation away!

Amish Baked Oatmeal
3 c. quick cooking oats
1 c. brown sugar, slightly packed
2 eggs
1 c. milk
1 tsp. vanilla
1 tsp. cinnamon
2 tsp. baking powder
1 large apple, peeled and chopped
1 stick butter, melted
1 1/2 tsp. salt
Extra Milk
Toppings: Fresh berries, nuts, dried fruit, etc

Preheat oven to 350. Lightly grease a 8x8 baking dish. In a large bowl combine first 10 ingredients. Stir well until mixed. Pour out into baking dish. Bake for 30-45 minutes until edges are brown and middle is set. Let sit for 5 minutes before serving. Garnish with milk and toppings. *NOTE* If you double this recipe, switch to a 9x13 pan, and increase cooking time a little, but start checking at the 30 minute mark.


Disclaimer: Recipe adapted from Taste of Home. As a field editor, and not a paid employee, I share this with no compensation.

Monday, November 21, 2016

Turkey Day, Made Easy

So, I can't lie, I am not on the hook for hosting Thanksgiving. In fact, most years I'm not. In the 13 years we've been married, I've only had to worry about cooking on Turkey Day twice. Why? Because we live 20 minutes from both my mom and mom in law, and they both have our family over on the holiday.

But just because I am not having a huge crowd over to my house doesn't mean I can't appreciate the need for some easy dishes to fall back on. One because I have hosted and know the stress that can go into preparing the biggest meal of the year. And two, this is what I do. I try to find ways to help your holiday cooking be more simple and less stressful each year.

This recipe is actually something I've made for years now, and we enjoy all autumn long. Seriously, as soon as the calendar says October, you can find me in the grocery store aisle looking for canned pumpkin. (By the way, if you live near an Aldi, their pumpkin is a "seasonal item" they only carry for a few months, but is ONLY $.89 per can! You won't find it cheaper anywhere else!)

So not only can you whip this up quickly, it's also totally adaptable for a few or a house full, plus it's 100% budget friendly!

I love a good pumpkin pie, but if I'm being honest, I don't need the crust. Give me the filling and some Cool Whip and I'm a happy girl. In fact, when I was little my grandma would take the extra filling she had after her pies were made, put it into custard dishes and bake it just for me.

This will be our first Thanksgiving since Grandma passed, and I felt it was time to revamp this recipe a bit, and bring it back to the blog (it's been 5 years since I first shared it) in her honor. Every time I make this, I am transported back into her kitchen with those little glass custard dishes and her saying " Geez Punkin (that's me), do you want a little pumpkin with your Cool Whip?" Yeah, I'm that girl. Pile on the topping!

If you are hosting Turkey Day this year, give yourself a much needed break and add this to your dessert menu. Sure, bake some pies too, by all means, but cross one or two off the list, replaced by the easiest recipe you'll make this holiday!

Pumpkin Fluff
2 (15 oz.) cans pumpkin 
2 small boxes instant vanilla pudding, DRY do NOT add milk
2 (8oz.) containers Cool Whip
1/2 tsp. cinnamon, extra for garnish
1/4 tsp. ground ginger
1/8 tsp. ground cloves
1/8 tsp. ground nutmeg

In a large bowl whisk together pumpkin and pudding mix. Fold in one container of Cool Whip. Add spices. Stir well. Chill for at least an hour before serving. Garnish with extra Cool Whip and cinnamon. 


Shared at Weekend Potluck

Wednesday, October 7, 2015

Celebrate #Oatober with Peanut Butter & Co.

Just in time for Halloween, and all the sweetness that goes with it, I've teamed up with my good friends at Peanut Butter & Co. and Bob's Red Mill to transform October into "Oatober"!

I've got something that the little ones can not only enjoy for an after school snack, lunchbox treat, or Halloween party dish, but can also help make! They will love getting their hands sticky and messy, and then maybe even licking them when done!

So many schools don't allow homemade treats at classroom parties, but if yours is okay with it, these would be perfect! So yummy and a perfect little sweet bite.

We love peanut butter. Like eat from the jar with a spoon love, so the double peanut butter punch in these, with the Reese's candies, makes them extra special.

If you're looking for something fun to make with your kids, or maybe something to feed all those little goblins and witches that come to your big Halloween bash, I've got you covered!

No Bake Halloween Balls
2 1/2 c. old fashion oats ( I used Bob's Red Mill)
1 c. creamy peanut butter (I used PB & Co. Smooth Operator)
1/2 c. honey
1 tsp. vanilla
1/2 c. mini chocolate chips
1/2 c. Reese's pieces

Combine all ingredients in a large bowl. Mix well. Roll into balls. Chill for 30 minutes to set. Store in fridge in airtight container. *NOTE* When rolling, some of the candies will want to fall out. Just keeping pressing. 


Shared at Weekend Potluck

Disclaimer: As part of Yum Squad I received product in exchange for this post. All thoughts, opinions and the recipe are all mine.

Monday, July 13, 2015

Another Sweet Side Dish

So...I need a vacation from my vacation. You know how it is. You come home after being gone, and you hit the ground running, trying to get back into the swing of things, you blink and a week has gone by and the laundry still isn't caught up, you still aren't 100% unpacked, and you feel like you've been going nonstop--totally cancelling out the two weeks of rest and relaxation you just had. Yep, that's where I'm at.

Plus, we had some added stress to our return. We had a death in our family, and we had to break to the news to our son that his teacher from this past school year had also passed away after a battle with cancer. It was a very sad week in our house. Alex loved Mr. Thorn, and when he became ill back in April, and had to leave the classroom for the rest of they year, he was crushed. But nothing could have prepared him for when we had to tell him back in June just how sick Mr. Thorn was, and then when we had to tell him his suffering and battle was over because God had called him home. Having to share with a 10 year old such devastating news (plus the added death of my husband's great uncle) was not how I wanted to spend the first few days post-vacation. But such is life, and we are now entering into a new, hopefully better week.

But you can see why I might feel like I've been going 100 mph since we got back, in every direction, with a million things to do. So cooking and blogging has kind of had to take a back seat. However, I did manage to make this new treat and just had to share.

I was making breakfast sandwiches and wanted something light to go with them. I wasn't in the mood for any of the "normal" things I serve with them, and then I remembered this recipe I had seen. Ya'll know how much I love these sweet salads I can call a side dish and be done with it. Plus, a little creamy fruit salad seemed appropriate as a breakfast for supper thing.

I am slowly but surely returning to normalcy around here. Or at least trying. In the meantime, I'm so thankful for quick and easy dishes I can whip up, we can enjoy, and then I can share with all of you.


Pineapple Fluff
Inspired by Southern Bite
 2 (20 oz.) cans crushed pineapple, drained well
8 oz. block cream cheese, room temperature
1/2 c. powdered sugar
1 tsp. vanilla
1 (8 oz.) tub Cool Whip
1 1/2 c. chopped walnuts, reserve a few for garnish

In a large bowl combine drained pineapple, cream cheese and vanilla. Stir until mixed well. Fold in Cool Whip until combined. Add powdered sugar and walnuts and stir again. Scoop into parfait glasses or dishes. Garnish with extra walnuts. Chill several hours before serving. 


 Shared at Weekend Potluck

Friday, April 10, 2015

Easter Treat Withdrawal

So, we have amazing friends. No doubt. But in the past week, one of those friends definitely scored extra bonus points with us. (Okay, that's not how it really works, but she really did treat us!)

Starting quite a few years ago, this friend would get us the same Easter treat every year. A giant, homemade peanut butter egg chocolate. I'm talking big enough for several portions. This started back before we even had Alex. And I'm not joking when I said Mr. E and I would fight over this egg every year. It became a joke between us her, because I would always tell her about us chasing each other around the kitchen for the last bite. Don't judge. You have no idea how delicious this egg is.

Then little man came along, and we realized we were going to have to share our egg with him. Well, not for the first few years. When he was really little, we just hid it from him. He had no idea it even existed. Again, don't judge. This egg is the best thing ever. But then he got old enough to know about the egg, and after one bite was as hooked as we were. So now we had to split this egg three ways. Sigh...

Then there were a couple years we had to do without our egg. Gasp! I know! So sad. Each Easter we would talk about the egg. Dream about the egg. Lament we didn't have the egg. Then last week this friend told me she had something for us. "An Easter treat." Could it be? Could we be that lucky? YES! We got our egg! Oh, it was just how we remembered it too!

And now, here we are a week later, and the egg is gone. We are trying to keep our chins up. But in the meantime, I needed to satisfy our withdrawal symptoms. These muffins were our answer! Oh my gosh, they are so yummy! They taste just like a peanut butter cup, and are the perfect bite size for snacking! Use them for breakfast, after school snacks or packed lunches.

If you love peanut butter and chocolate as much as we do, you will flip for these as much as we did. And now, we can have our favorite flavors the other 11 months of the year too! 

Peanut Butter Cup Mini Muffins 
Makes 36 mini muffins 
1 3/4 c, flour
2/3 c. packed brown sugar
2 1/2 tsp. baking powder
1/4 tsp. salt
1 egg
3/4 c. milk
2/3 c. chunky peanut butter
1/4 c. vegetable oil
1 1/2 tsp. vanilla
2/3 c. miniature chocolate chips

Preheat oven to 350. Line a mini muffin tin with papers. In a large bowl combine flour, brown sugar, baking powder and salt. Mix well. In a medium bowl whisk together egg, milk, oil, peanut butter and vanilla. Add to dry ingredients and mix just until moistened. Fold in chocolate chips. Fill each muffin well 2/3rd full. Bake for 15-17 minutes until toothpick comes out clean. *NOTE* This batter is VERY thick. If you think it's a little too thick when you are stirring, add a splash more milk to make it easier to combine.


Shared on The Country Cook April 10, 2015


Wednesday, February 11, 2015

A Snow Day With No Snow

Yep, that's right. Here in Indiana, we are so lucky (She says...dripping with sarcasm!) to get snow days with no snow! Unfortunately, that means there is ice instead, and that can be even more treacherous! That's exactly what happened a couple weeks ago. Not a flake of snow was on the ground, but we had gotten soaked with freezing rain/ice, and the morning commute wasn't safe for man or beast, so no school for us! 

As you know by now, when school gets cancelled, I am just as happy as little man is. I don't know which of us gets a bigger thrill when we hear our school system announced with all the others, me or him! I love having an unexpected day with him at home with me. Plus, it usually means we are going to get in the kitchen and make something extra yummy. Baking is one of those things a snow day was made for. 

This particular snow ice day we didn't know what we were in the mood for, but we knew it had to be something sweet, and we didn't have a lot to work with. See, it was towards the end of the week, and the grocery store trip was just around the corner, so we were going to work with what I had. Thankfully, I do keep basic baking things on hand at all times, so we weren't at a total loss. In fact, I bet if you go to your pantry right now, you probably have everything to make these. Okay, the maple extract might not be something you have laying around, but if that's all you need, you're doing pretty good! 

We ate these as a snack...later on that same evening for dessert...and then for a few days after for breakfast. Honestly though, Mr. E is lucky there were any left when he came home because Alex and I could have eaten the entire dozen in a blink of an eye. (And probably not felt that bad about it!)

These are super sweet, so beware! If you want to cut down on the sweetness a little bit, omit the maple flavoring. With Valentines Day being this Saturday, they would be a perfect treat for the sweet hearts in your life. 

Snow days are a simple pleasure in life that I for one, am so thankful for. My favorite little guy, at home, in the kitchen, safe and sound...pure bliss. 

Maple Frosted Spice Doughnuts
Makes 1 dozen
2 c. flour
1 tsp. baking soda
1/4 tsp. ground nutmeg
1/2 tsp. salt
1/2 tsp. cinnamon
2 eggs
3/4 c. white sugar
1 tsp. vanilla
1/2 c. milk
2 TBS butter, melted

Maple Frosting:
1 c. powdered sugar
2 TBS butter, melted
1-2 TBS water
1/2-1 tsp. maple extract

Preheat oven to 325. Grease a doughnut pan and set aside. In a large bowl combine flour, baking soda, nutmeg, cinnamon and salt. Mix well. In a small bowl whisk together eggs, white sugar, vanilla and melted butter. Add liquid mixture to dry mixture 1/3 at a time, stirring after each, until combined. Spoon mixture into doughnut pan, about 2/3 full for each well. Smooth tops with back of spoon. Bake for 10-15 minutes until firm to touch, and toothpick comes out clean. Rest on wire rack for a few minutes in pan. Using a silicone spatula, remove doughnuts to wire rack to completely cool. 

To make frosting, add water to powdered sugar a little at a time until desired consistency. I like it a little thick. Add butter and maple extract. Mix well. 

To frost doughnuts, dip each into frosting and let set on wire rack. 


Wednesday, February 4, 2015

A Gadget Makes All The Difference

So, I might have a new obsession. Well, I guess when it comes to food, I have quite a few, so I better narrow it down. The latest addiction I have to add to my list is muffins. I am constantly looking for new flavors, and a lot of this new infatuation has to do with one small thing. A cookie scoop.

See, until last year about this time, I had to use a normal, every day spoon to transfer the muffin batter to the muffin tin. But then something magical happened. I received a cookie scoop for my birthday. Do you know what I'm talking about? The kind with the spring loaded handle that when pressed, allows whatever is in it, to be removed quickly and easily. Nothing special, nothing fancy. But absolutely life changing.

Oh, and the funny part? I've never made cookies with it! For almost a year now, it has been used exclusively for muffins. I'm sure it would be fabulous for cookie dough too, believe me. It makes scooping anything so much easier. I can literally fill a 12 well muffin tin in almost no time at all! Plus, it helps to keep the mess down too! (I'm all about less clean up when I'm done!)

If you love banana bread, you're going to love these as much as we did. Plus these come with a glaze that banana bread usually doesn't, so they are that much sweeter! Perfect for breakfast, brunch, an after school snack or dessert.

Do you have a great kitchen gadget that makes all the difference in your life? Share it with me in the comments! I'm always looking for new ones!

Banana Nut Muffins
1/4 c. butter, softened
1/2 c. sugar
1 egg
1/2 tsp. vanilla
3/4 c. mashed banana (about 3)
1 c. flour
3/4 tsp. baking powder
1/4 tsp. salt
1/8 tsp. cinnamon
1/8 tsp. baking soda 
1/2 c. chopped walnuts
1/4 c. powdered sugar
Milk

Preheat oven to 350. Line muffin tin with papers or grease. Cream together butter and sugar. Beat in egg, vanilla and banana until smooth. In a separate bowl combine flour, baking powder, salt, cinnamon and baking soda. Mix well. Pour into moist mixture and combine just until moisten. Fold in walnuts. Fill muffin cups 2/3 full. Bake for 20-25 minutes until tooth pick comes out clean. Cool on wire rack. Mix together powdered sugar and enough milk to make glaze, usually about 2 tsp. When muffins are cool, drizzle with glaze.


Shared on The Country Cook Feb. 6, 2015

Disclaimer: As a Field Editor of Taste of Home, I share my own thoughts and opinions of this recipe. I am not a paid employee. 

Wednesday, November 12, 2014

Another Turkey Day Idea

So, is that Thanksgiving menu set in stone yet? Or are you still looking for a little inspiration? If the first one is true, good for you! Way to be ahead of the game! Way to be prepared! But if the second one rings more true for you right now, your friendly neighborhood blogger is here to help!

Sweet potatoes are such a staple on so many holiday tables, sometimes we forget there are more things we can do with them than the traditional marshmallow topped dish. But there are, there really are!

This recipe actually came about last week when I had bought sweet potatoes to simply bake; but decided I wanted something more. And how could I say no to the addition of great flavors like brown sugar, vanilla, cinnamon and pecans? I could not! I mean, who can resist the words pecan crumb topping?

I love this dish because you can easily adapt it to feed a few (This version fed the 3 of us with leftovers, so I'd say it would feed 6 as a side dish easily.) or the masses. It can also cook in the oven alongside the bird while you are working on other dishes. It's the perfect mix of savory and sweet, and literally tastes like a holiday on a plate. Plus, it would travel really well too, in case you have to go "over the river and through the woods!"

That Turkey Day menu needs to be coming together pretty soon. We've got 2 weeks to finalize it; and I for one love knowing what's going to be served so my taste buds can start looking forward to it now! If there is room on yours, this might just be what you've been waiting to add to it!

Roasted Sweet Potatoes
with
Pecan Crumb Topping

5 large sweet potatoes (about 3 lbs.), peeled and cut into 1 inch cubes
2 TBS orange juice
1/4 c. packed brown sugar
2 tsp. vanilla extract
1/2 tsp. ground cinnamon
1/2 tsp. ground ginger
1/2 tsp. salt
2 TBS butter, diced
1 c. dried cranberries

Topping: 
1/2 c. flour
1/2 c. packed brown sugar
4 TBS butter, diced
1 tsp. ground cinnamon 
1 tsp. ground ginger
1 c. chopped pecans

Preheat oven to 400. Lightly grease a 9 x 13 pan. Add sweet potatoes to a large bowl. In a small bowl whisk together orange juice, 1/4 c. brown sugar, vanilla, 1/2 tsp. cinnamon, 1/2 tsp. ginger and salt. Pour over potatoes. Stir well to coat. Transfer to pan. Sprinkle with cranberries. Dot with butter. Cover with foil and bake for 30 minutes. Meanwhile, in a small bowl, combine flour, brown sugar, cinnamon and ginger for topping. Mix well. Cut in butter using two forks. Stir in pecans. Remove potatoes from oven. Uncover. Sprinkle with pecan mixture. Bake an additional 25-30 minutes until potatoes tender and browned on top.


Shared on The Country Cook

Monday, September 15, 2014

All Things Pumpkin

The minute I flip the calendar from August to September it means all things pumpkin and apple are fair game. I know many people feel they are too used during this time of year, especially since Pinterest came along and it seems there are 1,000 new recipes featuring each every single day.

Well, no fear. I'm not going to inundate you with so many you feel like I'm running an apple orchard or pumpkin patch. But I would not be true to myself if I didn't feature my two autumn flavors in at least a couple dishes.

If I had to choose one, it would probably be pumpkin. (And not just because my nickname is "Punkin".) I was the kid who wanted pumpkin pie in lieu of a birthday cake. True story. And my child has been known to ask his Maa Ma (my mom) for the same thing. She makes a pretty mean pumpkin pie!

These are a simple dessert perfect any night of the week. They would be perfect for tailgating or a bonfire party too! But they are completely yummy and pretty enough if you wanted to serve them come Thanksgiving you totally could.

Fall means all things pumpkin and apple. They are what I crave this time of year (well, those and soup) and when that craving results in something this delicious, it makes me remember one of the few reasons I do enjoy autumn. 

Pumpkin Pecan Parfaits
1 (15 oz.) can pumpkin puree
1 (3.4 oz.) box instant vanilla pudding, unprepared
1 (12 oz.) tub Cool Whip
1/2 c. chopped pecans
1 c. granola cereal (I used one with pecans)
1/2 tsp. cinnamon, plus extra for garnish
1/4 tsp. ground ginger
1/8 tsp. ground nutmeg
1/8 tsp. ground cloves

In a large bowl combine pumpkin, dry pudding mix, 1 cup whipped topping, and spices. Mix well. Chill for 30 minutes to set. In large parfait glasses, layer pumpkin mix, granola, whipped topping and pecans evenly. Repeat layers, ending with pecans. Sprinkle with cinnamon. Chill until ready to serve. Makes 3 large parfaits or 5-6 small.


Friday, July 25, 2014

Our Holiday Dessert

So, it was the 4th of July, and I, in all my wisdom, had planned another holiday picnic for the three of us. Now, don't get wrong. I love our family picnics. They are one of the things I look most forward to in summer. But they aren't easy! At least our type aren't. They usually result in me in the kitchen the night before and morning of, prepping, cooking and packing. Sure, it's all worth it, every dish is tasty, and my boys are very grateful for the memories we make because I went to the trouble to plan it, but sometimes even mom wants some time off on a holiday. And on this day, that break came when it was time for dessert. 

I wasn't sure what our holiday dessert would be, but I knew it had to be simple and easy because after making enough food to fill a picnic basket and two coolers, I was ready to sit down and enjoy a glass of lemonade before we headed off for the park. So I started looking in the pantry, fridge and freezer to see what I could come up with what I had on hand. I'm not even going to lie, I truly thought about taking the berries as is, and the tub of Cool Whip for dipping and calling it a day. But in the next moment I remembered it was indeed a holiday, and we were going to be spending some special time together, so I wanted to put forth at least a little effort. 

This is what I came up with. If you've made a traditional strawberry trifle, you will recognize quickly just what an easy route I took. There was nothing complicated about it, and took almost no brain power to throw together. It's simple, delicious and great for summer parties! (Or picnics when your family is expecting effort and you just don't have any more to give!) 

Easy Strawberry Trifle
1 lb. strawberries, sliced
1 small box instant vanilla pudding
1 1/2 c. cold milk
1 (12 oz.) tub Cool Whip
1 (10 oz.) angel food cake from store bakery, cubed

Combine pudding mix and milk and whisk for 2 minutes. Chill in fridge for 5 minutes until soft set. In the bottom of a large bowl place enough angel food cake cubes to cover. Then layer pudding, Cool Whip and berries. Repeat layers until reach top. Spread with Cool Whip and finish with berries. Cover and refrigerate at least 3 hours before serving. 


Shared on The Country Cook July 25, 2014
Strawberries at Very Good Recipes

Wednesday, May 14, 2014

Springtime Snack with Peanut Butter & Co. {A Giveaway}

I don't know how it is in your house, but when the temps start to rise, and we are spending more and more time outdoors, our appetites begin to rise with them. I guess we're so busy and doing so many fun activities outside, instead of sitting inside avoiding the cold of winter, we burn more calories and need to refuel more often. 

And then when summer vacation arrives (In this house, that's in 17 days...not that I'm counting or anything!) it takes me a few days to remember I'm responsible for feeding this little person lunch every.single.day. until school starts again! Not to mention snacks while he is enjoying time outside, or while we are on the go doing all the things we love to during summer. 

Needless to say, easy, effortless, yummy snacks are a must in this house! They have to be something you can eat with your hands, no matter what you're doing, and they need to give us the energy we need to suck every last drop of fun out of summer we can! 

That's exactly what I had in mind when I created these using my buddy's Peanut Butter & Co's The Bees Knees Peanut Butter! My son loves the flavor of peanut butter and honey. In fact, during the school year, it's one of his favorite sandwiches for me to pack in his lunch. So when I remembered a friend telling me about these no bake peanut butter balls she makes for snacks after her trip to the gym, I knew this peanut butter would be perfect in them! 

If you love peanut butter, you're going to flip for these. If you love no bake sweets, you're going to flip for these. If you love coconut, you're going to flip for these. (Oh, and if you don't, you can easily roll them in something else. Chopped nuts perhaps!) These are so easy, even the kids can get in the kitchen and help make them. Yet another thing we love to do during summer vacation...usually on rainy days! 

The summer months are just around the corner, and your family is going to need extra energy to stay ahead of the sun. So be sure to make a big batch of these for them to nibble on while around the pool, enjoying a ball game, having a picnic, whatever summer means to you. Oh, and Peanut Butter & Co. wants to send (1) lucky winner 2 jars of The Bee's Knees to try in your kitchen! Just scroll down for the giveaway!! 

No Bake Peanut Butter Coconut Balls 
1/2 c. old fashioned oats
1 c. Peanut Butter & Co. Bee's Knees Honey
1 tsp. vanilla
2 pinches salt
1/3 c. sweetened flaked coconut

Place oats in a food processor and pulse until very fine. (Think flour consistency) In a large bowl add ground oats, peanut butter, vanilla and salt. Stir well. Using a cookie scoop, form balls, about 1 inch in diameter. Roll in coconut. Place in fridge for 1 hour to set. Refrigerate leftovers.


Shared on The Country Cook May 16, 2014


a Rafflecopter giveaway
Disclaimer: As a member of Peanut Butter & Co.’s Yum Squad food blogger club, I received product in exchange for this post. All opinions expressed are my own.

Wednesday, January 22, 2014

Snowmageddon 2014

Yes, that's what we called the huge snow storm that hit Indiana (and many other places too) a couple weeks ago. If you weren't part of the country that got hit with multiple feet of snow, I will give you a little glimpse into what it meant to us. Over 14 inches of snow, sub zero temps (-45 with the windchill), blizzard like conditions, schools closed for a week straight (Yay for extra Christmas vacation!) and many businesses closed for 1-2 days. The state was literally closed for about 48 hours. I was not around for the Blizzard of '78, but everyone who was said this was the worst snowstorm since then.

So, there I was at home with the whole family, snowed in. And that isn't an exaggeration. The snow drifts were high; and our vehicles would not start in the frigid temps. After the Christmas decorations were put away, the laundry was done, the house was cleaned, the child was entertained...what else could I do to pass the time? Bake, of course! But I needed to work with what I had, because remember, I couldn't get to the store no matter what.

Now here is where the story takes a funny turn. I'm in the middle of gathering ingredients and realize I'm completely out of brown sugar. Great. Just great. But then my brain took over and I decided to make my own. You know brown sugar is simply white mixed with molasses, right??!! (Don't feel bad if you didn't. I didn't until a few years ago.) So, I turned to my trusty friend Google to find an idea of the ratio I would need, played around with the amounts and finally had something I could work with. I was feeling quite pioneer like making my own, and so proud it worked! (If you want to try to make your own, see note below.)

These make a great breakfast for a busy weekday morning, brunch item on the weekends, dinner time dessert or even after school snack. Oh, and the house will smell fantastic when they are baking too! Maybe the next time a big snowstorm hits, you can make these while you're stuck inside. Or, simply make them anytime, and wish for spring!

Apple Pecan Muffins
2 c. flour
1/4 c. brown sugar, packed*
1/2 c. white sugar, divided
1 egg
1/2 c. vegetable oil
2/3 c. milk
1 tsp. vanilla
1 TBS baking powder
1/2 tsp. salt
1/2 c. chopped pecans
1 apple, peeled and finely chopped
1 1/2 tsp. cinnamon

Preheat oven to 400. In a large bowl whisk together egg, oil, vanilla and milk. Stir in flours, brown sugar, 1/4 c. white sugar, baking powder and salt, just until flour is wet. Add in pecans and apples. Mix well. Either grease a muffin tin, or use paper cups. Fill each about 2/3 full. In a small bowl combine 1/4 c. white sugar and cinnamon. Sprinkle tops of muffins with cinnamon sugar. Bake for 20 minutes until toothpick comes out clean. *NOTE* If you need to make your own brown sugar like I did, simply add 1 1/2 TBS molasses to 1 c. white sugar. Mix well. Store in an airtight container.

Shared on The Country Cook Jan. 24, 2014


Muffins at Very Good Recipes

Friday, November 1, 2013

They Are Coming

In case you've been living under a rock, today is the first day of November. Put those jack-o-lanterns away and grab the turkeys and pilgrims, kids. Thanksgiving is exactly 27 days from today. In this house once the fun of Halloween is behind is, it's pretty much a downward coast to the holiday season. Thanksgiving, Christmas and even New Year's are approaching quicker than some of you might realize, or even want. But don't fret, don't freak out, I am here to help with at least one aspect of the holiday rush. Over the next several weeks, I will be offering up some ideas for your meal plans, from breakfast to mains, to sides, that could all be great additions to your holiday planning. 

First up, something I made for supper a few weeks ago, that will definitely be appearing on our table again, and if you are planning on a house full of family for Thanksgiving or Christmas, could be the answer to your breakfast prayers!

I am SO excited to share this one because I know ya'll are going to go as nuts for it as we did. Sure, I used it as "breakfast for supper", and it was just as yummy at 6pm as I know it would be for breakfast or brunch. Oh, and a side note: this reheats beautifully! We had some leftover and Alex ate it for breakfast for the next 3 days. Just pop it in the microwave for about 30 seconds! Which is also a great idea if you're having house guests because maybe you cook it once, and they eat it for a couple days, saving you time and money!

If you love cinnamon rolls, French Toast and bread pudding, then let me introduce you to your new favorite dish. With a little help from refrigerated cinnamon rolls, and a custard filling filled with flavor, oh and of course nuts, syrup and icing, this is hands down the easiest and most delicious breakfast casserole I've ever made. Yes it's rich. I'm not gonna lie. But it's the holidays. We are all supposed to indulge a little!! Serve it with some fresh fruit on the side, that will make you feel better. 

The holidays are coming, like it or not. But we can prepare, and organize and get ready so maybe just a little of the stress is taken away so we can enjoy the time with our families a little more. Or, we can totally stress, and eat plates of this and not care because it tastes so darn good!

Cinnamon Roll French Toast Casserole
From Pillsbury
1/4 c. butter, melted
2 (12.4 oz.) tubes refrigerated cinnamon rolls, icing removed
6 eggs, beaten
1/2 c. heavy cream
2 tsp. cinnamon
2 tsp. vanilla
1 c. chopped pecans
1 c. maple syrup

Preheat oven to 375. Pour melted butter into the bottom of a 9x13 baking dish. Separate each tube into individual rolls. Cut each roll into small bite sized pieces, about 6-8 per roll. Lay cinnamon roll pieces in butter in dish. In a medium bowl, combine eggs, cream, cinnamon and vanilla. Mix well. Pour over cinnamon roll pieces. Sprinkle with pecans. Drizzle with maple syrup. Bake about 25 minutes, until golden brown. While baking, transfer icing to microwavable safe bowl. Heat for about 15 seconds, until thin enough to pour. When casserole is finished, drizzle top with icing. 


Shared on The Country Cook November 1, 2013

Friday, September 27, 2013

Breakfast Treat

Weekends are for many things; and in this house one of them is something special for breakfast. Adam and I don't eat breakfast most days, and while I make sure Alex does every single morning, it's usually something light, easy and quick. But when I have more time on the weekends I like to treat my boys to something yummy and new.

Lately, all three of us have totally gotten addicted to scones. They are perfect for breakfast or brunch, but I've also been known to whip up a batch for dessert too! 

Ya'll know my obsession with all things lemon, so when I found this recipe uniting an old obsession with a new one, I knew they would be the perfect version to try next. They are fresh and bright, perfect to wake you up in the morning. Each bite is like a little burst of sunshine on your tongue. Plus the glaze...oh the glaze. It's literally the icing on the "cake" so to speak. The scones are delicious enough on their own, but the glaze just puts them over the top. 

If you want to surprise your family with special extra special, not to mention yummy, this weekend, maybe these scones should make an appearance in your oven too!

Lemon Poppy Seed Scones From Country Living
2 c. flour
3 TBS sugar
2 TBS poppy seeds
2 lemons, zested
1 TBS baking powder
1/2 tsp. baking soda
1/2 TBS salt
1 stick cold butter, diced
1/2 c. heavy cream
1/4 c. fresh lemon juice
1/2 c. powdered sugar

Preheat oven to 400. In a large bowl combine flour, granulated sugar, poppy seeds, lemon zest, baking powder, baking soda and salt. Cut in butter until mixture is very coarse. Pour in cream and 1/4 c. lemon juice. Mix until dough forms. Using hand, form dough into a ball. Transfer to a parchment lined baking sheet and form into 8 inch dish. Cut into 8 wedges and separate so pieces are 1 inch apart. Bake until golden and a tooth pick comes out clean, about 12-14 minutes. Transfer to a wire rack and cool about 20 minutes. In a small bowl combine powdered sugar and remaining lemon juice. Stir until smooth, and desired consistency. We like ours slightly thick. Spoon glaze over scones. 


Shared on The Country Cook September 27, 2013
Lemon at Very Good Recipes

Wednesday, August 14, 2013

Alex In The Kitchen Once Again

Two years ago we started a tradition here on EMM, my favorite little monkey stopping by to guest blog something simple and yummy that your kids can enjoy making, and of course eating, too. And two of those posts, one at the beginning of his 1st grade year, and one at the end, had something in common. Lemon Fruit Salad and Key Lime Fruit Salad  were both creations he and I worked on together, and were perfect for little hands and little tummies.

So, in that same tradition, and since the school year is once again quickly approaching, we thought ti was a great time for Alex (now a 3rd grader!) to share yet another easy but tasty fruit salad perfect for an after school snack or even a light dessert. Or if you are like us and you are filling these last few days of summer vacation with as much fun as possible, it would be great for a picnic in the park too!

Please welcome the best little sous chef around back to the EMM kitchen!

Hi everyone! I'm so excited Mommy asked me to cook for you again! Well, I guess this isn't really something you actually cook, but you know what I mean! For those of you who don't know, I am going into the 3rd grade, and am really looking forward to it! I am sad to see summer end, but I love school, and seeing my friends, so I'm okay with going back too. (But that 7:30 am wake up Monday morning will NOT be easy!!) 

Mommy and I love finding simple sweet treats I can help her make, and this is another one of those. Using mostly canned fruit, it's nice for little kids because there isn't a lot of chopping. (Mommy did slice the bananas though) Plus, it's really neat to watch how the pudding mix and fruit juice turn into a "sauce" while you stir...which was my job! This makes a perfect snack, now or once school is in, or a dessert too. Oh, and I actually like eating it for breakfast too, especially on a hot day! 


I hope you enjoy my newest fruit salad creation. Be sure to make it with your kids too! I've been helping Mommy in the kitchen since I was a tiny baby, and we always have so much fun! I bet your kids would too!

Vanilla Fruit Salad Adapted from Taste of Home
1 (29 oz.) can fruit cocktail, with juice
1 (11 oz.) can mandarin oranges, drained
1 (20 oz.) can pineapple chunks, drained
3/4 c. fresh blueberries
1 TBS lemon juice
2 bananas, sliced
1 (3.4 oz) box instant vanilla pudding
Whipped Cream
Pecan Halves

In a large bowl combine all fruit except bananas. Add lemon juice. Stir. Sprinkle with pudding mix. Gently stir for about a minute until slightly thickened. Fold in bananas. Refrigerate until serving, at least an hour. When ready to serve, top with whipped cream and sprinkle with pecans.


Pin It

Friday, July 19, 2013

Fresh From The Patch

Are blueberries fresh for the picking in your area? Well, they are here in Indiana and oh, they taste so good fresh from the patch! We are lucky enough to live close to quite a few U-pick patches where I can take the boy and let him loose gathering in pound after pound. But this year, well, we did thinks a little differently.

I actually got notice that the berries were ready at one of our favorite places the day we were driving home from our vacation. I was literally sitting in the car in Jacksonville, Florida wondering "Okay, how am I going to get to the berries...and quick?" Luckily they also had some pre-picked ones available and my mother-in-law was nice enough to snag us a couple pounds so they were waiting on us when we got home.

Now I will be very honest, after being gone for 3 weeks, our cupboards and fridge were a little sad those first few days we were home. I had stock piled a few things before we left, but still, every time I went to make lunch for Alex I kind of felt like Old Mother Hubbard. So needless to say, most of that two pounds were simply eaten as is with lunch and snacks. But there was no way I wasn't going to find something to make with some of them too. And when I thought of my brand new ice cream maker...I knew exactly what it would be!

So if you have a berry patch near you, and are looking for a fun summer time activity for the kids, take them to pick their own. Then bring them home and have them help you make this great tasting, perfect cool down, summer time treat!

Blueberry Ice Cream
1/2 c. white sugar
1/4 c. water
1/2 tsp. vanilla extract
2 c. fresh blueberries, plus extra for garnish
2 c. heavy cream
1 TBS lemon juice
Pinch Salt

In a small saucepan over low heat combine sugar and water. Cook until sugar dissolves. Add berries, lemon juice, salt and vanilla. Stir and cook just until berries burst, about 5-7 minutes. Remove to bowl. Bring to room temperature. Place in refrigerator until cooled, about an hour. Add cream to blueberry mixture. Mix well. Add to ice cream machine and follow directions. For mine, after about 20 minutes of mixing it was a "soft serve" consistency. If you prefer a more frozen version, transfer to a bowl, cover and freeze until solid.


Shared on The Country Cook July 19, 2013
Shared on Make Ahead Meals July 22, 2013

Friday, May 31, 2013

No Bake Solution

This time of year I think we are all looking for more dessert options that don't involve our oven. The dreaded "I don't want to heat up the house" season is upon us, and I for one am looking forward to the challenge.

See, before I began this blog, I truly wasn't that much of a baker. I didn't enjoy, and tried to avoid it at all costs. But after getting more and more comfortable in the kitchen and using EMM has an outlet, I have become more of a seasoned baker, and my boys are very thankful for that. But there is still something inside of me that gets excited when I can find a no-bake alternative. They are so fun, so easy and perfect for the warm months. Sure, when it's the middle of October, the crisp autumn air moving in, it's comforting to pull a big pan of hot cobbler out of the oven. But when it's the middle of July, the sun is shining and eggs are being fried on the sidewalk, not so much.

This would be perfect for you next backyard barbecue or pool party. Cool and refreshing on a hot day, the flavors easily adaptable to fit your favorites. Not to mention, if your little ones are out of school for the next couple months (We have one more week, thank goodness!) this is a fun one to have them help with. Little hands could stir the pudding, put the blueberries on top...and of course taste test!

If you want to bake a pie when it's sweltering outside, my hat is off to you. But if you are like me and truly enjoy a no-bake sweet option this time of the year, this is just for you!

No Bake Blueberry Bliss
1 (10 oz.) store bought angel food cake "loaf"
1 (21 oz.) can blueberry pie filling
1 (3.4 oz.) box instant French vanilla pudding
1 3/4 c. milk
1 (12 oz.) tub Cool Whip
1/2 c. fresh blueberries

In a medium bowl combine pudding mix and milk. Whisk for 2 minutes. Refrigerate for 5-7 minutes until "soft set". Slice angel food cake in 1/2 inch slices. In a 8 x 11 baking dish, layer angel food cake slices (You might have to cut them to make them fit. Mine took 6 regular slices, 1 cut in half and 1 cut into thirds.) Pour half the pudding over angel food cake and spread evenly. Layer with half the pie filling and spread. Repeat layers once more, ending with pie filling. Top with Cool Whip. Spread evenly using a soft spatula. To form "peaks" like mine, lightly tap Cool Whip with flat side of spatula and lift up quickly. Sprinkle with fresh berries. Chill at least an hour before serving.


Shared on The Country Cook May 31, 2013
Shared on Make Ahead Meals June 3, 2013
Shared on Mandy's Recipe Box June 4, 2013

Friday, April 19, 2013

It's Almost Time

Berry season is just around the corner for most of us; and for some of you, maybe it's even closer than it is for me. We usually kick off our Memorial Day weekend with strawberry picking, and then the berry love continues right on through summer. Raspberries, red and black, blueberries....oh we love our berries!

I've told you before how raspberry crazy Mr. and Little Everyday are, so during the warm months, I try really hard to find as many recipes as I can using them. But during the colder months, they aren't something I'm really on the lookout for. However, I was always taught to never look a gift horse in the mouth. See, back in February my father in law was given an obscene amount of frozen black raspberries and he generously offered to share with us. So I filled a few bags, brought them home and popped them in the freezer, knowing at some point I would find the perfect use for them.

Then all of a sudden it was Easter weekend, and we were going to be celebrating with my parents on Good Friday evening, mom making a huge meal (it was actually the "re-do" from my birthday supper she was to ill to make), and I offered to take dessert. I knew I wanted something spring inspired, maybe with berries...and that's when I remembered those beauties just hanging out in the chest freezer.

These are so incredibly pretty! The layers of berries and cream create these perfect colored bars. Oh, and not to mention they are super easy and scrumptious too. Plus, with warmer weather coming, they would make a great dessert for a hot summer day when only a frozen treat will do!

Berry season is coming, and will be here before we know it' I'm so glad I'm prepared with this great new recipe, and I hope you are too!

Frozen Raspberry Cream Bars  
Adapted from Taste of Home
2 c. crushed vanilla wafers (about 65 wafers)
1/4 c. butter, melted
2 c. frozen unsweetened black raspberries, do NOT thaw
3/4 c. sour cream
1 c. half and half
1/2 c. sugar

In a bowl, combine the wafer crumbs and butter. Grease a 8 x 8 baking dish. Press half of the crumb mixture into dish. Set remaining crumb mixture aside. Sprinkle berries over crust. In a bowl, combine sour cream and sugar; gradually stir in half-and-half until smooth, whisking to combine. Pour over berries. Sprinkle with remaining crumb mixture. Cover and freeze for 3 hours or until firm. You can allow these to sit for about 10 minutes to make for easier cutting, but I actually prefer to serve them frozen.


Shared on The Country Cook Apr. 19, 2013
Shared on Make Ahead Meals Apr. 22, 2013
Shared on Mandy's Recipe Box Apr. 23, 2013
Shared on Lady Behind The Curtain Apr. 24, 2013
Shared on Miz Helen's Country Cottage Apr. 25, 2013

Saturday, December 1, 2012

Weekend Company {Guest Blogger Colleen}

Whew....it's December 1st! Can you believe it? I am still in disbelief myself, because I'm pretty sure Labor Day was just yesterday, but alas the calendar doesn't lie. However, I will say with the hustle and bustle of the holiday season upon us, it's nice to know ALL of my Christmas shopping is not only DONE, but also WRAPPED!!! (I realize some of you are leaving now in disgust, and I apologize.)

I hope you had a great week, and are ready for something yummy for the weekend. The is perfect for a brunch, or keep it bookmarked (or pinned) for those family visits that are just around the corner! Please welcome Colleen back to EMM~


Hi Everyone! I'm Colleen and I'm so happy to be back doing a guest spot at my favorite foodie blog. The recipe I'm going to share with you was given to me fairly recently by my dear friend, Shawna. When I told her that we were going to have a wedding rehearsal brunch for my son's upcoming wedding, she said "I've got just the recipe for you!" I was so impressed with this one that I immediately took pictures knowing that I would one day want to share it. This dish got rave reviews for the rehearsal brunch. I hope you all give it a try and enjoy it as much as we all did. I think it would make a great holiday brunch item, as well. Or maybe you could just liven up your weekend and serve this to your family one morning! They'd be thanking you all day.   

By the way, just in case you're wondering, the wedding rehearsal went great and was followed a couple days later by a beautiful wedding. The newlyweds have been married almost 2 months now and are doing very well. I'm happy to have them living just down the street from me and enjoy having them pop in now and then ... even though it's mostly to raid my refrigerator. LOL! The picture I'm including is of me with the happy new couple on their wedding day. :)

French Toast Casserole
2 tubes of refrigerated cinnamon rolls
1 cup maple syrup
6 eggs
1/2 c. heavy whipping cream
2 tsp. vanilla
1 tsp cinnamon (or to taste)
1 - 2 cups chopped nuts (optional)

Preheat oven to the temp listed on the package of cinnamon rolls (they can sometimes be different) and grease a 9 x 13 casserole dish.

Cut the cinnamon rolls into bite size pieces, reserving the icing packets for later. Place all the cut up pieces of cinnamon rolls into the buttered casserole dish. Pour the maple syrup over top of the cinnamon rolls covering as much area as you can.

In a bowl, beat the eggs and whipping cream just until it all comes together nicely. Add in the vanilla and cinnamon and mix thoroughly. Pour this mixture over the cinnamon roll mixture.
Add the chopped nuts to the top, if you are using.
Bake for about 35-40 minutes until the mixture doesn't jiggle when you shake the pan slightly.  When you take it out of the oven, open the reserved packets of icing mixture and drizzle them over the casserole. Serve warm.

Notes: This is best done in a glass casserole dish but if you do bake it in a metal or foil pan, don't add the nuts to the top until halfway through the baking process to avoid burning them. You can also bake this the day before you want to eat it. Just leave off the icing and refrigerate the casserole overnight. The next morning, heat it in a moderate oven just to re-warm it and then top with the icing after warming.


Thanks to Mrs. Everyday for allowing me to come by and share with you all once again. I hope you all have a very happy weekend full of family, love and good food. :)  


Pin It