Everyday Mom's Meals: Baked
_____
Showing posts with label Baked. Show all posts

Sunday, May 9, 2021

Dippy Eggs The Easy Way

What does your family call over easy eggs? I bet many of you just uttered "dippy" under your breath. Yep, our too. In fact, I grew up thinking it was just our family who referred to fried eggs with a runny yolk like that. It wasn't until I was a teenager, working at Bob Evans, that I learned just how many people know what dippy eggs are. In fact, I had lots of customers relieved when they would order and I knew exactly what they were talking about. 

Cooking the perfect dippy eggs in a skillet can sometimes be tricky. While I've almost mastered it over the years, I'm always up for an easier hack. Or in our case, a way for me to actually eat with the boys instead of cooking in batches, and being the last one to sit down. 

While I've made baked omelets and egg bites for a while, these were definitely a game changer! An entire dozen eggs, all cooked at the same time without grabbing the spatula! 

You want to start checking these about 10 minutes in. The whites need to be set, but the yolk still runny. Mine were perfectly cooked about 12 minutes in. The closer you get to 20 minutes, the more like hard boiled they will be. You can absolutely cook them longer if you prefer a yolk that is cooked through. 

I love baking up a batch of yummy muffins, but I also love that my muffin tin can do so much more! Now it can let us all have those dippy eggs we love with no flip needed!

 Baked Muffin Tin Eggs

1 dozen eggs

Canola Cooking Spray

Salt and Pepper

Preheat oven to 350. Spray muffin tin liberally with nonstick spray. Crack eggs into a separate bowl and transfer to muffin tin. Season with salt and pepper. Bake for 10-15 minutes and check. You want the whites set, but the yolks still runny. Around 20 minutes they will be more like hard boiled. Use a butter knife around each egg to remove from tin. 


Shared at Weekend Potluck


Sunday, November 3, 2019

Holidays Mean Company

With November upon us, can we finally start talking about the holidays? Look, anyone that knows me knows I am an early Christmas shopper, I wrap presents in October and look forward to the holiday season so, so much.

But honestly, to me, when I think about the "holidays" it starts November 1st and ends January 2nd. After Halloween has come and gone, I am 100% in Thanksgiving and Christmas mode. And while I am totally obsessed with all things Holly Jolly, I do make sure celebrate and enjoy each holiday for it's own.

That being said, let's talk Turkey Day. Okay, not really, but the time surrounding it. No, this isn't a post to inspire something new on your Thanksgiving table, but instead something you can make before and/or after the actual holiday, when you've still got those house guests to feed.

It never fails, every year I get messages from fans asking for simple meals to plan while that holiday company is hanging out for a few days. Let's face it, leftover turkey is only going to go so far. Plus, many times, the host/hostess still has to work while guests are filling up the house, and coming home to a hungry mob isn't very festive!

If this describes what you'll be dealing with in a few weeks, or even a few more weeks after that, how about a delicious pasta bake supper that will feed a crowd easily, and on budget? Plus, you could even prep this before leaving the house for work, or maybe Black Fridays shopping, pop it in the oven when you get home and have supper on the table in under an hour!

I adore the holiday season. The entire holiday season. And while some celebrate for weeks and weeks, and others can't wait for it to be over, the one thing we can all agree on is there is enough to stress about with the hustle and bustle of the season, dinner time shouldn't be on the list too!

Sausage Alfredo Pasta Bake
1 lb. rotini pasta
1 (26 oz.) jar marinara sauce
1 (16 oz.) jar Alfredo sauce
1 lb. pork sausage
1 TBS Italian seasoning
1 tsp. garlic powder
1 tsp. onion powder
1/4 tsp. crushed red pepper
2 c. shredded mozzarella cheese, divided use
Dried Parsley
Salt and Pepper to taste

Preheat oven to 350. Grease 9x13 baking dish. Cook pasta according to directions for al dente. In a large skillet brown sausage. Drain if necessary. Add Italian seasoning, garlic powder, onion powder, red pepper, salt and pepper. Add marinara and Alfredo. Stir well. Bring to a boil. Reduce heat and simmer for about 10 minutes. Add 1/2 cup cheese and stir until melted. When pasta is cooked, drain well. Add to sauce mixture and stir. Transfer to baking dish. Top with remaining cheese. Bake for 25 minutes until cheese melted. Sprinkle with parsley. Allow to sit 5 minutes before serving.


Inspired by Big Bear's Wife

Monday, October 23, 2017

Turkey Day Plan


One. Month. People.

Have you looked at the calendar to even realize what I'm referring to? Yes...that's right, the biggest foodie day of the year is only 4 weeks away! Thanksgiving 2017 is coming and coming fast!

Now, I know for many of you, it isn't even a blip on your radar yet, and you're saying "EMM...I am not even ready to start planning yet, don't rush me." And that is okay. But I am a planner...big time. So, if I were hosting I would already be coming up with a menu, making shopping lists and marking days on the calendar for prep. I know I can't be the only one, so this is for you!

For so many of us big holiday meals are filled with family favorites. Those dishes that show up every year, and everyone looks forward to. But I also know many like to add new things to keep it new and exciting.

To me, the side dishes are the easiest to experiment with. You can still have all the ones everyone craves, but add in a couple newbies too. If you're planning on making a couple veggies anyway, why not something delicious, simple and unique?

We loved these SO much! And since I don't host Thanksgiving, they will become part of our regular dinner rotation...yes, that's how easy they are! Plus, I love the colors...like fall in a bowl!

If you're already planning your Turkey Day Table, I salute you! If you are a "wait until the last minute" host, that is okay too..just remember to come back in a few weeks!

Roasted Carrots and Mushrooms
1 lb. baby carrots, patted dry
8 oz. white button mushrooms*
1 medium yellow onion, cut into wedges
1/4 c. butter, melted
2 TBS Worcestershire sauce 
2 garlic cloves, minced
Salt and Pepper to taste

Preheat oven to 425. Grease a 10x15 baking dish. Place carrots, mushrooms and onion in dish. In a small bowl whisk together butter, Worcestershire and garlic. Pour over vegetables. Sprinkle with salt and pepper. Toss gently to coat. Bake for 45-60 minutes until carrots are tender* stirring occasionally.  *NOTES* If you have mushroom lovers, add more! I will next time I make them, because we were fighting over them. We like our carrots crisp tender, so I pulled mine after 45 minutes. 


Wednesday, April 15, 2015

Forget Frozen, Make Your Own! {A Post For Earth Fare}

In no way will you ever hear me bash convenience foods. You've heard me say it time and time again...take the help from the store when you need to, and don't have an ounce of guilt about it. We are all super busy and if there are times we need to cut corners to make sure our families are still fed a good meal, well then, that's how life goes. So, the above title, is in no way a push for you to stop buying frozen anything. It's simply a statement about this recipe specifically, and if you have the time, what you can do with it!

I'm kinda a fry snob. They have to be just right for me to really rave about them. The right texture. The right flavor. Even the right temperature. I hate cold fries; but I also can't stand ones that burn my mouth with hot leftover grease.

So, when I set out to my own steak fries, I'm not even going to lie to you, it took me a few tries to get them just how I wanted them. For my taste buds, these have the perfect combination of seasonings. But feel free to add your own and switch them up. This is really a method, a jumping off point, that could lead to a thousand different varieties.

These would be so good with anything coming off the grill this summer! Steaks, burgers, hot dogs, barbecue...steak fries go with them all!

Oh, and on that time issue? These really don't take that much more than their frozen counterpart. Just a few extra minutes in the prep department to cut them. So if you have those few moments to spare, treat your family to something a little extra special. And if you don't? Well then, reach for that bag of frozen tater tots and know I fully support you!

Oven Steak Fries
6-8 medium potatoes, scrubbed and cut into wedges
1-2 TBS steak seasoning, to taste
1/4 c. olive oil
1/2 tsp. garlic powder
Salt and Pepper to taste

Preheat oven to 425. In a large bowl mix potatoes, oil, and seasonings. Stir very well to coat. Transfer to a large baking sheet that's lightly sprayed with nonstick spray. Bake for 30 minutes. Carefully turn. Bake for 10 minutes more. Change oven to broil setting. Cook for 5-7 minutes until golden.  *NOTE* To cut potatoes into wedges, cut each in half lengthwise. Then cut each of those halves into 4 wedges. 


Shared on The Country Cook April 17, 2015

Wednesday, December 10, 2014

Chicken Rut

Do you find yourself falling into a rut with your food? More specifically do you suffer from a rut with one particular ingredient? I think for many of us, both of these are true. In fact, there is a rule in our house that was made almost 12 years ago, when we were still newlyweds, based on one such rut.

See,  I love chicken. I could eat it all the time, in a hundred different ways; and  unfortunately right after we were married when I was still finding my comfort level in the kitchen, I tested this theory. I made chicken all the time, and Mr. E got so incredibly tired of it, he flat out asked me to keep it to only once per week; and that rule still stands today. Sometimes it's not easy to abide by, but I really, really try.

To compensate, I try to come up with as many new ways to prepare my favorite poultry as I can. I guess I figure if it's served in a new way, maybe he won't notice it as much??!! Believe me, it doesn't work...but it makes me feel better, so I keep doing it.

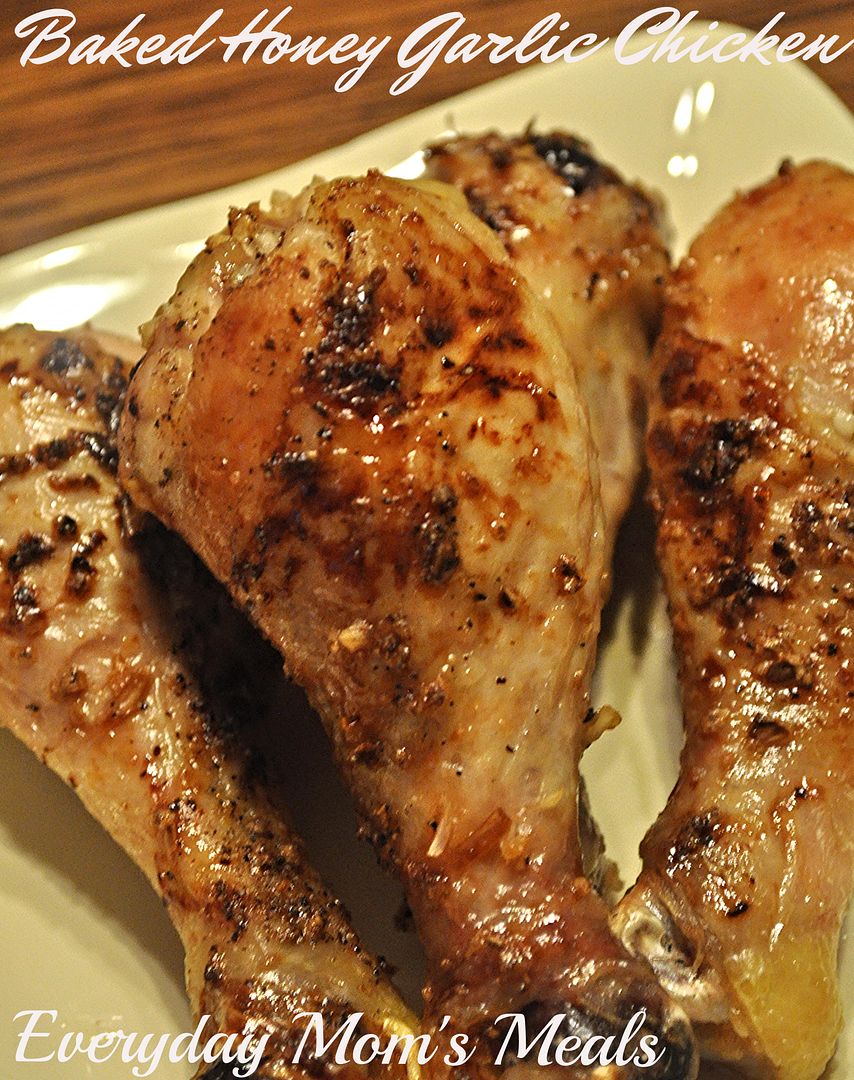
This chicken dish is actually perfect for a busy weeknight when you want something delicious, but it needs to be quick and easy. It comes out with amazing flavor with only a few ingredients! Plus, I'm guessing you could use this same method for wings and get an amazing new party food for all those holiday gatherings right around the corner.

Try not to fall into ruts. Keep your meals new and exciting! But if you do fall down the dark hole of a rut, don't feel bad, I'm sure you'll find myself and many others down there with you!

Baked Honey Garlic Chicken
12 chicken drumsticks
1/2 c. honey
2 TBS minced garlic
1 TBS hot sauce
Salt and Pepper to taste

Preheat oven to 400. Line baking sheet with wire racks. Spray with nonstick spray. Place drumsticks on wire racks. Season with salt and pepper. Bake 30 minutes. Meanwhile in a microwavable bowl combine honey, garlic and hot sauce. Microwave 30 seconds and mix well. Remove chicken from oven. Baste liberally with honey sauce. Bake 25 additional minutes or until juices run clear.

Monday, February 10, 2014

Potluck Classic

Around the holiday times I got into a deep discussion with a friend about how we missed the church pot lucks of our childhood. Because you know, that's what you do during the holidays. You sit around and eat, and talk about food while you chew!

We both remembered going to church on Sundays as a kid, and then what the service was over gathering in the church basement for a big meal, that everyone contributed to. All the little old ladies would bring their tried and true dishes everyone raved about, the ones they had brought to every pot luck for years and years. Everyone else would try to find something just as delicious to bring, and while their food was also appreciated and enjoyed, it was those long time favorites people looked forward to the most.

As we were talking she started to tell me about just that. A dish that showed up at every potluck she could remember, always brought by the same sweet lady. Now, the neat thing about this lady was that each time someone complimented her on the dish, and of course asked for the recipe, she was always happy to share it. I love that. Food is love, and sharing the love is half the fun!

 I couldn't wait to try it for myself, and I'm so happy I did! My boys were literally licking their plates! They couldn't get enough. This is the perfect side dish for a busy weeknight because you can throw it together as soon as you get home from work, the oven does all the work and about 45 minutes later a steaming plate of yummy is on your table. It has such incredible flavor, and goes great with pork, chicken, beef or fish.

If you enjoyed potlucks as a child too, you can appreciate what I'm talking about. Or, if you are just looking for a new rice dish, this is something you will want to try asap!

French Onion and Parmesan Rice
1 c. long grain rice
1 (10 3/4 oz.) French Onion soup
1 (10 3/4 oz.) beef consume'
1 stick butter
1/2 c. Parmesan cheese

Preheat oven to 350. Place rice in a 8x11 baking dish. Add soup and consume'. Stir to combine. Place stick of butter in center of rice mixture. Bake for 40 minutes until most of the liquid has absorbed and rice is tender. Remove from oven. Stir well. Sprinkle with Parmesan. Bake 5-7 additional minutes until cheese is melted. Remove from oven and stir before serving.


Shared on The Country Cook Feb. 14, 2014