Everyday Mom's Meals: Onions
_____
Showing posts with label Onions. Show all posts

Sunday, December 27, 2020

Happy (Almost) 2021

 How was your Christmas? I hope it was a day surrounded by those you love most in the world, with magic, joy and peace. (Even if some had to join virtually!)

We had a wonderful holiday, with celebrations over a couple days. According to the mound of presents under our tree Christmas morning, our boys were VERY good this year. (But Mommy could have told Santa that!) 

Now that my most favorite time of year is behind us, I tend to get a little depressed. I won't even lie. December 26th is my least favorite day of the year. But I do have something to look forward to! Our annual New Year's Eve Buffet! 

If you've been following me for a good amount of time, you know our tradition. Every NYE, I make a huge appetizer buffet filled with yummy things. We stay in, my parents come over, we eat, we watch movies, we play games, we eat, we stay up for the ball drop, we eat....you get the picture. 

So while many will be doing an "at home New Year's Eve" for the first time this year, we are experts and it's one of our most fun traditions!

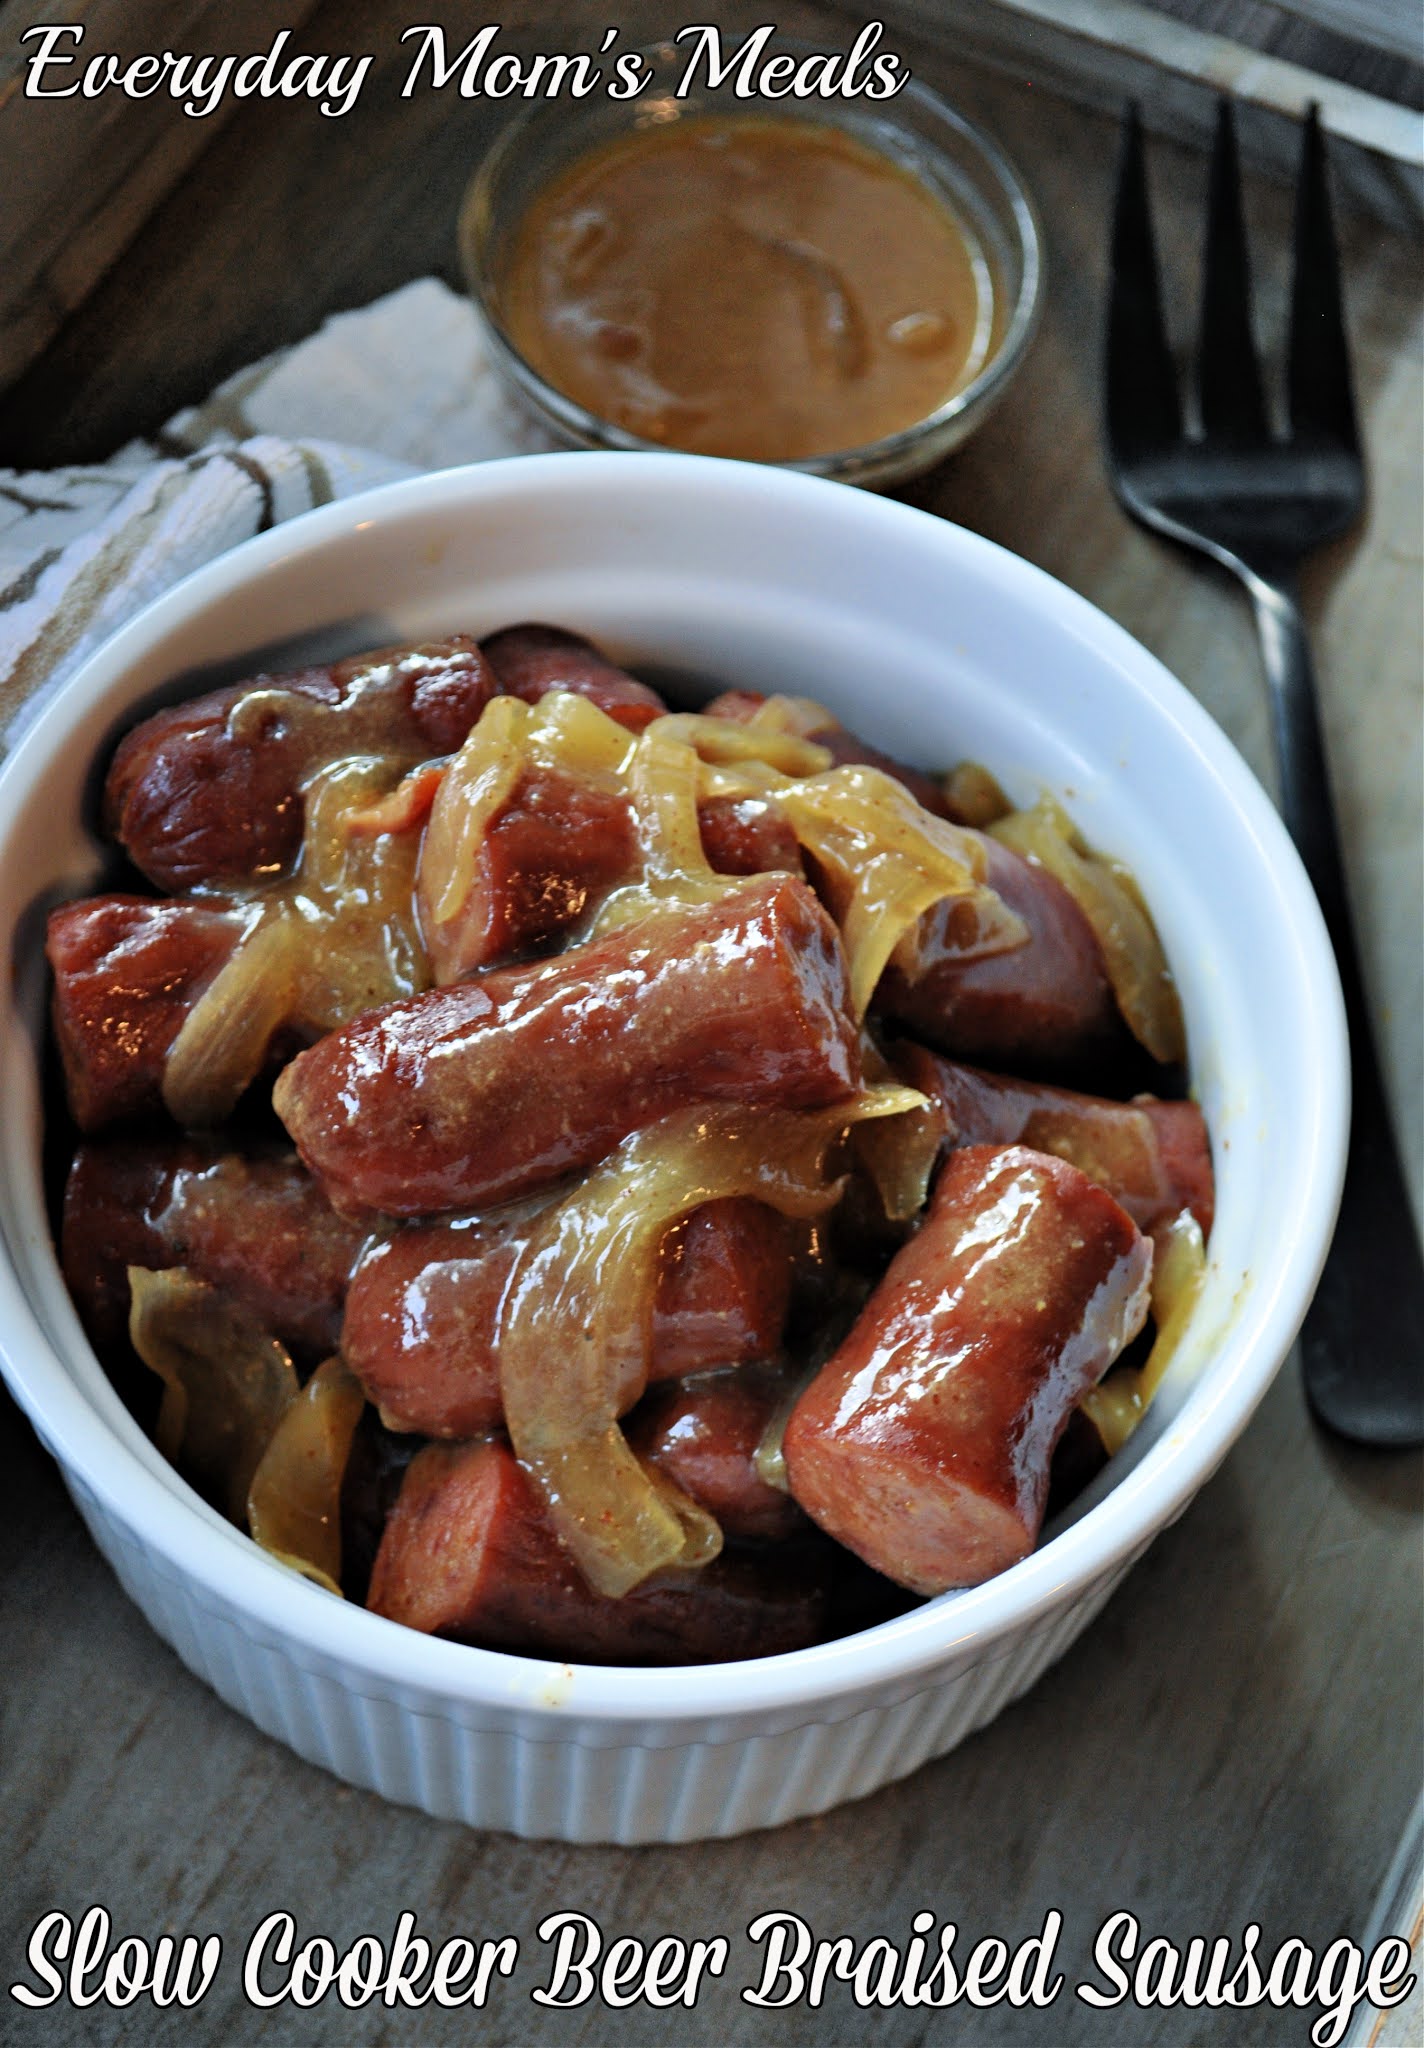
If you're planning some tasty food to welcome 2021, this slow cooker beer braised sausage could definitely be added to the menu! This is a versatile recipe that you can serve as an appetizer (just cut it into smaller pieces) or for a simple weeknight supper. It's delicious right out of the Crock Pot, but we also love putting it on some hoagie buns for a sandwich dripping in yum factor. 

I know many like to serve pork for good luck in the New Year, so this could be a fun twist on that tradition too! 

Without a doubt, 2020 will go down in history as one of the worst years ever, at least in most of our lifetimes. But I think there is a lot to be thankful for as we look back too. Sure, it might not always be the easiest to see, or focus on, but even in the darkest days this year, our family has been so incredibly lucky. So I am trying to focus on that as we say goodbye to another year, but am also ready to welcome 2021 with open arms. I wish you a happy, healthy and delicious New Year...only good things ahead!

 Slow Cooker Beer Braised Sausage

3 (9 oz.) packages smoked sausage

1 large white onion, thinly sliced

1/2 c. brown sugar

2/3 c. light beer

1/4 c. spicy brown mustard

1/4 c. apple cider vinegar

1 TBS water

2 tsp. cornstarch

Slice sausage into 1-2 inch pieces. Spray the slow cooker with nonstick spray. Lay sliced onions in bottom. Lay sausage on top of onions. In a medium bowl, whisk brown sugar, beer, mustard and vinegar. Pour over sausage. Cover and cook on LOW for 6 hours. About 15 minutes before serving, mix water and cornstarch. Add to slow cooker. Stir and cook on HIGH about 10 minutes until thickened. Serve as is or on hoagie buns with sauce drizzled over top.

 Shared at Weekend Potluck


Friday, May 15, 2015

Simple As 1-2-3

Do you have a preference for which type of rice you use? I guess I should word that differently. Do you prefer to use "regular" rice or instant when you cook? For me, it really depends on the recipe. I will use whichever makes the dish the best it can be.

It might shock you to learn just how many questions I get on the subject. When I write a recipe I am always sure to list the specific kind of rice I used when I tested it. Now, that doesn't mean folks aren't welcome to use whichever they are most comfortable with, or happen to have on hand, but I can't guarantee results if substituted. But the #1 question I get asked when I post a dish using rice is "How do I cook non-instant rice?" It's such a convenient item, many have never bought a bag of "real" rice and simply don't know how to prepare it. So, I'm here today with an easy trick to remember how, and a tasty recipe to go with it.

Cooking rice is as simple as 1-2-3. And not, I'm not just being cute. It's a simple way to remember the method in which you use. 1 Cup of Rice Boiled in 2 Cups of Liquid= 3 Cups Cooked Rice. See how easy that is. Oh, and that liquid? It can be water, broth, stock, a combo of both...it doesn't matter, as long as it is 2 cups. Now even if you have always used the instant, you can easily remember how to work with the other stuff too.

Some of you might be asking why even bother? Well, bagged rice is one of the best economical options at your grocery store. A bag of long grain rice will run you about the same as a box of instant (or at least it does at my store) and last forever! Okay, maybe not that long, but you certainly get more product for your money.

To demonstrate my little trick, I needed a recipe to go along with it. This casserole is sure to become a favorite in your house, just like mine. Rice, meat, veggies, a Tex-Mex flavor...it's got a little bit of everything to satisfy everyone!

When it comes to rice, if you haven't cooked with the real stuff, I encourage you to try. And if you run into a pickle, think 1-2-3...and I'm sure it will be a huge success!

Tex Mex Rice Casserole
1 lb. ground beef
1 c. long grain white rice
2 c. water
2 beef bouillon cubes
1 (15 oz.) black beans, rinsed and drained
1/2 c. frozen corn, thawed
1 (14 1/2 oz.) can diced tomatoes
1 packet taco seasoning
8 oz. cream cheese, softened
1 c. shredded Monterrey Jack cheese
1 small white onion, chopped
5 green onions, chopped, whites and light green only
Salt and Pepper to taste

Preheat oven to 350. Grease a 9 x 13 baking dish. In a small pot, bring water and bouillon cubes to a boil. Add rice. Bring back to a boil. Reduce heat to low, cover and cook 15 minutes, stirring often, until liquid is absorbed. In a large skillet, brown ground beef and white onion, seasoned with salt and pepper, until no longer pink. Drain if necessary. In a small bowl combine cream cheese and taco seasoning. Add tomatoes, black beans, corn and cream cheese mixture to beef. Stir and cook until cheese melts and mixture is slightly thickened. In bottom of prepared dish, mix cooked rice and 1/2 c. shredded cheese. Top with meat mixture and sprinkle with other 1/2 c. cheese. Bake for 30 minutes until bubbly and heated through. Garnish with green onions. 


Shared on The Country Cook May 15, 2015

Monday, January 12, 2015

Favorite Sandwich

One of my favorite sandwiches of all time is the all American Philly Cheese Steak. Those that know me really well assume this is because my parents hail form Pennsylvania, and most of my family is still back there. And it's a good guess, and makes for a very nice story, but here is my secret. For the hundreds of times I've been to the Quaker State in my life...I have never been to Philadelphia! 

Does that seem crazy to you? Maybe not so much once I explain. See, we live about 30 minutes from the Ohio state line. And where we visit in Pa, is about the same distance on the other side. It's about a 6 hour drive; but to then visit the City of Brotherly Love, it's another almost 6 hours! Yes, it's a huge state, and we've just never ventured that south into it. 

So while I have never had a traditional cheese steak, in the city where it was born, I have had lots of others. And before purists send me emails telling me this recipe is missing some things, and adding others, I'm aware. When I have a cheese steak, it has peppers, onions, and Provolone. I know. I know. Others are made differently. It's okay. Variety is a good thing. 

I love taking flavors of one favorite dish and using them in another application, especially when it's another favorite. So, a #1 sandwich in my world turned into an easy to make, weeknight friendly, casserole is a match made in heaven. 

Be sure to read the note in the recipe so you know your options when it comes to the biscuits, and my reasoning for baking them the way I do. 

Do you have a favorite sandwich you think might make a great casserole? Tell me about it in the comments!

Philly Cheese Steak Casserole
1 1/2 lbs. ground beef
8 oz. button mushrooms, sliced
8 slices provolone cheese
2 TBS butter
1 large onion, thinly sliced
2 green peppers, thinly sliced
2 cloves garlic, minced
1 (16.3 oz.) Grands biscuits
Salt and Pepper to taste

Preheat oven to 350. Grease a 9 x 13 baking dish. In a large skillet, cook beef and mushrooms, seasoned with salt and pepper until browned. Drain if necessary. Place in baking dish. Arrange cheese over beef mixture. In same skillet, melt better and saute onions and peppers until tender-crisp. Stir in garlic. Cook 1-2 minutes more. Spoon over cheese. Cover and bake for 35-40 minutes. Bake biscuits according to package directions. When ready to serve, spoon beef and pepper mixture over bottoms of biscuits and top with other half. *NOTE* You can also top the beef mixture with the uncooked biscuits, do NOT cover, and bake for same amount of time, but the bottoms can become a little soft, which we don't enjoy, so I bake them separately. 


Shared on The Country Cook Jan. 16, 2015


Friday, March 21, 2014

Been Trying For Years

I'm going to take you back in time today. The year is 2003. It's Christmas and I am celebrating my very first one as a newlywed. But also, we were celebrating with my parents, per a tradition we still observe today. After the presents were opened, the huge meal was eaten, and we were just sitting around, their phone rang. It was a family friend who lives down the street inviting us down for a late supper. She knew we had probably had a large meal in the early afternoon, but wanted to extend an invite for us to come down later for a simple supper of soup. She had made a few different varieties and wanted to share the leftovers. Never ones to turn down a sweet invitation from a friend, especially when it involves food, we were happy to go.

 Upon entering the dining room we discovered her version of "I have a few leftovers" really meant she had three different kinds, and lots of each left, along with homemade bread, rolls, and sweets. And even though we were still pretty full from our meal earlier in the day, boy oh boy did we eat good!

Each kind she served was delicious, but to be honest I can't remember what two of them were. Why? Because the third was hands down my favorite, and for the past decade, the one I have been trying to recreate in my own kitchen. It was a barley soup with a beef base and big slices of mushrooms. And not only was it my favorite, but also Mr. Everyday's and my Daddy's too. I can still remember all times we uttered the words "Oh My Gosh! This is delicious!" while slurping it up as fast as we could.

Over the years I've tried a few different versions, but never recreating it's tastiness...until now! This is the first one I've tried that was so close, my taste buds immediately stood up and screamed "You did it!!!"

Like beef? Like mushrooms? Like soups? Like using your slow cooker on busy days? If you answered yes to all of those, or even just one, then this is the soup for you! I'm happy to bring you a little something from my past that your family could very well enjoy for years to come!

Slow Cooker Beefy Mushroom Barley Soup Adapted from Taste of Home
2 lbs. round steak, cut into 1 inch cubes
1 TBS canola oil
1 large onion, diced
4 medium carrots, diced
2 ribs celery, diced
2 garlic cloves, minced
8 oz. button mushrooms, sliced
1 tsp. garlic powder
1 (14 oz.) can beef broth
1 (14 oz.) can chicken broth
4 beef bouillon cubes
1/2 c. pearl barley
1/2 tsp. dried thyme
Dried Parsley, for garnish

Preheat slow cooker to HIGH. In a large skillet, heat oil to medium high. Season beef with salt, pepper and garlic powder. Brown in oil until no longer pink, and browned on all sides, about 5 minutes. Add beef and all liquid to slow cooker. Add all other ingredients except parsley. Cook on HIGH for 4 hours. Stir. Check for tenderness of barley. If mostly tender, reduce heat to LOW and cook 2 additional hours. If not, leave on HIGH for those 2 hours, checking occasionally. Garnish individual portions with parsley.


Shared on The Country Cook Mar. 21, 2014


Soup at Very Good Recipes

Disclaimer: As a Field Editor of Taste of Home, I share my own thoughts and opinions of this recipe. I am not a paid employee.

Saturday, February 15, 2014

Soul Food Saturday #43

Breakfast for dinner? Sure. How about a breakfast burrito with the perfect amount of spice? Now that I have your attention, let's talk. With just a few items to chop these can be made on a busy weeknight, or a late morning breakfast. Bacon, egg, cheese, what could be a better combination? Grab a plate your going to want more than one.

Anytime of day Breakfast Burritos

2 tbs. butter
1 medium onion, diced
2 jalapenos, diced
6 strips bacon, chopped
8 eggs
2 tbs. Half and half
2 tsp. granulated garlic
2 c. Cheddar jack cheese
Salt to taste
4 large flour tortillas (or 8 medium)

In a medium skillet add butter and allow to melt. Add onions and jalapenos. Stir to combine. Cook until onions are clear. Add bacon, stir to combine. Cook until bacon is tender and cook through. In a small bowl add eggs, salt, garlic and half and half. Beat lightly to blend with seasoning. Add beaten eggs and stir gently to combine. Cook until eggs are cooked through. Add half cheese and remove from heat. Stir to combine and melt cheese. Place tortillas in a zip top bag, and seal. Pop in microwave for 30 seconds on 100% power.
Remove carefully, they will be hot. Separate tortillas gently, as to not tear them. In each tortilla add a quarter of eggs and a quarter of extra cheese. Fold up bottom and roll up. Repeat with rest of tortillas. Serve hot. Enjoy!


Wednesday, March 20, 2013

More of Indiana's Finest

As the saying goes, "There's more than corn in Indiana"...and that's true...but there is also corn, a lot of corn. For those of you who have never visited our Hoosier state, we love our corn, and we know our corn! Did you know Orville Redenbacher was born in Brazil, Indiana? Where to this day, they still hold a Popcorn Festival! And that is just one of the many corn celebrations we have across this state each year. 

Field after field corn grows from one end of Indiana to the other, and for most of us, it's one of our favorite things to eat too! There is nothing better than fresh picked sweet corn, with some butter and salt. Mmmm....my mouth is watering just thinking about it. Truly one of the things I look forward to summer the most is stopping at a roadside stand where the corn is about as fresh as you can get it. But during the winter months, I find myself looking for recipes that use canned or frozen corn so I'm able to get our corn fix. And when you take that and combine it with another favorite, my Crock Pot, it's like a 2 for 1 special! 

This soup is so simple, and oh so comforting on a cold day. Yes, I realize today is the official First Day of Spring, but let's face it, there are still some chilly days ahead of us, especially for those of you living in areas even colder than Indiana! Creamy and flavorful, your family will enjoy this oh so much. 

So, while there is more than corn in Indiana, I'm incredibly happy there is plenty of it too! 


Corn and Cheese Chowder From Fix It and Forget It
1/2 c. chopped onions
1 1/2 c. chopped celery
1 1/2 c. chopped carrots
3/4 c. water
1 (15 oz.) can corn, drained
1 (15 oz.) can creamed corn
1 1/2 c. shredded cheddar cheese, plus extra for garnish
3 c. milk
Salt and Pepper to taste

Place onions, carrots, celery, water, salt and pepper in Crock Pot. Cook on HIGH for 4-6 hours. Add both cans of corn, milk and cheese. Cook on HIGH 1 additional hour. Turn down to LOW until ready to serve. Garnish with extra cheese if desired.


Shared on Lady Behind The Curtain Mar. 20, 2013
Shared on Miz Helen's Country Cottage Mar. 21, 2013
Shared on The Country Cook Mar. 22, 2013


Tuesday, February 5, 2013

Packaging Dilema

Today you are going to take a little trip. A trip inside my head during my random thoughts at the grocery store. Hey, what can I say? Sometimes I do my best thinking while wandering the aisles. This wasn't really a pondering moment as much as a rant. A rant that occurred totally in my head.

I found myself once again standing in front of the chicken selection, feeling irritated. Why? Because of the packages of boneless chicken breasts. I don't know how it is at your store, but at 99% of the ones I shop at, if I want them here are my choices. Three per pack or seven per pack. Really? Can't we find a happy medium? Yes, there are only 3 members in my family, but I have a growing boy on my hands! And yes, I could buy the bigger pack and then freeze the extras, which I will, when they are on sale, but that doesn't always happen or isn't always in the budget. So there I was ticked off I was only getting three in the pack, knowing they weren't going to be enough for the meal I had planned. Solution? I just added extra side dishes, and we still had enough to eat. So I guess in the end, it wasn't that big of a deal, and we survived, but at the time it was annoying.

You can imagine my excitement then, when my friend shared this recipe with me. The first ingredient on the list? THREE boneless skinless chicken breasts! How perfect! I could buy one package and have it be exactly enough! In fact, I knew by shredded it, it would really stretch and might even end up being more than enough...and I was correct!

If you love Mexican food, and also love your Crock Pot, you are going to enjoy this just as much as I did. It literally took about 5 minutes to put together, cooked all day while I was busy and then was ready to serve at dinner time. Deep in flavor, moist and tender, those three chicken breasts are definitely the star!

If there is a petition out there to demand companies start putting 4 chicken breasts in a package, please let me know where I can sign! Or maybe I'll start one! Oh heck, I'm too busy to lead that movement. I'll just keep making this recipe using the three they want to give me!

Crock Pot Chicken Fajitas 
3 boneless skinless chicken breasts
3 bell peppers, green, yellow and red, thinly sliced
1 packet Fajita seasoning
1 medium white onion, thinly sliced
1/2 a medium red onion, thinly sliced
Salt and Pepper to taste

Place peppers and onions in Crock Pot. Toss to combine. Lay chicken on top. Sprinkle with salt and pepper. Sprinkle with seasoning packet. Cook on LOW 6-8 hours. (Mine were done after 6.5) Remove chicken and slice or shred. Serve with warm tortillas.
*NOTE* I removed the peppers and onions with a slotted spoon. I sliced the chicken and placed everything on my cast iron crepe pan. I then set it on the stove on LOW until I could hear it sizzle. It created that restaurant wow factor!


Shared on Mandy's Recipe Box Feb. 5, 2013
Shared on Lady Behind The Curtain Feb. 6, 2013
Shared on Miz Helen's Country Cottage Feb. 7, 2013
Shared on The Country Cook Feb. 8, 2013

Tuesday, January 29, 2013

The Only Way I Can

When our cousin was home from college for holiday break, he and I got into a very lengthily discussion about the difference between Coney Dogs and Chili Dogs. And like many subjects, we discovered this was yet something else we definitely agreed on. There is a huge difference between the two, and the terminology is not interchangeable.

I've already told you how much our family loves Coney Dogs. So much so that I had to recreate a recipe at home to match the local diner that serves them. And I'm not even going to try to lie, I think we absolutely prefer the coney style over the typical chili dog any day of the week. In fact for me, I can honestly say I'm not a fan of a "regular" chili dog whatsoever, and actually didn't eat the coney ones here in town for years because I thought they were the same until Mr. Everyday convinced me to try them; and I was instantly hooked.

For those of you who don't know, coney sauce has no beans, and the meat is broken up into a finer consistency. And the sauce itself is thinner than a chili sauce, a little more watery if you will. And these were the differences our cousin and I were talking about; and airing our frustration when a menu reads "Coney Dog" when indeed it's a chili dog. Or when people say "They are the same thing." Uh, no they are not!

But this recipe, which was given to me a few years back, is the only way I can eat an actual chili dog. And it would not taste the same using my coney sauce, so I guess the chili does have it's place. I enjoy this casserole because it's a kid friendly meal that can be done in no time after a busy day. I love to top it the same way we do our coney dogs, or a hot bowl of chili~ with a little freshly chopped white onion. The burst of crunch and flavor really rounds out the dish.

If you are a chili dog fan, you too will appreciate this meal. And if you are like us, and enjoy it's cousin, the coney, go ahead and give it a chance. I truly think you won't regret it!

Chili Dog Casserole
2 (15 oz.) cans chili with beans
6 hot dogs
6 corn tortillas, small size
Shredded Cheddar Cheese
1 small white onion, finely chopped

Preheat oven to 425. Pour both cans of chili into 9x11 baking dish. Lay each hot dog in a tortilla, roll and place on chili seam side down. Sprinkle with cheddar cheese to desired amount. (I probably used about 3/4 c.) Cover with foil and bake for 25 minutes until hot dogs are cooked and everything is heated through. Remove foil, garnish with onions and serve.


Shared on Mandy's Recipe Box Jan. 29, 2013
Shared on Lady Behind The Curtain Jan. 30, 2013
Shared on Miz Helen's Country Cottage Jan. 31, 2013
Shared on The Country Cook Feb. 1, 2013