Everyday Mom's Meals: Thyme
_____
Showing posts with label Thyme. Show all posts

Wednesday, March 25, 2015

Let Me Count The Ways

Egg Noodles. How I love thee. Let me count the ways...

What? You don't recite poetry to your food? Um, okay...awkward...

Well, I adore them. Can't get enough of them. Could eat them every single day.

To me, egg noodles are one of the most versatile and simple convenience foods out there. You can do almost anything with them, and they go with pretty much any protein, rounding out a meal perfectly.
Heck, you can just boil them and add a little butter, salt and pepper and your family will think you are a genius! Or add veggies for a one pot meal! Or add protein for even more punch. See...the possibilities are endless.

These are my latest creation. How? Easy. I wanted noodles. I had no idea what to make with them. I started throwing things into the pot until I achieved the flavor I was looking for. Sometimes recipe creation isn't as sexy as chefs/cooks would have you believe. But they are egg noodles. You would have to work pretty hard to screw them up.

If you are looking for a simple side dish for tonight's supper. Here you go. Or maybe a new dish for your Easter table??!! These would be so good with ham! Add your own favorite herbs and spices to make a whole new flavor profile! Have fun with it! Honestly? I think you could make a big batch on Sunday and eat them for lunch all week too! See, I told you they were versatile! 

Parmesan Herbed Noodles
1 lb. egg noodles
1/4 c. Parmesan cheese
4 TBS butter, softened
1 tsp. dried basil
1/4 tsp. dried thyme
3 tsp. dried parsley
Salt and Pepper to taste

Cook noodles according to package directions. Drain very well. Return to pot over warm heat. Add butter, cheese, herbs, salt and pepper. Stir well to combine. Serve with some extra herbs sprinkled on top. 


Shared on The Country Cook Mar. 27, 2015


Monday, March 9, 2015

Chilly Spring Days

According to the weather man, we have a warm up headed our way this week. No offense to him, but I will believe it when I feel it. Don't get me wrong, I will be incredibly thankful if it is indeed true, but after this loooonnngggg, cold frigid winter, I refuse to get my hopes up. But I'm telling you right now, if the thermometer reaches 50 or above, I'm busting out the flip flops!

Regardless of a warm up, we all know even after that first official day of Spring,  (Which is March 20th by the way...not that I'm keeping track or anything) we will still have some chilly days in our future. I wish it could just magically be warm and sunny every day, but I'm told we need rain too. So there will be those days when it's wet, and windy, and there is a chill in the air. And those are the ones that call out for soup on the dinner table.

This is a soup that truly eats like a meal. To me, when you have to chew a soup, it is a extra filling. I served this with just some crusty bread on the side, and we were all so full we could barely move. I love the creamy texture with the big chunks of chicken and bite of the wild rice. (Be sure to read my note below so you get the correct wild rice!) It's got amazing, rich flavor that tastes like you had to put much more effort into it than you actually did.

I'm glad to see winter on its way out, but I'm not naive enough to think we are totally out of the woods. I realize sunny and hot every single day is still very far off. So in the meantime, I will be thankful for any day above freezing, and enjoy a few more weeks of soup weather!

Crock Pot 
Creamy Chicken and Wild Rice Soup
2 lbs. boneless chicken thighs, trimmed and cut into 1 inch cubes
2 (10 3/4 oz.) cans cream of potato soup
2 (10 3/4 oz.) cans cream of chicken soup
1/2 tsp. garlic powder
2 c. chicken broth
1 c. wild rice, uncooked*
1/4 tsp. dried thyme
2 c. half and half
1/2 c. frozen chopped onions
5 medium carrots, peeled and finely chopped
3 ribs celery, finely chopped
1 TBS dried parsley
Salt and Pepper to taste

Combine all ingredients in Crock Pot, except half and half. Stir very well. Cook on LOW for 7-8 hours until rice is tender. Stir in half and half. Cook additional 30 minutes until warmed through. *NOTE* This wild rice is not a boxed mix. This is plain, uncooked wild rice. It can usually be found in a small box with the other bags/boxes of  long cooking rice.


Shared on The Country Cook Mar. 13, 2015

Friday, February 6, 2015

Eight Dollars??!!!

Woo hoo! Gas prices are way down lately around us. How about you? Now, they actually have gone back up a tad compared to a few weeks ago, but it's still cheaper than it has been in a long time, so I won't complain. However, I have noticed something interesting. Even though the cost of fuel has gone down, grocery prices, at least on some items, have continued to go up.

Now, to me, if the fuel it takes to haul them from Point A to Point B, is cheaper, than the price should reflect that. I'm not talking about things that are out of season that have to come across the country. I know to get a good tomato or orange in Indiana in the winter I'm going to pay a premium. These items are ones that don't really have a season per say, and just continue to go up.

One in particular? Chicken. It's not cheap. And it just keeps getting more not cheap. In fact, in our house, with the budget I set for myself, if chicken isn't on sale, I don't buy it. Thankfully at least one store around us usually has a sale about once per week, or every other, so I am lucky.

But a couple weeks ago I wanted a whole roasting chicken. Nothing fancy, just one I could slap some garlic and lemon on and throw in the oven. I couldn't find any in the sales ad, but I figured I would look in store since sometimes there are unadvertised specials. Well guess what! There weren't. In fact, the cheapest roasting chicken I could find was over $8!! And there are only three of us, so it's not like I was trying to buy some huge bird to feed an army. I'm talking about a 4.5-5 pound one...so you can see why $8+ was a little crazy to me.

So, there I stood, looking around in the poultry case trying to figure out what I could do instead. I'm sorry, I just refused to spend that kind of money. While what I wanted wasn't on special, they did have leg quarters at a great price, so they went in the cart instead...and this yummy recipe came to be.

If you aren't a skin lover, I'm sure this would be just as delicious on boneless skinless too, just with less of a crispy result. For me, I am a skin fanatic, from way back. In fact, others in the family, including my husband will relinquish their skin to me without even asking because they know it's a sure bet I want it.

The combination of seasonings lead to a rich flavor, with a crispy outside and tender and juicy on the inside.  A terrific oven chicken dinner perfect for any weeknight! Plus, with only a handful of ingredients, it's very budget friendly too...rather you can find the chicken on sale or not!

Rustic Roasted Chicken
4 chicken leg quarters, trimmed
3 TBS vegetable oil
1 tsp. paprika
1 tsp. seasoning salt
1/4 tsp. dried thyme
1/4 tsp. garlic powder
Salt and Pepper to taste

Preheat oven 400. Pat chicken dry with paper towels. Season with salt and pepper. In a small bowl whisk together oil, paprika, seasoning salt, thyme and garlic powder. Lay chicken on a rack in a large roasting pan. Baste liberally with marinade. Bake for 60-75 minutes, until juices run clear. Half way during cooking time, spoon some pan drippings over the chicken, and then again right before serving.
*NOTE* If your chicken doesn't give off much liquid, simply whisk together the same marinate ingredients in HALF quantities and baste during cooking. And if you do choose to use boneless skinless, I would mix up the marinade and let the chicken sit in it in the fridge for a few hours before cooking. Then mix up a second batch to baste while cooking. 


Shared on The Country Cook Feb. 6, 2015

Friday, October 24, 2014

It Doesn't Have To Be Fancy

A couple weeks ago my mom and I were browsing one of our favorite little grocery stores when we stumbled upon a brand new display. We were elated to find they are now carrying an entire line of products from our favorite Amish store. One stop shopping! Which is great, because we never get to the Amish store as much as we would like! 

Well, the first thing my eyes traveled to were the homemade Amish noodles. Yep, there I stood, in  the middle of the store, drooling. I love noodles. Plain noodles, noodles with sauce, noodles in soup...it doesn't matter to me as long as it includes noodles. 

I was looking at all the varieties, and I found a bag of the thinnest egg noodles I had ever seen. They were beautiful. (Yes, I love noodles so much I find beauty in them!) My brain immediately goes into food blogger mode and I start brainstorming what I could do with them. And that's when mom comes into the story. 

I was staring at them, the gears in my brain turning, and she asked what I was doing. "I'm trying to think of something special I could do with these. A new recipe for the blog." Here comes mom's infinite wisdom..."Why? Do something simple. It doesn't have to be fancy. They would be perfect in chicken noodle soup." Talk about a huge "Duh!!" moment! For it was in that instant I realized I had never blogged my classic, go-to chicken noodle soup recipe! Sure, I had shared my Lemon Chicken Noodle Soup forever ago, but never my "ordinary, every day" one! Sometimes you just need a little perspective; and in my life, that usually comes from mom! 

So, here it is. The chicken noodle soup recipe I've been making since we were first married. It's a classic in our house, but you might notice a couple nontraditional things about it. First of all, I don't boil the chicken with the veggies. Sure, this leads to a delicious broth, but for me, I think it also leads to chicken lacking in flavor. Instead, I roast mine, locking in all the juice and flavor. Secondly, I start my veggies by sauteing them. Why? Two reasons really. One, it helps to get them cooking, so this can be ready as soon as possible. And two, it's about flavor again. To me, veggies cooked in butter taste a whole lot better than just boiling them. Sure, it's an extra step, but one that can be done while the chicken cooks, so the soup is moving forward while you wait! 

This is a classic soup recipe for a cold day, or perfect to take to someone who is under the weather. It's one of those soups that eats like a meal. It's simple, but delicious. Easy, but filling. 

See, it doesn't have to be fancy. It just has to be yummy!

Roasted Chicken and Noodle Soup
3 boneless chicken breasts
Olive Oil
2 (32 oz.) boxes chicken broth
2 chicken bouillon cubes
1 lb. fine egg noodles
3 TBS. butter
2 c. water
5 carrots, diced
3 celery stalks, diced
1 medium white onion, diced
1/2 tsp. garlic powder
1/2 tsp. ground thyme
1 TBS dried parsley
Salt and Pepper to taste

Preheat oven to 375. Line a baking sheet with foil. Drizzle chicken with olive oil. Season with salt and pepper. Roast for 30-45 minutes until juices run clear. Allow to slightly cool and shred. Set aside. In a large stock pot over medium heat melt butter. Add onions, carrots, and celery. Saute' until veggies are beginning to soften. Add chicken to mixture. Season with garlic powder and thyme. Saute' for 2 more minutes. Add broth, water and bouillon cubes. Stir to combine. Cover and bring to a boil. Reduce heat and simmer for 20 minutes to allow flavors to develop and veggies to cook through. Bring heat back up to a hard simmer. Add noodles and cook about 5 until tender. Add parsley. Stir and serve.


Shared on The Country Cook Oct. 24, 2014


Friday, March 21, 2014

Been Trying For Years

I'm going to take you back in time today. The year is 2003. It's Christmas and I am celebrating my very first one as a newlywed. But also, we were celebrating with my parents, per a tradition we still observe today. After the presents were opened, the huge meal was eaten, and we were just sitting around, their phone rang. It was a family friend who lives down the street inviting us down for a late supper. She knew we had probably had a large meal in the early afternoon, but wanted to extend an invite for us to come down later for a simple supper of soup. She had made a few different varieties and wanted to share the leftovers. Never ones to turn down a sweet invitation from a friend, especially when it involves food, we were happy to go.

 Upon entering the dining room we discovered her version of "I have a few leftovers" really meant she had three different kinds, and lots of each left, along with homemade bread, rolls, and sweets. And even though we were still pretty full from our meal earlier in the day, boy oh boy did we eat good!

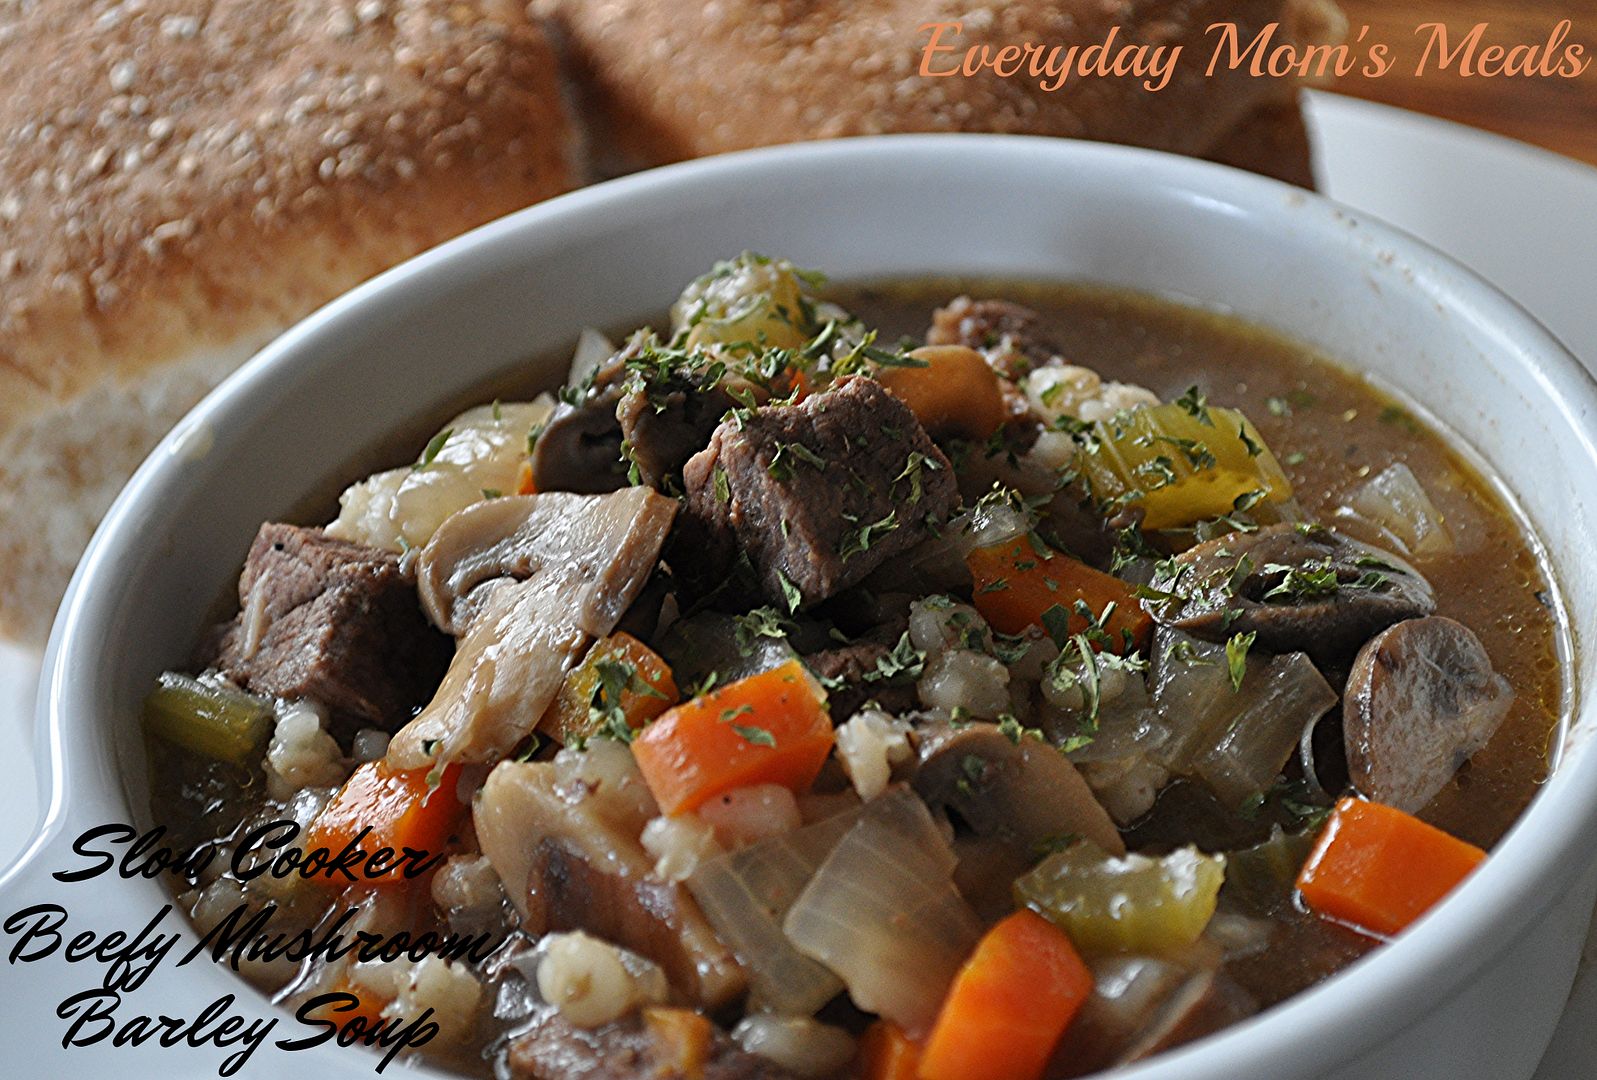
Each kind she served was delicious, but to be honest I can't remember what two of them were. Why? Because the third was hands down my favorite, and for the past decade, the one I have been trying to recreate in my own kitchen. It was a barley soup with a beef base and big slices of mushrooms. And not only was it my favorite, but also Mr. Everyday's and my Daddy's too. I can still remember all times we uttered the words "Oh My Gosh! This is delicious!" while slurping it up as fast as we could.

Over the years I've tried a few different versions, but never recreating it's tastiness...until now! This is the first one I've tried that was so close, my taste buds immediately stood up and screamed "You did it!!!"

Like beef? Like mushrooms? Like soups? Like using your slow cooker on busy days? If you answered yes to all of those, or even just one, then this is the soup for you! I'm happy to bring you a little something from my past that your family could very well enjoy for years to come!

Slow Cooker Beefy Mushroom Barley Soup Adapted from Taste of Home
2 lbs. round steak, cut into 1 inch cubes
1 TBS canola oil
1 large onion, diced
4 medium carrots, diced
2 ribs celery, diced
2 garlic cloves, minced
8 oz. button mushrooms, sliced
1 tsp. garlic powder
1 (14 oz.) can beef broth
1 (14 oz.) can chicken broth
4 beef bouillon cubes
1/2 c. pearl barley
1/2 tsp. dried thyme
Dried Parsley, for garnish

Preheat slow cooker to HIGH. In a large skillet, heat oil to medium high. Season beef with salt, pepper and garlic powder. Brown in oil until no longer pink, and browned on all sides, about 5 minutes. Add beef and all liquid to slow cooker. Add all other ingredients except parsley. Cook on HIGH for 4 hours. Stir. Check for tenderness of barley. If mostly tender, reduce heat to LOW and cook 2 additional hours. If not, leave on HIGH for those 2 hours, checking occasionally. Garnish individual portions with parsley.


Shared on The Country Cook Mar. 21, 2014


Soup at Very Good Recipes

Disclaimer: As a Field Editor of Taste of Home, I share my own thoughts and opinions of this recipe. I am not a paid employee.

Wednesday, February 26, 2014

Budget Friendly Chicken

Every week when I am ready to make out my meal plan for the upcoming week, I sit down and decide what meals I want to make, scour the kitchen to see what I have on hand, and check the sale papers to see what great bargains I can take advantage of as well. It's a three step process that I've found leads to us eating the yummiest food, on the best budget. So when I see a great sale on chicken, you can bet I'm going to try find a way to use it, rather it be a tried and true recipe, or something new. And I'm pretty sure I'm not the only penny pinching mom/wife who keeps such a close eye on the sale ads. 

That is exactly how this recipe came about. Well, that and a bit of an "oops" on my part. I was actually planning on making my Garlic Lime Chicken, which is a recipe I wrote using breast meat, but when thighs were on sale for super cheap, I figured there was no reason why they couldn't be substituted. Sure, that was a great plan. Until I forgot that recipe also needs to marinade in the fridge for about 8 hours; and when I was ready to make supper, they were still in the package, with not one ounce of marinade on them. 

I had these beautiful chicken thighs to use, and let's face it, when you get something for a great price, they only taste better! So I needed to come up with a new recipe, that was quick, but still flavorful. Well, let's just say not only was it a complete success, but the "oops" turned out a good thing, leading to yet another delicious chicken recipe, which let's face it, is always a good thing. 

If you can find chicken thighs on sale too, be sure to keep this simple dish in mind. Or maybe for those nights when you have one thing planned, but instead to need to think quickly on your feet to make sure supper is saved and the family is still fed on time, being one the wiser to your mistake!

Crispy Baked Chicken Thighs
8 bone-in, skin-on chicken thighs, extra fat trimmed off
Cooking Spray
1/2 tsp. onion powder
1/2 tsp. garlic salt
1/2 tsp. oregano
1/2 tsp. thyme
1/2 tsp. paprika
Salt and Pepper to taste

Preheat oven to 350. Line a rimmed baking sheet with foil. Spray liberally with cooking spray. Lay chicken on sheet. Spray with cooking spray. Sprinkle with salt and pepper. Combine other spices and herbs and mix well. Sprinkle liberally over chicken, and under skin directly on meat. Bake for 30 minutes. Open oven and spray chicken again with cooking spray. Continue cooking for 30 minutes (1 hour total) until juices run clear and chicken is crispy. Allow to rest 5 minutes before serving.


Shared on The Country Cook Feb. 28, 2014


Friday, January 24, 2014

His Face Said It All

I've got a question for all you wives out there. Has your husband ever asked what's for dinner, and when you answer him, no matter how much he tries to hide his disgust or disappointment, his face says how he really feels? If you answered yes, please, join me in my boat! Now, I will admit most of the time my "boys" are up for just about anything I want to experiment with in the kitchen; but every once in a while even I get the feeling that something I'm about to make is not a good idea.

This is how it happened. We were driving to the grocery store, and I asked my husband if we had any more pork sausage in the freezer, before I bought any. He answered me, and then asked what I was using it for. I replied, "A new recipe", and began describing it to him...and that's when it happened. The look on his face was priceless, and there was no doubt I would not be making that. Now, I'm not willing to share with you what it was, because my hope is to convince him he needs to try it, and I don't want any preconceived notions about it before I do.

So, the next step was to figure out what I would make instead, but by this time I was standing in the grocery store, trying to adapt my list, create a recipe in my head, and fight all the pre-snow storm shoppers. Oh, yeah, I forgot to mention that. This happened the weekend before the big snow fall, so of course, the grocery store shelves were bare! No kidding, the first two recipes I came up I couldn't do because 90% of the ingredients were not to be found any where in this city.

This is what I finally came up with, and I have to admit I am so happy I did. My boys love a little spice in their food, and they could not get enough of this. They gobbled it up and told me over and over how yummy it was. But don't worry if you aren't into too much heat, because either am I, and I could enjoy this too without my tongue crying out for help.

Don't be intimated by the list of ingredients. I'm guessing you probably have a good majority of it in your pantry. And if you prefer to slow cook your sauce in the Crock Pot, I'm sure it would work perfectly as well.

That moment when you realize a recipe is simply not going to be received well is something every home cook dreads. But at least this time it happened before it was even cooked, and not as the first bite is being chewed!

Shells with Zesty Tomato Sauce
1 lb. bulk Italian sausage
2 TBS olive oil
1 lb. medium shell pasta
8 oz. white button mushrooms, sliced
1 (28 oz.) can crushed tomatoes
3 (8 oz.) cans tomato sauce
1 (12 oz.) can tomato paste
1 small onion, finely chopped
1 1/2 tsp. dried basil
1 1/2 tsp. dried oregano
1/4 tsp. dried thyme
1/2 tsp. dried parsley, extra for garnish
1 tsp. garlic powder
1/4 tsp. red pepper flakes
1 1/2 tsp. sugar
1/2 tsp. white vinegar
1 c. water
1/4 c. grated Parmesan cheese
Salt and Pepper to taste
Shaved Parmesan for garnish, optional

In Dutch oven, or large skillet, brown sausage until no longer pink, about 10 minutes. Drain well. Wipe out any dark bits from pan. Add oil and heat over medium. Add onions and mushrooms. Saute' until tender, about 5-7 minutes. Using a mortar and pestal (or small bowl) combine basil, oregano, thyme and parsley. Crush and mix well. When onion mixture is tender, add all other ingredients except Parmesan cheese. Stir well to combine. Bring to a boil. Reduce heat to low, cover and simmer 1 1/2-2 hours, stirring occasionally. Cook pasta according to package directions and drain VERY well. Add grated Parmesan cheese to sauce and mix well. Add shells to sauce and toss to combine. Serve with shaved Parmesan  and extra parsley sprinkled on top.


Shared on The Country Cook Jan. 24, 2014

Pasta at Very Good Recipes

Monday, January 13, 2014

Mommy, They Look Like Fingers

That was my son's reaction when he saw these cooking in the pan. Well, to be more specific, my new oven safe Dutch Oven that Mr. Everyday got me for Christmas, that I am totally in love with!

Anyway, little man could see these cooking through the glass lid and asked "Mommy, what are you making? They look like fingers." I laughed and explained that he was right on the money since they were fingerling potatoes! And if you've ever seen them, you know what I'm talking about!

I actually found these in the store when I was on the hunt for some baby red potatoes, but couldn't find any I liked at a price I liked. These appeared to be something the store had gotten in for the holidays and were running on "special" to try to get rid of them since Christmas was over. I bought two packages, not knowing yet what I was going to do with them.

Now, back to this skillet I love so much! See, when I get something new in my kitchen I look for anything and everything I can cook in it. So, the day after Christmas (yeah, I didn't make it more than 24 hours without having to play with it!) I remembered those potatoes sitting in the crisper drawer and knew I could do something magical with them in my new pan. Sure, I could have just simply oven roasted them, but what fun would that have been?

If you're always on the hunt for new potato dishes, be sure to jot this one down, or Pin it. They are crispy on the outside, but tender and butter inside. And if you can't find fingerlings in your store, baby potatoes of any variety would work just as well. You just want something with the skin left on, so they can get browned and crisp.

Did you get any new kitchen "toys" for Christmas? If so, leave a comment telling me what they are! I can always add to my wish list for next year!

Pan Roasted Fingerling Potatoes
1 lb. yellow fingerling potatoes
2 TBS olive oil
2 cloves garlic, minced
1 tsp. dried rosemary
1 tsp. dried thyme
2 tsp. dried parsley
Salt and Pepper to taste

In a large dutch oven or high sided skillet, cover potatoes with cold water. Bring to a boil and cook until just fork tender, about 5-7 minutes. Drain well. Wipe out pan. Heat oil over medium high heat. Add potatoes and seasonings. Stir to combine. Saute' until browned on all sides, stirring often, about 10-15 minutes. Garnish with extra parsley if desired.


Shared on The Country Cook Jan. 17, 2014

Wednesday, August 28, 2013

A Hand In The Kitchen Part 2 {A Review of Cooking Planit}

Monday I introduced you to my new favorite assistant in the kitchen, Cooking Planit! Their site and their app are a home cook's best friend. (If you missed Monday's post, click here to read all about it!)

Today I'm sharing a delicious sandwich that if it weren't for the step by step instructions provided by Cooking Planit, might seem a little over whelming to an inexperienced cook. Or heck, even one like me who spends a lot of time in the kitchen! But I promise you, it's very simple, and the end result is very worth it.

Now, just like the Bowtie Pasta Salad I shared the other day, I made a few adjustments to this recipe to better suit our taste buds. To see the original, click here. One of the things that caught my eye about this sandwich was the avocado mayo...but then I remembered Mr. Everyday does not care for avocados in the same loving way I do, so I decided to substitute my herb mayo that I've been making for years.

Also, while I love arugula, I was already buying the spinach for the pasta salad, so I thought why not get double duty out of it, and include it as the green in the sandwich instead. That's just my budget conscious self shining through. I think the arugula would be 100% yummy too.

But without a doubt, the star of this sandwich, and the one thing I knew I could not mess with, is the Pickled Red Onions. Talk about taking a simple ingredient and with almost no effort transforming it into something new, unique and delicious! Once you make them, you will find a hundred more ways to use them, I know it!

A simple sandwich supper is always welcome in this house. If it is in yours too, try this one tonight, and maybe that scrumptious pasta salad too. Oh, and don't forget to check out Cooking Planit, and scroll down for the fabulous giveaway they are offering EMM readers too!

Roast Chicken Sandwich with Pickled Red Onions and Herb Mayo Adapted from Cooking Planit
1 (1.25 lb.) package chicken tenders
1/2 tsp. garlic powder
1/2 tsp. onion powder
1 TBS olive oil
1 c. baby spinach, stems removed
1 small cucumber, peeled and thinly sliced
Salt and Pepper to taste
4 Hoagie buns

Preheat oven to 375. Place chicken on baking sheet. Drizzle with olive oil. Sprinkle with garlic powder, onion, powder, salt and pepper. Stir to coat. Roast for 20-30 minutes until cooked through. Spread each bun with herb mayo. Layer spinach, cucumber and chicken. Top with pickled onions.

Pickled Red Onions:
1 medium red onion, thinly sliced
1 c. apple cider vinegar
1 tsp. mustard seed
1 dried bay leaf
1 tsp. salt
3 black peppercorns
2 TBS sugar

Fill a small saucepan 2/3 with water. Bring to a boil. Cook onions for 1 minute to soften. Drain. In the same pot, combine vinegar, mustard seed, bay leaf, salt, peppercorns and sugar. Stir well. Bring to a boil. Cook onions for 8-10 minutes until pink in color. Drain and reserve.

Herb Mayo:
1/2 c. mayo
1 tsp. dried basil
1 tsp. dried oregano
1 tsp. dill weed
1/2 tsp. dried parsley

Mix all ingredients well and chill until ready to use.


Shared on The Country Cook Aug. 30, 2013
Sandwich at Very Good Recipes


a Rafflecopter giveaway

Friday, July 5, 2013

A Little of This, A Little of That

Sometimes when I have chicken thawing in the fridge, the only thing I know for certain I'm going to do with it is cook it. Yep, I go into dinner without a definite battle plan. Now, I will be completely honest, if it were anything else besides chicken I might freak out a little, but let's face it, chicken happens to be one of the most versatile proteins out there; and it can be transformed from boring to tasty with only a few ingredients.

This was the exact scenario the evening this recipe was born. Boneless chicken breasts happened to be on sale the previous week so I bought them without really knowing why. So the night it was time to turn them into dinner, I began thinking about anything and everything I had in the fridge and pantry that could help me.

We love basin garlic and lemon chicken. It's one of the most used marinades in our house. I've been making it for years, and knew it might be a good base to build from. So I looked around for other flavors I knew would compliment the lemon well, and what I came up with turned out to be super tasty! The lemon helps to keep the meat juicy and tender, while the balsamic gives it a sweet glazed like texture. It makes the outside crispy while the inside stays succulent and flavorful.

If you find yourself in the kitchen with no real idea what to make with a certain meat one night, start playing around with what you have. You know what flavors your family loves, so start adding a "little of this, a little of that" until you get the perfect combination to turn your everyday meal into something special!

Grilled Balsamic Lemon Thyme Chicken
3 boneless chicken breasts
1/2 c. olive oil
3 TBS balsamic vinegar
1 lemon juiced
2 tsp. dried thyme
1 1/2 TBS Montreal Chicken Seasoning, plus a little extra
2 garlic cloves, minced
Salt and Pepper to taste

In a medium bowl, whisk together marinade ingredients. Place chicken in large container. Pour half the marinade over chicken and stir well. Place reserved marinade in fridge. Allow chicken to marinade in fridge for 4-5 hours, stirring half way through. Remove from marinade 1/2 hour before grilling time and allow meat to come up to room temperature. Sprinkle with extra Montreal Seasoning. When ready, preheat grill to high. Place chicken on grill, searing both sides for 2 minutes. Reduce heat to medium and continue cooking until cooked through, about 15-20 minutes. Use reserved marinade to baste chicken often during grilling.
*NOTE* Due to the sugars in the vinegar and the oil, this can burn very easily. We like our grilled chicken a little dark around the edges, but if you don't, watch it carefully.


Chicken at Very Good Recipes
Pin It

Wednesday, February 20, 2013

Childhood Soup

I have many fond food memories from when I was little. Dishes mom made better than anyone, things that grandma made better than anyone, special traditions that seemed so simple, but now are remembered with such great fondness. Like when my dad used to "tear down" making breakfast for supper. Pancakes just taste better at 6:30 pm for some reason. And those memories are exactly where the inspiration for this recipe comes from.

About once a month, mom would declare it was "soup night" and in our family that meant 1 thing. Everyone got to choose their own variety of canned soup to enjoy. Now, if everyone wanted the same, it became a meal. But sometimes the three of us would all want different kinds, and that was okay because mom would make them all. That's what made it so much fun! And 9 times out of 10, I was going to choose Bean and Bacon! Oh I loved it so much! Just the smell could make my mouth water! Plus, mom always treated me to my favorite "dipper"~ some crispy Texas toast. Mmm Mmm good! 

So you can imagine how thrilled I was when I came across this homemade, Crock Pot version! I couldn't believe how easy it was! I guess I shouldn't have been, but it was a pleasant surprise none the less. If you like my Ham and Beans, then I strongly suggest you try this. It's very similar, but still different enough not to seem like a repeat. Plus, an added bonus? Put this in the slow cooker int he morning, and when you come home after a long day, your house will smell amazing! Believe me, I'm speaking from personal experience. To make a little easier on yourself, let me suggest prepping the carrots and onions the night before. Pop them in the fridge and they are waiting on you the next morning when you might be in a rush trying to get this ready!

Another comforting food from my childhood updated just a little bit; and it includes my best kitchen friend, the Crock Pot. It doesn't get much better than that!

Crock Pot Bean and Bacon Soup From Crock Pot Ladies
16 oz. dried northern beans
6 slices bacon, cooked and chopped...reserve a little for garnish
32 oz. chicken broth
1 medium yellow onion, diced
3-5 large carrots, diced
2 cloves garlic, minced
1/2 tsp. dried thyme
1/2 tsp. dried rosemary
1/2 tsp. pepper
Salt to taste
Water

Put beans in a large bowl and cover with cold water by 2 inches. Soak overnight. Drain beans and add to Crock Pot. Add bacon, onions, carrots and garlic. Pour in broth. Add enough water to cover mixture by 1 inch. Add seasonings and stir. Cook on LOW for 10-12 hours or HIGH for 6-8. Garnish with crispy bacon before serving. 
*NOTE* I chopped the onions and carrots in the food processor so they were extra fine. 


Shared on Lady Behind The Curtain Feb. 20, 2013
Shared on Miz Helen's Country Cottage Feb. 21, 2013
Shared on The Country Cook Feb. 22, 2013

Friday, January 18, 2013

Back In Time

Right after the beginning of the New Year, a dear friend asked me if I had any "foodie resolutions". Well, as a general rule I don't make New Year's resolutions. Personally I think they are just asking for us to feel let down, disappointed in ourselves and guilty when we break them. But she did get me to thinking about what I could do here on EMM as a resolution type of thing. Two years ago I vowed to make at least 1 new recipe per week for the entire year, and I DID! Some weeks even more than one. But to be honest I don't think I could do that again if I tried. Our schedules weren't nearly as busy back then as they are now, and some weeks I just need to rely on old stand bys to make sure there is food on the table each night. So after a little thought I decided on a foodie resolution that will not only help out all of my readers but also me. See, there are quite a few recipes I blogged back when only my mom and husband read EMM; so why not go back and "re-blog" some of those? That way, they are like new recipes to all of you but still things that I don't necessarily need to "test" before I feel comfortable sharing them. They are already blog approved, just hidden in the vault as I like to call it.

So to start off this 2013 resolution, I chose one of my favorite recipes of the bunch. This is simple yet delicious. Easy yet elegant. And 100% delicious. If you are a fan of artichokes and lemon, this will excite you as much as it does me. Plus, I love the fact it uses boneless chicken thighs because they are one of the most affordable cuts of chicken in the store!

I hope this experiment of going back in time on EMM turns out as fun and tasty as I plan, and this recipe is the perfect way to begin!

Chicken with Artichokes and Lemon
1 1/2 lb. boneless, skinless chicken thighs, patted dry (about 6 pieces)
1/4 c. all purpose flour
2 TBS vegetable oil
1 c. chicken broth
2 cans artichoke hearts in water, drained
1 lemon, thinly sliced
1/2 tsp dried thyme
1 tsp. dried parsley
1 TBS butter
Salt and Pepper to taste
Garlic Salt to taste

Sprinkle chicken with garlic salt, salt and pepper. Lightly dredge both sides in flour. Warm oil in a large skillet over medium high heat. Add chicken and cook, turning once, until browned on both sides, about 4 minutes total. Add broth, and artichokes and bring to a boil. Reduce heat, cover and simmer until chicken is almost cooked through, 10-15 minutes. Scatter lemon slices over chicken, cover and cook until chicken is done, 2-3 minutes longer. Transfer chicken, artichokes and lemons to platter. Add butter to skillet. Bring to a boil. Reduce heat and stir in thyme and parsley. Cook 1-2 minutes until slightly thickened and "shiny". Pour sauce over chicken.


Shared on The Country Cook Jan. 18, 2013
Shared on Make Ahead Meals Jan. 21, 2013
Shared on Mandy's Recipe Box Jan. 22, 2013

Tuesday, December 18, 2012

Two Pot Wonder

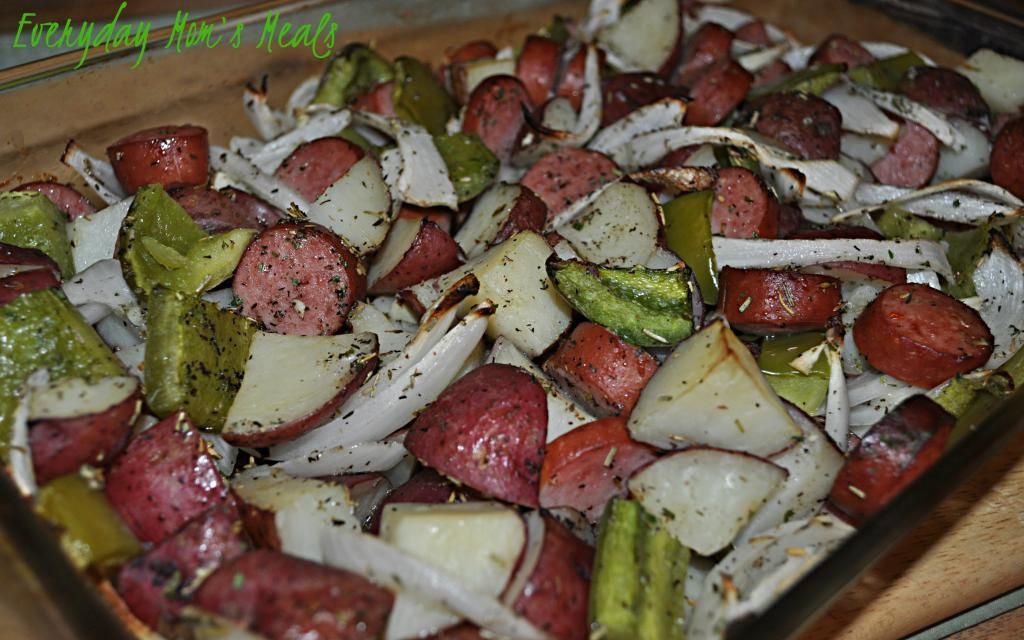
When I find something in my freezer that I didn't even know was there (okay, maybe I knew and forgot) sometimes I look as it as an opportunity, Sure, I could go ahead and make whatever I had originally planned with it, but most times when I this happens, it's something that leftover or "extra" from another recipe. For example, this came about because I found an extra package of smoked sausage, after buying three when I only needed two. So yes, I could have went ahead and bought one more package and fixed the same meal I had the previous time, but instead I went looking for something new. And what I found is not only delicious and easy, it's a great recipe to feed a crowd. The way it is written here, I would say it would feed 4-5 comfortably. But it could simply be doubled (If you do, use two separate pans for more even cooking) to feed a group much bigger! Plus it has your protein, starch and veggies all in one place! Technically I can't call it a one dish wonder, because you do have to prepare the potatoes in a separate pan, but if you're like me, that one can be washed, dried and put away by the time the oven timer chimes, and you are left with only one to clean after supper! If you are planning on a full house at some point over the next couple weeks, and want to serve more than just one big meal with leftovers for days, this is would be a great solution! Remember to check that freezer now and again too. You never know what inspiration you might find.

Sausage, Potato and Pepper Bake From Hillshire Farm
1 (1 lb.) package turkey smoked sausage, sliced into 1/4" pieces
6 cups red potatoes, cut into 1 inch cubes
2 green peppers, seeded and cut into 1 inch pieces
1 large onion, thinly sliced
2 garlic cloves, minced
1/4 c. chicken broth
1 TBS olive oil
1 tsp dried rosemary
1 tsp dried thyme
Salt and Pepper to taste


Preheat oven to 400. In a medium saucepan, cover potatoes with water. Bring to a boil. Reduce heat to simmer. Cook 10 minutes until crisp-tender. Drain well. In a 9x13 pan, combine potatoes, peppers, onions, garlic and sausage. In a small bowl combine chicken broth, oil and seasonings. Mix well. Pour oil mixture over sausage mixture. Gently stir well to combine and coat. Bake uncovered for 40-45 minutes until veggies are tender and potatoes are browned around edges.


Shared on Mandy's Recipe Box Dec. 18, 2012
Shared on Lady Behind The Curtain Dec. 19, 2012
Shared on Miz Helen's Country Cottage Dec. 20, 2012
Shared on The Country Cook Dec. 21, 2012