So, who got a new air fryer for Christmas? *Raises hand*
Yep, I have joined the cool kids club!
Want to hear the funny part?
I actually had an air fryer given to me through the blog. It was a very nice one, but on the larger side. It was very intimidating, at least to me. Plus, we don't have a lot of extra counter space in the kitchen and when I decided I wanted an ice maker, I decided the air fryer had to go. I found it a very lovely home with a friend, and she was super excited. (And that ice maker? One of the best purchases ever!)
Fast forward to this past fall and I had the opportunity to have another air fryer given to me for work purposes. I did learn from the last time and asked for it to be a smaller model. We still didn't have the counter space for it, so a new microwave cart was promptly ordered and it now resides happily on the bottom shelf.
I will fully admit I am having fun playing around with it, finding all sorts of things to make in it. From frozen taquitos and jalapeño poppers for our New Year's Eve appetizer buffet, to tasty weeknight meals.
One of the first dishes I knew I wanted to try was salmon-for my boys. I don't eat salmon (thanks to a nasty food poisoning over 20 years ago) but oh my they love it. So, I knew I would score major wife/mom points with this one!
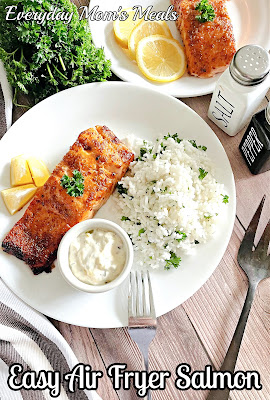
This is the easiest fish recipe ever, and it comes out with immense flavor. Since I don't eat it, I will share what the hubby said after the first bite. "Oh my gosh. It's moist. Falling apart tender. I taste sweet, savory and a little tang too." Both he and the teenager agreed it was 100% delicious and I had their "permission" to make it again and again. I would say that is a rave review!
If you're experimenting with your new air fryer, or even a seasoned pro, I hope this simple but oh so flavorful salmon makes it way to your table soon. And be on the lookout for more air fryer recipes as I get more comfortable with my new toy!
What Temperature To Cook Salmon In The Air Fryer
Various recipes will say temps between 350 and 400. I did 400 because my filets were a little thicker than 6 ounces.
How Long Do I Cook Salmon In The Air Fryer
Again, different recipes have different cook times. Some say it's done as quick as 7-9 minutes. This one takes a little longer. The size of your air fryer will determine cook time.
Can I Use Oil In The Air Fryer
When you want to use oil on something in the air fryer, be sure to put it directly on the food. Brushing or spraying oil on the food itself helps to protect the air fryer surface.
Should I Use Salmon With or Without Skin
You can use either in this recipe, but I will tell you while I prefer skin off, it would help to keep the salmon together once cooked. This was super fragile and fell apart very easily-having the skin on would have helped to prevent that. Salmon skin is absolutely edible, and would nice and crisp in the air fryer.
How Do You Know Salmon Is Cooked In The Air Fryer
Salmon turns opaque when cooked and becomes very flaky. But the only sure way to know it has reached that 145 degree temp is with an internal meat thermometer.
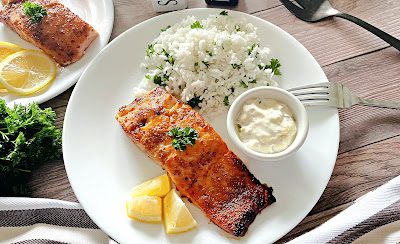
Easy Air Fryer Salmon
2 salmon fillets, 6-8 ounces each
1 TBS stone ground mustard
1 TBS brown sugar
1/2 TBS olive oil
1/2 TBS soy sauce
1/4 tsp. garlic powder
Salt and pepper
Fresh parsley
Lemon
Preheat air fryer to 400. (Check your manual- mine needs about 5 minutes) In a small bowl combine mustard, soy, brown sugar, olive oil, garlic powder, salt and pepper. Using paper towels, dab salmon dry on both sides. Brush mustard mixture on salmon, on both sides. Sprinkle with extra salt and pepper. Place in air fryer basket. Cook for 10-15 minutes, until internal temp of 145. Carefully remove and garnish with parsley. Serve with lemon and tartar sauce if desired.
Best Tips
You can use salmon with or without skin. I prefer without.
Air fryer size will alter cooking times. Mine is an 8 quart.
Start checking salmon after 10 minutes and continue cooking until a meat thermometer reaches 145 degrees.
The salmon will be very fragile. Use a sturdy, flat spatula to remove. It might still fall apart.
Dijon or spicy brown mustard would also be delicious.
You can substitute honey for brown sugar.
Want a great homemade tartar sauce? Here is my recipe.
Shared at Weekend Potluck