Everyday Mom's Meals: Parsley
_____
Showing posts with label Parsley. Show all posts

Wednesday, August 12, 2015

One Extra Pot

So, I wish I could "advertise" this as a one pot wonder, but I can't tell a lie. It would be false advertising and I just can't do that. However, it only takes one extra pot, so it's like a very close cousin! That's all. Just one more, and it is barely going to get dirty, so it only half counts. 

I think one of the reason why when searching for recipes we all seem to stop at the ones labeled "one pot" or "one skillet" is because life demands meals be quick, both for cooking time, and clean up. Let's face it, those huge meals taste great and are so satisfying, but the after math? I for one always wish for the dish fairy to show up...and she never does....lazy witch. You know the ones I'm talking about. Where it seems like every single dish/pan/pot/utensil in the kitchen is dirty and piled up in the sink. Even with the added blessing of a dishwasher, the amount of work can seem daunting. So when I can give my family, and all of you, a dish this delicious, and make the promise of only two pans...it's a successful food blogger day. 

This is another way to really stretch the budget when it comes to seafood. If you haven't seen me sing the praises of the frozen options in the stores today, you are now. The 12 oz. bag I used in this recipe cost me about $5, and easily fed our family of three. Oh, and if you're wondering if you have to buy the ones with tail left on per the recipe, it's a personal choice. I like to use them in dishes like this because they shrink less. But if you don't mind that, and don't want to mess with the tails when chowing down, feel free to use tail off. 

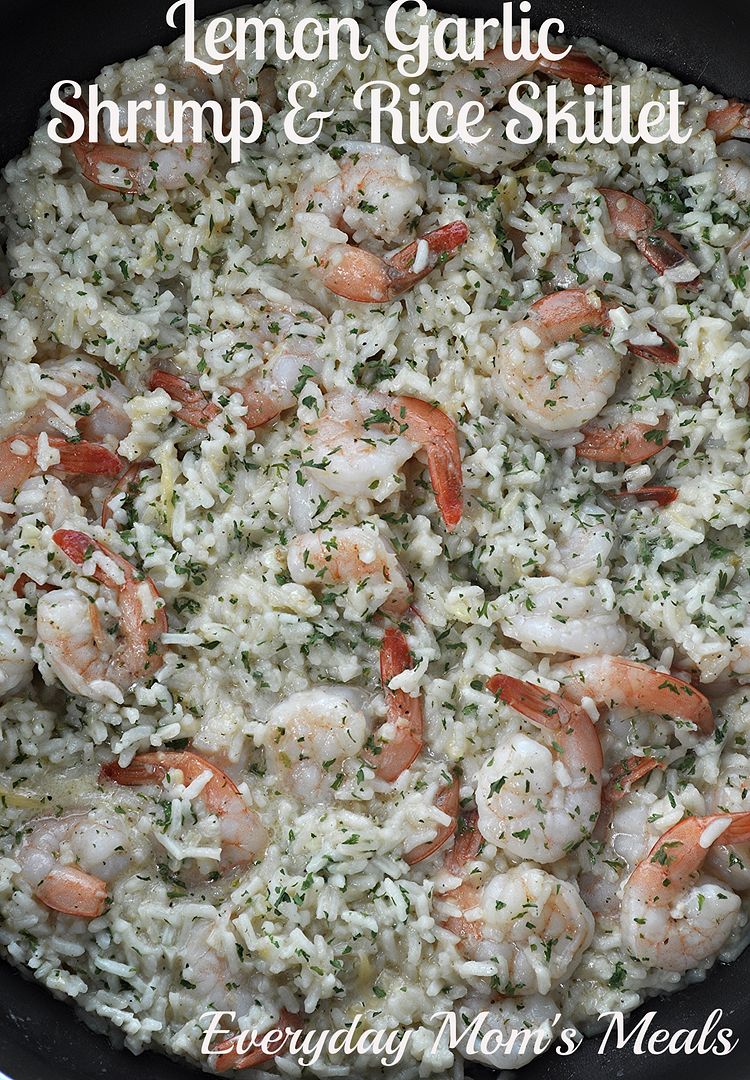
Between the garlic and lemon, this is bursting with flavor, and even with the cheese and milk, I think it's still super light. Add a veggie and maybe some bread on the side and supper is on the table in under 30 minutes! And your clean up will be even less than that!

Lemon Garlic Shrimp and Rice Skillet
Inspired by Diethood
2 c. instant white rice
2 c. water
2 chicken bouillon cubes 
6 TBS butter
5 large garlic cloves, finely chopped
12 oz. frozen medium shrimp, tail on, thawed
6 TBS milk
1/2 c. shredded Parmesan cheese
1 1/2 TBS dried parsley, extra for garnish
Juice of 1/2 lemon
Salt and Pepper to taste 

In a medium pot, bring water and bouillon cubes to boil. Add rice. Stir. Cover. Remove from heat. Let stand 5 minutes. Fluff with fork. Set aside. (These were my directions. Check your box!) In a large skillet, heat butter over low heat. Add garlic and cook for 2-3 minutes until fragrant, stirring constantly. Add shrimp, salt and pepper. Cook and stir, until shrimp are pink, about 5 minutes. Move shrimp to sides of pan, add rice. Stir well. Add milk, cheese and parsley. Stir to combine and cook for 1-2 minutes more until thickened. Remove from heat. Squeeze lemon over. Sprinkle with extra parsley. 


Shared at Weekend Potluck

Wednesday, June 24, 2015

What I Won't Do For Him

When I was a kid, one of my favorite meals was my mom's salmon patties. I used to ask her to make them all the time. Then when Mr. E and I started dating, they became one of his favorites for her to make also. So, it shouldn't be a big deal for me to make them for him now, right??!! I should jump at the chance, right??!! Wrong. Very wrong.

See, some years back, we went to a local seafood restaurant, which shall remain nameless, and I ordered something I knew I would love. Salmon. A nice piece, with a sweet glaze and grilled. Mmmm....yummy. Right? Wrong again. Because by that night, I realized food poisoning wasn't my friend and I was so, so sick.

Now I don't know about you, but once something makes me sick, it takes a very long time for me to allow it back into my mouth again. And sometimes it is simply never welcome back. That was the case with salmon. I was so sick and have such vivid memories of it, even the smell of it can make my tummy not happy, so I've avoided it for years.

But then a couple weeks ago, while making out my meal plan, I asked my hubby what he was hungry for. "Your mom's salmon patties." Really? Seriously? Did you just say that. Well evidently I was feeling generous that day, or maybe he had done something nice for me, I can't remember, because I actually agreed to this.

Thankfully, since it was a different texture, a different flavor and something that actually brought back happy memories of eating it, I did just find. Whew...I'm so happy! I've missed not eating one of mom's best recipes!

These are super simple and come together much quicker than you might think. I like to serve them with a fresh creamy dill dipping sauce and some rice, for a supper filled with good protein!

I am so happy I made it through this meal and now know I can enjoy these once again, just as much as I did when I was a kid. Well, almost...they are never as good as when mom made them!

P.S. Today just happens to be my parents wedding anniversary too. Happy Anniversary, Mom and Dad! We are so blessed to have you as parents and wish you many more blessed years to come!

Mom's Salmon Patties
2 (14.75 oz.) cans salmon, drained and bones removed
1 egg, beaten
1 c. bread crumbs*
1/2 c. finely chopped onion
1 TBS dried parsley
Salt and Pepper to taste
Vegetable Oil for frying
Lemon slices for garnish

Dill Sauce
1/3 c. mayo
1/3 c. sour cream
1 tsp. dried parsley
1 1/2 tsp. dill weed
1 tsp. lemon juice
1 tsp. horseradish
1 TBS minced onion
1/4 tsp. garlic salt
Pepper to taste

Combine all ingredients for dill sauce in a medium bowl. Stir until well mixed. Chill until ready to serve. Place drained salmon in a large bowl. With hands, break up and recheck for bone pieces. Add egg and onion. Add bread crumbs, a little at a time until mixture starts to bind. Add salt, pepper and parsley. Mix well using hands. Using hand, make patties about 1/2" thick. Heat oil until 350 degrees, or medium-high. Fry on both sides until browned. Serve with sauce and lemon on the side. *NOTE* I used about a cup of bread crumbs. You will need to eyeball it to see how much you will need, depending on how wet your salmon is. We like them extra crispy on the outside, because mom always made them that way. If you don't want them quite as brown, fry at 325 and watch very closely.


Monday, June 1, 2015

$50 Meal Plan Challenge Month #3 { Indiana Family of Farmers}

Whew....where did May go? That's okay though. It's June 1st and that means we only have 7 more days of school. Yes, thanks to all those snow days we have class until June 8th. But the beginning of the month also means it's time for me to take the $50 meal plan challenge once again, and share my ideas with all of you! 

This meal plan was actually one designed around our Memorial Day weekend a couple weeks ago. One of our favorite summer time activities is heading to a local park, complete with splash pad, and let the boy run in the sun, play in the water, and then enjoy a tasty meal. And if I plan it just right, watch the sale ads, and buy carefully, a fun day can also be economical! I love when I can give my family great time, make some memories and still stay on budget!

Meal 1 (Picnic)
Fried Chicken
Tex-Mex Pasta Salad*
Deviled Eggs
Nectarines
Chips
Cookies
** I knew with the holiday weekend our local stores would have their deli fried chicken on special. I was able to get 8 pieces for only $4.99. The pasta salad was a great deal because it used many pantry items, and made enough for us to eat, and then have leftovers for lunch all week long. Plus, it's a new recipe to share with all of you!

Meal 2
Dijon Chicken Lettuce Cups
Fresh Pineapple
Cottage Cheese
** I love making salads and light meals during the hot days of summer; plus not serving it on bread or rolls can sometimes save some cash. Plus this week our local Aldi had a coupon for $3 off fresh meat. I got over 2 lbs. of chicken for about $2! Oh, and they had the pineapple for $.99 too. Seriously, if you have an Aldi in your area and have never shopped there, check it out! They have great food (even gluten free and organic) at GREAT prices!

Meal 3
Grilled Steaks
Baked Sweet Potatoes
Horseradish Coleslaw
** If this is your first time reading my challenge posts, seeing the word "steak" might confuse you when I'm supposed to be on budget. So let me explain for those of you who don't know. We have freezer beef on hands at all times. Sure, the initial cost might be something we have to save for, but over time it saves us a ton of money. If you have never looked into it, check with your local butcher and see if this might be an economical option for your family too.

Meal 4
Eggs
Sausage Links
Hashbrowns
Fruit Cocktail
** Breakfast for supper is a great way to feed your family on the cheap! For this menu, it was even better because I had already bought eggs for the picnic, so now had a great use for the extra ones.


So there you have it. Four meals for $50. I love being able to share these ideas with you, and maybe give you something you can start using to keep the weekly grocery store trip a little easier on the wallet!

Tex-Mex Pasta Salad
1 lb. tri color rotini, cooked, rinsed with cold water and drained
1 green pepper, chopped
1 (15 oz.) can black beans, rinsed and drained
3/4 c. canned corn
1/2 c. sliced black olives
1 (16 oz.) jar salsa
1/2 c. sour cream
2 tsp. garlic powder
3/4 tsp. cumin
2 TBS dried parsley
1/2 c. shredded Cheddar Jack cheese
Salt and Pepper to taste
2 green onions, chopped

In a medium bowl combine salsa, sour cream, cumin, and garlic powder. Mix well. In a large bowl combine pasta, green pepper, black beans, olives corn, parsley, and cheese. Toss to combine. Pour dressing over. Stir well. Season with salt and pepper. Chill for at least an hour before serving. Garnish with green onions. 


Shared on The Country Cook June 5, 2015

Wednesday, April 29, 2015

Steak Season

At last, grilling season as returned! Well, for us, it never truly leaves, but you know what I mean. For many one of the first signs of spring is to return to cooking outdoors. You can smell it now, can't you?

During the hot summer months, I try really hard not to heat up the house with the oven or stove as much as I can. The grill usually takes care of the meat portion of the meal, but then I'm responsible for sides, and that's when I usually have to break my own rule. Sure, I can do cold potato or pasta salads, but sometimes we want more...that's where this recipe comes in. And I promise it's worth the little bit of heat it might put into the house.

I love mushrooms with steak, but not on top. We are kind of steak purists. We don't like anything taking away from the flavor of the meat itself, so instead we like them on the side. Just like we can get at our favorite steakhouse.

This is a totally new take on the traditional sauteed mushrooms I've made a thousand times. These are creamy! Just a hint of cream cheese gives them an unique flavor and texture that takes them to the next level!

If you have some steaks going on the grill this week, think about adding these to the menu too. You won't be sorry! 


Garlic Creamy Mushrooms
24 oz. large button mushrooms
3 large garlic cloves, minced
2 TBS beef broth
2-3 oz. cream cheese
1/2 tsp. dried oregano
1/2 tsp. dried rosemary
1 tsp. dried parsley, extra for garnish
3 tsp. grated Parmesan cheese
Salt and Pepper to taste
3 TBS butter
1 TBS olive oil

Preheat oven to broil. In a large skillet  melt butter over medium heat. Add oil. Mix. Add mushrooms. Don't move for about a minute, to allow to brown. Gently toss to brown on all sides. Add garlic and herbs. Keep tossing. When browned on all sides. move to outside of pan, as much as possible. Add broth. Remove from heat, stir in cream cheese until smooth. Stir to coat. Transfer to a baking dish and sprinkle with Parmesan cheese. Broil for about 5 minutes until cheese golden. 


Shared on The Country Cook May 1, 2015

Friday, April 24, 2015

#Plate Proud with Green Bean Delivery

I love entering recipe contests, but when they are also sponsored by a favorite company, that's even better. And that's the exact scenario I got when I was approached by my buddies at Green BEAN Delivery about their Plate Proud recipe contest.

Each participant is asked to submit their favorite original recipe in one—or all—of five categories for a chance to win impressive culinary prizes, including a grill set, planters, placemats, a Mandoline slicer and much more. Categories include everything from recipes on the grill to packed lunches to meals using only local ingredients. All winning recipes will be highlighted on the contest website.

Well, sign me up! I couldn't wait to come up with something delicious to submit, and of course share with all of you. I chose to develop something for the Veggie Side category, since summer time, fresh garden veggies are something I love to cook with in the warm months. Rather they be from our own backyard, or a favorite Farmer's Market, or in this case Green BEAN themselves, I can't get enough. 

This is sure to be a hit at your next cookout, potluck or family get together. Anything you have coming off the grill, from steaks, to burgers, to some delicious barbecue is going to taste even better with this crisp, cool, refreshing side. Fresh corn, tomatoes, avocado and a refreshing dressing make it like a bite full of sunshine in your mouth. Honestly, it's filling enough, it would make a terrific lunch or light supper when it's too hot to cook too! 

I've entered the Plate Proud contest and you can too. Just visit the entry page and share a recipe in one, or all five, categories! 

Summer Corn Salad
5 ears corn
2 medium tomatoes, seeded and chopped
1 small red onion, finely chopped
1 avocado, chopped
1 tsp. dried basil
2 tsp. dried parsley
Salt and Pepper to taste

Dijon Vinaigrette
1 TBS lemon juice
1 TBS white wine vinegar
2 tsp. Dijon mustard
1 garlic clove, minced
1/2 c. vegetable oil
Salt and Pepper to taste

Combine all ingredients for dressing in a jar and shake well. Chill until ready. 

For salad, bring a large pot of water to boil. Cook corn for about 3 minutes. Remove and immediately rinse with cold water. When cool, remove kernels from cobs. In a large bowl combine all ingredients for salad. Toss well to coat. Pour about 1/2 of the dressing over salad. Mix well to combine. Chill until ready to serve. Serve salad with rest of dressing on side for people to add if needed. 


Shared on The Country Cook April 24, 2015

Disclaimer: I was given a complimentary bin from Green BEAN Delivery in exchange for this feature and entering the contest. All thoughts and opinions are my own. 

Wednesday, March 25, 2015

Let Me Count The Ways

Egg Noodles. How I love thee. Let me count the ways...

What? You don't recite poetry to your food? Um, okay...awkward...

Well, I adore them. Can't get enough of them. Could eat them every single day.

To me, egg noodles are one of the most versatile and simple convenience foods out there. You can do almost anything with them, and they go with pretty much any protein, rounding out a meal perfectly.
Heck, you can just boil them and add a little butter, salt and pepper and your family will think you are a genius! Or add veggies for a one pot meal! Or add protein for even more punch. See...the possibilities are endless.

These are my latest creation. How? Easy. I wanted noodles. I had no idea what to make with them. I started throwing things into the pot until I achieved the flavor I was looking for. Sometimes recipe creation isn't as sexy as chefs/cooks would have you believe. But they are egg noodles. You would have to work pretty hard to screw them up.

If you are looking for a simple side dish for tonight's supper. Here you go. Or maybe a new dish for your Easter table??!! These would be so good with ham! Add your own favorite herbs and spices to make a whole new flavor profile! Have fun with it! Honestly? I think you could make a big batch on Sunday and eat them for lunch all week too! See, I told you they were versatile! 

Parmesan Herbed Noodles
1 lb. egg noodles
1/4 c. Parmesan cheese
4 TBS butter, softened
1 tsp. dried basil
1/4 tsp. dried thyme
3 tsp. dried parsley
Salt and Pepper to taste

Cook noodles according to package directions. Drain very well. Return to pot over warm heat. Add butter, cheese, herbs, salt and pepper. Stir well to combine. Serve with some extra herbs sprinkled on top. 


Shared on The Country Cook Mar. 27, 2015


Monday, November 3, 2014

Thanksgiving Planning

Welcome to November!! Okay, I guess technically we are three days into the month already, but in EMM land, this is my first recipe of November, so it still counts! And with the coming of this new month, comes a promise from me. I am going to try my hardest to bring you some ideas for your Thanksgiving meal planning to save you time and energy, but will still make your family say "Yum!" Today is the first of those! 

Do you always look for new side dishes to serve? I know for me the couple times I've hosted the Turkey Day meal, the choice of meat was the first thing I decided upon. (Yes, one year I served ham instead of the traditional turkey; and it was fantastic. We really enjoyed it!) Then the "staples" were next. A potato dish, rolls, of course pumpkin pie for dessert. Those were easy. But then came the daunting task of finding sides, salads and veggies to complete our feast. The hard part wasn't so much choosing, but narrowing it down so we weren't eating the leftovers until New Year's. Plus, I'm the type of cook that always tries to throw a couple new, or updated, dishes into the mix. Knowing all of this, you can see why in my mind today is the day to start that menu brain storming! 

If you also like to fill your serving bowls with new, but familiar dishes, you're gonna love this one. Carrots. So simple. So "autumny" (Yeah, that's a word. I say so.) Usually in our house they are candied, with brown sugar and butter. But not this time. We've switched it up just a bit, and you are going to be so glad I did! If you love other veggies roasted, but have never tried the same method with carrots, you're missing out. They taste totally different after some time getting all happy in a hot oven. They come out still just a little crisp (Not crunchy. Just with a little bite, and not at all mushy.) and with amazing flavor. Oh, and these just happened to be roasted in butter...the holiday time's favorite condiment! 

I realize some of you aren't even thinking about your Thanksgiving Day menu yet, and that's okay. When you do, and it's time to get cooking, you know you can always come back here and I will have some ideas waiting on you, ready to inspire!

Butter Roasted Carrots
2 lbs. carrots, peeled and cut into long strips
2 TBS butter, melted
2 tsp. olive oil
Salt and Pepper to taste
Dried Parsley

Preheat oven to 425. Spray a large cooking sheet with nonstick spray. Lay carrots in a single layer. In a small bowl combine butter and oil. Whisk well. Pour over carrots. Season with salt and pepper. Mix well. Roast for 25-30 minutes until fork tender and browned. Remove to serving bowl. Sprinkle with parsley. 


Shared at The Country Cook Nov. 7, 2014


Wednesday, October 29, 2014

I Can't Help Myself

No matter how hard I try, I can't stay away from the potatoes. They call out to me in the produce section. Even if I have something else planned on the menu, the taters sense me walking by and entice me with their wicked ways.

Okay, I can't lie. That scenario only takes place in my mind. (In case you hadn't figured that out for yourself!) And honestly, I don't really try that hard to stay away from them. In fact, I don't try at all. They are a staple in the Marshall diet, and we can't get enough!

I think one of the reasons I gravitate towards them so much, besides the delicious factor, is no matter when it is, I can almost always find them on sale at one store or another, especially red potatoes. From the regular size to the "baby B's", they are budget friendly year round.

This recipe came about after I had once again purchased some red potatoes out of the bulk bin that were on sale for $.99/lb. I had them. I had supper to make. It was time to figure out what to do; and this is what happened. A little of this. A little of that and wah-lah a new potato recipe is born.

One of my favorite things about this preparation, is you can easily split the work into two stages. Precook the potatoes in the morning before work, or even the night before. Then you have a great head start at the end of the day. Plus, you can easily add whatever herbs and spices you feel like at the moment. Just be sure not to move them around too much in the beginning. This will give you the brown "crusty" edges you see in my picture, which is most definitely the best part!

If you have an addiction to potatoes like me, don't make apologies. Embrace it! Love it! Enjoy every single bite! 

Skillet Red Potatoes
7 medium-large red potatoes, cooked and cut into 3/4 inch cubes
4 TBS canola oil
1 tsp. garlic powder
1 tsp. onion powder
1 tsp. paprika
Salt and Pepper to taste
Dried Parsley, for garnish 

Heat oil in large skillet over medium-high heat. Add potatoes in single layer. Do not move. Allow to cook/brown for 3-4 minutes. Stir. Season with salt, pepper, garlic powder, onion powder, and paprika. Continue to fry and stir for 15 minutes until browned on all sides. Remove to serving platter, and sprinkle with parsley *NOTE* To precook my potatoes I microwaved them for 10 minutes, until just fork tender. 


Shared on The Country Cook Oct. 31, 2014


Friday, October 24, 2014

It Doesn't Have To Be Fancy

A couple weeks ago my mom and I were browsing one of our favorite little grocery stores when we stumbled upon a brand new display. We were elated to find they are now carrying an entire line of products from our favorite Amish store. One stop shopping! Which is great, because we never get to the Amish store as much as we would like! 

Well, the first thing my eyes traveled to were the homemade Amish noodles. Yep, there I stood, in  the middle of the store, drooling. I love noodles. Plain noodles, noodles with sauce, noodles in soup...it doesn't matter to me as long as it includes noodles. 

I was looking at all the varieties, and I found a bag of the thinnest egg noodles I had ever seen. They were beautiful. (Yes, I love noodles so much I find beauty in them!) My brain immediately goes into food blogger mode and I start brainstorming what I could do with them. And that's when mom comes into the story. 

I was staring at them, the gears in my brain turning, and she asked what I was doing. "I'm trying to think of something special I could do with these. A new recipe for the blog." Here comes mom's infinite wisdom..."Why? Do something simple. It doesn't have to be fancy. They would be perfect in chicken noodle soup." Talk about a huge "Duh!!" moment! For it was in that instant I realized I had never blogged my classic, go-to chicken noodle soup recipe! Sure, I had shared my Lemon Chicken Noodle Soup forever ago, but never my "ordinary, every day" one! Sometimes you just need a little perspective; and in my life, that usually comes from mom! 

So, here it is. The chicken noodle soup recipe I've been making since we were first married. It's a classic in our house, but you might notice a couple nontraditional things about it. First of all, I don't boil the chicken with the veggies. Sure, this leads to a delicious broth, but for me, I think it also leads to chicken lacking in flavor. Instead, I roast mine, locking in all the juice and flavor. Secondly, I start my veggies by sauteing them. Why? Two reasons really. One, it helps to get them cooking, so this can be ready as soon as possible. And two, it's about flavor again. To me, veggies cooked in butter taste a whole lot better than just boiling them. Sure, it's an extra step, but one that can be done while the chicken cooks, so the soup is moving forward while you wait! 

This is a classic soup recipe for a cold day, or perfect to take to someone who is under the weather. It's one of those soups that eats like a meal. It's simple, but delicious. Easy, but filling. 

See, it doesn't have to be fancy. It just has to be yummy!

Roasted Chicken and Noodle Soup
3 boneless chicken breasts
Olive Oil
2 (32 oz.) boxes chicken broth
2 chicken bouillon cubes
1 lb. fine egg noodles
3 TBS. butter
2 c. water
5 carrots, diced
3 celery stalks, diced
1 medium white onion, diced
1/2 tsp. garlic powder
1/2 tsp. ground thyme
1 TBS dried parsley
Salt and Pepper to taste

Preheat oven to 375. Line a baking sheet with foil. Drizzle chicken with olive oil. Season with salt and pepper. Roast for 30-45 minutes until juices run clear. Allow to slightly cool and shred. Set aside. In a large stock pot over medium heat melt butter. Add onions, carrots, and celery. Saute' until veggies are beginning to soften. Add chicken to mixture. Season with garlic powder and thyme. Saute' for 2 more minutes. Add broth, water and bouillon cubes. Stir to combine. Cover and bring to a boil. Reduce heat and simmer for 20 minutes to allow flavors to develop and veggies to cook through. Bring heat back up to a hard simmer. Add noodles and cook about 5 until tender. Add parsley. Stir and serve.


Shared on The Country Cook Oct. 24, 2014


Wednesday, October 22, 2014

Yep, Another Tater

If you're a long time reader of EMM, you've heard me refer to our family as "tater lovin' people" too many times to count. Yep, we've got a reputation. What can I say? It's one we accept and even celebrate like a badge of honor.

And in that spirit, I have yet another potato side dish recipe to share today. These are so easy to make, but so packed with flavor. You might not guess it from the simplicity of the ingredients, but they will make your taste buds sit up and take notice!

I think this would be a great one to keep around come the holiday rush too. Maybe not for the actual holiday meal, but for all of those "extra" holiday parties that come up between Thanksgiving and New Year's. Especially if there are ones you have to travel with a dish for. These would take a car ride beautifully!

If you enjoy other herb/spice combinations, you could easily adapt these to fit those, no problem. However you make them, they are going to be easy and yummy...two things I love almost as a good tater! 

Zesty Red Potatoes
6 large red potatoes, thinly sliced, about 1/4"
1 stick butter, melted
1 small onion, thinly sliced
1/2 tsp. red pepper flakes
1 tsp. dried parsley
Salt and Pepper to taste
Chives, for garnish

Preheat oven to 400. Spray a 9 inch square baking dish with nonstick spray. Layer potatoes and onions, seasoning each layer with salt and pepper. End with potatoes on top. Mix butter with red pepper flakes and parsley. Pour over potatoes. Cover with foil. Bake 25 minutes. Remove foil and bake an additional 20-25 minutes until browned and potatoes are tender. Sprinkle with chives. 


Shared on The Country Cook Oct. 24, 2014

Disclaimer: As a Field Editor of Taste of Home, I share my own thoughts and opinions of this recipe. I am not a paid employee.

Wednesday, October 8, 2014

Sandwich Night

Do you do sandwich night at your house? If not, you're kinda missing out. I don't mean to be that blunt, but it's true. I love a good sammy; and they can be a such a simple, comforting meal at the end of a tiring day. I find myself planning them about once a week; and am constantly on the lookout for new ones! 

If you don't think of sandwiches as a substantial meal on a weeknight, let me explain. I'm not talking about the run of the mill peanut butter and jelly, or turkey on wheat. The kind of sandwiches I love to serve for supper, are hearty...filling...eat like a meal!! But they are still simple. That's a must. When I know I have sandwiches planned for dinner, I look forward to it because that means I get to somewhat relax during meal time. So if little effort is part of the goal, I don't want something that takes a lot of time, or is complicated. In fact, many times the sandwiches I fix are more of an assembly process than a recipe; and this is one of those.

I'm guessing some of you might even have everything you need for these already in your kitchen. Don't you love when that happens? That just makes simple sandwich suppers even better! Plus, these are totally adaptable to your favorites. Like a different kind of ham? Okay. Maybe honey mustard? Fine. Enjoy provolone instead of Swiss? Great. You can totally make them to fit your tastes. But however you plan on making them, make sure you have big plates because this aren't skimpy sammies! They are B.I.G.

If you don't usually think of sandwiches as a filling, appropriate supper after a long day when the family is starving and it's your job to satisfy their hunger, this just might be the recipe that changes your mind! 

Baked Ham and Cheese Sandwiches
12 slices Texas toast, buttered on both sides
24 slices black forest ham
6 slices Swiss cheese
1/4 c. Dijon mustard
1 1/2 c. finely shredded Monterrey Jack cheese
1-2 TBS dried parsley

Preheat oven to 350. In the bottom of a 9 x 13 dish, spread mustard evenly. Place 6 slices of bread, butter side down in dish. Top each slice with 2 slices of ham and 1 slice of cheese. It's okay if they overlap a little. Top each with another slice of bread, butter side up. Sprinkle with shredded cheese, liberally. Press cheese down slightly to adhere. Bake for 25 minutes until golden brown. In the last 5 minutes, sprinkle with parsley. Press slightly. When finished baking, allow to sit for 5 minutes before removing from pan. 


+


Shared on The Country Cook Oct. 10, 2014

Wednesday, September 24, 2014

Autumn Chicken {A Post For Earth Fare}

I wish I had some wonderful autumn themed story to tell you that was my inspiration for this recipe. A day spent picking apples that led to me coming home to a fire in the fire place and sitting around with the family eating this delicious dish. Well...not so much. Apple picking? That's still on our to do list. Sitting around the fire place? Yeah, we don't have one of those. What I do have is a simple explanation that is going to give you a new chicken recipe you're going to love.

It was time for me to go shopping at my local Earth Fare for my monthly post. It just so happened they had beautiful chicken thighs on sale for $.99/pound! It was a deal I couldn't pass up. The second part of the story is while we grill year round, when the days start to get a little chilly, and then down right cold, Mr. E. is in charge of manning the grill. Sure, he normally is anyway, but I have actually gotten pretty proficient  at it myself over the last few years, but only when it's warm outside.

So there I was. I had these gorgeous chicken thighs that needed to be cooked in the oven. Okay, that's easy enough. I love roasted chicken. And why not add in some autumn flavor with apples. Do you cook savory dishes with apples? They are fantastic in dishes other than dessert. And if you've never tasted the way they compliment onions, you must! When they cook together (think a stuffing that has apple in it) it's a match made in fall heaven.

This would make a terrific Sunday supper but is also easy enough for any weeknight. It's a beauty to entertain with, and can be adapted to feed more without much hassle

Not every recipe has to have some magical story behind it. Sometimes the yummiest of dishes come by the most simple of means. A good deal + A chilly day = Your lucky day!

Roasted Honey Mustard Chicken 
with 
Apples
6 bone in chicken thighs, patted dry
2 large Cortland apples, cut into large chunks
1 large white onion cut into large chunks
1 c. chicken broth
2 TBS honey mustard
1 1/2 TBS olive oil
Salt and Pepper to taste
Dried Parsley

Preheat oven to 450. Grease a 9x13 baking dish. Heat oil in large skillet over medium high heat. Season chicken with salt and pepper. When oil is hot, place chicken in, skin side down, and cook for about 6 minutes until golden brown. Flip. Cook 3 additional minutes. Remove to a platter lined with paper towels. Drain off all but 2 TBS drippings. Add apples and onions to skillet. Season with salt and pepper. Sprinkle with parsley.Saute' until softened about 4 minutes. Mix honey mustard with broth. Pour into skillet. Increase heat to high and bring to a boil. Carefully transfer to baking dish. Lay chicken on top. Roast in oven for 20-25 minutes until chicken cooked through. To serve, remove chicken and then using a slotted spoon, lay apples and onions on platter. Lay chicken on top. Spoon pan juices over top. Sprinkle with extra parsley. *NOTE* This honey mustard is NOT the salad dressing. It can be found in the condiment aisle next to the other varieties of mustard.  


Shared on The Country Cook Sept. 26, 2014


Disclaimer: I was provided with a gift card in exchange for this post. All thoughts and opinions are my own. 

Friday, August 15, 2014

One Skillet To Heart Healthier

As many of you know, last month we had a real scare in our family when Mr. E was hospitalized for 2 1/2 days with pulmonary emboli...also known as blood clots in the lungs. It was quite the ordeal, and now a month later I am happy report he is doing exceptionally well, and has had all good check ups at both his cardiologist and hematologist...praise be to God!

Upon being discharged from the hospital, the only dietary restrictions he had were to attempt to eat a little heart healthier, meaning lower sodium and trans fats. To be honest, it wasn't a major change in something he's already been doing. See, a few years ago at the urging of his physician, he decided to start eating better and working out. That's when his food habits began to change; and he went back to Taekwondo. Three years later, and almost 100 lbs. later, he is more fit, and healthier than he has ever been in the 17 years we've been together. I'm so proud of the changes he made in his life; and was up to the challenge to find even more ways to make his diet healthier.

In that spirit, how about a one skillet meal that has robust, fresh, bright flavor that is not only a fantastic meal for a busy weeknight, but also includes my favorite tip on adding less salt, without taking away flavor. What is that? You ask. Well, it's our trusty friend the lemon

I can't even tell you where I learned this trick, it's been so long ago, but the flavor of lemon or lemon juice hits some of the same taste buds on your tongue as that of salt, in such a way, it tricks your brain into thinking it has a salty flavor when in reality it has very little or even none. 

So there you go. A terrific new supper idea you can have on the table in almost no time at all; and a tasty little trick to keep up your sleeve any time you want to reduce the sodium but punch up the flavor! 

Lemon Chicken and Rice Skillet
3 boneless chicken breasts, cut into bite size chunks
1 1/2 c. instant white rice
1 (14 oz.) can low sodium chicken broth
1 TBS cornstarch
1 medium white onion, chopped
2 TBS butter or margarine
2 carrots, thinly sliced
1 c. frozen peas
1 lemon, juiced and divided
2 tsp. dried parsley
2 cloves garlic, minced
Salt and Pepper, to taste

In a large skillet or dutch oven, melt butter over medium high heat. Saute chicken, onions and carrots until tender and chicken is browned, about 10 minutes, stirring often. Season with salt and pepper.  Add garlic and cook 1 minute more. In a small bowl combine chicken broth, 2 TBS lemon juice and cornstarch. Add to chicken mixture. Bring to a boil, and cook 2-3 minutes, stirring, until slightly thickened. Add rice and peas. Stir well. Remove from heat and cover. Let stand for 5 minutes. Check for rice tenderness. Add parsley and stir again. Just before serving, drizzle with remaining lemon juice, to taste.


Shared on The Country Cook Aug. 15, 2014


Wednesday, August 13, 2014

Do You Have An Abundance?

Zucchini. Do you it have it "coming out of your ears" so to speak? I know so many summer gardens out there are over flowing with it, and there is only so much zucchini bread you can make! I don't have the green thumb in our house, but I live with two boys who have two sets of them, and every year they plant a garden, and even during the summers when other things have a hard time growing, I always end up with an abundance of zucchini, so I was super excited to find this recipe!

Ironically enough, my two little farmers weren't able to plant a garden this summer, but I have a dear friend who has been very generous sharing her bounty with me, including the gigantic zucchini that inspired this recipe. I wanted to do something different with it, and I thought a salad would be a nice twist. I think zucchini is sometimes looked at as something you eat cooked, not raw, but this dish is going to change all that!

If your kids are veggie lovers like mine, they will flip for this...according to my almost 10 year old! Seriously, he couldn't stop eating it! And with something like this, he didn't have to! It is so crunchy, so flavorful, so delicious, it's going to become a go-to in the summer for us, and hopefully you, in no time!

Have other garden fresh veggies sitting in the crisper drawer to use? Add them! It's so versatile, it will be yummy no matter what! I am a huge artichoke heart fan, and was happy to have yet another recipe featuring those too. 

If you make this, be sure to do so for people you really love. Why? Because they are going to keep coming back again and again for more! If you make it to take to a potluck, cook-out or party, be sure to jot down the recipe in multiple copies because everyone is going to ask for it! 

Marinated Zucchini Salad 
Adapted from Taste of Home
1 extra large zucchini (or 4 medium), peeled and diced
1 (2.4 oz.) can sliced black olives, drained
1 ( 6 oz.) jar sliced mushrooms, drained
1 (14 oz.) can artichoke hearts in water, drained, rinsed and chopped
3 Roma tomatoes, seeded and diced
1 envelope Ranch dip mix
1 c. Italian dressing
1 TBS dried parsley
Salt and Pepper to taste

In a small bowl, whisk together dressing and dry dip mix. In a large bowl combine zucchini, artichokes, olives and mushrooms. Stir well. Pour dressing over. Add parsley, salt and pepper. Toss to coat. Cover and refrigerate several hours or overnight. 1 hour before serving, add tomatoes and toss again. Drain well before serving. 


Shared on The Country Cook Aug. 15, 2014


Zucchini at Very Good Recipes


Disclaimer: As a Field Editor of Taste of Home, I share my own thoughts and opinions of this recipe. I am not a paid employee. 

Monday, August 11, 2014

America's Better Sandwich with Brownberry ® Bread {A Review and Giveaway}

I love a good sandwich. Like really love. Like kind of obsessed! Especially in the summer months. There are so many evenings when it's supper time, and still scorching outside, too hot too cook, that a sandwich piled high with our favorite meats, cheeses and veggies really hits the spot; and makes for a filling, yet still light supper. Great sandwiches are made better with Brownberry® Bread, and now they have a contest to prove it! 


Brownberry® Bread is some of the best you can find in your grocery store. It's soft, delicious and everything you want in a good quality bread, while being something you can feel good about giving your family. Just look at some of these facts:


All of Brownberry® Whole Grain Sliced Breads and Brownberry® Sandwich Thins® Rolls contain/are:

3 to 4 grams of fiber per slice or thin

Zero grams of Trans Fat

No High Fructose Corn Syrup
Cholesterol free

Health authorities recommend munching on 25-38 grams of fiber and 48 grams of whole grains per day, much of which may come from whole grain products like Brownberry® Whole Grain Sliced Breads or Brownberry® Sandwich Thins® Rolls varieties.

If you’re not sure of how  many grams of whole grains you are getting, look for the Whole Grain Stamp found on all of Brownberry® Whole Grain Sliced Breads and Brownberry® Sandwich Thins® Rolls.


And now, the folks at Brownberry® want to see your best sandwich! In their  “America’s Better Sandwich” Contest, the sandwich artist whose filling best matches the goodness of Brownberry® bread  will win the grand prize of $25,000!!


Here are more details about the contest:
Before entering a better sandwich in the Contest, the entrant should make sure it includes any of the Brownberry®Whole Grain Sliced Breads or Brownberry® Sandwich Thins® Rolls varieties.

There are four (4) sandwich categories in the Brownberry®  “America’s Better Sandwich” Contest including: “Creative Classic” (a healthful twist on a sandwich that has been around for more than two generations, such as a Reuben, BLT or club sandwich), “Stealthily Simple” (maximum of five (5) ingredients), “Fueling Good” (ingredients that help boost your energy such as healthful fats, protein, fiber and iron), and “Meatless Marvel” (no animal products including land and sea animals may be included in the recipe).

The recipe in each sandwich category with the highest score will receive a $5,000 category prize.

Entries will be accepted July 23rd - August 22nd, online consumer voting will take place September 22nd - October 17th, and the winners will be announced on National Sandwich Day- November 3rd.

To submit a recipe, receive tips on creating a better sandwich or learn more about the Official Rules visit:www.americasbettersandwich.com.

For more info and fun, be sure to check them out on Facebook too!

Now, it's time to see what I did with my Brownberry® Bread. That's easy. I let the summer time garden inspire me. Some tasty bread filled with loads of fresh veggies and a flavored mayo that takes it to the next level! This sandwich is one of my favorites and I'm so excited to share it with you! 

Plus, the great folks at Brownberry® want you to try their fantastic bread in your kitchen. They are giving (1) lucky EMM reader coupons for free bread  and a $25 Visa gift card! Just scroll down past the recipe to enter! 


Garden Delight Sandwich with Herb Mayo
Brownberry® Oat Nut Bread
Spinach, washed and dried
Tomatoes, sliced thin
Cucumbers, peeled and sliced thin
Provolone Cheese
Banana Peppers, well drained
1 c. mayo
1 tsp. dried parsley
1 tsp. dried oregano
1 tsp. dried basil
1 tsp. freeze dried chives
Salt and pepper to taste

In a small bowl whisk together mayo, herbs and salt and pepper. Chill until ready to serve. To build sandwich, spread both slices of bread with mayo. Start with cheese on bottom, then spinach, tomatoes, cucumbers and finish with banana peppers. 


Shared on The Country Cook Aug. 15, 2014


To Enter: Leave a comment telling me what sandwich you would love to try with Brownberry® Bread. 
(1) Winner will receive coupons for free product and a $25 Visa Gift Card
Contest Ends Aug. 15, 2014


Disclaimer: The coupons for product redemption, information, and gift card have been provided by Brownberry® Bread so that I could try the product and share my thoughts and information about Brownberry®. The opinions expressed in this post are my own and do not reflect the opinions of Brownberry® Bread.

Saturday, June 21, 2014

Soul Food Saturday


Lately we have been experimenting with mixing our own spices and finding fun new ways of cooking chicken. Our ultimate favorite is still grilling. This recipe takes Chipotle and adds half the spice cabinet to mingle right a long side; Along with big man size pieces to satisfy any carnivore appetite. Add a quick side and you’ve got a meal fit for the spice lovers in your life.
 
               Chipotle Chicken Grill Seasoning  
1 tbs. chipotle powder
 1 ¼ tsp. granulated garlic
1  tsp. granulated onion
¼ tsp. dried minced onion
¼ tsp. crushed red pepper flakes
¼ tsp. dried oregano
½ tsp. ground cumin
1 tsp. dried parsley
2 tsp. salt
½ tsp. black pepper

In a small bowl add all spices and mix together. Add to a shaker container for easy sprinkling over meat.
 
Chipotle Grilled Chicken 
   4 chicken leg thigh quarters, rinsed, trimmed and patted dry
Chipotle Chicken Grill seasoning
 
 
Sprinkle Chicken liberally with seasoning, coating both sides. Allow seasoning to sit on chicken 10 minutes, and then grill as desired.