Everyday Mom's Meals: Candy
_____
Showing posts with label Candy. Show all posts

Sunday, September 27, 2020

Welcome October(ish)

With posting new recipes on Mondays, the timing of something I want to say doesn't always line up perfectly with the calendar. Thus is the case this week. I wanted to welcome the new month with this simple, fun, autumn inspired snack...but October doesn't begin until Thursday. Oh well. I think you appreciate my effort. 

By now, you have seen quite a few snack mixes from me like my Sweet n Salty Snack Mix, Halloween Snack Mix, and Harvest Party Mix. I try to come up with a new one every fall, and my boys always look forward to my yearly creation.

I don't know what it is about autumn that makes me want to dig into a big bowl of salty, sweet goodness, but it never fails- the minute the temps drop a bit and pumpkins are on the porch, I find myself walking up and down the grocery store aisles waiting for inspiration.

 This year's is especially simple because there is no baking. No sauce. No cooking. You literally dump, stir and eat. It will last forever (okay, not really, but a long time) in an airtight container at room temp, so it's perfect to enjoy all season long. My boys love it for an afternoon snack, road trip treat or movie night! With Halloween just around the corner, you're going to need plenty of spooky movie snacks and this will satisfy both the popcorn and candy taste buds, all in one handful! 

Get the little ones in the kitchen and have them help make a big batch of this, get out side and enjoy some crisp, sunny days, visit a pumpkin patch or U pick apple orchard...soak up all October has to offer!
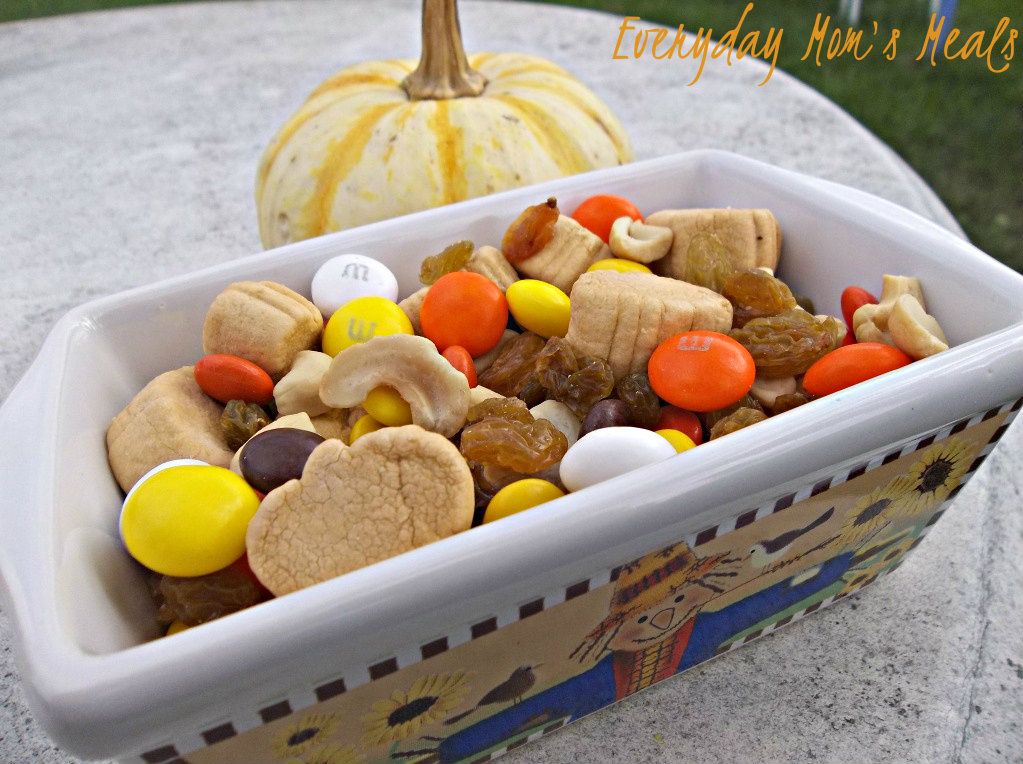
 

Scarecrow Crunch

2 (6 oz.) boxes butter toffee popcorn

2 c. buttered popcorn

1 (16 oz.) bag candy corn

1 (16 oz.) bag candy pumpkins

2 c. Cheerio cereal

1 (5 oz.) box Whopper candy

1 (4 oz.) box Reece's pieces candy

In a very large bowl combine all ingredients. Gently stir. Store in an airtight container at room temperature. Stir before each serving, as some of the smaller pieces will fall to the bottom.  


 Shared at Weekend Potluck

Shared at Meal Plan Monday

Sunday, September 22, 2019

Hello Fall

If you aren't paying attention, we have arrived at the first day of fall. Sure, some of us have had our autumn decor out since the calendar still said August (*cough cough*...I might resemble that remark) but it's official. Now our husbands can't make fun of our pumpkins and scarecrows anymore.

Autumn brings so many reasons to "party". Between bonfires, those last few warm evening cookouts, Halloween parties, Game Day...the list goes on and on! And if you don't have a reason to party, make one! There are days when we are outside raking or doing jobs around the house, and I have a big pot of chili or soup cooking, plus some snacks for motivation too! So you can't make it to the stadium to tailgate for your favorite team. Have a football day at home in your living room!

My point is a delicious party mix can be appreciated for so many reasons this time of year. This would be great for an after school snack, kids' Halloween party or classroom party (if home made is allowed).

We love Chex Mix, or more specifically Adam's late grandma's Chex Mix recipe. I make it a lot. It's the perfect salty snack. But this time I wanted something a little sweet, and of course autumn inspired.

Oh. My. Gosh. As Alex said, "This stuff is dangerous!" Talk about addicting! We couldn't stay out of it! Sweet, salty...mmmmm. We have a couple days trips planned for this fall, and I think I will make sure we have a bag of this for the car too!

Fall might not be my favorite season, but I do enjoy it and all the fun activities it brings. Add in some yummy snacks and it's a party any day of the week!

Harvest Party Mix
1 (12 oz.) box rice cereal, like Chex
4 c. pretzel twists
1 (7 oz.) bag original Bugles
2 ( 4 oz.) boxes Reece's pieces
2 ( 9 oz.) bags autumn candy mix
3/4 c. margarine, melted
3/4 c. brown sugar, packed
2 TBS vanilla extract

Preheat oven to 275. In a medium bowl whisk together margarine, brown sugar and vanilla until combined. In a very large bowl combine cereal, pretzels and Bugles. Pour sauce over mix. Stir gently, but well. Spread evenly on a baking sheet* and bake for 45 minutes, stirring every 15 until crisp and brown. Remove and allow to cool. Add candy and stir well. Store in airtight container.  
*NOTE* You will either need to do this in batches, or use 2 cookie sheets at a time. 


Inspired by One Little Project

Sunday, June 3, 2018

Summer Time Snacking

School is out! Hooray!!! Seriously, those last couple weeks were rough! And then the fact we had to go back after Memorial Day for 1.5 days was almost torture. But we persevered and don't have to set an alarm or pack a lunch until August!

I adore summer vacation. I realize it is different for me because I am at home, and don't have the stress of additional child care, but I cherish every minute he's home with me. And now that Max is old enough to understand "Bruh Bruh" is home with us, well let's just say it even more special.

One of the things that I do recognize has being harder during these months is the fact I have to feed the teenager that extra meal every day, every week! I find myself going to make Max's lunch and saying "Oh that's right. Alex might want something too." Now, to be fair we are only a few days into summer vacation, so I'm still getting into my groove. But it isn't just lunch! He wants snacks too! I swear, these kids...they think they need fed 24/7. LOL

I love making trail mixes because we can all enjoy them. Even Max now! (Sure he likes to pick out the M&Ms, but he does like the pretzels and cheese crackers too) And in the summer, they are perfect for snacking in the car, at the park, beside the pool, or just hanging out in the back yard. True story, if you would have seen us last weekend in our back yard, Max was in his baby pool, and the three of us were sitting around it, watching him, and passing around a huge bowl of this!

Sweet and salty together are one of my favorite things. Even flavor combos you think might not work do. Mr. E made the comment he didn't know how the candy and cheese crackers would taste, but they were really good!

You can always add some other ingredients your family loves too. Make it your own! Let the kids get in on the action too--they could come up with some interesting combos!

Summer break is something I look forward to all school year long. My boys, with me, adventures to be found, and yummy snacking on the way!

Sweet n Salty Trail Mix
4 c. twist pretzels
3 c. cheese crackers
2 c. honey roasted peanuts
1 1/2 c. roasted almonds
1/2 c. M&Ms
1/2 c. Reece's Pieces
1/2 c. raisins

Mix all together in a large bowl and store in an airtight container. 


Shared at Weekend Potluck

Disclaimer: I received free samples from Kroger and MyMagazine Sharing Network for use in this post.

Monday, October 19, 2015

Halloween Party

In just under two weeks our streets are going to fill with ghosts, goblins, witches, zombies, super heroes, ballerinas, princesses and more! Yep, all the little ones will begin their annual neighborhood, door-to-door candy marathon.

In our house, the Halloween celebrations start well before the 31st, and basically mean Mommy coming up with yummy treats for the boy to enjoy all month long. But I know for many of you, a big Halloween bash is on the menu, and you need ideas that are both easy and yummy.

That's where I come in. This was actually my last post for The Children's Museum of Indianapolis this month. I can't believe my 6 months with them has come and gone, but I enjoyed every minute. What a thrill for me to work with a place that not only does my child adore, but I have very fond memories of growing up as well.

I wanted to give them a recipe that kids can enjoy as an after school snack, or like I said, at a big Halloween party. Something so simple it can come together in almost no time, and enjoyed all night long, or in our case, be munched on for days!

Even if you don't have huge Halloween plans, you can still make it a fun day for the little ones. And more importantly, a really delicious one!

Halloween Snack Mix
2 ½  heaping cups. Apple Cinnamon Cheerios
2 cups pretzels
1 (7.5 oz) jar salted roasted peanuts
1 (8 oz.) bag candy pumpkins
1 (8 oz.) bag candy corn
2 (3.4 oz) boxes M&M’s
Mix all in a large bowl. Store in an airtight container.


Originally Posted on The Children's Museum
Shared at Weekend Potluck

Friday, March 27, 2015

He's Coming...

With only a week left until Easter, the above title could mean a couple things. For most of us in the Christian world, it means we once again get to celebrate the Resurrection of our Lord Jesus, and we can shout from the mountain tops, "He is Risen. Risen Indeed! Hallelujah." 

At the same time, those of us with kids know they are anxiously awaiting the return of their favorite bunny, Mr. Peter Cottontail himself, bringing with him their favorite sweet treats of the season. 

For our family, both of these are true. We try really hard to find a happy medium between our faith and the fun of Easter. I'm proud to say yes my 10 year old loves his Easter Basket of candy, toys and books, he also knows the true reason why we celebrate renewed life this time of year. 

In the spirit of the all things yummy, I wanted to share a super easy sweet bite perfect for your Easter table! How can you resist something with only 4 ingredients that looks like a fluffy bunny tail? Not to mention, being filled with one of my favorite spring time flavors...coconut

I was so excited when I saw these because they didn't contain any chocolate. I know. Weird for a woman to say. But for me, I like chocolate, but there is so much of it everywhere this time of year, satisfying my sweet tooth cravings with something else is nice too. Plus, I love easy things the boy can help me with. 

If you are looking for something cute, yummy and simple to add to your Easter menu, these should definitely be it. Make a few, make a lot, and watch them disappear quicker than the Easter Bunny's footprints! 

Coconut Truffles
4 oz. cream cheese
2 1/2 c. powdered sugar
1/2 tsp. coconut extract
1 1/4 c. sweetened shredded coconut, divided

Combine cream cheese and coconut extract. Beat well until smooth. Add powdered sugar, 1/2 c. at a time and beat until combined. Add 1/4 c. coconut and beat once more. Form into balls (I used my cookie scoop to make it easier.) and roll into coconut. Place on a cookie sheet lined with parchment paper and chill for 15-20 minutes until set. Store in an airtight container in the fridge. 


Shared on The Country Cook Mar. 27, 2015


Tuesday, December 11, 2012

Tropical Holiday

As I have shared with you before, but will once again for those just tuning in, my "boys" are lime crazy!  Anything and everything made with the little green gems is a favorite of theirs. From Cilantro Lime Rice to Key Lime Pie, they just can't get enough. So when I saw this recipe in my new Gooseberry Patch cookbook, The Christmas Table I knew it would one of the new holiday treats I tried this year. Oh sure, we have our favorites...the ones I make every year, but each year when the tree goes up, and usually before, I start to compile a list of new and fun things I've seen to try, and possibly add to our holiday traditions. I couldn't believe this when I saw it. I had never even thought of it, but it's pretty genius! Especially for those of us who love all the Christmas candies, but sometimes find a few to be too heavy. It's not so much that this is "lighter" than other fudge, but the lime flavor makes it so refreshing, and it gives your mouth a burst of flavor. If you have tried either my Peanut Butter or Easy Chocolate Fudge, you will love this too because once again, it's a simple method and you do NOT have to be a candy maker expert to be successful. Believe me, if I can make it, you can! I've had some candy disasters in the kitchen, but these easy fudge recipes never let me down! I hope I've found something yummy for you to include in your holiday baking extravaganza too, after all those neighbors and teachers gifts can always use something new and fun!

Key Lime Fudge From Gooseberry Patch
3 c. white chocolate chips
1 (14 oz) can sweet condensed milk
2 tsp. key lime zest, a little reserved for top
2 TBS key lime juice
1 c. chopped macadamia nuts, a few reserved for top

In a medium saucepan on low heat, combine chocolate chips and milk. Stir and cook until melted together. Remove from heat. Stir in zest and juice. Add in nuts. Stir well to combine. Line a 8x8 baking pan with foil, with enough covering over edges for easy lifting.  Grease foil well. Pour into prepared pan and spread evenly. Sprinkle with extra nuts and zest. Gently. pat to adhere. Chill 2 hours in fridge. Remove from pan by lifting on foil and then removing. Cut into squares. Store in fridge.


Shared on Mandy's Recipe Box Dec. 11, 2012
Shared on Lady Behind The Curtain Dec. 12, 2012
Shared on Miz Helen's Country Cottage Dec. 13, 2012
Shared on The Country Cook Dec. 14, 2012


Lime at Very Good Recipes
Pin It

Tuesday, October 30, 2012

Candy Overload

On November 1st, parents across this country, from one coast to another, will all be dealing with the same problem. TOO MUCH candy! Little ones will bring it home by the bagful on Halloween night, and even after picking through and probably disposing of some, there will still more than enough to feed an entire army for months! Or, many of you might have a different kind of candy problem. You bought bag after bag to hand out to the little ghosts and goblins, but only a tenth of what you anticipated rang your doorbell. So, if you find yourself with one, or both, of these problems come Thursday morning, I've got a great resolution for you that is yummy and easy at the same time. Why not take some of those candy bars and turn them into another dessert? How about adding in some fruit so you can feel better about eating it? When I saw this idea I thought it was pretty ingenious, and not just because it contained my favorite candy bar of all time. And yes, before you ask, I'm the mom that when I go through my son's candy bag at the end of the night, is sure to sneak a couple for myself. Don't judge...you know you do it too! So if you find yourself very "candy happy" and want to use some of it in a new,unique way, this salad is just the answer!

Apple Candy Bar Salad 
1 (3.4 oz) box French vanilla instant pudding
3/4 c. milk
1 1/2 c. Cool Whip
2 large honeycrisp apples, cored and chopped into bite sized chunks
2 Snickers candy bars (regular size), chopped
1/2 c. coconut
1 small chocolate bar, optional

With a wire whisk, combine 1/2 of the pudding mix and milk. Whisk for 2 minutes and let rest for 2 minutes until soft set. Fold in Cool Whip and remaining pudding mix. Stir well to combine. Add apples and candy bars. Stir. Add coconut. Stir well. Using a lemon zester, grate chocolate over the to to garnish. Chill until serving.


Shared on Mandy's Recipe Box Oct. 30, 2012
Shared on Lady Behind The Curtain Oct. 31, 2012
Shared on Miz Helen's Country Cottage Nov. 1, 2012
Shared on The Country Cook Nov. 2, 2012

 
Mandy‘s Recipe Box
Featured On

 
Adapted from Taste of Home

Tuesday, October 23, 2012

Make Your Kids Say "Ewww"...

Do you have anything planned fun planned for Halloween? A costume party? A classroom party? Maybe you are just like me and while you don't have a big gathering to attend, you still want to make the day as fun as possible for you little ones. And maybe like me you enjoy the fact that not only can you be the coolest mom ever with a sweet treat, but you also get a little thrill of totally grossing them out! If this is the case, then why not have something easy to make, fun to say and yummy to eat waiting on them after school on Halloween? Can you imagine the kiddies walking through the front door asking "Mommy, can we have a snack?" And you answering with "Sure, I've some worms in dirt for you." The looks of horror on their faces would be priceless (In fact, you might want to have the camera ready!) This is actually something I remember eating as a kid at our church Halloween party, and it was always so much fun! Eating something that sounds so gross always makes it taste better! Let's face it, with kids (especially boys) the more gross something sounds, but tastes great, the more they will love it! So, if you are looking for a entertaining, yet simple dessert for Halloween night when the ghosts and goblins stop by to say "Boo", I've got you covered!

Worms in Dirt
1 (3.4oz) package instant chocolate pudding
2 c. cold milk
1 (8oz) tub Cool Whip
1 (16oz) package chocolate sandwich cookies
Gummy Worms (I used the sour variety)

In a large bowl, combine pudding and milk. Whisk constantly for 2 minutes. Allow to set in fridge for 5 minutes. In a large plastic bag, add cookies and crush with a rolling pin. When pudding is set, add Cool Whip and half the crushed cookies. Stir well until mixture is all the same color. In small plastic cups place 1 TBS remaining crushed cookies. Spoon pudding mixture into another plastic bag, and cut corner off to make a pastry bag. Pipe pudding into plastic cups, filling about 3/4 the way. Top each with about 2 TBS remaining cookies and gummy worms.

~Join me for Tasty Tuesday on Formula Mom~

Shared on Mandy's Recipe Box Oct. 23, 2012
Shared on Lady Behind The Curtain Oct. 24, 2012
Shared on Miz Helen's Country Cottage Oct. 25, 2012
Shared on The Country Cook Oct. 26, 2012
Kids at Very Good Recipes
Pin It

Friday, October 12, 2012

Marshmallow Inspired

So a few weeks ago I was rushing through Meijer trying to pick up a few last minute items I had actually forgotten the previous day when I was grocery shopping when all of a sudden an "end-cap" display stopped me dead in my tracks. What could have caught my attention so much you ask? Well, it was something I had never seen before and instantly knew would be going home with me...Pumpkin Spiced Marshmallows.

 Have you seen them at your store? I just love all these creative & yummy flavors they are coming out with! Last year we discovered the Peppermint ones at Christmas time (so delicious in hot cocoa!), and then this summer I used the Mint Chocolate ones for my first s'mores ever! And now the perfect ones for autumn! I wasn't even sure what I would do with them but I knew I had to come up with something!

After about a week of sitting in my cupboard I finally knew what I wanted to do. A snack mix, of course. I just love trail mixes and coming up with different combos is both challenging for me, and fun for Alex. Last Halloween I shared with you my Goblin Mix and then more recently Monkey Munch I served at his birthday party. They just make such great party foods, or even after school snacks. For this one, I wanted every ingredient to be fall colored, so it took a little extra effort, but the result is both pretty and yummy! If your child's class is having a fall party, put some of this in cute treat sacks and the kiddies will love it! And be sure to be on the lookout for new flavors of marshmallows coming to a baking aisle near you!

Pumpkin Spice Snack Mix
1 (8oz) package pumpkin spice marshmallows
1 c. cashew halves
1 c. golden raisins
1 (9.9oz) package White Chocolate Candy Corn M&Ms
1 (14.5oz) package Reece's Pieces Candy

In a large bowl, combine all and mix well. Store in airtight container.


Shared on The Country Cook Oct. 12, 2012
Shared on Make Ahead Meals Oct. 15, 2012
Shared on Mandy's Recipe Box Oct. 16, 2012

Snacks at Very Good Recipes
Pin It

Tuesday, March 20, 2012

Easter Treat

Only a couple more weeks until ladies dawn their Easter bonnets, little girls pick out their new frilly dresses, kids everywhere search high and low for colored eggs and we all get a sense of new life. For us Easter is one of the most holy days of the year, and we make sure Alex understands what that means to us, our faith and our family. I'm proud to say he knows it's not all about hunting eggs, chocolate bunnies and jelly beans. But I also let him be a kid! It's a fun holiday that as long as we remember the reason why we celebrate, we can also enjoy the more whimsical side of it. So I  find new, cute, fun activities in the kitchen for Alex to try. Coloring eggs is always on our "to-do" list, and then I attempt to find something else he can do mostly himself. This year, Spring Break happens to fall the week before Easter, so these activities can double as ways to keep busy during the week off. I saw this idea in Food Network magazine and couldn't wait to try it. I knew Alex would get such a kick out of it b/c he loves the originals. In fact they are one of his favorites! And then he could share his work w/ the family come Easter Sunday. These are perfect for little ones to help with, and if you're having a large number of kids for an Easter luncheon, what a great way for them to stay busy while the adults are chatting! Plus, they can make something yummy to contribute to the meal. Let's face it, anything on a stick always tastes better!! Easter brings with it so many treats, sweet and spiritual!

Homemade "Peeps"
Large marshmallows, strawberry flavored
Candy sticks
Pastel colored sprinkles (found in the baking aisle)
Water
Piece of floral foam or Styrofoam

Place sticks in marshmallows, to make "pops". Dip each in water to dampen. Dab lightly on a paper towel to remove excess. Roll each in sprinkles, covering evenly. Place sticks in floral foam, standing upright to dry. When dry, place in a cup for easy enjoyment!


Shared on Mandy's Recipe Box Mar. 20, 2012
Shared on Chef in Training Mar. 20, 2012 
Shared on Naptime Creations Mar. 20, 2012 
Shared on Celebrating Family Mar. 20, 2012 
Shared on Addicted to Recipes Mar. 20, 2012 
Shared on Cups by Kim Mar. 20, 2012 
Shared on Grateful Belly Mar. 20, 2012 
Shared on Lady Behind The Curtain Mar. 21, 2012 
Shared on It's A Keeper Mar. 22, 2012
Shared on Miz Helen's Country Cottage Mar. 22, 2012 
Shared on The Country Cook Mar. 23, 2012 
Shared on Sweet As Sugar Cookies Mar. 23, 2012 
Shared on Six Sisters' Stuff Mar. 31, 2012 
Shared on Around My Family Table Mar. 31, 2012


Tuesday, December 13, 2011

Bark For Under The Tree

When I was a teenager, my best friend's mother made the best Christmas candy assortment tins ever! Each year she would show up at our house bearing this beautiful tin filled w/ all sorts of holiday sweets; and it was something my family and I looked forward to each year. Now after the first couple times, she learned I had a favorite part of her famous tin, and started making extra of that candy, for only me! After that, the tin would arrive and along side would be a Ziploc bag filled w/ my "stash"....of peppermint bark! To be honest, I had never had it until hers, and was instantly hooked. I love all things peppermint, especially at Christmas time. Since then our friendship has faded, and I no longer receive my annual tin of goodies; so you can imagine my extreme happiness when I found this oh so simple recipe in Gooseberry Patch's Quick and Easy Christmas. (You remember that one....it's where the Cinnamon Biscuits and Dill Pickle Dip came from.) I haven't made many candy recipes before, but I knew this one I could handle w/o any trouble. Now I can become the "cool mom" w/ the Christmas tin of goodies everyone looks forward to!

Peppermint Bark
2 12 oz. bags white chocolate chips
1 tsp. peppermint extract
1/2 c. crushed candy canes ( about 6)

Line a baking sheet w/ parchment paper. In a microwavable bowl, heat chocolate chips for 30 seconds. Stir and heat another 30 seconds. (Mine actually took an additional 30 seconds, for a total of 1:30 minutes). Add extract and crushed candy. Stir well. Spread on prepared baking sheet and refrigerate 2 hours. Break into small pieces and store in airtight container.


Shared on Mandy's Recipe Box Dec. 13, 2011
Shared on Naptime Creations Dec. 13, 2011
Shared on This Chick Cooks Dec. 14, 2011
Shared on Something Swanky Dec. 15, 2011
Shared on Gooseberry Patch Dec. 15, 2011
Shared on The Country Cook Dec. 16, 2011
Candy at Very Good Recipes

Wednesday, December 7, 2011

Bring This, Not Figgy Pudding

"Oh bring us some figgy pudding. Oh bring us some figgy pudding. Oh bring us some figgy pudding; and bring it right here...." Well, I don't know about you, but I have no idea what figgy pudding is, so I'm not even going to attempt to make it, let alone bring it to our Christmas celebrations! But if you are looking for one last treat to serve your holiday guests this weekend, or maybe something quick to wrap up for under the tree, or even a simple hostess treat, this is it! I have been using this recipe for years, and just like my Peanut Butter Fudge, it is no fool proof and comes out perfect every time. To be honest, I am not the biggest chocolate fudge fan, and even I love this! I hope you are able to make a batch of this to include in your Christmas weekend! Think of it as my "We Wish You A Merry Christmas" carol from my family to yours!

 Easy Chocolate Fudge
12 oz. semi sweet chocolate chips
1 14 oz can sweetened condensed milk
1 tsp vanilla
1 c. chopped walnuts

Line a 8x8 baking pan with foil, with extra hanging over edges. Spray lightly with cooking spray. In a heavy bottomed sauce pan, combine chocolate chips and condensed milk. Over low heat, mix well until chocolate melts and well combined. Remove from heat. Add vanilla and stir in nuts. Spread evenly in prepared pan. Chill for 2 hours or overnight. Remove with foil and peel off. Cut into squares.

*NOTE* For nut-free option, just omit walnuts and make recipe as is.


Shared on This Chick Cooks Dec. 7, 2011
Shared on Hugs&Cookies Dec. 7, 2011
Shared on Newlyweds Blog Dec. 7, 2011
Shared on The Country Cook Dec. 9, 2011
Shared on Gooseberry Patch Dec. 15, 2011


Thursday, October 20, 2011

Can't Eat Just One

Nope, I'm talking about potato chips. There aren't very many things in this world that I can't walk away from eating. Yes I love food, and many things tempt me, but when I'm full I'm full. But there are a few select things that if left alone in the house w/ I am in T-R-O-U-B-L-E. Serious trouble. And one of those? Peanut Butter Fudge. No chocolate fudge. In fact, I don't really even like the "original" chocolate flavor, and only make it for others to snack on.  But peanut butter....ooohhhhh.....how sweet it is! If there is a plate of it within a 10 mile radius, I'm dangerous! My favorite version, like so many other things, is my Grammy's. Every Christmas she would make 2 or 3 kinds, and she always made extra peanut butter b/c it was not only my favorite, but my dad's. She still makes it and sends it to us around the holidays, but when I get a craving, I can't wait until December! I found this simple recipe in Taste of Home the first Christmas Adam and I were married and was so excited to try it, being a newlywed wanting to make the holiday extra special, and hoped it would come close to Grammy's. Well, it did....hallelujah. I still make this every Christmas, even if Grammy does send some of her own....you can never have enough peanut butter fudge. Especially if you live in my house, w/ me, the fiend, and have to distract me w/ new purses and shoes just to have a fighting chance at enjoying some too!

Peanut Butter Fudge
1 c. packed brown sugar
1 c. white sugar
1/2 c. milk
5 large marshmallows
1 1/2 c. creamy peanut butter

In a heavy 2 qt. saucepan, combine sugars, milk and marshmallows. Bring to a boil over medium heat stirring until sugar dissolves and marshmallows melt. Remove from heat and stir in peanut butter. Pour into a greased 8x8 square baking dish. Cool. When firm, but into squares.


Shared on Around My Family Table Oct. 20, 2011
Shared on It's A Keeper Oct. 20, 2011
Shared on Something Swanky Oct. 20, 2011
Shared on Gooseberry Patch Oct. 20, 2011
Shared on Six Sisters' Stuff Oct. 22, 2011
Shared on Sweet as Sugar Cookies Oct. 22, 2011
Shared on The Saturday Evening Pot Oct. 23, 2011
Shared on Make Ahead Meals Oct. 24, 2011
Shared on Sweetology Oct. 25, 2011
Pin It