Everyday Mom's Meals: Parmesan
_____
Showing posts with label Parmesan. Show all posts

Tuesday, February 13, 2018

Lemons In The Winter

Okay, was it just me or did January last 215 days? Seriously! I know winter months can drag on and on, but that was especially painful. Yes, it had 5 Mondays, which in itself should be outlawed, but I think there were 9 Tuesday and 17 Thursdays in there somewhere too.

Regardless, we onto February, and while for our family it is a very busy month, I realize for many it can drag on too.

Now is about the time of year my taste buds start to crave brighter, spring like flavors. They are ready to come out of winter hibernation and live again. Sure, we eat really well during these cold, drab months...soup, stew, casseroles...and there is nothing wrong with that. But they are always way ahead of the calendar and the weather, and wanting more.

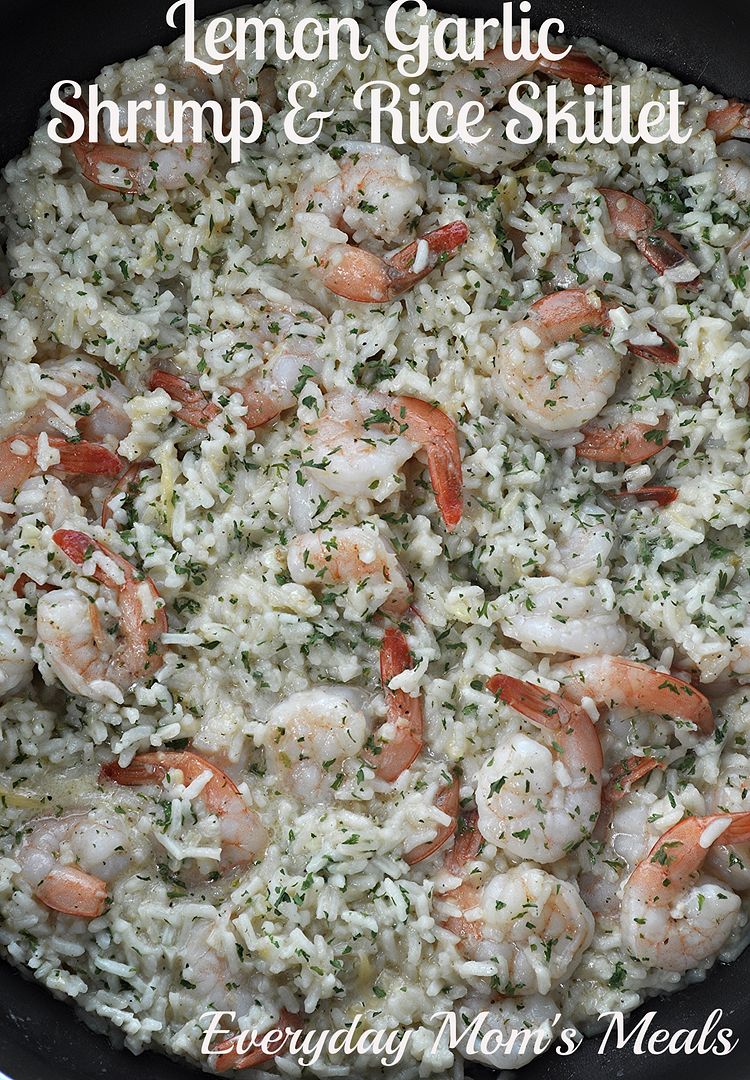
One way I can wake them up a little is lemon! I will take lemon pretty much any way I can get it. Savory dishes, desserts, main dishes, sides, and everything in between.

This recipe is extra special, because it gives you pasta as a side dish. I don't know about you, but 99% of the time if I'm boiling pasta, it is going to be the star of the meal. Either on it's own, or in a casserole. But not with this. It is perfect alongside some chicken, or maybe some fish since we are entering Lent!

If you feel like this winter is never going to end, I assure you it will. Just maybe not as quick as we would like. In the meantime though we can have a burst of springtime on our plate!

Baked Lemon Noodles
1 lb. rotini pasta
16 oz. sour cream
1 stick butter
Juice of 1 lemon
1 tsp. lemon zest
2 TBS dried parsley
2 TBS grated Parmesan cheese
Salt and Pepper to taste


Preheat oven to 400. Grease a 2 1/2 quart casserole dish. Cook noodles to al dente. Meanwhile in a medium sauce pan melt butter. Add lemon juice and zest. Slowly whisk sour cream until well blended. Add parsley, salt and pepper. Keep on warm. When pasta is done, drain well. Return to hot pot. Add sauce. Stir well. Transfer to casserole dish. Sprinkle with cheese and extra parsley. Bake for 25 minutes until heated through.


Inspired by Montana Happy

Monday, January 11, 2016

He Eats THAT?? {A Post for Earth Fare}

So, we've talked before about how lucky we are that our 11 year old boy loves food. All food. Seriously, he is probably one of the least picky eaters on the face of the planet. He has always been that way. This is the kid who was eating sushi and fried calamari at the age of 5.

How did we do this? Did we put some spell on him? Brain wash him? Nope. We just never allowed him to be a picky eater. Now, I'm not here to judge or tell others how to parent their children. But I do think that many times when children turn their noses up at foods, it is a learned behavior, or one that is condoned so much, it's normal. So, in a way, I think sometimes parents inadvertently create their own picky eaters, without realizing it.

However, I also believe that every person, including kids, are allowed to have certain foods they simply don't care for. We all do, and as long as the boy tries it once, if he determines it is truly something that doesn't agree with his palate, I'm okay with that. But those things are few and far between in our house. But when he does discover one, I will respect that.

When I made this pasta dish and was telling it to a friend her first response was "And Alex will eat that? With mushrooms and spinach in it?" You can imagine her shock when I explained it was actually he who requested me to make a new pasta with spinach in it. He loves the stuff! She of course was bewildered because she happens to have a picky eater on her hands, and it is getting to be quite frustrating for her.

I feel for her. It must be a daily struggle when it comes to meal time, and kids like hers are missing out on so many yummy food experiences. I encouraged her to keep trying. Maybe give her child new things in a different way. Doesn't like cooked broccoli? Try it raw. Maybe find ways to sneak more veggies into the dishes she will eat. And of course, try to stay strong. Don't become a short order cook. As my mama always said "You don't like it? It's a long time until breakfast."

This pasta supper is hearty and filled with so many fresh ingredients you can actually feel good about it! Plus, it's super hearty and filling, perfect after a long, cold day! And if you can trick your picky eaters into liking it, think what a victory it will be!

Sausage & Spinach Rigatoni Bake
1 lb. mild Italian sausage
1 lg. rigatoni pasta
2 TBS olive oil
2 garlic cloves, minced
 3 c. fresh spinach
8 oz. baby bella mushrooms, sliced
2 c. shredded mozzarella cheese, divided
1/4 c. grated Parmesan cheese
2 (14 oz.) cans diced tomatoes, drained with a little juice left behind
1 tsp. Italian seasoning
Salt and Pepper to taste

Preheat oven to 375. Grease a 9 x 13 baking dish. Cook rigatoni to package directions for al dente. In a large skillet heat oil over medium heat. Add garlic and stir for two minutes. Add sausage. Cook until no longer pink. Add mushrooms and cook until browned. Add tomatoes, seasonings and spinach. Stir to combine. Cover and reduce heat to low. Cook until spinach is wilted, about 10 minutes. Check for salt and pepper, and season again if necessary. When pasta is cooked, drain well. Add to sauce mixture and mix well. Add half sausage mixture to baking dish. Sprinkle with 1 cup mozzarella. Add other half of sauce mixture. Top with 1 cup mozzarella and Parmesan. Bake uncovered 20-25 minutes until slightly browned.


Recipe from Wine & Glue

Wednesday, December 2, 2015

Christmas at Grandma's Day 2

Did you catch Monday's post? It was a terrific festive veggie salad that would be beautiful on your holiday table. And today I'm sharing what would be a tasty main dish alongside it!

I'm kind of a chicken addict. I love it any and all ways, and if it weren't for husband I wold more than likely cook it multiple times per week. But as it is, he isn't the biggest chicken fan in the world, so I try to limit myself to once every week, or even every other. And when I do make it, I know he will be more likely to enjoy it if it's white meat. While I love the flavor of the dark, he is the exact opposite.

So when I saw this recipe in Christmas at Grandma's, I knew it could be a happy compromise for us both. Now, I will admit I'm not a fan of breaded baked chicken. It's not my first choice because I am always afraid of it coming out mushy or bland or both, but with this recipe neither is a worry!

This comes out with a crispy outside, tender and juicy inside and flavor galore! If you're going to be entertaining holiday guests, this would be a great choice. Simple and quick for the host and delicious for your guests.

We can all use more chicken options, rather it be for the holidays or a weeknight meal. Oh, and you can have a chance to win a copy of this new Gooseberry Patch cookbook too! Just click here to enter!

Zesty Baked Chicken
3-4 boneless chicken breasts, patted dry
1/4 c. butter, melted
1/4 tsp. garlic powder
1/2 c. bread crumbs
1/4 c. grated Parmesan cheese
1 tsp. dried oregano
1/4 tsp. paprika
2 tsp. dried parsley
Salt and Pepper to taste

Preheat oven to 350. Season chicken with salt and pepper. In one shallow dish combine butter and garlic powder. In another mix together bread crumbs, cheese, oregano, paprika, parsley, salt and pepper. Lightly grease a 9 x 13 baking dish. Dip each piece of chicken in butter and then cover in bread crumbs. Shake off excess. Place in baking dish. Cover. Bake for 45-60 minutes. Uncover and bake for 15 more minutes. 


Shared at Weekend Potluck

Monday, October 26, 2015

Pasta's Cousin

By now you all know what a pasta lover I am. How if I had to pick one food to eat for the rest of my life, it would definitely be in the running. But now, I've got another Italian classic that I am currently obsessed with and can not get enough recipes for...gnocchi!

These little potato dumplings are like soft little potato pillows that can take on whatever flavor you want and be a super star doing it. I've seen them featured in so many different ways I could do a different one each week and never repeat!

Plus, I've seen our local stores (even the discount ones like Aldi) carrying more and more varieties as well. Different flavors than just the standard potato gnocchi, so you can really switch it up!

This time around I wanted to pair them with a traditional meat sauce that normally I would serve with a short cut pasta. Seriously, this sauce is so good, and super easy, there is no reason to by the jarred stuff again! And after you boil them, the gnocchi can finish cooking right in the skillet you make the sauce in, so it is really close to being another "one pot wonder" meal your family will love!

If you still haven't tried them at home, the store bought gnocchi are really a steal at the store. They are inexpensive and very filling. Be sure to keep the sauce recipe handy too for so many other things!

Gnocchi with Homemade Meat Sauce
2 lbs. gnocchi
1 lb. ground beef
1 medium white onion, finely chopped
2 (14 oz.) cans diced tomatoes, undrained
2 (8 oz.) cans tomato sauce
1 (6 oz.) can tomato paste
2 tsp. dried oregano
2 tsp. dried basil
1 tsp. garlic powder
Salt and Pepper to taste
Shredded Parmesan cheese

In a large skillet brown beef with onion. Drain if necessary. Add tomatoes, tomato sauce, tomato paste and seasonings. Stir well. Bring to a boil. Reduce heat to low and cook for 1 hour, stirring occasionally. Boil gnocchi according to package directions and drain well. Add to sauce. Stir to combine. Keep on warm about 10 minutes to allow flavors to develop. Garnish with cheese. 


Wednesday, August 12, 2015

One Extra Pot

So, I wish I could "advertise" this as a one pot wonder, but I can't tell a lie. It would be false advertising and I just can't do that. However, it only takes one extra pot, so it's like a very close cousin! That's all. Just one more, and it is barely going to get dirty, so it only half counts. 

I think one of the reason why when searching for recipes we all seem to stop at the ones labeled "one pot" or "one skillet" is because life demands meals be quick, both for cooking time, and clean up. Let's face it, those huge meals taste great and are so satisfying, but the after math? I for one always wish for the dish fairy to show up...and she never does....lazy witch. You know the ones I'm talking about. Where it seems like every single dish/pan/pot/utensil in the kitchen is dirty and piled up in the sink. Even with the added blessing of a dishwasher, the amount of work can seem daunting. So when I can give my family, and all of you, a dish this delicious, and make the promise of only two pans...it's a successful food blogger day. 

This is another way to really stretch the budget when it comes to seafood. If you haven't seen me sing the praises of the frozen options in the stores today, you are now. The 12 oz. bag I used in this recipe cost me about $5, and easily fed our family of three. Oh, and if you're wondering if you have to buy the ones with tail left on per the recipe, it's a personal choice. I like to use them in dishes like this because they shrink less. But if you don't mind that, and don't want to mess with the tails when chowing down, feel free to use tail off. 

Between the garlic and lemon, this is bursting with flavor, and even with the cheese and milk, I think it's still super light. Add a veggie and maybe some bread on the side and supper is on the table in under 30 minutes! And your clean up will be even less than that!

Lemon Garlic Shrimp and Rice Skillet
Inspired by Diethood
2 c. instant white rice
2 c. water
2 chicken bouillon cubes 
6 TBS butter
5 large garlic cloves, finely chopped
12 oz. frozen medium shrimp, tail on, thawed
6 TBS milk
1/2 c. shredded Parmesan cheese
1 1/2 TBS dried parsley, extra for garnish
Juice of 1/2 lemon
Salt and Pepper to taste 

In a medium pot, bring water and bouillon cubes to boil. Add rice. Stir. Cover. Remove from heat. Let stand 5 minutes. Fluff with fork. Set aside. (These were my directions. Check your box!) In a large skillet, heat butter over low heat. Add garlic and cook for 2-3 minutes until fragrant, stirring constantly. Add shrimp, salt and pepper. Cook and stir, until shrimp are pink, about 5 minutes. Move shrimp to sides of pan, add rice. Stir well. Add milk, cheese and parsley. Stir to combine and cook for 1-2 minutes more until thickened. Remove from heat. Squeeze lemon over. Sprinkle with extra parsley. 


Shared at Weekend Potluck

Wednesday, April 29, 2015

Steak Season

At last, grilling season as returned! Well, for us, it never truly leaves, but you know what I mean. For many one of the first signs of spring is to return to cooking outdoors. You can smell it now, can't you?

During the hot summer months, I try really hard not to heat up the house with the oven or stove as much as I can. The grill usually takes care of the meat portion of the meal, but then I'm responsible for sides, and that's when I usually have to break my own rule. Sure, I can do cold potato or pasta salads, but sometimes we want more...that's where this recipe comes in. And I promise it's worth the little bit of heat it might put into the house.

I love mushrooms with steak, but not on top. We are kind of steak purists. We don't like anything taking away from the flavor of the meat itself, so instead we like them on the side. Just like we can get at our favorite steakhouse.

This is a totally new take on the traditional sauteed mushrooms I've made a thousand times. These are creamy! Just a hint of cream cheese gives them an unique flavor and texture that takes them to the next level!

If you have some steaks going on the grill this week, think about adding these to the menu too. You won't be sorry! 


Garlic Creamy Mushrooms
24 oz. large button mushrooms
3 large garlic cloves, minced
2 TBS beef broth
2-3 oz. cream cheese
1/2 tsp. dried oregano
1/2 tsp. dried rosemary
1 tsp. dried parsley, extra for garnish
3 tsp. grated Parmesan cheese
Salt and Pepper to taste
3 TBS butter
1 TBS olive oil

Preheat oven to broil. In a large skillet  melt butter over medium heat. Add oil. Mix. Add mushrooms. Don't move for about a minute, to allow to brown. Gently toss to brown on all sides. Add garlic and herbs. Keep tossing. When browned on all sides. move to outside of pan, as much as possible. Add broth. Remove from heat, stir in cream cheese until smooth. Stir to coat. Transfer to a baking dish and sprinkle with Parmesan cheese. Broil for about 5 minutes until cheese golden. 


Shared on The Country Cook May 1, 2015

Monday, April 27, 2015

The Extra In The Pantry

Go look in your pantry. Right now. I'll wait...

So, how many half used packages of pasta to you have? The extra elbow macaroni, penne, spaghetti and/or egg noodles? If you're like me, there are a few. Well, if one of them does happen to be egg noodles, then you've come to the right place to find out how to use them up.

Sure, when I cook with egg noodles, 9 times out of 10 the recipe calls for an entire 16 oz. bag. No leftovers. But every once in a while, there are some leftover and they usually sit in the cupboard for quite some time before I find a way to use them. Is that you too? Well, then this recipe is for you!

This amazingly delicious, super simple pasta supper does not take entire pound of pasta, making it the perfect use for those extras. Plus, you probably have many of the other ingredients on hand, making it budget friendly too.

The noodle/sour cream mixture makes a great first layer, with the seasoned meat layer being the perfect topping. You might be inclined to mix it all together, but restrain yourself! For whatever reason, it cooks just right this way, and tastes much better if everyone "mixes" on their plate!

Extra noodles in the pantry can mean a tasty meal tonight! So go looking and see what you've got on hand before you head to the grocery store! 

Cheesy Beef Noodle Bake
1 lb. ground beef
1 TBS vegetable oil
3 c. egg noodles
1 1/4 c. sour cream
1/2 c. Parmesan cheese
1 (14 oz.) can diced tomatoes
1 small yellow onion, finely chopped
1 red bell pepper, chopped
2 garlic cloves, minced
1 TBS tomato paste
1/2 tsp. dried basil
1/2 tsp. dried oregano
1/2 tsp. parsley
1 c. shredded cheddar cheese
1 c. shredded Monterrey Jack cheese
Salt and Pepper to taste

Preheat oven to 425. Cook noodles until just al dente. Drain well. In a large skillet brown beef in oil over medium high heat. Add onion, garlic and red bell pepper. Season with salt and pepper. Cook until beef no longer pink and peppers are crisp tender. Stir in tomato paste, basil, oregano, parsley and diced tomatoes. Lower heat to low and cook until slightly thickened. When noodles are done, drain well. In a large bowl combine sour cream and Parmesan. Add noodles and mix well. Season with salt and pepper. Grease a 8 x 11 pan. Add noodle mixture. Pour meat mixture over top. Sprinkle with cheeses. Bake for 15-20 minutes until bubbly. Allow to stand 10 minutes before serving. 


Shared on The Country Cook May 1, 2015

Wednesday, April 22, 2015

Easy Family Dinner with Hamburger Helper #freebeef #helper #ad

You know I am the biggest advocate for taking a little help from the store where you can. I think there is absolutely no shame in it. We have all been there, and will be again. It's supper time, but there is no time. You need something fast, but still tasty.  Quick family meals are where Hamburger Helper comes in! 

Something from our childhood, made new again with some great new flavors! Plus, did you know you can feed your family with one box and one pound of ground beef? Yep, you read that correctly! And now, with the ground beef rebate (more about that in a minute) you can get dinner on the table for about $1.50! Almost too good to be true, I know. But it is!!


Helper is a great dinnertime solution because not only is it convenient, but it is a crowd pleaser. Watch it be gobbled up. Or if there does happen to be some leftovers, that's okay too...lunch the next day! 

Launched in the 1970's, Helper has always been a brand synonymous with value. It gives you the ability to stretch your dollar while giving your family a yummy and hearty meal. Oh, and let's not forget it gives you something else we all love...a chance for a "one pot wonder" supper! 

About that rebate! Right now, when you buy 3 boxes of Helper, you can go online and print out a rebate form for a free pound of ground beef! FREE!! How much do we love that word??!! 


I picked a variety I knew my family would love, something with an Italian flare. Then I decided to add a few extra veggies just for good measure, and ramp up the flavor even more. Plus, it lets me still only use one pound of beef for two boxes, because the veggies kind of act like "filler" instead of more meat.  In the end, it was a big skillet of a pasta that tasted like pizza...how can you go wrong? Plus, you can easily add your favorite pizza toppings! I think black and green olives would be delicious. Oh, and banana peppers. See, the possibilities are endless! Just remember to go and get the great rebate offer so you can feed your family on the cheap too!


One Skillet Pizza Shells
2 boxes Hamburger Helper Cheesy Italian Shells
Milk and Water, check box for amounts
1 pound ground beef
8 oz. button mushrooms, sliced
1 green bell pepper, chopped
1 tsp. garlic powder
1/4 tsp. red pepper flakes
1/2 c. shredded Parmesan cheese
Dried Parsley
Salt and Pepper to taste

In a large skillet over medium high heat, brown beef until no longer pink. Season with salt and pepper. When beef is almost done, add mushrooms and peppers. Stir to mix. Continue cooking until veggies are tender and beef is cooked through. Drain if necessary. Season with garlic powder and red pepper flakes. Add water and milk, per package instructions. Add pasta. Stir. Bring to a boil. Reduce heat, cover and simmer for 20-25 minutes, stirring frequently, until pasta is tender. Sprinkle with cheese and dried parsley. Replace lid. Allow to sit for about 5-7 minutes until cheese melts and sets.


Shared on The Country Cook April 24, 2015

Monday, March 30, 2015

Light and Bright For Spring

By now all of you know how much of a pasta fiend I am. Seriously, it's an addiction. If there were meetings, I would attend. I'd be a leader. Multiple times per week. I have to refrain from eating pasta every meal. Every day. And no, I'm not exaggerating. 

If you're a regular reading, you also know I'm a huge fan of lemon. Anything and everything lemon. Especially in the warm months. Beginning in spring and right through to summer, it's at the top of my favorite flavors. 

So, imagine my excitement, my joy, my utter elation when I saw a recipe combining them!!! Oh. My. Blog. I couldn't even fathom how could this was going to be, but I was ready to find out! 

If you've never tasted a Meyer lemon, it is even more lemony than a regular one. (Is that a word? Well, it is now.) Plus, it has hints of orange in the background. So they give you a double citrus punch in whatever you use them in. 

This is a creamy, filling pasta supper, while still being light. I know that's hard to believe, but it really is! It tricks your brain into thinking it's eating a much heavier cream sauce. Not to mention the fact the hints of lemon are so refreshing and bright! 

If you are looking for ways to enjoy some lighter, but still filling and satisfying meals, for spring, you've come to the right place. Or if you are simply a pasta and/or lemon addict and are looking for an enabler, I've got you covered there too. 

Creamy Lemon Linguine
2 lbs. linguine, cooked according to package directions
5 Meyer lemons, juiced
4 tsp. grated Meyer lemon rind
1 c. park skim ricotta cheese
1/2 c. chopped chives
1/2 c. heavy cream
1/2 c. grated Parmesan cheese
1/2 c. plus 6 TBS pasta cooking water
Salt and Pepper to taste

While pasta is cooking in salted water, add ricotta, lemon juice, rind, and cream to a blender. When pasta is finished, BEFORE draining, carefully remove the cooking water to a separate bowl. Add 6 TBS cooking water to blender and blend until smooth. Drain pasta well. Heat a large dutch oven over medium-low heat. Add cream mixture. Heat until warmed through. Add pasta, chives salt and pepper. Stir. Add 1/2 c. cooking water a little at a time until pasta mixture is creamy. Remove from heat, add Parmesan cheese. Garnish with extra chives. *NOTE* If eating leftover, add a splash of cream or water to make creamy again. Also, I don't know how this would work with regular lemons. The Meyer variety can be found at most grocery stores. I got mine at Kroger and have seen them at Meijer too. 


Wednesday, March 25, 2015

Let Me Count The Ways

Egg Noodles. How I love thee. Let me count the ways...

What? You don't recite poetry to your food? Um, okay...awkward...

Well, I adore them. Can't get enough of them. Could eat them every single day.

To me, egg noodles are one of the most versatile and simple convenience foods out there. You can do almost anything with them, and they go with pretty much any protein, rounding out a meal perfectly.
Heck, you can just boil them and add a little butter, salt and pepper and your family will think you are a genius! Or add veggies for a one pot meal! Or add protein for even more punch. See...the possibilities are endless.

These are my latest creation. How? Easy. I wanted noodles. I had no idea what to make with them. I started throwing things into the pot until I achieved the flavor I was looking for. Sometimes recipe creation isn't as sexy as chefs/cooks would have you believe. But they are egg noodles. You would have to work pretty hard to screw them up.

If you are looking for a simple side dish for tonight's supper. Here you go. Or maybe a new dish for your Easter table??!! These would be so good with ham! Add your own favorite herbs and spices to make a whole new flavor profile! Have fun with it! Honestly? I think you could make a big batch on Sunday and eat them for lunch all week too! See, I told you they were versatile! 

Parmesan Herbed Noodles
1 lb. egg noodles
1/4 c. Parmesan cheese
4 TBS butter, softened
1 tsp. dried basil
1/4 tsp. dried thyme
3 tsp. dried parsley
Salt and Pepper to taste

Cook noodles according to package directions. Drain very well. Return to pot over warm heat. Add butter, cheese, herbs, salt and pepper. Stir well to combine. Serve with some extra herbs sprinkled on top. 


Shared on The Country Cook Mar. 27, 2015


Friday, March 13, 2015

Mom Knows Best Day 2 {A Review and Giveaway from Gooseberry Patch}

If you didn't have time to log on Wednesday, you missed the debut of the newest cookbook from Gooseberry Patch. You can read all about it here, and see the yummy soup I made too!

For the second recipe I wanted to share with all of you, I didn't even have to turn the page from the soup recipe. Yep, they are on the same one in the book. And it was a genius move because they go so well together. When I make soup, we have to have what I call a "dipper" on the side. That can be a sandwich, sliced bread, biscuits, rolls...anything along those lines. So, it was as if the folks at Gooseberry Patch read my mind when they featured this recipe right under that minestrone one I wanted to try.

Plus, both of these were in the section Kids in the Kitchen. Well, ya'll know how much my little man loves to my sous chef! And you've heard me say it 100 times. Get your little ones into the kitchen, cooking, exploring, helping, and learning. It's a great way to curb some of their picky eating habits. Why? Because if they help to prepare dinner, they will be much less likely to complain about it because of the sense of pride they will feel!

Anyway, back to these tasty little biscuits. If you've ever had pull-apart bread, this is very similar. It would be great for parties or holidays too...easy to adapt to feed more. Double the recipe and put them in a 9 x 13 pan. I think they would be very tasty with your Easter ham!

I love finding new ways to serve bread with soup. The combination if such a staple in our house, and I don't like to fall into food ruts! Oh, and you have a chance to win a copy of Mom Knows Best for yourself. Just click here to enter!

Biscuit Buddies
1 (12 oz.) can refrigerated biscuits, each quartered
1/4 c. butter, melted and divided
2 TBS Italian seasoning, divided
1/4 c. grated Parmesan cheese

Preheat oven to 350. Mix half the butter and Italian seasoning together. Pour into bottom of 8 x 8 baking dish. Add biscuit quarters in single layer. Mix other half of butter and Italian seasoning together and pour over biscuits. Sprinkle with cheese. Bake for 15-18 minutes until golden. *NOTE* I added some dried parsley to the top, after the cheese, for extra color. 


Shared on The Country Cook Mar. 13, 2015


Monday, February 9, 2015

Fingers Crossed

Recipe contests. They aren't something I enter a lot, but when I do, I want to make sure of two things. One, the sponsor is a company I respect and/or use in my every day life. Two, I am confident I can create a recipe to be proud of, so that even if it doesn't win, I can know I did my very best.  And this time you actually get to take this little journey with me.

I've worked with Healthy Solutions Spice Blends before. In fact, you can read all about them in my original post, here. So when I was contacted about entering their Blogger Recipe Challenge, I immediately said "Sign Me Up!"

It was really quite simple. I got to pick out one of their terrific spice blends to create a dish around, and then share it with all of you, and them.

Having already tried a couple varieties for my original review, I wanted to use a different one this time around. While browsing their product line when I saw the word Italian, I knew I had found my winner ! Ya'll know what a sucker I am for great Italian food, so I knew I could do something yummy and unique with this one.

Sure, this blend of spices is made to enhance the flavor of both meatballs and sauce, but I wanted to take that idea and turn it into a simple weeknight meal. And with that decision one word came to mind. Casserole. Yep, a scrumptious pasta and meatball dinner turned into every busy mom's best friend!

This one would travel well too, so keep it in mind for your next family or church potluck! Oh, and if you wouldn't mind, please keep your fingers crossed for me and I will let you know if I win! 

Meatball Casserole
1 lb. penne pasta, cooked to al dente
1 lb. ground beef
1 egg, beaten
1/2 c. bread crumbs
1/2 c. plus 1 TBS grated Parmesan cheese, divided
1 TBS Healthy Solutions Italian Meatball Seasoning
3/4 c. shredded mozzarella cheese, divided
1 (24 oz.) traditional pasta sauce
2 tsp. Italian seasoning
1 c. ricotta cheese
Salt and Pepper to taste
Dried Parsley

Preheat oven 375. In a large bowl combine ground beef, egg, bread crumbs, 1 TBS Parmesan cheese, meatball seasoning, salt and pepper. Using hands, mix well. Form into 1 inch meatballs. (You should have about 20.) Lay wire racks on a large baking sheet. Spray with nonstick spray. Lay meatballs on. Bake for 25-30 minutes until done through. 

While meatballs cook, warm sauce and Italian seasoning in a large saucepan over low heat. And cook pasta.  When meatballs done, transfer to skillet and stir to combine with sauce. When pasta is done, drain well. 

Spray a 11 x 5 baking dish with nonstick spray. Layer in half the meatball mixture. Top with half pasta, half the ricotta, half the remaining Parmesan and half mozzarella. Repeat layers. Sprinkle top with parsley. Reduce heat to 350. Bake for 20-25 minutes until browned and bubbly. 

*NOTES* You can make the meatballs ahead of time and chill in fridge until ready to use. I actually prefer to do this because they seem to "set" and stay together better. Also, don't be alarmed if the ricotta cheese doesn't melt and "spread out" entirely. As soon as you scoop the casserole to serve, it will mix together very well and become creamy. Also, you can also substitute Italian seasoning for the spice blend and achieve the same result, for those of you not entering this contest with me! 

Friday, January 30, 2015

Are You Ready For Some Football??? {A Post For Earth Fare}

It's finally here people! Super Bowl weekend is upon us. Okay, so maybe I'm a little more excited than I should be. But let's face it. Even if you aren't a football fan. Even if you don't know what teams are playing. Even if you don't care about the commercials or the half time show...we can all unite behind one aspect of Sunday's game. One important, universal tradition near and dear to all our hearts...the FOOD!

Sure, I love the game. I love the excitement. I love to watch all 4 quarters of football. But I realize in the world of women, I'm part of the exception group. (And yes, I remind my husband often how lucky he is to have a wife who not only likes the game, but understands it as well!) Many of you ladies out there could care less about those 4 hours Sunday night, but you still put on the happy face, fire up the ovens and make sure all the pigskin fans in your life have a great time.

Here is a dish that is as simple as chopping, stirring and pouring; and in about a half hour, you have something creamy, delicious and perfect for dipping! In fact, this one is so good, you might want to make two batches because it's going to go fast! Especially when you are eating the first before you can set it out for the others!

If you love spinach artichoke dip, this is very similar. And it's not missing the spinach because we don't like the green stuff. We love it! I just felt like something a little different this time. Plus, if you've got kids at your Super Bowl party, the spinach might turn them off a little, but this cheesy goodness won't! But feel free to add some spinach for extra flavor. I'm sure it would be delicious!

Sunday will be one of the biggest foodie days of the year. Be sure to have yummy things for everyone to nibble on, as they root for their favorite team. Or in our case, with our team sitting this one out, yummy things to nibble on while we watch the commercials and scream at the refs! 

Hot Artichoke Dip
1/2 c. sour cream
1/2 c. mayo
1 (14 oz.) can artichokes in water, drained and chopped
1 tsp. Tabasco
1 tsp. lemon juice
1 tsp. garlic powder
1 c. grated Parmesan cheese
Salt to taste

Preheat oven to 350. In a medium bowl combine sour cream, mayo, artichokes, hot sauce, lemon juice, garlic powder, cheese and salt. Stir to combine. Spread into a 9 inch pie plate or a quiche plate. Bake for 25 minutes. Increase heat to 375 and bake 5-10 minutes more until browned on top. Let stand 15 minutes before serving. Serve with crackers, pita chips, etc. (Or seriously....eat it with a spoon!)


Shared on The Country Cook Jan.30, 2015

Monday, January 5, 2015

Conquer Fears in 2015

It's the new year folks. I hope it's treating you well thus far. How do you feel about new year's resolutions? I don't really believe in them. I think they actually set us up to fail. I think there is enough pressure in day to day life, adding to it only makes things harder. Instead, simply try to be a better person than I was the day before, all the time knowing some days I will fail. I will fall down. But thankfully, God gives me the opportunity to start over the next day and try again. 

That being said, I do try to come up with some foodie goals each January. A few years back, my goal for myself and this blog was to try at least one new recipe every week. Well, I am happy to report not only did I achieve that goal that year, but I have continued to follow that plan for over 3 years now! That's a lot of new recipes!! 

Last year my foodie resolution was to provide ya'll with both more casseroles and slow cooker dinners, because that's what you asked for. I hope I did a great job with that request because I tried really hard to bring you as many new ones as I could. 

This year, I don't really have such a specific recipe goal in mind. I am thinking in broader strokes this time. I've decided I'm going to attempt to conquer those dishes that still intimidate me in the kitchen. Or, find a way to make them that fits into my world a little better...and this recipe is the first example of that.

Risotto...have you ever made it? I've watched it be made on television a thousand times. I've heard all of my favorite chefs say "It's time consuming, but easy if you pay attention and have patience. Well, I've got news for you. I'm not the most patient person in the world. I can be when I have to be, (After all, I am the mother to a very active 10 year old boy!) but I only have so many patience to go around every day and sometimes there just isn't any left to use while cooking. 

So imagine my joy when I found this recipe while thumbing through a new holiday cookbook I got a couple weeks ago. Yep. Risotto...baked in the oven. Some stirring and pouring, and the oven does the rest of the work. Hallelujah!

Now, a couple things. First, when it says to stir a couple times during cooking, don't skip this step. Yes, I know I said the oven does all of the work, but believe me, you're going to be happy you took the 20 seconds it takes. Secondly, don't be scared if most of the cooking time passes and you see a lot of liquid left. The rice is going to cook, and then absorb it, it just takes a while. You just have to be patient. Gee, where have I heard that before? 

I promise you're going to love this dish. It makes a great side to any meal you are serving, and it's pretty enough you can entertain with it too.

No matter what your 2015 goals are, I'm so thankful you are joining me for another year of my family's food, and look forward to sharing my conquering tales with you.

Baked Risotto
3 1/4 c. water
1 (10 3/4 oz.) can cream of celery soup
1 1/4 c. medium grain rice (NOT instant)
1/3 c. matchstick carrots
1/2 c. frozen peas, thawed
1/2 c. grated Parmesan cheese
Salt and Pepper to taste
2 tsp. dried parsley

Preheat oven to 375. In a medium bowl combine uncooked rice, water, soup, carrots, salt and pepper. Transfer to an ungreased casserole dish. Bake covered for 55-60 minutes, stirring twice during cooking, or until rice is tender. Remove and stir in peas, Parmesan and parsley. Let stand for about 10 minutes before serving. 


Shared on The Country Cook Jan. 9, 2015

Wednesday, November 26, 2014

A Little Spice For Mr. Everyday

So, tomorrow is the big day! Do you have your cooking game plan down? Maybe you've been cooking all week so there isn't as much to do tomorrow. You're so smart! Either way, we are coming down to the wire, and it's time to loosen our belts and bring on the feast!

For today's post I could have easily shared another holiday idea, but instead I thought I would post something for those pre-feast hours. When everyone is sitting around, watching football, or the parade, playing games. The snacking time. I'm not even kidding you. My Grammy is famous for all the "nibbly bits" (as Monkey calls them) she puts out to tide everyone over until the big meal. So many delicious things that many times they are a meal in themselves; and by the time the turkey hits the table you're almost too full to eat. Almost. 

When a friend gave me this recipe I knew it would be perfect for Mr. E. He likes spicy things, and while many times I shy away from recipes that have a kick to them because my taste buds are wimps, I thought these would be a nice treat, just for him. And I will be honest...he ate the whole batch because after trying one, I was gasping for water. These. Are. Spicy. Very. Spicy. So, if you can't stand the heat, be sure to adjust the amount of red pepper flakes!! 

The turkey may be thawing, and the side salads might be waiting in the fridge, but that doesn't mean we can't still look for things to munch on all holiday weekend long. And if you like a little spice in your snack, these are just for you.

From our family to yours, I wish you a very

~*~Happy Thanksgiving~*~

Spicy Ranch Crackers
4 sleeves saltine crackers
1 package ranch dressing mix
2 TBS red pepper flakes
1/4 c. shredded Parmesan cheese
1 c. canola oil

In a large bowl whisk together oil, ranch mix and red pepper flakes. Working in batches dip crackers in mixture, covering completely. Lay on baking sheets. Sprinkle liberally with Parmesan.  Bake at 250 until golden brown and crunchy, about 45 minutes. (Check often as not to burn!) Store in airtight container. 


Snacks at Very Good Recipes

Friday, September 5, 2014

Long Day?

School is in full swing. Are you feeling it yet? Feeling the stress of busy days packed full of driving the kids, heading to work, picking the kids up, getting them to dance, football, scouts, etc...and somewhere in all of that you have to feed the family too! It's a lot of pressure; but rest assured, I'm here to help!

I've heard from so many busy parents that meal time needs to be quick and simple, but it has to be filling and delicious too. After a long day, sure a fast meal is appreciated, but  you want it to taste good too, plus be hearty to satisfy a hungry bunch. All of these requirements scream pasta to me! 

We are some pasta lovin' people in this house. I have too many pasta bake recipes to count. They are my go-to suppers when I know the schedule is getting crazy. But this one is just a little extra special. Why? Because it is a no boil one! That's right, no need to pre-cook the pasta. None. It cooks itself while baking in the oven while you sit and relax. (Yeah, right...in what dream world??!!) Want to make it even easier on yourself? Brown the hamburger the night before. Set it in the fridge, so it's waiting on you at dinner time. That just took your prep time down another fifteen minutes!

If you love my Baked Mac n Cheese that is also a no boil recipe, you're gonna want to try this for sure! It takes the idea of a simple supper to a whole new level! 

No Boil Ziti Pasta Bake
1 lb. ziti or penne
1 lb. ground beef
1 (26 oz.) jar spaghetti sauce
2 c. water
1/4 c. Parmesan cheese
1 TBS Italian seasoning
1/2 tsp. garlic powder
1 c. shredded mozzarella cheese
1 c. ricotta cheese
Salt and Pepper to taste hea

Preheat oven to 400. Grease a 9x13 baking dish. In a large skillet brown beef until no longer pink. Season with garlic powder, Italian seasoning, salt and pepper. Reduce heat to low. Add pasta, sauce and water. Stir to combine. Add ricotta and Parmesan. Stir until well blended. Transfer to baking dish. Cover tightly with foil. Bake for 55 minutes. Remove and add mozzarella cheese. Cook an additional 10 minutes until cheese is melted. Allow to sit at room temp for 5 minutes before serving.


Shared on The Country Cook Sept. 5, 2014

Pasta at Very Good Recipes

Wednesday, June 4, 2014

Getting Ready For The Garden

Do you plant a summer garden? If so, my hat is off to you. I have two brown thumbs and can't get anything to grow on my own. Thankfully, I married a man with a green thumb and he has passed that gene down to our son. So, come summer time, they are 100% in charge of our backyard garden.

Now I will be honest with you. Our garden doesn't always turn out the best yield. I don't know if there is something in our soil, or maybe the location we have it in our yard, but some years are definitely better than others. Last year was an almost complete bust, but that was because of a major drought and temps rising to almost 100 for weeks on end with no rain. But even during the years that we don't get as much bounty from it that we like, one thing always seems to grow well, and we end up with more of it than I can find uses for...zucchini

So I figured this year I would prepare myself and test a few new recipes using it before I found myself with a crisper drawer full of it and no idea what to cook. And I have to admit, I don't know why I don't think to cook with it more than I do. It's one of the best bargains in the produce section, can be prepared many different ways, and takes on amazing flavors of whatever it is paired with. 

This dish is a great way to get more veggies in the kids too. If they turn their noses up at anything that is green, add some garlic and cover it all in cheese. I bet they will be more willing to bend to your will. It's a simple side dish perfect for any meal that screams summertime to me. But to be honest, if you made enough of it and maybe added in a few other garden fresh veggies, it would be a great main dish too. 

Our summer garden harvest will be here before I know it, and I'm happy to have a few new recipes up my sleeve to enjoy when it comes. If you are too, be sure to jot this one down today!

Sauteed Zucchini with Garlic and Parmesan
3 medium zucchini, cut into matchsticks
2 tsp. olive oil
1 garlic clove, mined or grated
1/4 tsp. red pepper flakes
3 TBS shredded Parmesan cheese
Salt and pepper to taste

In a large skillet heat oil over medium high heat. Add zucchini, red pepper flakes and garlic. Saute' for about 10 minutes until zucchini are golden brown on all sides, stirring often. Season with salt and pepper. Remove from pan to serving dish. Sprinkle with Parmesan cheese. 


Shared on The Country Cook June 6, 2014

Friday, February 28, 2014

Not Just For Muffins

When I was a working girl one of my favorite places to "go to lunch with the girls" was Uno's Pizzeria.  One, because they were close to the office, and offered a 15 minute lunch. From the time you ordered, to the time they brought you the food, it was 15 minutes, or it was FREE! When you only have an hour to spare, that's a pretty great deal. And two, because they had, hands down, two things on their menu that to me, they did better than anyone else.

The first favorite I had was their fish n chips. Oh my word. It was this huge piece of beer battered cod, served with a huge helping of their yummy fries. Just thinking about it makes my mouth water. But the other was an in-house specialty...their deep dish pizza. I'm not really a deep dish fan, but theirs? I could not get enough! They did it better than anyone. After all, they originated in Chicago, and nobody does deep dish like Chi-town! The crust was the absolute best I have ever eaten, and it was the perfect indulgence during a busy work day.

Well, Uno's closed here in Fort Wayne quite a few years back, and I have not had a deep dish pizza since. No joke! But when a friend told me about these cute little appetizer pizzas she had a party, I figured they might just be a great way to get me out of the rut. Not because they would even come close to the one I loved so much, but they were easy, and I love something that can play multiple rolls. Sure, they make a great appetizer, but make enough, add a salad and you've got a meal the kids will love! Oh, and any time I can find a new use for my muffin tin...I'm in!

Add your favorite toppings and make these a fun new pizza party treat! Get the little ones in the kitchen and let them help! If you've got extra tortillas left over from tacos earlier in the week, turn them into something completely new! There are so many reasons these would be a star in your kitchen, and you will be a total rock star for making them!

I miss those deep dish pizzas a lot, and don't know if I'll ever find another I enjoy as much, but until then, I'll munch on these to ease my pain!

Mini Deep Dish Pizzas
4 large flour tortillas
Cooking Spray
1 c. mozzarella cheese
12 turkey pepperoni, cut into 4 pieces each
1 (15 oz.) can pizza sauce
1/2 c. grated Parmesan cheese
1 TBS Italian seasoning

Preheat oven to 400. Spray muffin tin with cooking spray. In a small bowl combine pizza sauce, Italian seasoning and Parmesan cheese. Stir well. Using a glass or the empty pizza can, cut 3 rounds from each tortilla. (You want to make sure the rounds are just a little bigger then the wells in your muffin tin.) Place tortilla rounds in muffin tin, so each well is covered on the bottom and up the sides a little. Fill each with about 2 TBS of pizza sauce. Sprinkle with cheese. Top with 4 pieces of pepperoni each. Bake for 10-15 minutes until golden and crispy. Let stand 2 minutes and remove with fork.


Shared on The Country Cook Feb. 28, 2014
 

Monday, February 10, 2014

Potluck Classic

Around the holiday times I got into a deep discussion with a friend about how we missed the church pot lucks of our childhood. Because you know, that's what you do during the holidays. You sit around and eat, and talk about food while you chew!

We both remembered going to church on Sundays as a kid, and then what the service was over gathering in the church basement for a big meal, that everyone contributed to. All the little old ladies would bring their tried and true dishes everyone raved about, the ones they had brought to every pot luck for years and years. Everyone else would try to find something just as delicious to bring, and while their food was also appreciated and enjoyed, it was those long time favorites people looked forward to the most.

As we were talking she started to tell me about just that. A dish that showed up at every potluck she could remember, always brought by the same sweet lady. Now, the neat thing about this lady was that each time someone complimented her on the dish, and of course asked for the recipe, she was always happy to share it. I love that. Food is love, and sharing the love is half the fun!

 I couldn't wait to try it for myself, and I'm so happy I did! My boys were literally licking their plates! They couldn't get enough. This is the perfect side dish for a busy weeknight because you can throw it together as soon as you get home from work, the oven does all the work and about 45 minutes later a steaming plate of yummy is on your table. It has such incredible flavor, and goes great with pork, chicken, beef or fish.

If you enjoyed potlucks as a child too, you can appreciate what I'm talking about. Or, if you are just looking for a new rice dish, this is something you will want to try asap!

French Onion and Parmesan Rice
1 c. long grain rice
1 (10 3/4 oz.) French Onion soup
1 (10 3/4 oz.) beef consume'
1 stick butter
1/2 c. Parmesan cheese

Preheat oven to 350. Place rice in a 8x11 baking dish. Add soup and consume'. Stir to combine. Place stick of butter in center of rice mixture. Bake for 40 minutes until most of the liquid has absorbed and rice is tender. Remove from oven. Stir well. Sprinkle with Parmesan. Bake 5-7 additional minutes until cheese is melted. Remove from oven and stir before serving.


Shared on The Country Cook Feb. 14, 2014
 

Monday, January 27, 2014

So Glad I Saved It

I am so excited to share today's recipe with you. And I really think you're going to be just as happy after you read it. And even happier when you eventually try it, because I'm telling you, it's out of this world! Seriously, this is probably one of the best pasta dishes I've ever made. Oh, and did I mention you get to use your Crock Pot too? If I didn't have your attention before, I do now! But first, let me back up a little...

Over a year ago a friend was telling me about this amazing spaghetti she had the recipe for. It reminded her of a restaurant quality dish, easily made at home, and in the slow cooker none the less. Well, I was instantly intrigued. There was only one problem. At this time, I still had my old Crock Pot. The one I had gotten right after we were married, at a garage sale for $.25! It was the green, upright kind your mom probably used to have. And while it worked perfectly find, and I could make tons of dishes in it, when my friend told me about this, I was kind of doubtful it would turn out the same as it would cooked in the newer oval style. I'm not saying it wouldn't have, but I was just skeptical enough not to try it. So, she jotted down the recipe and I put it in the back of my recipe box, where is stayed until just recently.

See, only about 3 months after this conversation, Christmas 2013, I got a brand new Crock Pot, in the new updated oval style! I was so excited, and happy to retire my old one to the Goodwill so someone else could get some use out of it. Well, that was now over a year ago, and I am just now making this recipe! Why? Because that's what happens when you put something in the back of your recipe box and totally forget about it.

Boy oh boy was I thrilled when I stumbled upon it; and after making it our stomachs were even happier. This spaghetti is so creamy, cooked to perfection (As long as you read the note below!) and is full of delicious flavors. Now, I know when some of you read it, you're going to ask me, "Why so much sauce?" The answer is easy, as the noodles cook, they absorb it, soaking in all its goodness. Instead of boiling in water, soaking it up, it is essentially doing the same thing in all that sauce, resulting in an absolutely amazing meal.

If you haven't went back through some of your old recipes lately, you should! Especially if you are like me and have ones on little pieces of scrap paper, shoved to the back of a recipe box, that you haven't thought about in months, or even years. Sometimes, they are the ones that will lead to the yummiest results.

Crock Pot Creamy Spaghetti
1 lb. spaghetti noodles, broke in half
1 lb. ground beef
1 tsp. garlic powder
1 tsp. onion powder
1 tsp. Italian seasoning
4 oz. cream cheese
3 (24 oz.) jars traditional spaghetti sauce
1/2 c. Parmesan cheese
1 c. chicken broth
Salt and Pepper to taste
Dried Parsley for garnish

Preheat Crock Pot to HIGH. In a large skillet brown beef. Season with garlic powder, onion powder, Italian seasoning, salt and pepper. When beef is no longer pink, drain if necessary. In bottom of Crock Pot, pour 1 jar of sauce. Lay spaghetti noodles on top of sauce. Add beef and sprinkle with Parmesan cheese. With fingers, break up cream cheese over meat. Pour 1 jar sauce over top. Cook on HIGH for 2.5-3 hours. Stir. Add chicken broth and last jar of sauce. It will be very thick. If you like a thinner consistency, add more chicken broth. If pasta isn't tender, cook 1 additional hour. Stir well before serving. Garnish with parsley if desired. *NOTE* My pasta was perfectly cooked after 2.5 hours. I turned the heat down to Keep Warm until serving. If it dries out, you can always add more broth and stir.


Shared on The Country Cook Jan. 31, 2014