Everyday Mom's Meals: June 2015
_____

Monday, June 29, 2015

Happy 4th of July!!

Okay, so technically I'm a few days early, but this is my only post this week, so I thought it best to say Happy Birthday America today, and share something you could easily whip up in no time this weekend of your holiday celebration.

Do you love parfaits as much as I do? I'm kinda addicted. Anytime I can find a way to simply layer things into a pretty dish and call it dessert, I'm happy. They are truly one of the easiest things you can make, and really budget friendly for feeding a crowd too. You can make ingredients stretch a lot farther because you are using less in each one, therefore making more. 

Not to mention, this time of year, any sweet treat that doesn't involve baking is like icing on the cake to me! No bake desserts were invented for the summer months. And who doesn't love going to a party and having an individual dish, hands-friendly for walking, talking and eating all at the same time. 

I hope however you're spending the upcoming holiday weekend, you will be with those whom you love most, celebrating this terrific nation of ours, and everything the founding fathers had in mind all those years ago when they declared our independence, and created one nation under God for liberty and justice for all! 

Patriotic Parfaits
1 small box instant vanilla pudding
1 1/2 c. cold milk
Cool Whip
16 oz. container strawberries, chopped
1 pint blueberries
Vanilla Wafer Cookies

In a medium bowl whisk together milk and pudding mix until combined. Set in fridge for 5 minutes until soft set. In bottom of parfait cups or bowls, layer whole cookies, overlapping if necessary. Layer in pudding, strawberries, Cool whip, and blueberries. Repeat layers. Chill for at an hour to set before serving. *NOTE* For easy layering, place Cool Whip and pudding into plastic bags and cut off tip to pipe. The amounts of each you will need will depend on how big your parfaits are. I made 6 of this size.


Friday, June 26, 2015

Summer Time Boats

Did that title immediately take you to the lake, nice and cool, and yourself riding in a big boat, the wind in your hair? Well...I'm actually talking about a different kind of summer time boat, but I guarantee you, you'll like them!

I'm kind of addicted to finding things to put in lettuce leaves. I think we've discussed this recently. I'm always looking for new dishes, or transforming old ones, so they can be served in their own little "boat" of lettuce. It's fun, healthy and totally hands friendly for all those cookouts and parties popping up this time of year.

I love a good Cobb salad. Especially a California Cobb, with the added avocado. But I I know from when I worked as a waitress, not everyone grooves on all the regular components of a Cobb. I remember these business ladies that would come in for lunch every week, and in the group of 4, not one of them ordered the salad as is. They each had something they wanted left off. And that's fine... to each their own. But I bring it up, because that's where these might be a better option. Set out all the "fixin's" so to speak, and let everyone build their own!

If you're planning a big Independence Day picnic or maybe a day at the lake, these would be a great take along! Simply pack everything up in separate containers and then assemble on site for your eating pleasure!

Boats and summer time go hand in hand, and now they can also go from hand to stomach too!

Cobb Salad Boats
1 1/2 lbs. boneless chicken thighs
Olive Oil
Salt and Pepper to taste
Garlic Powder to taste
3 hearts of Romain, leaves separated
1 pint cherry tomatoes, halved
4 oz. blue cheese crumbles
1 bunch of green onions, chopped, dark greens only
1/2 lb. bacon, cooked crisp and chopped
6 hard boiled eggs, chopped
1 avocado
1 tsp. lemon juice
Favorite dressing

Preheat oven to 350. Drizzle chicken with olive oil and season with salt, pepper and garlic powder. Roast for 30 minutes. Allow to cool and chop. In a small bowl combine avocado, lemon juice and a pinch of salt. Mash until mixed well. To build boats, spoon some avocado mixture into bottom of lettuce leaves. This will act as a barrier and "glue" for the other ingredients. Add other desired toppings. Serve with dressing on the side.


Wednesday, June 24, 2015

What I Won't Do For Him

When I was a kid, one of my favorite meals was my mom's salmon patties. I used to ask her to make them all the time. Then when Mr. E and I started dating, they became one of his favorites for her to make also. So, it shouldn't be a big deal for me to make them for him now, right??!! I should jump at the chance, right??!! Wrong. Very wrong.

See, some years back, we went to a local seafood restaurant, which shall remain nameless, and I ordered something I knew I would love. Salmon. A nice piece, with a sweet glaze and grilled. Mmmm....yummy. Right? Wrong again. Because by that night, I realized food poisoning wasn't my friend and I was so, so sick.

Now I don't know about you, but once something makes me sick, it takes a very long time for me to allow it back into my mouth again. And sometimes it is simply never welcome back. That was the case with salmon. I was so sick and have such vivid memories of it, even the smell of it can make my tummy not happy, so I've avoided it for years.

But then a couple weeks ago, while making out my meal plan, I asked my hubby what he was hungry for. "Your mom's salmon patties." Really? Seriously? Did you just say that. Well evidently I was feeling generous that day, or maybe he had done something nice for me, I can't remember, because I actually agreed to this.

Thankfully, since it was a different texture, a different flavor and something that actually brought back happy memories of eating it, I did just find. Whew...I'm so happy! I've missed not eating one of mom's best recipes!

These are super simple and come together much quicker than you might think. I like to serve them with a fresh creamy dill dipping sauce and some rice, for a supper filled with good protein!

I am so happy I made it through this meal and now know I can enjoy these once again, just as much as I did when I was a kid. Well, almost...they are never as good as when mom made them!

P.S. Today just happens to be my parents wedding anniversary too. Happy Anniversary, Mom and Dad! We are so blessed to have you as parents and wish you many more blessed years to come!

Mom's Salmon Patties
2 (14.75 oz.) cans salmon, drained and bones removed
1 egg, beaten
1 c. bread crumbs*
1/2 c. finely chopped onion
1 TBS dried parsley
Salt and Pepper to taste
Vegetable Oil for frying
Lemon slices for garnish

Dill Sauce
1/3 c. mayo
1/3 c. sour cream
1 tsp. dried parsley
1 1/2 tsp. dill weed
1 tsp. lemon juice
1 tsp. horseradish
1 TBS minced onion
1/4 tsp. garlic salt
Pepper to taste

Combine all ingredients for dill sauce in a medium bowl. Stir until well mixed. Chill until ready to serve. Place drained salmon in a large bowl. With hands, break up and recheck for bone pieces. Add egg and onion. Add bread crumbs, a little at a time until mixture starts to bind. Add salt, pepper and parsley. Mix well using hands. Using hand, make patties about 1/2" thick. Heat oil until 350 degrees, or medium-high. Fry on both sides until browned. Serve with sauce and lemon on the side. *NOTE* I used about a cup of bread crumbs. You will need to eyeball it to see how much you will need, depending on how wet your salmon is. We like them extra crispy on the outside, because mom always made them that way. If you don't want them quite as brown, fry at 325 and watch very closely.


Monday, June 22, 2015

Think Outside the Pasta Box

Here in Indiana we've been dealing with some really stormy weather. We've got floods in towns near to us, and farmers crops probably ruined for the season. It's been hot, humid and wet. But I know for many of you south of us, you're simply dealing with HOT temps. The stifling heat that takes your breath away the minute you walk out the door. On days like that, you want food that satisfies you, but doesn't raise your body temperature any more than it already is.

By now you know how much we love pasta. You know my obsession for it runs deep and if I could eat something every day for the rest of my life, it would be it. But when it's hot and muggy, as much as I love it, I just can't eat it as much as I would like. Or so I thought...until I started thinking outside the pasta box.

Why can't I have the pasta I love, but in a cool, summer inspired salad, filled with garden fresh, crunchy veggies, without a heavy, hot sauce? There is no reason I can't!!! We love pasta salad, so why not just ramp it up to take it from a side dish we love on picnics and at barbecues, to a main dish filling enough for a supper after a long day??!!

Oh.My.Blog! This is crazy good! I can't even describe it. There are no words for just how yummy it is. Seriously, I'm salivating just thinking about eating it again. Oh, and it just happens to make a ton too, so you can feed a crowd, or have it to eat all week long. Add some crusty bread or fresh fruit, and supper is done!

Be sure to keep this one in mind for your upcoming July 4th party! I guarantee it will be the thing everyone takes seconds and thirds of, and then will want the recipe too!

Summer Spaghetti Salad
Inspired by Taste of Home
1 lb. thin spaghetti, broken into thirds
1 (10 oz.) container cherry tomatoes, halved
2 medium zucchini, chopped
2 medium cucumbers, peeled, seeded and chopped
1 red bell pepper, chopped
1 yellow bell pepper, chopped
1 (3.4 oz.) can sliced black olives
1 (16 oz.) bottle zesty Italian dressing
1/4 c. grated Parmesan cheese
1 1/2 TBS sesame seeds,  extra for garnish
1 tsp. paprika
1 tsp. celery seed
1/4 tsp. garlic powder
1 TBS dried parsley, extra for garnish
Salt and Pepper to taste

Cook spaghetti until just done. Do not over cook. Rinse with cold water and drain well. In a large bowl combine all veggies and spaghetti. Toss to combine. Season with salt and pepper. In a medium bowl whisk together dressing, cheese, sesame seeds, paprika, celery seed, garlic powder and parsley. Pour over salad. Toss very well to coat. Garnish with extra parsley and sesame seeds. Chill at least 2 hours before serving. Can be made ahead 24 hours and refrigerated until serving.


Shared on The Country Cook

Disclaimer: As a field editor for Taste of Home, I share this recipe with my own thoughts and opinions. I am NOT a paid employee. 

Friday, June 19, 2015

Too Hot To Cook { A Post For Earth Fare}

So lately I've become a little obsessed with eating things I can serve in lettuce. Call them boats, call them cups, call them wraps...however you describe them, I've been on a total kick lately.

It's the weather, I know it is. Sure, I love the healthier aspect of it, like swapping out shells for Romain leaves in my Taco Boats, but deep down I know the soaring temps are what is leading me back to this idea again and again. Light, flavorful meals we can eat later in the evening and not feel like we are going to bed with a brick in our stomachs.

Take that idea and combine it with another warm weather classic, chicken salad, and you have a party on a plate! For this one I wanted more of a mustard flavor than mayo to give it extra tang. The added grapes are like a little burst of freshness in every bite.

I served these with some crusty bread and fresh fruit on the side for a simple supper; but they would be perfect for a poolside or lake party too. Simply put out a big bowl of the chicken salad, and a platter with the lettuce leaves separated, so your guests can fill their own!

Summer time means lighter meals for us. Salads, fresh fruit, veggies, sandwiches...and apparently anything and everything I can find to stick inside a lettuce leaf!

Dijon Chicken Salad Cups
2 lbs. boneless chicken tenders
3 ribs celery, diced
1 c. seedless red grapes, halved
1/4 c. mayo
1/4 c. Dijon mustard
1 TBS lemon juice
1 TBS dried parsley
1/3 c. sliced almonds, reserve a few for garnish
1 head bibb lettuce
Garlic Powder, to taste
Salt and Pepper to taste 
Olive Oil

Preheat oven to 375. Drizzle chicken liberally with olive oil, and season with garlic powder, salt and pepper. Roast for 30-40 minutes until cooked. Allow to cool for a few minutes and then shred. Allow to finish cooling. In a small bowl combine mayo, mustard, lemon juice, parsley, salt and pepper. Mix to combine. In a large bowl combine cooled, shredded chicken, grapes, celery and almonds. Toss to combine. Add dressing. Stir well. Chill for at least an hour. When ready, fill leaves of lettuce with chicken salad. Sprinkle with extra almonds. *NOTE* In my store, the bibb lettuce is also marked "living lettuce" and has the roots still attached. Any lettuce will work, I just like the shapes of these leaves the best.


Wednesday, June 17, 2015

Welch's 1 Million Fans

We eat a lot of fruit snacks in our house. And when I say "we" I mean little man. Between packed lunches, after school snacks and treats on the go, he eats A LOT. And one of his favorites has always been Welch's Fruit Snacks because of the amazing flavors and variety. 

Well, we aren't the only ones who love Welch's because they just reached 1 Million Facebook fans! To celebrate and say "thank you" to all the loyal fans who got them there, they are giving away 1 Million Fruit Snacks! Cool, huh??!!

To enter, just click here to visit their Facebook page and follow the instructions for your chance to be a part of the celebration!

But you have another way to win too! My good friends at Welch's are giving away 3 boxes of fruit snacks to 3 lucky EMM readers! Just read below to enter!

Congratulations to Welch's on 1,000,000 fans and here is to the next million! 


To Enter: Like Welch's on Facebook and leave me a comment telling me you have. Be sure to include an email address so I can find you! 

(3) Winners will win (3) boxes of fruit snacks each!

Contest Ends: July 1, 2015

Popsicle in a Bowl

By now, my entire fan base (or close it) and certainly my friends and family know how much I love a sweet side salad. For those of you who are new around here, let me explain. I'm talking about those dishes that are technically sweet enough they can be considered dessert, but since you add the word "salad" to them, they can now be served right alongside the meal, as a side dish. They are fun, yummy, and allow our brains not to notice the fact we are basically eating our dessert with our meal instead of after.

I especially love these types of dishes for potlucks, cookouts, holidays, family reunions, etc. Why? Because when you're feeding a crowd, something that can pull double duty is invaluable. Set a sweet salad out, and some will take it with their main meal, and then hit the pies, cakes and ice cream for dessert. While others, will hold off and go back for it when their meal is over. It lets one dish to play different roles, making it satisfy everyone, in their own way.

This one is going to remind you of those orange creamsicle pops you would get from the ice cream man, and maybe still do. You know the ones I'm talking about. Orange on the outside, a thick creamy center...a kid's summer time favorite.

So, are you wondering how I served this yet? I actually had this with a light summer meal with my Tuna Macaroni Salad; and this was the perfect fruity side dish for it. But then the next day, we had it as dessert after a big meal. See what I mean? Double duty!

Take this to your next poolside party or picnic in the park and watch everyone young and old fight over the scoop!

Creamsicle Salad
1 small box orange Jello
1 small box instant vanilla pudding
1 c. boiling water
1/2 c. cold water
1 (8oz.) tub Cool Whip
1 (11 oz.) can mandarin oranges, drained, reserve a few for garnish
1 c. mini marshmallows, reserve a few for garnish

In a large bowl combine Jello and boiling water. Mix well to dissolve. Add cold water.  Chill for 20 minutes. Whisk in pudding mix until smooth. Chill for 10 minutes until thickened. Fold in Cool Whip, oranges and marshmallows. Chill until set, about an hour. Garnish with extra oranges and marshmallows.


Inspired By The Better Baker


Tuesday, June 16, 2015

Tropical Treat

I love when I can take something we love to eat and use it in a totally new way for something even yummier we love to eat! That's exactly what you get when you combine the ideas of Great Grains cereal for dessert!

Between the pool parties, camping trips, barbecues and vacations, there is no question that the summer season brings non-stop fun! When there's no slowing down, you'll want to have easy go-to recipes on hand for whatever comes your way. That's why Post Great Grains created the Tropical Crunch Parfait, a refreshing summer-themed recipe that will impress your guests but WON'T cost you cooking time or extra trips to the grocery store!

The combination of whole grain flakes, nuts and dried banana of Great Grains Banana Nut Crunch cereal complements layers of fresh banana, pineapple and Greek yogurt for the perfect tropical experience – also equally creamy and crunchy!
 
 Tropical Crunch Parfait
3/4 cup vanilla Greek yogurt
1 medium banana, sliced
3 oz. fresh pineapple chunks
1/2 cup Great Grains Banana Nut Crunch cereal
1 tsp. honey
1 mint leaf sprig
 
Slice banana and chop pineapple chunks. Place in bowl and put to side. Spoon 1/4 cup vanilla Greek yogurt into parfait glass. Add first layer of banana and pineapple mix, followed by 1/4 cup Great Grains Banana Nut Crunch cereal. Repeat process. Top with honey drizzle and a dollop of vanilla Greek yogurt. Garnish with mint leaf sprig. 


Be sure to show off your food styling skills and take a photo of your beautiful parfait creation!  Tag your photo with #GreatGrains and follow on Facebook too!

Disclaimer: I received a free sample and gift in exchange for this feature. All thoughts and opinions are my own.

Monday, June 15, 2015

A Cool One For A Hot Day

I don't know about you, but when it is 90 degrees with 100% humidity, the last thing I want to do is cook, and honestly, eat. As much as we love food, when the weather is stifling, we just can't bring ourselves to enjoy a good meal. But we have to eat, so I have to become creative.

So this time of year, supper is many times pushed to around 7:30 or even 8 pm, to allow it to cool down a little; and I try to find light things that fill us up, satisfy those starving bellies, but don't leave us feeling like we have bricks in our stomachs when bedtime rolls around.

When I came up with this recipe, it was one of those "why haven't I ever thought of this before?" moments. I mean, we love mac salad. We love tuna salad. We love tuna and noodle casserole. So why not take elements of all of those, and turn them into a cool, creamy dish perfect for a hot day? I simply added some croissants and fresh fruit on the side for a whole meal. I think this would be a killer dish at any cookout or potluck this time of year too. I'm betting it would be that one thing people devour and wonder why they didn't think to make it. Plus, if you make a big batch like me, you've got lunch covered for the whole week; and it just keeps getting better as the days go on.

Even if you're hanging out in the AC at the end of a long hot day, your body needs time to cool down and recover. Standing over a hot stove, or having the oven heat up the house isn't really going to help matters. That's when you need to remember dishes like this and feed your family something that will make them say "mmmm" and "ahhhh" at the same time.

Tuna Macaroni Salad
1 lb. elbow macaroni
3 small cans tuna, drained well
3/4 c. sweet relish, divided
4 hard boiled eggs, chopped
1 small white onion, chopped
1/2 c. mayo
1 TBS lemon juice
1 TBS celery seed
1 1/2 TBS dried parsley
Salt and Pepper, to taste

Cook macaroni until just al dente. You want it to have a little "bite" left to it, not mushy. Rinse with cold water, and drain very well. In a large bowl mix together macaroni, tuna, 1/2 c. relish, eggs and onion. Mix well. In a small bowl whisk together mayo, 1/4 c. relish, lemon juice, celery seed, parsley, salt and pepper. Pour over macaroni mixture. Stir well to combine. Chill for at least an hour before serving.


Friday, June 12, 2015

Bring A Little Piece of China Home

As some of you know, last month, I debuted as a new Blog Ambassador for the Children's Museum of Indianapolis. This is such a honor for me, and I'm so incredibly excited to be associated with a place I've enjoyed since, literally, I was a kid; and now share with my son!

For my first post, I wanted to visit the museum, and then find a way to bring the fun home, and of course, in true EMM fashion, into my kitchen. Plus, it gave us a chance for a mini road trip and a family day FULL of fun!


One of Alex's favorite exhibits this time around was Take Me to China. I'm not kidding when I say we felt like we stepped onto a plane and entered a new land. There were so many things to learn, interact with and do, it truly was like visiting the Orient right at home.


Inside the exhibit, his hands down most favorite thing to experience was the restaurant. Yep, an entire area where kids can pretend to run a traditional Chinese restaurant. He took our orders, "cooked" the food, and served it to us! Well, that certainly got me brainstorming as to how we could have some of the same kind of fun at home!


That's easy! We'll make some Chinese food! I'm talking take-out quality, but simply made in your own kitchen! You know how much I love recreating favorites from the take out menu with fresher ingredients and without all the preservatives!

If your family loves Chinese food, they are going to flip for this, and you're going to love how easy it is. Perfect for a busy weeknight. And if you live within driving distance to Indianapolis, be sure to take a trip to China soon! Oh, and be on the look out for all of my posts for the TCM blog coming soon!

Cashew Chicken with Fried Rice
Originally Posted on the Children's Museum of Indianapolis Blog
2 1/4 lbs. boneless chicken tenders, cubed
3 large garlic cloves, minced
1/2 c. soy sauce
1/4 c. corn starch
1/4 c. vegetable oil
1 bunch green onions, chopped
8 oz. button mushrooms, thickly sliced
1/3 c. sweet chili sauce
1 c. cashews, reserve a few for top
Black Pepper to taste

Fried Rice
4 c. leftover brown rice*
1 (12 oz.) bag frozen peas and carrots, thawed
2-4 TBS soy sauce, to taste
3 eggs, beaten
2 TBS vegetable oil

In a large skillet, heat 1 TBS oil over medium heat. Add egg, and stir to scramble. When cooked, remove with slotted spoon to paper towel lined plate.  Wipe out pan, and add 1 TBS oil. Place rice in skillet and let fry until you can hear it sizzle. Then start stirring. Add peas and carrots and soy sauce. Stir and saute' until flavors combined, about 10 minutes. *NOTE* I make my rice in the morning and let it sit in the fridge all day. You can even make it the night before!

 In a small bowl whisk together soy sauce and cornstarch until smooth. Place chicken in a large bowl, season with black pepper. Add garlic. Pour soy mixture over. Mix well. Allow to sit at room temperature for about 10 minutes. In a large skillet, heat oil over medium-high heat. Add chicken. Saute', stirring frequently, until no longer pink, about 7 minutes. About half way through, add mushrooms. When chicken is done and mushrooms are brown, add onions, chili sauce and cashews. Stir to combine. Serve with fried rice. Sprinkle with extra cashews.


Shared at Weekend Potluck

Wednesday, June 10, 2015

Any Reason For Cheese

So this recipe is basically just a vessel to bring more cheese to your life. It's kind of like frosting for me. See, I like cake. But I LOVE frosting, and if the cake wasn't there, I wouldn't be upset. It's simply a vessel to get the frosting in my mouth. And this recipe is kinda like that, but with nacho cheese!

When I found this recipe for homemade nacho cheese sauce, scribbled on a piece of scrap paper, hiding in the back of my recipe box, I couldn't believe I hadn't tried it yet. I can't even tell you where I first got it, but since the paper had started to yellow it was so old, I know it was forever ago.

So I had this amazing cheese recipe I wanted to try; and sure, I could have simply served it up with some tortilla chips for dipping, but I wanted more. To do something with it extra special, extra yummy. Then the light bulb went off. Why not drizzle it over some thick cut steak fries, add some toppings and dig in??!!

I served these as a side dish for some juicy burgers hot off the grill, but I think they would be a huge hit at your next party or cookout if you served them up "nacho" style. Lay them out on a big platter, add all the toppings, and watch your guests gobble them up! And one of the great things about this sauce? As long as you keep it warm, it will stay creamy. Keep in on the stove on warm, or put it in your Crock Pot-- either way, your guests can enjoy it for hours.

We are cheese lovers, and obviously will do anything for any reason to be able to eat it. But truthfully, this delicious sauce really would be yummy with some tortilla chips on the side too.

Loaded Steak Fries
1 (32 oz.) package frozen steak fries, or homemade
Chopped green onions
Real Bacon Bits
French Fry Seasoning, to taste

Homemade Nacho Cheese Sauce
2 TBS butter
2 TBS flour
1 c. milk
1 ( 8 oz.) block sharp cheddar cheese, grated
1/4-1/2 tsp. hot sauce, to taste
Salt to taste

Cook steak fries according to package directions. Add 5-7 minutes of cooking time, under the broiler to brown and crisp. In a large non stick skillet, melt butter over low heat. Add flour and whisk until light blonde roux. Slowly add milk, whisking constantly. Increase heat to high and bring to a boil. Immediately reduce heat to low and stir until thickened. Add salt and hot sauce. Whisk to combine. Add cheese in batches, whisking between each until smooth. Keep over warm until fries are cooked. Once fries done, sprinkle with french fry seasoning. Transfer to a platter, drizzle with cheese sauce and sprinkle with green onions and bacon bits.  *NOTE* French Fry Seasoning is a blend you can find on the spice aisle. If you can't find it, seasoning salt or an all purpose seasoning would work too.


Shared at Weekend Potluck

Tuesday, June 9, 2015

Say Cheese with Elli Quark { A Feature}

It's the first day of summer vacation! That's right the day we've waited 180 days is here, and I don't know who is happier....me or the boy. Gosh, I love him having home with me for the next 8 weeks! But you know what that means? I'm gonna have to feed him 3x a day, plus snacks! No more relying on school lunch. And with all the fun activities we love this time of year, it's my job to make sure his meals and even his snacks are giving him the fuel to play all day long. I need snacks he loves to eat, and I can feel good about. I have my stand bys, and now, thanks to my new friends at Elli Quark, I have a new one!

What is Elli Quark you ask? Well, let me tell you. It's a spoonable, fresh cheese! Yep, I said cheese! It has a creamy texture similar to Greek yogurt, but with a richer, less sour taste! Plus it has a better protein to carb ratio, NO added sugars or artificial sweeteners. 

With almost half the calories of Greek yogurt, almost 15% more protein, all nature and non-GMO, effective probiotics, gluten free and the freshest fruit, it has all the things you want in something your kids will gobble down. Seriously, if your little ones are yogurt lovers like my son, they are going to L.O.V.E this new treat!

Coming in flavors like mint chocolate, blueberry, sea salt caramel, strawberry, lemon, red velvet, cherry, and more...there is definitely something for everyone! My little guy devoured one kind after another, declaring them all yummy! He loved the texture and I enjoy watching him try something new, that might be like something he already likes, but oh so much more!

Elli Quark is currently available across the US, simply enter your zip code here to find a location in your area. Can't find any close to you? That's okay because you can also purchase online and have it delivered right to your front door!

If you have yogurt fans in your house, I highly reccommend letting them try Elli Quark for a tasty, healthy alternative that will have the whole family saying "cheese!"

Disclaimer: I received free products in exchange for this feature. All thoughts and opinions are my own. 

Monday, June 8, 2015

A Deep South Dish {A Review and Giveaway}

Do you love traditional Southern food? Our family sure does. Any time I can find recipes that bring a little bit of the South into my Hoosier Yankee kitchen I am a happy cook! Those flavors we love in the dishes we can't get enough of; and now I've got another source for them all! Another food blogger we love has a terrific cookbook!


Deep South Dish Homestyle Southern Recipes is full of Southern comfort food that is nothing short of homemade heaven! Mary loves to share the food that her mother and grandmother used to make. She calls on her heritage to come up with recipes that have one thing in common--incredibly great taste!

When I first started thumbing through my copy, I didn't know where to begin. Each recipe was making my mouth water more than the last. So many delicious things to try, what's a girl to do? But then I came upon this recipe and at first I didn't think it would be the one, but then I saw the on ingredient that made it just that. See, I had made another recipe with that ingredient years ago and while the hubby loved it, I wasn't convinced, so I wanted to try again.

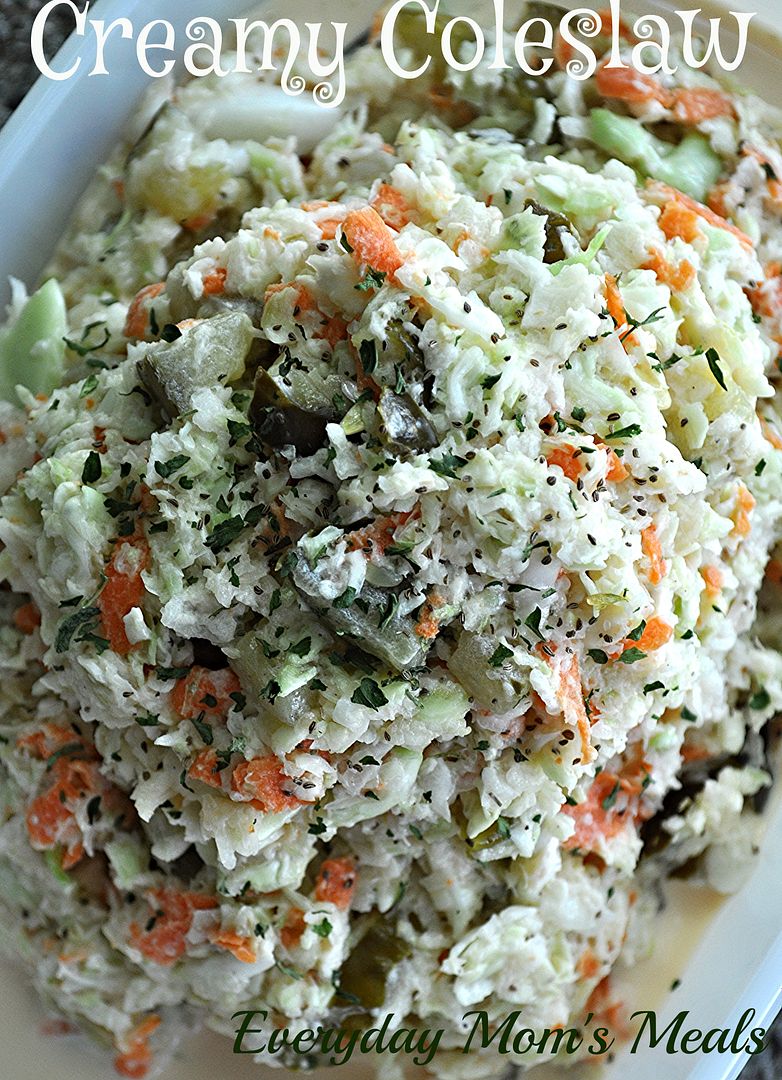
This is what Mary calls her "basic creamy coleslaw", but it's so not basic! And that ingredient that caught my attention? Horseradish! We love the stuff, but the recipe I had used it in a before wasn't anything special and I felt it didn't add anything but an overpowering flavor. But not this! This is exactly what I was looking for the first time around, but had to wait to try Mary's recipe to find.

This will be the dish you make for your next cookout or summer party that everyone loves, and asks "What do I taste?" They will know there is something special hiding in there, but won't be able to put their finger on it. It's the perfect side dish this time of year, after all what is a backyard barbecue without a great coleslaw?

If you love Southern comfort food as much as I do, be sure to check out what Mary has cooking over at her blog, and order a copy of her book while you're there! But you can also WIN one right here! Yep, I'm giving a copy of Deep South Dish away to one lucky winner, just scroll down to find out how!

Creamy Coleslaw
1/2 large head cabbage, shredded
1/4 white onion, grated
1/2 c. grated carrot
1/2 (16 oz.) jar bread and butter pickles, chopped 

Dressing:
1 c. mayo
3 TBS sugar
1 TBS apple cider vinegar
1/4 tsp. pepper
Large pinch kosher salt
2 heaping tsp. prepared horseradish 
1 tsp. celery seed
1/4-1/2 c. pickle juice from the jar

In a large bowl, whisk together mayo and sugar until well blended. Add vinegar, salt, pepper, horseradish, celery seed and pickle juice. Whisk well. Add cabbage, carrots, onion and pickles on top of dressing. Toss until dressing is mixed and cabbage is covered. Chill for 1 hour or longer, tossing occasionally. *NOTE* I added some dried parsley and extra celery seed for garnish.  


Shared at Weekend Potluck


Disclaimer: I received a free cookbook in exchange for this review. All thoughts and opinions are my own.

*******GIVEAWAY********

Leave a comment telling me your favorite traditional Southern dish. Be sure to leave your email address too so I can find you if you win! 

Contest Ends: June 22, 2015

Saturday, June 6, 2015

Meal Plan June 7-12

*New Recipe
Links to Recipes on Blog

Sunday
Salmon Patties
Wild Rice
Broccoli   

Monday
LAST DAY OF SCHOOL!!!!
Sloppy Joes
Corn on the Cob
Cottage Cheese

Tuesday
 Cold Spaghetti Salad*
Breadsticks

  Wednesday
Breakfast Sandwiches
Sausage Links
Hashbrown Cakes

Thursday
We have a company picnic! 

Friday 
Grilled Lemon Pepper Chicken
Roasted Red Potatoes
Green Beans


Friday, June 5, 2015

What Did We Ever Do?

It is well known in our inner circle of friends and family, I am NOT a naturally cool person. And no, I'm not talking about my personality. I mean my actual body temperature. As my grandma has always said about me, I'm a "hot box." 

I have two temps...warm and hot. There is not in between. I'm the girl who sweats in the winter. I drive around when there is snow on the ground with the AC cranked. When I was pregnant with little man, I made Mr. E turn the air conditioner on in March and it didn't get turned off until he was born in September.

So you can imagine my utter despair a few weeks ago when just as the thermometer started to rise to 85 degrees and higher, with 80% humidity, our central air quit working. Literally, one minute it was blowing nice cold air and the next the temp in the house was climbing to 75 degrees. I was pretty miserable, pretty quickly. I started to think back to when I was a kid and we didn't have AC at all. We had fans. And open windows. Those hot sticky nights when you would wake up in the morning soaked from sweltering all night long. Not fun. 

We are so addicted to our AC we don't even own fans!!! Luckily my parents hooked us up, and we got some up in this joint very quickly! So we had air circulating, but at one point, it was still 80 degrees in here. Needless to say, I thought I was going to spontaneously combust! 

Come Monday night I had a repair company scheduled to come look at it, but in the meantime I had to cook supper, which I hadn't done since it went out. Between the weekend and Mother's Day, I had yet to be made to prepare a meal in the sauna, but my time had come. 

I was craving barbecue, but knew it needed to be stove top because I wasn't turning on the oven, and I didn't really even want to grill either...that just meant being outside in the heat, and no relief once I came in. So, this is what I came up with. It gave me the bbq flavors I was craving but without the time and effort, and most importantly high temperatures I couldn't deal with. 

These would be fantastic for a party, potluck or cookout that gets interrupted by rain! Think sloppy joe texture but a different flavor...perfect for summer time.

I'm not sure what we did before the days of AC. but I know I don't want to find out any time soon again. Oh, by the way, I am currently typing this...in my nice and cool house...so thankful it's working again!

BBQ Ground Beef Sandwiches
1 lb. ground beef
1 small onion, chopped
3 ribs celery, finely chopped
1 c. ketchup
1/2 c. water
1 TBS butter
2 TBS apple cider vinegar
1/2 TBS. lemon juice
1 TBS Worcestershire sauce
1 TBS brown sugar
1 tsp. garlic powder
Salt and Pepper to taste
 Buns
Pickles

In a large skillet over medium high heat, saute beef, onion and celery in butter until no longer pink. In a medium bowl whisk together ketchup, vinegar, lemon juice, Worcestershire, brown sugar, garlic powder, salt and pepper. When beef is cooked, add ketchup mixture and water. Stir to combine. Bring to a boil. Reduce heat to low and simmer, covered, for 40 minutes. Serve on buns with pickles.


Shared on The Country Cook June 5, 2015

Thursday, June 4, 2015

Foodie Father's Day

Father's Day is just around the corner (Sunday June 21st for those not paying attention to the calendar) and if you have a dad that loves to cook, or a husband that is the master of the grill, have I got the gift idea for you, thanks to my friends at Ergo Chef!

The #1 rule in cooking? The tools/utensils you cook with are just as important as food you are preparing. That's why Ergo Chef if dedicated to engineering the highest quality utensils for chefs of all skill levels. 

And now they have these amazing Locking Duo Tongs I am happy to introduce to you! From an indoor meal to a summer time cookout they are sure to be the most useful thing you will cook with! 

As the name implies, DUO tongs have a one of a kind dual construction. The BPA-free silicone side is safe for non-stick pans and heat resistant to 500 degrees. The stainless steel side is great for great grip and use on aluminum or stainless steel pans or grills. Plus the ergonomic angled head is perfect for picking up delicate foods and the slotted head easily drains liquids for no mess! 

With their non-slip grip and precise control, they are the only tongs you'll need for any method of cooking. So, if you have a dad, husband, grandpa, uncle, friend or is also a foodie, these would make a great Father's Day gift! 

Find more info and order here


Disclaimer: I received free product in exchange for this review/feature. All thoughts and opinions are my own.

Wednesday, June 3, 2015

A Little Korean In My Kitchen {A Review}

Do you enjoy authentic Koren food? We sure do! If you've never tried it, but like other Asian cuisine, I highly encourage you to go for it! 

Like many worldly dishes, I had never had Koren food until Mr. E introduced me to it a few years ago. As many of you know, he and Little Man both train in Taekwondo; but what you might not know is Mr. E actually began his training years ago as a child. And during that, his Master instructor, who was from Koren, introduced him to many things from his culture, including authentic food prepared by his wife. It was love at first bite for my husband, and to this day he remembers those meals with fondness. 

Nowadays since she no longer lives around here, he satisfies his Koren cravings at a great family owned place just 10 minutes down the road, which serves up all the traditional dishes he loves. This is where he first introduced me to it, and also the boy. Well, both of us fell in love with it just as much as him! And now, thanks to a Hoosier company, and restaurant, Sunny's Korean, I can bring a little of those amazing foods into my very own kitchen! 

Chom Sun Kaminski, aka Sunny, hails from South Korea, and moved to the US at the age of 22. Growing up, food had always been a passion for her and she spent many years working to learn the art of creating delicious food. 

Sunny's Korean Restaurant has been operating in Mishawaka, Indiana since 1992. For over 20 years, she has been sharing her homemade, fresh, healthy and scrumptious Korean cuisine. Plus, you can order her products online! Both the Korean Teriyaki and Kimchee Seasoning are staples in the dishes folks love at the restaurant and now can make at home!

Both are all natural, have no preservatives or MSG and are gluten free. Making them so much better than stuff you can find on your grocery store aisle. 

If you've never had Kimchee, it's a traditional Korean dish made with vegetables and seasonings, and has hundreds of known varieties. You might have seen it at your local Asian restaurant as "spicy coleslaw". It can be made with cabbage, cucumbers, spinach...anything really.

I was so thrilled at the chance of trying these products in my kitchen because Mr. E has been bugging me for years to make him some Kimchi! I started with a simple cucumber salad but will definitely be moving onto the cabbage dish next! This has a little heat to it, so be sure to add it to your taste. I will tell you as someone who can't handle a lot of heat, this amount was perfect for my wimpy tongue.

This comes together in almost no time and is the perfect side dish to any Asian inspired meal you make at home. If you have friends who love Kimchi, they will be so impressed you know how to make it. We won't tell them you took a little help!!

Kimchi Cucumber Salad
2 cucumbers, peeled and sliced 1/4" half moons
1/2 c. thinly sliced yellow onion
1/2 c. shredded carrot
2 TBS Sunny's Korean Teriyaki
2 TBS Sunny's Kimchee Seasoning

In a large bowl, combine all ingredients. Toss to coat. Chill for at least 5 minutes before serving. *NOTE* If you noticed the different spellings, I learned this dish as "kimchi" but Sunny uses "kimchee" so I use both to respect her product.


Shared on The Country Cook June 5, 2015

Disclaimer: I received free product samples in exchange for this review/feature. All thoughts and opinions are my own. 

Tuesday, June 2, 2015

Sizzling Summer with NatureSweet {A Feature}

Ya'll know how much we love us some NatureSweet tomatoes! They are our favorite little tomatoes for everything from salads to snacking. And now, my good friends at NatureSweet have a fantastic summer time inspired giveaway going on too! 


Just in time for barbecue season, NatureSweet has partnered with Weber Grills to host a summer grilling sweepstakes! From now until July 5th, at select retailers nationwide, customers can enter to win weekly giveaways of the Weber® Q®1200 Gas Grills or the Ultimate Weber® Grill Prize Package, valued at $3,000! 

Customers can enter the Glorys of Grilling Sweepstakes by submitting a photo/video and description of their favorite grilled Glorys recipe at glorysofgrilling.com


NatureSweet Glorys tomatoes are the perfect must-have for the upcoming grilling season! Glorys were recently launched with new packaging making it 100% recyclable and adding a re-sealable lid with ventilation holes in both the top and bottom of the container, making the rinse and storage process a breeze for customers.

Be sure to check NatureSweet out on Facebook and all the details of  the contest here

Disclaimer: I received free product samples in exchange for this review/feature. All thoughts and opinions are my own. 

Monday, June 1, 2015

$50 Meal Plan Challenge Month #3 { Indiana Family of Farmers}

Whew....where did May go? That's okay though. It's June 1st and that means we only have 7 more days of school. Yes, thanks to all those snow days we have class until June 8th. But the beginning of the month also means it's time for me to take the $50 meal plan challenge once again, and share my ideas with all of you! 

This meal plan was actually one designed around our Memorial Day weekend a couple weeks ago. One of our favorite summer time activities is heading to a local park, complete with splash pad, and let the boy run in the sun, play in the water, and then enjoy a tasty meal. And if I plan it just right, watch the sale ads, and buy carefully, a fun day can also be economical! I love when I can give my family great time, make some memories and still stay on budget!

Meal 1 (Picnic)
Fried Chicken
Tex-Mex Pasta Salad*
Deviled Eggs
Nectarines
Chips
Cookies
** I knew with the holiday weekend our local stores would have their deli fried chicken on special. I was able to get 8 pieces for only $4.99. The pasta salad was a great deal because it used many pantry items, and made enough for us to eat, and then have leftovers for lunch all week long. Plus, it's a new recipe to share with all of you!

Meal 2
Dijon Chicken Lettuce Cups
Fresh Pineapple
Cottage Cheese
** I love making salads and light meals during the hot days of summer; plus not serving it on bread or rolls can sometimes save some cash. Plus this week our local Aldi had a coupon for $3 off fresh meat. I got over 2 lbs. of chicken for about $2! Oh, and they had the pineapple for $.99 too. Seriously, if you have an Aldi in your area and have never shopped there, check it out! They have great food (even gluten free and organic) at GREAT prices!

Meal 3
Grilled Steaks
Baked Sweet Potatoes
Horseradish Coleslaw
** If this is your first time reading my challenge posts, seeing the word "steak" might confuse you when I'm supposed to be on budget. So let me explain for those of you who don't know. We have freezer beef on hands at all times. Sure, the initial cost might be something we have to save for, but over time it saves us a ton of money. If you have never looked into it, check with your local butcher and see if this might be an economical option for your family too.

Meal 4
Eggs
Sausage Links
Hashbrowns
Fruit Cocktail
** Breakfast for supper is a great way to feed your family on the cheap! For this menu, it was even better because I had already bought eggs for the picnic, so now had a great use for the extra ones.


So there you have it. Four meals for $50. I love being able to share these ideas with you, and maybe give you something you can start using to keep the weekly grocery store trip a little easier on the wallet!

Tex-Mex Pasta Salad
1 lb. tri color rotini, cooked, rinsed with cold water and drained
1 green pepper, chopped
1 (15 oz.) can black beans, rinsed and drained
3/4 c. canned corn
1/2 c. sliced black olives
1 (16 oz.) jar salsa
1/2 c. sour cream
2 tsp. garlic powder
3/4 tsp. cumin
2 TBS dried parsley
1/2 c. shredded Cheddar Jack cheese
Salt and Pepper to taste
2 green onions, chopped

In a medium bowl combine salsa, sour cream, cumin, and garlic powder. Mix well. In a large bowl combine pasta, green pepper, black beans, olives corn, parsley, and cheese. Toss to combine. Pour dressing over. Stir well. Season with salt and pepper. Chill for at least an hour before serving. Garnish with green onions. 


Shared on The Country Cook June 5, 2015