Everyday Mom's Meals: Lemon
_____
Showing posts with label Lemon. Show all posts

Sunday, May 1, 2022

Happy May!

 The calendar says May, but I'm not sure if Mother Nature has gotten the memo yet. Sure, some days it's sunny and sitting on the edge of warm, but I think it's been one of the chilliest, cloudy, wet springs we've had in a while; and the WIND! Oy vey! 

I made the comment the other day waking up every morning to more clouds and gloom can really start to mess with your mood. My complaint must have been heard because the next day I woke up to sunshine, thank goodness. Mama needs her Vitamin D! 

All I can say is I hope with the arrival of this new month, the weather starts to get her act together and over the next 4 weeks we can truly start to believe summer is coming. 

But until then, it's still spring, and to me the official flavor of springtime is lemon. It is so bright, so refreshing- it is exactly what we need to wake up our taste buds!

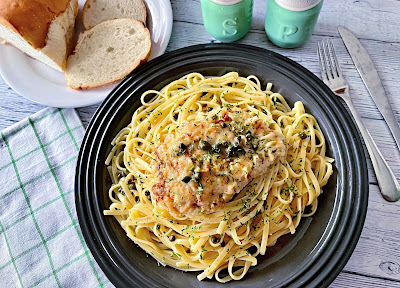
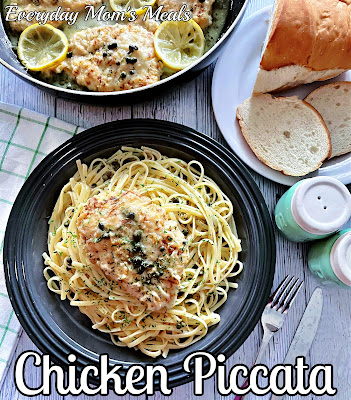
One of my favorite chicken dishes to order out is Chicken Piccata, so it was about time I made it at home. With its simple sauce made of butter, lemon and another favorite of mine, capers, every bite is a burst of flavor in your mouth. 

Let's talk about the chicken you're going to use. Look for "thin cut" chicken breasts to make this extra easy on yourself. You will need 8 pieces total, depending on the size. You want a decent portion of chicken for each plate of pasta, sometimes that's one large one, or a couple smaller ones. (This recipe makes 4 plates!) I wasn't lucky enough to find the thin ones, so I bought a pack of 4 large breasts, split them open like a book, sliced into 2 pieces, laid them between layers of plastic wrap, and pounded them thin with a meat tenderizer. 

While not hard, it is a little time consuming, so if you can find the thin cut ones, half the work is already done for you! Lucky! 

If you've never used capers, I always tell people they are like a tiny olive. It's the only way I can think to describe them to someone who has never tasted them. They are briny, salty and delicious! They pair perfectly with the lemon too! 

If you are looking for a spring inspired meal or maybe you want to treat mom to something special next weekend, Chicken Piccata would be perfect! Make it now before the summer weather is finally here, and we are all grilling out as much as we can!


 Chicken Piccata 

4 boneless chicken breasts,  split and pounded thin OR 8 thin cut 

4 TBS olive oil

Juice and zest of 1 lemon, then sliced

1/2 cup + 1 1/2 TBS flour

1 1/2 cups chicken broth

4 TBS butter

1 (3 oz.) jar capers, drained

1 TBS dried parsley

cooked linguine pasta

salt and pepper

Cook pasta according to package directions. Combine 1/2 cup flour, lemon zest, salt and pepper in a shallow dish. Dredge each piece of chicken and shake off excess. Heat 2 TBS oil in a large skillet over medium high heat. Sauté chicken in batches until brown on both sides, about 4-5 minutes. Add extra oil as needed. Remove from skillet and cover to keep warm. In same skillet, melt butter over medium heat. Add remaining flour, whisking constantly until smooth. Cook 1-2 minutes. Gradually add 1 cup broth, whisking constantly. Add lemon juice and remaining broth. Continue to cook on medium or medium low, whisking until slightly thickened. Add capers and chicken back to sauce. Spoon sauce over chicken, add lemon slices and simmer 5-7 minutes until chicken is cooked through. Drain pasta. Serve chicken and sauce over pasta, garnished with parsley.


 Shared at Weekend Potluck


Sunday, August 22, 2021

One Last Lemon Dish

 Summer brings so many flavors that we love so much; and while we might enjoy them year round, they never taste quite as good as they do on a hot, sunny, summer kissed day! At the top of that list for me is lemon! From a tall glass of ice cold lemonade by the pool to some perfectly grilled chicken with a hint of citrus I can't enough.

 I am a lover of all things lemon, and thought it was about time I found a way to combine my obsession with another favorite around here, roasted potatoes. 

When I am making my weekly menu plan, I start with main dishes, move onto side dishes and then extras if needed. For example, if I am a making a big roast, or meatloaf, those will get a starchy side and a vegetable too. But if I'm planning a pasta supper, there is usually salad, garlic bread, or both. Over the years I have developed a so-called template that works for our family and it makes it easy to simply plug things into each category. 

What are the extras you ask? In the summer I add fresh fruit to as many meals as possible, or if we've been given some beautiful garden ripe tomatoes, those get sliced and put on the table. These are things that are seasonal to my template! 

When I'm planning suppers, if I get stumped, 9 times out of 10 it will be for a side dish! I don't like falling into a rut of always having the same things with the same meals. Of course we have favorites that if I tried to deviate from there would be riots, but other times it's okay for me to switch it up a bit. And when these moments happen, many times I turn to roasted potatoes. 

Why? Simple. I can make them a thousand different ways, so while they are yet another potato dish, they are still new because of unique flavors. Hence why I felt it was time to take my beloved summer flavor of lemon and find a way to utilize it in yet another roasted potato recipe. 

These spuds are perfectly crispy on the outside, buttery on the inside and bursting with bright, fresh flavor!By waiting until the end of the cooking time to add the fresh lemon juice, it elevates them to another level just before serving! They are perfect with anything you can think of, but grilled chicken or fish come to mind first! 

Summer might be coming to an end, but I'm hanging on with both hands, sucking every last bit of flavor out while I can, especially when it comes to lemon!

 Lemon Roasted Potatoes

3 lbs. small yellow potatoes, quartered

3 TBS olive oil

1/4 cup lemon juice

2 tsp. dried oregano

6 cloves garlic, minced

1 TBS dried parsley

Salt and pepper 

Preheat oven to 425. Place potatoes, oil, oregano, garlic, salt and pepper in a large bowl. Toss well. Transfer to a greased baking sheet. Cook 45 minutes, stirring once. Pour lemon juice over potatoes and sprinkle with parsley. Roast for 10 more minutes. 


Shared at Weekend Potluck

Sunday, May 2, 2021

An EMM Update

If you have been an EMM fan for a while now, you will remember a cucumber recipe I posted years ago. Like before I understood how food photos should look! I've shared that recipe numerous times over the life of this blog, but have always wanted to go back to not only update the photo, but also rewrite the recipe to match the tweaks I've added over time. Well, today is the day! 

First, let's talk about lemon extract. Every time I share this recipe, be it online or in person, I always get the "I don't have lemon extract, can't I just use lemon juice?" To be short and sweet, no. 

Believe me, I know how annoying it is to read a recipe and realize you are going to have to buy a "special" ingredient for it. It's one thing to have to add things to your grocery list, but it is a whole other to have to purchase something you are only going to use for one recipe. I try very hard not to write recipes that require specialty ingredients; but there is no way around it this time. 

However, it's not that bad. See, lemon extract is easily found in the same baking aisle at most grocery stores. It will be right there next to the vanilla and almond extracts. Plus, it's not the expensive. I think the last bottle I bought was around $3. Last, your bottle is probably going to last for quite a while, if this is the only recipe you use it for. Since each batch only takes 1 teaspoon, my bottle usually takes me a year to use and I make these a lot during the summer months. 

The extract is made from the lemon rind, where the essential oils are. The flavor is more intense than any amount of juice. You will notice it right away when you take the lid off! Smell that lemon goodness! 

These are a copycat recipe from a Chinese restaurant we used to love. Unfortunately that restaurant has been gone for a while now, but these cucumbers live on! They used to serve these with their lunch specials, along with a chicken wing, egg roll and crab rangoon. Seriously- by the time your entree came, you were almost full from the appetziers. Oh, I miss that place so much! 

These are Alex's favorite way to enjoy cucumbers in the summer, and when gardens are overflowing with them, they are so inexpensive to make too! Our local farmers' market usually has beautiful cukes for less than a buck each. 

I love these for summer too because they can go anywhere, staying fresh in a cooler. Plus, no mayo or sour cream means easier for fun in the sun! They are perfect for picnics, cookouts, backyard barbecues, graduation parties or a burger night on the deck! 

If you enjoy lemon flavored anything, as much as I do, especially in the hot summer months, this recipe needs to be on repeat from now until September!

 Lemon Marinated Cucumbers

3 large cucumbers, peeled and sliced into semicircles

2/3 c. white vinegar

6 TBS sugar

1 tsp. lemon extract

Salt and Pepper

 In a small bowl whisk together vinegar, sugar, lemon extract, salt and pepper. In a large bowl pour dressing over sliced cucumbers. Stir well. Add extra salt and pepper if needed. Cover and chill several hours before serving.  


Shared at Weekend Potluck

Sunday, April 25, 2021

Springtime Lemon Lovers

 Spring has arrived! Okay, last week old man winter reared his ugly head again and gave us 4 inches of unwanted snow, but it melted quickly and this week we have 70s and even 80 in our forecast, so thankfully spring time might just be here to stay!

For me, no other flavor in the world screams spring and warmer temps more than lemon. I love it year round, but this time of year my taste buds crave the freshness and brightness of it in everything from drinks, side dishes, main dishes and of course desserts! 

For this recipe I was looking for a simple noodle side dish for a chicken supper I was having and wanted to cook from my pantry/fridge. I think a lot of us learned to do that more over the past year in the pandemic. Using what we had on hand meant we didn't have to venture to the grocery store, and let us experiment too. 

I would bet many of us have lemon pepper in the back of our spice rack and need more ways to use it! I always have it on hand for an extra flavor boost in dishes, but a little goes a long way so it lasts forever.

In this dish mixing the lemon pepper with fresh lemon juice really takes the flavor to a whole new lemony level. The sauce clings to every single noodle making each one burst with bright, bold flavor. 

These noodles are a terrific side dish with any protein you're making, but we really love them with chicken and fish. The recipe could also be doubled easily for a main dish pasta supper. 

If one of your favorite spring time flavors is lemon too, be sure to save this recipe to add to your menu plan soon! Your taste buds are sure to thank you! 

Lemon Pepper Noodles

1 lb. angel hair pasta

6 oz. cream cheese, cubed

3 TBS sour cream

6 TBS milk

1/4 tsp. onion powder

1 1/2 tsp. lemon pepper

1 TBS fresh lemon juice

2 tsp. dried parsley, extra for garnish

1/4 c. pasta cooking water

3 TBS butter

2-3 cloves garlic, minced 

1/4 c. grated Parmesan/Romano cheese blend

Salt and Pepper 

Cook pasta according to directions. While pasta cooks, in a large skillet melt butter over low heat. Saute garlic in butter for about a minute. Add sour cream and milk. Stir well. Add cream cheese a little at a time, stirring constantly. Season with lemon pepper, onion powder, salt and pepper. Continue stirring until smooth. Add parsley and lemon juice. When smooth, add Parmesan cheese and stir until melted. When pasta is cooked, reserve 1/4 c. cooking water and add to cheese sauce. Mix well. Drain pasta well and add to sauce, mixing well with tongs. Garnish with extra parsley. 


Sunday, May 3, 2020

Welcome May

Well kids, we made it. I know, it's hard to believe after 739 days in April, but yes we have arrived! May is the gateway to summer! Sure, I live in Indiana so one day it will be 70, gorgeous and sunny, and the next will be 50 and rain, but we know summer is knocking on the door!

This month also brings many reasons to celebrate. Mother's Day, end of school, graduation, Memorial Day...just to name a few. And while many of those will look different this year in the world we are living in, they still have one major thing in common. Such special occasions call for extra special sweet treats!

This was actually our dessert on Easter, and I purposely saved it for my first post in May because I think it is going to be a go-to summer cookout, pool party, backyard barbecue sweet treat for many of you! Lemon is almost the mascot flavor of summer, and this not only super easy, it bursts with bright lemon flavor!

Oh, and it just happens to be no bake, so no need to heat up the house when those 90 degree days finally do arrive.

Now, let's talk lemon extract. No, it is NOT the same as lemon juice. You will find small bottles of lemon extract in the baking aisle next to the other extracts like vanilla, almond, coconut, etc. It has a much higher concentrated flavor, and really packs a punch. Hence why the recipe calls for 1-2 tsp depending on how strong a lemon flavor you wish. For us, I used 1 1/2 and it was the perfect combo of sweet and tart.

Mom would love this next Sunday for a sweet treat made from the heart. It will be a star at that first neighborhood cookout  you can hopefully have before summer is over. Or, if you're hunkered down and are just eating your way through shelter in place, it would be delicious just because too!

However you are celebrating the beginning of another month, one that gets us closer to summer, I pray you are safe, healthy and snacking on something yummy!


Lemon Icebox Lush
2 (8 oz.) blocks cream cheese, softened
1 (3.4 oz.) box instant lemon pudding mix
1 c. milk
1-2 tsp. lemon extract
1 lemon, zest grated
1 (8 oz.) tub Cool Whip
1 box honey graham crackers

In a large bowl beat together cream cheese, milk, pudding mix and lemon extract until smooth. (Begin with 1 tsp and add more for how much lemon flavor you want.) In the bottom of 8x8 baking dish, layer graham crackers, breaking to fit if necessary. Spoon layer of cream cheese mixture and spread evenly. Spoon Cool Whip and spread evenly. Grate some lemon zest on. Repeat layers 2-3 more times depending on size of your dish, ending with Cool Whip. Cover with plastic wrap and chill overnight. Before serving use garnish with lemon slices and extra zest. 


Shared at Weekend Potluck
Shared at Meal Plan Monday

Sunday, June 30, 2019

Port A Pit At Home

Here in northern Indiana, we can count on many things during the summer months. Lots of beautiful sweet corn to enjoy, the humidity being oppressive some days, and parking lots filled with the smell of port-a-pit chicken cookers.

I honestly don't know if port-a-pit is a thing everywhere, so I guess I should explain a little. They are portable cookers that come to your event, or many times are hired for fundraisers that make some of the best chicken I've ever had in my life. Seriously. It's drool worthy, and something our family has been crazy about for years. 

How much? Well, when Mr. E started working for his current company almost 5 years ago, the first company picnic we went to we found out the meal was provided by the best port-a-pit business around. All of us were giddy! We just about licked our styrofoam plates. 

It's so unique and amazing, it isn't something you can 100% recreate at home. After all, the cooker is key. But many years back I made this marinade, and after grilling some chicken with it, we all proclaimed "Wow, this tastes almost like port-a-pit!" The flavor was just about the closest thing we can get.

I use chicken quarters because that's what port-a-pit we buy is, but I'm sure this would be just as tasty on any other cut. 

If you are planning a big July 4th bash, give your guests something new, besides the standard barbecue! 

You have to educate me too. Do you have port-a-pit in your area? Do you love it as much as we do?

Tangy Grilled Chicken
1 c. Worcestershire sauce
1 stick butter
1/2 tsp. onion powder
Juice 2 lemons
4 Chicken Quarters, patted dry
Chicken Grill Seasoning
Salt and Pepper to taste
Cooking Spray

In a small sauce pan, melt butter over low heat. Add Worcestershire, onion powder and lemon juice. Stir to combine. Bring to a boil and reduce heat back to medium low. Simmer for 10 minutes. Reserve a small dish of sauce for serving. Allow chicken to come to room temp. Spray with cooking spray. Season liberally with grill seasoning, salt and pepper on both sides. Sear chicken over high heat for 3 minutes on each side. Reduce heat to low. Cook chicken for 45 minutes, turning every 7-10 minutes, basting with sauce with each turn. Cook until internal temp is 165. Serve with extra sauce if desired.


Shared at Weekend Potluck

Sunday, March 24, 2019

Oops

Some recipes come to be because I brainstorm, test, tweak, test again, tweak a little bit more and finally they are ready to share with all of you. Others? Well, they happen because I screw up, are a complete accident and were never planned. Such is the case today!

I've been making my Lemon Chicken Noodle Soup for years. In fact, it's one of the first recipes I can remember tearing from a magazine and making when we were newlyweds. It's one of those that I know so well I can make it from memory, and it turns out perfect every time. Then basketball season happened.

Back when the boy was practicing 3-4 times per week, plus games too, I tried really hard for us to still have a meal on the table we could all sit down to. Many time I would simply cook it, and then keep it warm until he came home. It was really important to me that he wasn't eating leftovers every night and we weren't hitting the drive through either.

So, one cold January night I figured, what better meal for him to come home to than a warm bowl of my yummy soup he's loved since he was little. I prepared it, I turned off the heat, covered it and let it wait on us. Well, do you know what happens when you let noodles sit in broth? (For the record, so do I, but I had a total brain fart!) Yep, they soaked up all the liquid to the point when I ladled it up...there was barely a drop of broth left.

I was so mad at myself, and then I looked around the table and all the boys were gobbling it down. Hmmmm, maybe I'm onto something!

We love chicken and noodles, so why not put a new spring twist on it? I knew I had a new recipe up my sleeve, after a little tweaking of course!

This is a fresh twist on a classic perfect for a chilly spring day!

Lemon Chicken & Noodles
1 lb. egg noodles
2 lbs. chicken tenders
2 large carrots, peeled and diced
3 celery ribs, diced
1 small white onion, chopped
1/4 c. vegetable oil, divided use
1 TBS butter
2 (32 oz.) boxes chicken broth
1 c. water
1 TBS dried basil
1 TBS dried parsley
1 lemon, juiced
Salt and Pepper to taste
Garlic Powder to taste

Preheat oven to 350. Lay chicken tenders on baking sheet. Drizzle with 2 TBS oil. Season with salt, pepper and garlic powder. Roast for 30 minutes until juices run clear. Transfer to a bowl and allow to cool for a few minutes. Shred chicken using two forks. Set aside. 

In a large stock pot, heat 2 TBS oil and butter over medium high heat. Saute vegetables for 10 minutes until they begin to soften. Add chicken and saute for a few minutes more. Add broth, water, basil, parsley, salt and pepper. Bring to a boil. reduce heat, cover and simmer 15 minutes. Add noodles, increase heat and bring back to boil. Cook 10 minutes until noodles are tender. Add lemon juice and stir well. Turn off heat and cover. Allow to sit for 20-25 minutes until noodles have absorbed broth. Stir and serve.


 Shared at Weekend Potluck
Shared at Meal Plan Monday

Tuesday, February 13, 2018

Lemons In The Winter

Okay, was it just me or did January last 215 days? Seriously! I know winter months can drag on and on, but that was especially painful. Yes, it had 5 Mondays, which in itself should be outlawed, but I think there were 9 Tuesday and 17 Thursdays in there somewhere too.

Regardless, we onto February, and while for our family it is a very busy month, I realize for many it can drag on too.

Now is about the time of year my taste buds start to crave brighter, spring like flavors. They are ready to come out of winter hibernation and live again. Sure, we eat really well during these cold, drab months...soup, stew, casseroles...and there is nothing wrong with that. But they are always way ahead of the calendar and the weather, and wanting more.

One way I can wake them up a little is lemon! I will take lemon pretty much any way I can get it. Savory dishes, desserts, main dishes, sides, and everything in between.

This recipe is extra special, because it gives you pasta as a side dish. I don't know about you, but 99% of the time if I'm boiling pasta, it is going to be the star of the meal. Either on it's own, or in a casserole. But not with this. It is perfect alongside some chicken, or maybe some fish since we are entering Lent!

If you feel like this winter is never going to end, I assure you it will. Just maybe not as quick as we would like. In the meantime though we can have a burst of springtime on our plate!

Baked Lemon Noodles
1 lb. rotini pasta
16 oz. sour cream
1 stick butter
Juice of 1 lemon
1 tsp. lemon zest
2 TBS dried parsley
2 TBS grated Parmesan cheese
Salt and Pepper to taste


Preheat oven to 400. Grease a 2 1/2 quart casserole dish. Cook noodles to al dente. Meanwhile in a medium sauce pan melt butter. Add lemon juice and zest. Slowly whisk sour cream until well blended. Add parsley, salt and pepper. Keep on warm. When pasta is done, drain well. Return to hot pot. Add sauce. Stir well. Transfer to casserole dish. Sprinkle with cheese and extra parsley. Bake for 25 minutes until heated through.


Inspired by Montana Happy

Monday, November 14, 2016

Your Holiday Guests


So we are only 10 days away from Thanksgiving. Are you ready? Or was this a rude awakening and now you're having a panic attack? It's going to be okay. Take some deep breaths. I'm here to help.

Did your stomach just jump into your throat because you are going to have a house full of people come next week? I understand completely. Did you just remember you need to feed all of them for multiple days, and not just the big one? Sure, you will have leftovers after Thursday, but what the heck are you gonna do until then? Again, don't worry, calm down, EMM is here.

This is actually a tried and true recipe from my Grammy. It's something I've been making for years, and is perfect for any busy weeknight. So why not plan it for those couple days when you're still working before the holiday, but have to come home to a house full of people asking "What's for dinner?" Let's face it, if you are going about your normal day of work, school and life, plus prepping for Thanksgiving, coming up with dinners every night that week isn't going to be too easy. But this is!

Now, heads up! When you read the recipe, and see it calls for margarine, many of you are going to be inclined to say "Oh I can use butter instead." Don't do it. Seriously. I did the same thing once and regretted it. I don't know why, but the flavor completely changes and I don't like it. It's about the only recipe I have that flat our calls for margarine. Most of the time I am an all butter all the time girl, but not with this.

This feeds the 3 of us quite comfortably with a good sized portion each. So, if you're cooking for a big crowd, I suggest making two pans of it. It's going to go quick, I promise.

But if you aren't expecting house guests, don't feel like this isn't for you. It makes a terrific comfort meal any time, and once you make it once, it will become a part of your regular meal rotation, just like it did in my house!

Don't worry if you aren't quite ready for Thanksgiving. You still have time...just not too much, so start planning those meals now and cross one thing off that to-do list!

Chicken on Rice Casserole
2 lbs. boneless chicken tenders (about 8-9)
1 1/2 c. instant rice, uncoooked
1 can cream of mushroom soup
1 can cream of chicken soup
1 can cream of celery soup
1 stick margarine, melted
1 tsp. sugar
1/4 c. lemon juice 
Garlic Powder to taste
Salt and Pepper to taste
Dried Parsley for garnish

Preheat oven to 350. Grease a 9 x 13 baking dish. In a large bowl combine rice, soups, salt and pepper. Stir well. Transfer to baking dish and spread evenly. Lay chicken on top of rice. In a small bowl whisk together melted margarine, sugar and lemon juice. Pour over top of chicken. Season chicken liberally with salt, pepper and garlic powder. Bake for 1 1/2-2 hours until rice is tender. Stir well before serving. Garnish with parsley.


Monday, April 18, 2016

Finally, 70+

After this uber cold spring we've been having, I really thought the warm and sunny days were never coming. After all, it was only 8 days ago we had snow showers and a high of 37 with 40+ mph winds making it feel like 25!!

But come they did! That's right, Mother Nature had pity on us, and exactly one week after that loveliness, we had blue skies, the sun was shining and the thermometer read 75...76...77...78...basically, heaven on earth! 

I am a sucker for warm weather. I loathe winter. I can't help it. Like my husband says "You don't have to shovel sunshine." No joke, the minute the weather began to change, I could feel my entire mood improve with it. I was ready to bust out the capri pants, flip flops and get outside. (Okay, I can't like, being naturally hot blooded, plus pregnant, I would have been wearing both of those back in February had I not had to worry about frostbite, since I am heating from the inside out!)

Plus, I felt like cooking again. After all the weeks of nausea, and just being so dog gone tired, I have to admit my time in the kitchen working on new recipes for you guys has been sparse. I just find myself leaning on those tried and true ones that I can make with my eyes closed, making it easier on myself. 

It was time to come up with something new. Something to celebrate the weather. Something that says backyard eating or cooking out. Well, what says that better than a coleslaw? But this isn't your old stand by slaw recipe. This uses one of my favorite veggies out there...Brussels sprouts! If you've never had them raw, you might think I'm crazy, but they are just baby cabbages, so think of it as coleslaw, miniature size! 

This comes together in almost no time. Seriously, the most time consuming part will be slicing the sprouts, I promise. Plus, it has to sit in the fridge for a bit anyway, so you can easily make it ahead and have it waiting on you when you're ready to eat.

If the warm, sunny spring days haven't found your neck of the woods yet, have faith. They will. If they can come to Indiana, they can come anywhere! And now, we can start focusing on all those summer time barbecues, picnics, parties and all the yummy food, like this, that is to come!

Brussels Sprouts Slaw
1 lb. Brussels Sprouts, thinly sliced or shaved
1/2 c. dried cranberries
1/3 c. chopped pecans
1/2 c. mayo
1/2 tsp. celery seed
1 TBS Dijon mustard
2 tsp. lemon juice
1/4 tsp. garlic powder
Salt and Pepper to taste

In a large bowl combine sprouts, cranberries and pecans. Toss well. In a small bowl whisk together mayo, mustard, celery seed, lemon juice, garlic powder, salt and pepper. Pour over sprout mixture. Stir well. Chill 2 hours before serving. 


Shared at Weekend Potluck

Monday, December 14, 2015

Red Potato Facelift

Are you potatoed out? Yeah, me either. I can't help it. We love us some taters and we will take them any time any way. Now, that's not to say I don't enjoy finding new ways and switching up our tater routine!

With the holiday season in full swing, (If you haven't looked at the calendar lately, there are only 11 days until Christmas.) you might be desperate for an easy side dish for a weeknight meal. Or maybe you have your own version of Cousin Eddie and already have house guests to feed, who won't be leaving until the New Year! Or maybe you want potatoes on your holiday feast menu, maybe with some ham, and you are looking for something new to try. If any, or all of those apply, you're going to be so happy you logged on today!

The flavors of lemon and rosemary are so classic, I can't believe I never thought to use them on potatoes before. So bright. So unique. They really brighten up an every day dish and bring your taste buds back to life.

These are as pretty as they are tasty and would look terrific on your Christmas table! They might be the one thing your guests all say "hmm...what is that" when they take the first bite! Oh, and if you're feeding a crowd, they would be easy to adapt (This amount would feed 4-6) and still stay on budget, being so economical!

So many of us turn to the classics during the holiday entertaining season, but we can also take those tried and true favorites, give them a little face lift and create something new to become a tasty tradition.

Lemon & Rosemary Roasted Potatoes
12 red potatoes, quartered
5 TBS lemon juice
8 teaspoons olive oil
1 tsp. dried rosemary
1 tsp. garlic salt
1/4 tsp. pepper 
Salt to taste
Dried Parsley

Preheat oven to 450. Spray a large rimmed baking sheet with nonstick spray. Place potatoes in a large bowl. In a medium bowl combine 4 TBS lemon juice, olive oil, rosemary, garlic salt and pepper. Whisk to combine. Pour over potatoes. Stir well to coat. Transfer to baking sheet. Sprinkle with salt and extra pepper, if desired. Add dried parsley. Bake for 45 minutes-1 hour until fork tender and golden, stirring a couple times. Remove to serving bowl and drizzle with 1 TBS lemon juice. 


Wednesday, December 9, 2015

Exhaustion

For those of you who didn't know, my poor mom has been in the hospital for over a month now. What started as a simple foot surgery back in July ended with her in the ER on November 8th with a serious infection and sepsis. We were very lucky they caught it when they did, and are very thankful to the wonderful doctors, nurses and hospital staff who worked so hard to get her into the healing process.

Needless to say, it's been a long month in our family, and for me, it has meant running back and forth to the hospital at least once per day, sometimes more. Don't get me wrong, I am more than happy to do it. She's my mom. I love her. I adore her. I want her better. But that doesn't take the fact away that between the running around, the extra work, the mental fatigue....I'm exhausted. Again, happy to do it; just sleepy most days.

So when it comes to meals these days, my "it needs to be quick and yummy" mentality is in over drive. We need them now more than ever. I want to be with her as much as I can, but I also have to make sure my family is fed. It has become quite the balancing act, let me tell you. But when I come up with delicious meals like this one, it makes it worth it!

We love cabbage. Can't get enough of the stuff. I probably incorporate it into our menu plan at least once per week, or once every other. This is a new twist on my classic Cabbage Roll Casserole. A lot of the same element, but still different enough to taste like something new.

If you're in the holiday rush, you are probably exhausted too. Or maybe you are already thinking ahead to how you are going to feed those house guests in a couple weeks. This would work perfectly for either of those scenarios.

And if you have an extra minute, and an extra prayer or well wish laying around, please lift my mama up...we are keeping our fingers crossed the progress she has made continues and we will get to have her home by Christmas.

Sausage & Cabbage Bake
1 lb. mild Italian sausage*
2 c. cooked long grain white rice, NOT instant
1 medium head of cabbage, thinly sliced
1 medium yellow onion, chopped
1 (15 oz.) can tomato sauce
1 TBS brown sugar
1 TBS lemon juice
1 tsp. Worcestershire sauce
1/2 tsp. seasoned salt
Salt and Pepper to taste
Dried Parsley

Preheat oven to 350. Grease a 9 x 13 baking dish. In a large skillet brown sausage and onion until no longer pink. Drain if necessary. Add cabbage and cook until slightly wilted. Add rice and stir to combine. Season with salt and pepper. Transfer to baking dish. In a medium bowl whisk together tomato sauce, brown sugar, lemon juice, Worcestershire, seasoned salt and pepper. Pour over casserole. Spread evenly. Sprinkle with parsley. Bake uncovered for 1 hour until cabbage tender. Stir before serving. Garnish with extra parsley. *NOTE* You can add spice by using hot Italian sausage. 


Shared at Weekend Potluck


Monday, August 31, 2015

Fresh Family Meals {A Gooseberry Patch Review & Giveaway]

It's that time again! Oh, so many things could be applied to that statement, but in EMM land right now, it refers to another awesome Gooseberry Patch cookbook; and the chance for one of you to walk away with a copy for yourself!


Fresh and Easy Family Meals is filled with over 200 yummy recipes your family is sure to love. Plus, like so many of their cookbooks, a ton of helpful kitchen tips!

Page after page has something else you will want to try. Take it from me, don't dog ear the pages with ones you want to make. Why? Because every single page will be marked!!

From main dishes, to sides to desserts, you could feed your family for months just from this cookbook! I had to really narrow it down to one I wanted to feature, and boy did I pick a winner!

This is a simple side dish for any meal that you can feel really good about serving! The bright, fresh lemon flavor takes it from simple to scrumptious. Plus, any chance I have to use fresh spinach, I'm happy. We love the stuff, and it's filled with so many vitamins and minerals! The person who submitted the recipe to Gooseberry suggested serving it with baked chicken, so that's exactly what I did; and it was fan-freakin-tastic!

I adapted this just a little bit to fit our tastes, but I've included the page number so you can see the original recipe. I can't wait to make this again during those looonngggg winter months when we crave something fresh and bright to remind us of summer time flavors. There are so many ways I can think to serve it, and maybe even add some sauteed shrimp for full meal deal!

If you're looking for something new, that's also pretty healthy you've come to the right place. Oh, and don't forget to enter to win a copy of Fresh and Easy Family Meals for yourself. Just scroll down under the recipe to see how!

Lemony Spinach Orzo
Original Recipe found on page 72
1 lb. orzo pasta
8 oz. fresh spinach, chopped
1 tsp. garlic powder
1 tsp. lemon zest
Juice of 1/2 lemon
4 TBS butter 
Salt and Pepper to taste

Cook orzo according to package directions. Meanwhile, in a large skillet melt butter over medium heat. Add spinach, in batches, until starting to wilt. Add garlic powder and stir. When pasta is cooked, drain very well. Add to skillet. Toss to combine. Add lemon zest, juice, salt and pepper. Stir well. 


******GIVEAWAY******

To Enter: Leave a comment telling me you want to win. That's it. Easy!! Just be sure to leave an email address so I can notify the winner.

Bonus Entry: Become a Fan of Gooseberry Patch on Facebook. Leave a comment telling me you have.

(1) Winner will win a copy of Fresh and Easy Family Meals.

Open to US Residents 18 and over only.

Contest Ends: Sept. 16, 2015


Disclaimer: I received a cookbook in exchange for this review. And one to give away. All thoughts and opinions are my own. 


Shared at Weekend Potluck

Wednesday, August 12, 2015

One Extra Pot

So, I wish I could "advertise" this as a one pot wonder, but I can't tell a lie. It would be false advertising and I just can't do that. However, it only takes one extra pot, so it's like a very close cousin! That's all. Just one more, and it is barely going to get dirty, so it only half counts. 

I think one of the reason why when searching for recipes we all seem to stop at the ones labeled "one pot" or "one skillet" is because life demands meals be quick, both for cooking time, and clean up. Let's face it, those huge meals taste great and are so satisfying, but the after math? I for one always wish for the dish fairy to show up...and she never does....lazy witch. You know the ones I'm talking about. Where it seems like every single dish/pan/pot/utensil in the kitchen is dirty and piled up in the sink. Even with the added blessing of a dishwasher, the amount of work can seem daunting. So when I can give my family, and all of you, a dish this delicious, and make the promise of only two pans...it's a successful food blogger day. 

This is another way to really stretch the budget when it comes to seafood. If you haven't seen me sing the praises of the frozen options in the stores today, you are now. The 12 oz. bag I used in this recipe cost me about $5, and easily fed our family of three. Oh, and if you're wondering if you have to buy the ones with tail left on per the recipe, it's a personal choice. I like to use them in dishes like this because they shrink less. But if you don't mind that, and don't want to mess with the tails when chowing down, feel free to use tail off. 

Between the garlic and lemon, this is bursting with flavor, and even with the cheese and milk, I think it's still super light. Add a veggie and maybe some bread on the side and supper is on the table in under 30 minutes! And your clean up will be even less than that!

Lemon Garlic Shrimp and Rice Skillet
Inspired by Diethood
2 c. instant white rice
2 c. water
2 chicken bouillon cubes 
6 TBS butter
5 large garlic cloves, finely chopped
12 oz. frozen medium shrimp, tail on, thawed
6 TBS milk
1/2 c. shredded Parmesan cheese
1 1/2 TBS dried parsley, extra for garnish
Juice of 1/2 lemon
Salt and Pepper to taste 

In a medium pot, bring water and bouillon cubes to boil. Add rice. Stir. Cover. Remove from heat. Let stand 5 minutes. Fluff with fork. Set aside. (These were my directions. Check your box!) In a large skillet, heat butter over low heat. Add garlic and cook for 2-3 minutes until fragrant, stirring constantly. Add shrimp, salt and pepper. Cook and stir, until shrimp are pink, about 5 minutes. Move shrimp to sides of pan, add rice. Stir well. Add milk, cheese and parsley. Stir to combine and cook for 1-2 minutes more until thickened. Remove from heat. Squeeze lemon over. Sprinkle with extra parsley. 


Shared at Weekend Potluck

Monday, July 20, 2015

Yay!!! He Was Home

Back when Mr. E and I were first married, he was 100% in charge of the grill. I didn't even know how to start the thing let alone cook anything on it. And it wasn't really an issue because we were both working, home around the same time, and while I worked on the "inside" part of the meal, he would man the grill. 

But after he and little man started training in Taekwondo, there were many evenings he would have to go straight to the dojang (the school) from work, and he wouldn't eat supper until after class; and that left Monkey and I on our own if we wanted something grilled. So...I learned. I put my big girl panties on and started grilling more and more. And I have to say, I was pretty proud of my skills. I became almost the grill master he is....almost. 

See, there is still one thing I just can't quite get the same results he can. Bone in chicken. I can handle boneless like a champ, but for some reason when I try to cook legs, thighs or breasts on the bone, they don't come out as tasty as his. So, I figure since I can grill so many other things, I will leave those to him. But that can get tricky when planning the menu. I have to make sure it is an evening I know he'll be home, or on Sundays. Those are our allowed bone-in grilled chicken days. 

In fact, this was our supper last Sunday. I was craving some grilled drumsticks and wanted that bright, pungent flavor of lemon. Lemon on chicken is so perfect. It gives it tons of flavor, and helps to keep it so moist and juicy too. 

So many of us are grilling out every chance we get this time of year, and it's easy to fall into a chicken rut. Put some life back into yours with this flavorful, simple and delicious dish!

Grilled Lemon Pepper Chicken
7-10 chicken drumsticks
1/4 c. olive oil
2 TBS lemon pepper seasoning, divided
Juice of 1 lemon, divided
2 tsp. garlic powder
Salt and Pepper to taste
Non Stick Spray

 Combine chicken, olive oil,  1 TBS lemon pepper seasoning, garlic powder, salt and pepper. Toss to combine. Cover and marinate in the fridge for 8 hours. 30 minutes before ready to cook, allow chicken to come to room temp. Spray with non stick spray. Sprinkle with other 1 TBS lemon pepper seasoning and drizzle with half the lemon juice.  Preheat grill to high. Spray with nonstick spray. Sear chicken for 1 minutes on all sides. Reduce heat to heat to low, cook, and turn often until chicken is cooked through, about 30-40 minutes. Remove from heat and drizzle with remaining lemon juice.


Shared at Weekend Potluck

Wednesday, June 24, 2015

What I Won't Do For Him

When I was a kid, one of my favorite meals was my mom's salmon patties. I used to ask her to make them all the time. Then when Mr. E and I started dating, they became one of his favorites for her to make also. So, it shouldn't be a big deal for me to make them for him now, right??!! I should jump at the chance, right??!! Wrong. Very wrong.

See, some years back, we went to a local seafood restaurant, which shall remain nameless, and I ordered something I knew I would love. Salmon. A nice piece, with a sweet glaze and grilled. Mmmm....yummy. Right? Wrong again. Because by that night, I realized food poisoning wasn't my friend and I was so, so sick.

Now I don't know about you, but once something makes me sick, it takes a very long time for me to allow it back into my mouth again. And sometimes it is simply never welcome back. That was the case with salmon. I was so sick and have such vivid memories of it, even the smell of it can make my tummy not happy, so I've avoided it for years.

But then a couple weeks ago, while making out my meal plan, I asked my hubby what he was hungry for. "Your mom's salmon patties." Really? Seriously? Did you just say that. Well evidently I was feeling generous that day, or maybe he had done something nice for me, I can't remember, because I actually agreed to this.

Thankfully, since it was a different texture, a different flavor and something that actually brought back happy memories of eating it, I did just find. Whew...I'm so happy! I've missed not eating one of mom's best recipes!

These are super simple and come together much quicker than you might think. I like to serve them with a fresh creamy dill dipping sauce and some rice, for a supper filled with good protein!

I am so happy I made it through this meal and now know I can enjoy these once again, just as much as I did when I was a kid. Well, almost...they are never as good as when mom made them!

P.S. Today just happens to be my parents wedding anniversary too. Happy Anniversary, Mom and Dad! We are so blessed to have you as parents and wish you many more blessed years to come!

Mom's Salmon Patties
2 (14.75 oz.) cans salmon, drained and bones removed
1 egg, beaten
1 c. bread crumbs*
1/2 c. finely chopped onion
1 TBS dried parsley
Salt and Pepper to taste
Vegetable Oil for frying
Lemon slices for garnish

Dill Sauce
1/3 c. mayo
1/3 c. sour cream
1 tsp. dried parsley
1 1/2 tsp. dill weed
1 tsp. lemon juice
1 tsp. horseradish
1 TBS minced onion
1/4 tsp. garlic salt
Pepper to taste

Combine all ingredients for dill sauce in a medium bowl. Stir until well mixed. Chill until ready to serve. Place drained salmon in a large bowl. With hands, break up and recheck for bone pieces. Add egg and onion. Add bread crumbs, a little at a time until mixture starts to bind. Add salt, pepper and parsley. Mix well using hands. Using hand, make patties about 1/2" thick. Heat oil until 350 degrees, or medium-high. Fry on both sides until browned. Serve with sauce and lemon on the side. *NOTE* I used about a cup of bread crumbs. You will need to eyeball it to see how much you will need, depending on how wet your salmon is. We like them extra crispy on the outside, because mom always made them that way. If you don't want them quite as brown, fry at 325 and watch very closely.


Friday, June 5, 2015

What Did We Ever Do?

It is well known in our inner circle of friends and family, I am NOT a naturally cool person. And no, I'm not talking about my personality. I mean my actual body temperature. As my grandma has always said about me, I'm a "hot box." 

I have two temps...warm and hot. There is not in between. I'm the girl who sweats in the winter. I drive around when there is snow on the ground with the AC cranked. When I was pregnant with little man, I made Mr. E turn the air conditioner on in March and it didn't get turned off until he was born in September.

So you can imagine my utter despair a few weeks ago when just as the thermometer started to rise to 85 degrees and higher, with 80% humidity, our central air quit working. Literally, one minute it was blowing nice cold air and the next the temp in the house was climbing to 75 degrees. I was pretty miserable, pretty quickly. I started to think back to when I was a kid and we didn't have AC at all. We had fans. And open windows. Those hot sticky nights when you would wake up in the morning soaked from sweltering all night long. Not fun. 

We are so addicted to our AC we don't even own fans!!! Luckily my parents hooked us up, and we got some up in this joint very quickly! So we had air circulating, but at one point, it was still 80 degrees in here. Needless to say, I thought I was going to spontaneously combust! 

Come Monday night I had a repair company scheduled to come look at it, but in the meantime I had to cook supper, which I hadn't done since it went out. Between the weekend and Mother's Day, I had yet to be made to prepare a meal in the sauna, but my time had come. 

I was craving barbecue, but knew it needed to be stove top because I wasn't turning on the oven, and I didn't really even want to grill either...that just meant being outside in the heat, and no relief once I came in. So, this is what I came up with. It gave me the bbq flavors I was craving but without the time and effort, and most importantly high temperatures I couldn't deal with. 

These would be fantastic for a party, potluck or cookout that gets interrupted by rain! Think sloppy joe texture but a different flavor...perfect for summer time.

I'm not sure what we did before the days of AC. but I know I don't want to find out any time soon again. Oh, by the way, I am currently typing this...in my nice and cool house...so thankful it's working again!

BBQ Ground Beef Sandwiches
1 lb. ground beef
1 small onion, chopped
3 ribs celery, finely chopped
1 c. ketchup
1/2 c. water
1 TBS butter
2 TBS apple cider vinegar
1/2 TBS. lemon juice
1 TBS Worcestershire sauce
1 TBS brown sugar
1 tsp. garlic powder
Salt and Pepper to taste
 Buns
Pickles

In a large skillet over medium high heat, saute beef, onion and celery in butter until no longer pink. In a medium bowl whisk together ketchup, vinegar, lemon juice, Worcestershire, brown sugar, garlic powder, salt and pepper. When beef is cooked, add ketchup mixture and water. Stir to combine. Bring to a boil. Reduce heat to low and simmer, covered, for 40 minutes. Serve on buns with pickles.


Shared on The Country Cook June 5, 2015

Friday, April 24, 2015

#Plate Proud with Green Bean Delivery

I love entering recipe contests, but when they are also sponsored by a favorite company, that's even better. And that's the exact scenario I got when I was approached by my buddies at Green BEAN Delivery about their Plate Proud recipe contest.

Each participant is asked to submit their favorite original recipe in one—or all—of five categories for a chance to win impressive culinary prizes, including a grill set, planters, placemats, a Mandoline slicer and much more. Categories include everything from recipes on the grill to packed lunches to meals using only local ingredients. All winning recipes will be highlighted on the contest website.

Well, sign me up! I couldn't wait to come up with something delicious to submit, and of course share with all of you. I chose to develop something for the Veggie Side category, since summer time, fresh garden veggies are something I love to cook with in the warm months. Rather they be from our own backyard, or a favorite Farmer's Market, or in this case Green BEAN themselves, I can't get enough. 

This is sure to be a hit at your next cookout, potluck or family get together. Anything you have coming off the grill, from steaks, to burgers, to some delicious barbecue is going to taste even better with this crisp, cool, refreshing side. Fresh corn, tomatoes, avocado and a refreshing dressing make it like a bite full of sunshine in your mouth. Honestly, it's filling enough, it would make a terrific lunch or light supper when it's too hot to cook too! 

I've entered the Plate Proud contest and you can too. Just visit the entry page and share a recipe in one, or all five, categories! 

Summer Corn Salad
5 ears corn
2 medium tomatoes, seeded and chopped
1 small red onion, finely chopped
1 avocado, chopped
1 tsp. dried basil
2 tsp. dried parsley
Salt and Pepper to taste

Dijon Vinaigrette
1 TBS lemon juice
1 TBS white wine vinegar
2 tsp. Dijon mustard
1 garlic clove, minced
1/2 c. vegetable oil
Salt and Pepper to taste

Combine all ingredients for dressing in a jar and shake well. Chill until ready. 

For salad, bring a large pot of water to boil. Cook corn for about 3 minutes. Remove and immediately rinse with cold water. When cool, remove kernels from cobs. In a large bowl combine all ingredients for salad. Toss well to coat. Pour about 1/2 of the dressing over salad. Mix well to combine. Chill until ready to serve. Serve salad with rest of dressing on side for people to add if needed. 


Shared on The Country Cook April 24, 2015

Disclaimer: I was given a complimentary bin from Green BEAN Delivery in exchange for this feature and entering the contest. All thoughts and opinions are my own. 

Monday, April 13, 2015

That's What Friends Are For

A few weeks ago my good friend told me about this treat she had a party the night before and how she "couldn't stop eating it." Well, you know with an endorsement like that, I had to know what it was, and how I could make it!

She described this amazing fruit salsa, how simple the recipe was, and how if she had just a touch less self control, she could have eaten the whole bowl herself. Well, that's all I needed to hear. The next day I was in the produce section, picking up everything I needed and by that night, I too was trying to avoid gobbling down the entire batch all by myself.

This is the perfect sweet treat for the kids, a summer cookout, a pool or lake party, or simply for snacking. So fresh, so tasty and really, actually healthy too. Just a hint of sugar, and the rest of the sweetness comes naturally from the fruit itself.

I served this with graham crackers and little man couldn't get enough. In fact, when he ran of crackers, he asked for a spoon to eat the rest. No joke! However, my friend said the batch she had was served with some cinnamon sugar chips you can find next to the tortilla chips at the store. I think those would be absolutely scrumptious too! 

I can't wait to make this again...and again...and again. Especially this summer when we go strawberry picking! Oh, I can only imagine how fresh picked berries would make it even better!

Great friends are for so many things, including yummy recipes I can then share with you!

Fruit Salsa
1 lb. strawberries, diced
2 granny smith apples, peeled and diced
2 kiwis, peeled and diced
1 ( 6 oz.) container raspberries
Juice of 1 lemon
3 heaping TBS strawberry preserves
2 TBS packed brown sugar

In a large bowl combine apples and lemon juice. Stir to combine. Let sit 2 minutes. Add strawberries, raspberries and kiwi. In a small bowl stir together preserves and brown sugar well. Pour down over fruit. Mix well. Allow to sit at room temperature 15 minutes before serving. Serve with graham crackers, cookies, etc. 


Shared on The Country Cook April 17, 2015