Everyday Mom's Meals: Coconut
_____
Showing posts with label Coconut. Show all posts

Monday, June 22, 2020

Just For Daddy


I hope everyone had a great Father's Day celebrating with all the special guys in your life! I am blessed to be the little girl of an amazing daddy; and wife to the best I could have asked for to our boys.

I have to share a secret with you. This week's new recipes was actually a dessert on Easter. Then it went into my draft folder and I forgot about it. Oops. When I stumbled upon it a couple weeks ago, I was so annoyed with myself, but then remembered that Father's Day would be the perfect occasion to share it because it is hands down my daddy's favorite dessert I make him.  In fact, this pie wasn't our Easter meal dessert, but one I made for dad as a treat since we couldn't be together on the holiday thanks to lock down. Pie porch pick up it was!

I've made a few different versions of this pie over the years, and this by far is the easiest and my favorite. Filled with coconut flavor, and perfect to make the day before as well. Oh, and it can also be made into a mini version using those mini pie shells you can find in the baking aisle. I know because that is what I made for our Father's Day dessert! Since we wanted to eat on the deck and my uncle was joining us, I figured a mini version would be more outside friendly. And they were SO cute!

Let's talk toasted coconut. First off, start it in a cold pan. Second, don't let the heat get above low. Third, do NOT take your eye off it for a second. Seriously. It can go from white to black in about 5 seconds. So toast it slow, stirring often and you will be fine. And before you ask "Do I really need to toast it?" My answer is always yes. There is a huge difference in flavor between out of the bag and toasted. It truly makes the difference in this pie.

However you spent Father's Day, I hope you got to hug that special man in your life and tell him how much you appreciate everything he does for you every single day!

Easy Coconut Cream Pie
1 (9 oz.) graham cracker pie shell
2 (3.4 oz.) boxes instant coconut cream pudding
3 1/2 c. milk
3 cups shredded sweetened coconut, divided use
1 (8 oz. ) tub Cool Whip

In a large bowl whisk together milk and pudding mixes until smooth (there will be some tiny chunks from the coconut) Chill for 5-10 minutes until soft set. While pudding chills, heat 1 1/2 cups coconut in a skillet on low heat. Stirring constantly, toast until golden brown. Remove from heat and set aside. When pudding is set, add remaining coconut and mix well. Pour into pit shell. Chill for 2 hours to set. Top with Cool Whip and toasted coconut. Chill until serving.*NOTE* If you want to make the mini version, follow recipe except use 2 (6 count) packages mini graham cracker pie shells, found in the baking aisle.


Shared at Weekend Potluck


Friday, July 24, 2015

Missing Florida

A month ago at this time, I was laying in a lounge chair, next to my favorite pool in the world, just steps away from our favorite beach in the world. Yes, we were on vacation, and yes, we've been home for nearly 3 weeks now...and we are still going through withdrawal.

We can't help it. It's not that we don't love our Hoosier home, but the sand, the surf, the relaxation, the freedom...all of it is so appealing, but especially when you get back into the daily grind and your already busy life explodes with more and more to do.

Now, this week it did get a tad easier because we "discovered" a great public pool about 20 minutes north of our house that is such a fun time, the boy literally spent an entire afternoon playing and swimming. (I say discovered, because it's been there for years, and I've known about it, but this week was the first time we actually went.) So after a fantastic day poolside, I wanted to make something with a little tropical feel to really complete the "almost like Florida" vibe.

This makes a terrific sweet side to any summer meal, or wait and serve it for dessert. If you're having a pool party or maybe a get together at the lake, it's super cute for those too. To me, it's a little like the classic ambrosia I've made a thousand times, but just with a little something sunnier. Oh, and if that pool party happens to have kids at it, be sure to spring for the tiny umbrellas. The boy thought they were the best part!

Creamy Tropical Salad
1 ( 20 oz.) can pineapple chunks, drained
1 (11 oz.) can mandarin oranges, drained
1 c. sour cream
1 tsp. vanilla 
1 1/2 c. mini marshmallows
1 1/2 c. sweetened flaked coconut, reserve a little for garnish
Maraschino cherries, for garnish

In a large bowl combine pineapple and oranges. In a small bowl whisk together sour cream and vanilla until combined. Pour over fruit. Stir until combined. Fold in marshmallows and coconut. Chill for at least 6 hours before serving. Garnish with extra coconut and cherries. 


Shared at Weekend Potluck

Friday, March 27, 2015

He's Coming...

With only a week left until Easter, the above title could mean a couple things. For most of us in the Christian world, it means we once again get to celebrate the Resurrection of our Lord Jesus, and we can shout from the mountain tops, "He is Risen. Risen Indeed! Hallelujah." 

At the same time, those of us with kids know they are anxiously awaiting the return of their favorite bunny, Mr. Peter Cottontail himself, bringing with him their favorite sweet treats of the season. 

For our family, both of these are true. We try really hard to find a happy medium between our faith and the fun of Easter. I'm proud to say yes my 10 year old loves his Easter Basket of candy, toys and books, he also knows the true reason why we celebrate renewed life this time of year. 

In the spirit of the all things yummy, I wanted to share a super easy sweet bite perfect for your Easter table! How can you resist something with only 4 ingredients that looks like a fluffy bunny tail? Not to mention, being filled with one of my favorite spring time flavors...coconut

I was so excited when I saw these because they didn't contain any chocolate. I know. Weird for a woman to say. But for me, I like chocolate, but there is so much of it everywhere this time of year, satisfying my sweet tooth cravings with something else is nice too. Plus, I love easy things the boy can help me with. 

If you are looking for something cute, yummy and simple to add to your Easter menu, these should definitely be it. Make a few, make a lot, and watch them disappear quicker than the Easter Bunny's footprints! 

Coconut Truffles
4 oz. cream cheese
2 1/2 c. powdered sugar
1/2 tsp. coconut extract
1 1/4 c. sweetened shredded coconut, divided

Combine cream cheese and coconut extract. Beat well until smooth. Add powdered sugar, 1/2 c. at a time and beat until combined. Add 1/4 c. coconut and beat once more. Form into balls (I used my cookie scoop to make it easier.) and roll into coconut. Place on a cookie sheet lined with parchment paper and chill for 15-20 minutes until set. Store in an airtight container in the fridge. 


Shared on The Country Cook Mar. 27, 2015


Friday, August 8, 2014

My First Time

Thai food. Do you love it? Or maybe I should start with, have you ever tried it? I say that because until a few weeks ago, I hadn't. I have been wanting to for a long time, and my hubby has been encouraging me to because of his love of it, but I just never had the opportunity until now. 

I will be honest, I had always been a tad apprehensive to try Thai because I had heard how a lot of it is spicy; and as I've said before, I'm a wimp and while the mister enjoys tears it while he eats, I do not. Now, usually when I am going to try a new cuisine for the very first time, I "leave it to the experts" so to speak. As in, I will go to a restaurant that is known for it, or I will have someone who prepares it on a regular basis treat me. But this time, I found a great recipe on a great blog that I just knew would be the best way for me to stick my toes in the water, so to speak.

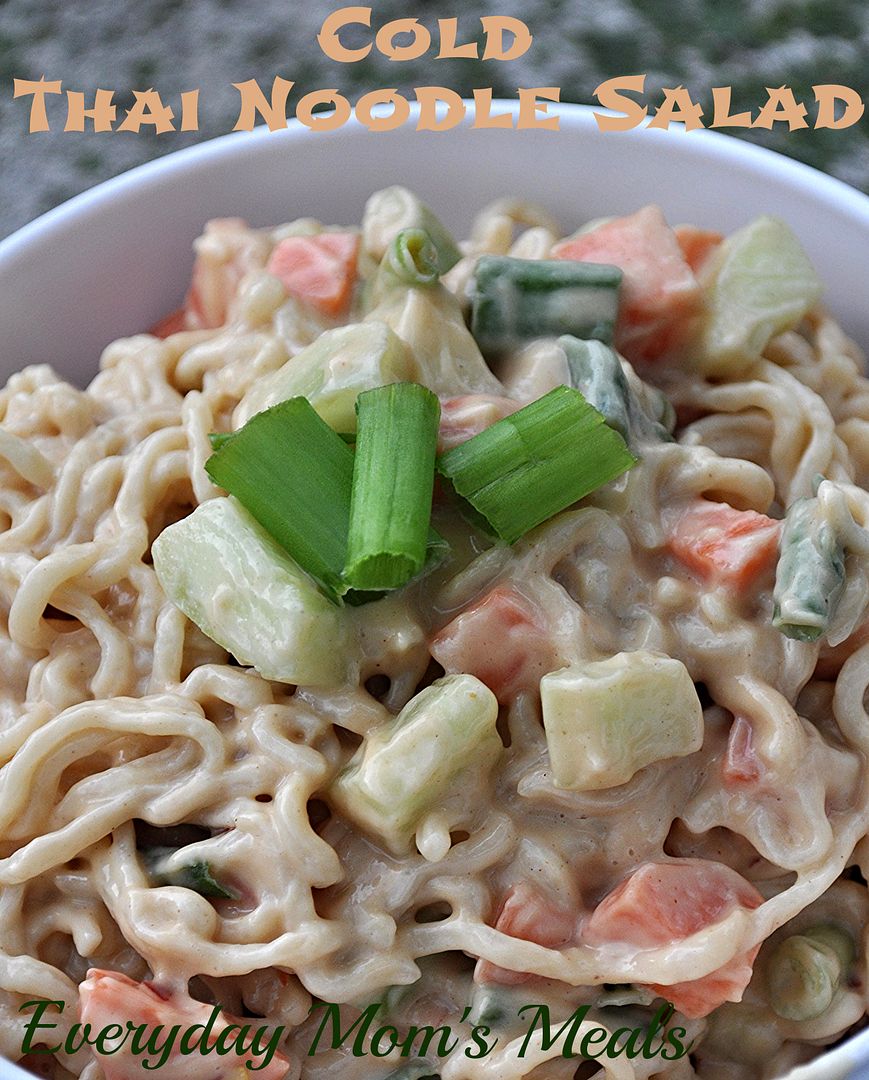
If you love cold noodle salads, this is going to be your new favorite go-to. If you have never made one at home, this is going to be your new favorite period. This makes a great side dish with some egg rolls or hot and sour soup. Or make a double batch and turn it into a light summer, it's too hot to cook, supper. Or, make that same double batch and you have lunch for the week! I think it would be a great dish to take to your next potluck or cook-out too...something new and unique everyone will rave about! You will be the one with the dish everyone wants the recipe for! 

If you are like me and have never tried Thai food, then this should definitely be your first time. This creamy, cool, crunchy, sweet and savory all rolled into one, delicious, simple dish will have you wanting to try even more as soon as possible!

Cold Thai Noodle Salad From Cajun Mama Cooks
2 (3 oz.) packages ramen noodles, any flavor, seasoning packets discarded
3/4 c. coconut milk
3/4 c. peanut butter
1 medium cucumber, seeded and finely diced
6 green onions, chopped
2 medium carrots, peeled and finely diced
1/4 tsp. red pepper flakes
1/4 c. lime juice
1 TBS sugar
3/4 tsp. salt

Bring a medium pot of water to boil. When boiling, break noodles into water. Cover and remove from heat. Let sit until noodles are tender. Drain and rinse with cold water, separating with fork. In a large bowl whisk together peanut butter, coconut milk, lime juice, red pepper flakes, sugar and salt. Add veggies. Stir to coat. Add noodles. Toss gently to coat. Chill until serving. 


Shared on The Country Cook Aug. 8, 2014
Thai at Very Good Recipes

Monday, May 19, 2014

No Straw Required

I am not a huge alcohol drinker. Sure, I enjoy the occasional drink now and then, but they really come few and far between. I don't enjoy wine like 99% of my friends, and there is only one or two beers I can stomach. I'm more of a "fruity drink with a an umbrella in it" kinda girl; and one of my favorites, the pina colada, was my inspiration behind this new dessert.

This was actually what I made when we celebrated Easter with my parents. With two families so close, it's great to be able to see everyone on holidays, but it also requires so logistics so we don't feel like we spend half the day in the car driving. So for the past couple years, it's been easier for us to see my parents on Good Friday and then my in-laws on Easter. It allows us to spend quality time with each side without having to leave in the middle of the fun.

My mom was taking care of the main course (her famous beef n noodles) and side dish (her also famous coleslaw) so I volunteered to make dessert. But before we were headed out there in the late afternoon, I had a busy day with my little man planned. He was home from school, we had eggs to dye and other fun things to do. Needless to say I didn't want to be in the kitchen for most of it.

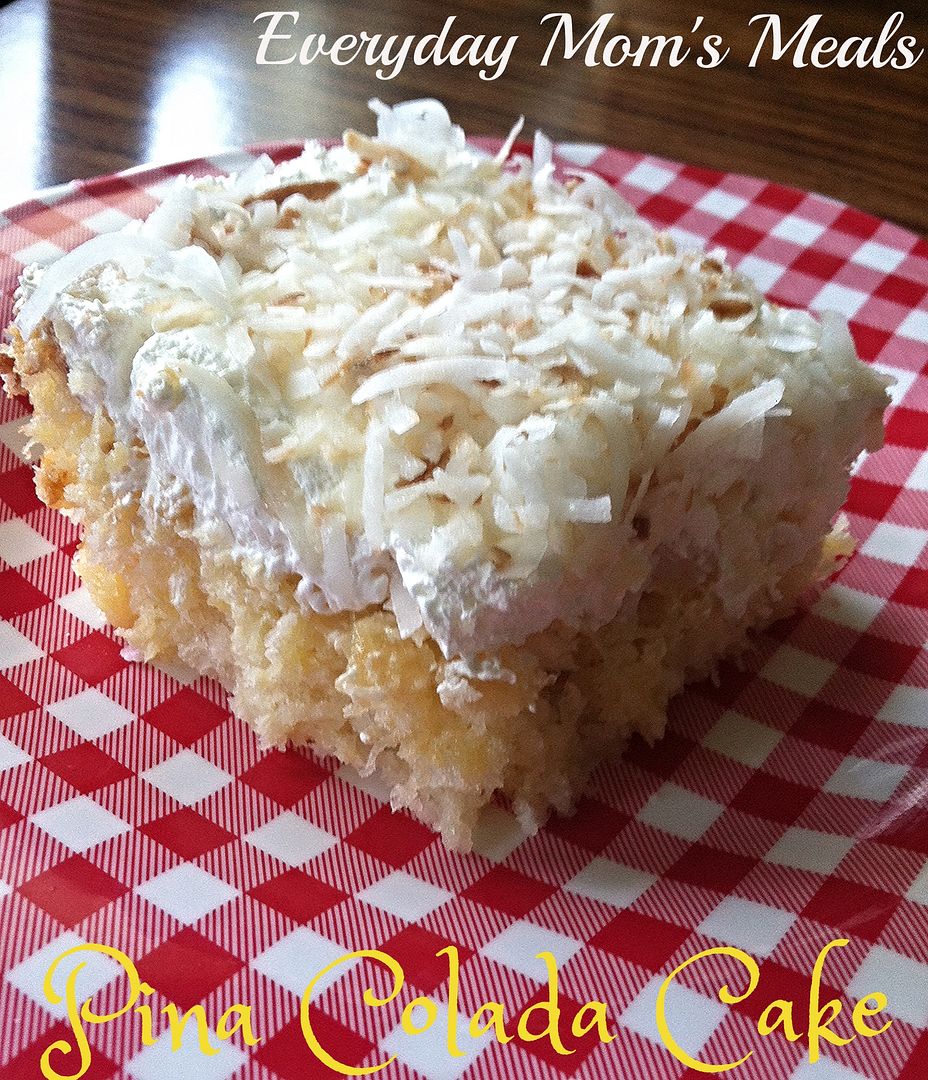
Luckily, this cake almost makes itself. Almost. Seriously though, if you can stir and pour, you can do this. Plus, it is prepared in a couple separate steps, so while it cools, you can be doing other things too. It is so moist, so sweet and bursting with those pina colada flavors I love so much. It's perfect for warm weather too, because it's delicious while still being light.

If you're looking for a sweet treat for your Memorial Day cookout, keep this one in mind. Your guests can enjoy some libation flavors with no straw required!

Pina Colada Cake
1 box angel food cake mix*
1 (20 oz.) can crushed pineapple, undrained
1 (12 oz.) tub Cool Whip
1 1/4 cups sweetened coconut, divided


Preheat oven to 350. In a large bowl combine cake mix and pineapple with juice. Mix well. Pour into an ungreased 9x13 baking pan. Bake for 30-40 minutes until toothpick comes out clean. Cool on a wire rack completely. When cool, sprinkle cake with 1/2 cup coconut. In a small skillet over low heat, toast other 3/4 cup coconut until browned on edges. Top cake with Cool Whip over coconut layer. Sprinkle top with toasted coconut. Chill until serving. Refrigerate leftovers. *NOTE* You will NOT add the other ingredients the cake mix calls for.


Shared on The Country Cook May 23, 2014

Wednesday, July 24, 2013

In Lieu Of Birthday Cake

For those of you who don't know, this past Sunday was Mr. Everyday's 39th birthday. We were lucky enough to have it land on the weekend, so I was able to plan a nice dinner for him, along with his parents, (little man was at Vacation Bible School) with some summer time favorites to treat him with. And to finish it off...nope not birthday cake...something even better (to him) a new raspberry pie recipe!

To me, everyone should get to have what they want for dessert on their birthday. For some, that is cake, every single year, but for others, we like to mix it up. One year I can remember asking my mom for her Peach Custard Pie. Another...I wanted pumpkin...and my birthday is in February. She was happy to oblige, after all it was my special day. Years later she had to laugh because my son requested her to make the same thing for his birthday...pumpkin pie...and his in in September. I can't say I blame him. Mom makes a pretty darn good pumpkin pie! 

The past few years, my choice as been a giant cookie cake. I'm sure you've seen the ones. The ginormous chocolate chip cookies that are frosted...oh Mylanta...they are so yummy! But for Mr. Everyday's special day, if I can include something with words raspberry pie, I know I will score major wife points! In fact, a few years ago, I attempted my very first raspberry pie from scratch for his birthday. Yeah...I got extra smooches that day! 

This year, my mom actually saved this recipe for me from the evening paper, because she knew her favorite son- in -law (yeah, he's the only one too) would flip for it. And flip for it he did...we all did. Myself, my in-laws and Alex all thought it was incredibly tasty! I'm not a huge raspberry fan, and even I was licking the spoon. Sweet, creamy, fruity... it hits all the right notes. Plus the crust...well, it's too good for words! 

I'm so happy I am able to use my love of the kitchen to treat my special guy to something extra special on his special day! If you have a raspberry lover in your house, they will adore you forever because of this pie. And when it's your birthday, don't forget to request exactly what you want for dessert...it's your right...seriously...I think it's in the constitution! Okay, maybe not, but it should be!

Raspberry Cream Pie with Coconut Crust Adapted from Dash Insert
1 (5.3 oz.) package shortbread cookies
2/3 c. packed sweetened coconut
1 stick butter, melted
3 (6 oz.) containers fresh raspberries, divided
1 (14 oz.) can sweetened condensed milk
3 large egg yolks, beaten
2 tsp. cornstarch
4 oz. cream cheese, at room temperature
Powdered Sugar

In a food processor, pulse cookies until finely ground. Add coconut and pulse to mix. Add butter. Pulse to mix (will resemble dough). Spoon into an 8-inch pie plate. Using fingers, press in bottom and up sides to form crust. Freeze for 15 minutes.

Place a fine mesh strainer over a small sauce pan. Press 1 container of the raspberries into strainer. Using the back of a wooden spoon, press them through, "juicing" them. You need approximately 1/3 cup of juice. Discard solids. Whisk juice, egg yolks, cornstarch and condensed milk. Cook over medium heat, stirring constantly, until it just starts to simmer, about 8 minutes. Remove from heat and transfer to a medium bowl. Using electric mixer, beat in cream cheese until smooth. Allow to cool 5 minutes. Poor into crust. Refrigerate at least 2 hours. Top with other 2 containers of raspberries and sprinkle with powdered sugar before serving. 


Shared on Lady Behind The Curtain July 24, 2013
Shared on The Country Cook July 26, 2013


Wednesday, October 31, 2012

Happy Halloween!!!

It's finally here! If your kids are anything like Monkey, and I think most are, the only countdown bigger than the one to today is the one coming up in about a month towards December 25th! Children everywhere are sitting in classrooms right now watching the minutes tick away just trying to contain themselves until they can get home, don their witches hats, pirate swords, superhero capes and princess tiaras. When Monkey gets home, he is convinced he needs to change right away, and trick or treating should start promptly at 3:45 pm. Well, our city council sees things differently and therefore made trick or treat hours from 6-8 pm, which means I have 2 hours to fill the void with some Halloween fun so I don't have to hear "Is it time yet?" every 5 minutes. So, I'm going to surprise him with these for a yummy, festive after school snack! I know he is going to think they are too cute and be surprised at what lies underneath. Hopefully these will lessen his urge to run out the door a little bit until that magical witching hour. From my family to yours, I wish you and your little ones a very "spook-tacular" and fun filled day!

~HappHalloween~

My Monkey as Captain America


Ghost Pops From Pinterest
1 banana, cut into thirds
1 (6 oz) container very vanilla yogurt
1 c. sweetened flaked coconut
Candy sticks
6 pieces of chocolate puff cereal

Spread each piece of banana with yogurt, coating liberally. Roll in coconut, pressing to adhere. Dip each piece of of cereal in yogurt and press into banana for eyes. Freeze for 1 hour to set.


Shared on Lady Behind The Curtain Oct. 31, 2012
Halloween at Very Good Recipes
Pin It

Tuesday, October 30, 2012

Candy Overload

On November 1st, parents across this country, from one coast to another, will all be dealing with the same problem. TOO MUCH candy! Little ones will bring it home by the bagful on Halloween night, and even after picking through and probably disposing of some, there will still more than enough to feed an entire army for months! Or, many of you might have a different kind of candy problem. You bought bag after bag to hand out to the little ghosts and goblins, but only a tenth of what you anticipated rang your doorbell. So, if you find yourself with one, or both, of these problems come Thursday morning, I've got a great resolution for you that is yummy and easy at the same time. Why not take some of those candy bars and turn them into another dessert? How about adding in some fruit so you can feel better about eating it? When I saw this idea I thought it was pretty ingenious, and not just because it contained my favorite candy bar of all time. And yes, before you ask, I'm the mom that when I go through my son's candy bag at the end of the night, is sure to sneak a couple for myself. Don't judge...you know you do it too! So if you find yourself very "candy happy" and want to use some of it in a new,unique way, this salad is just the answer!

Apple Candy Bar Salad 
1 (3.4 oz) box French vanilla instant pudding
3/4 c. milk
1 1/2 c. Cool Whip
2 large honeycrisp apples, cored and chopped into bite sized chunks
2 Snickers candy bars (regular size), chopped
1/2 c. coconut
1 small chocolate bar, optional

With a wire whisk, combine 1/2 of the pudding mix and milk. Whisk for 2 minutes and let rest for 2 minutes until soft set. Fold in Cool Whip and remaining pudding mix. Stir well to combine. Add apples and candy bars. Stir. Add coconut. Stir well. Using a lemon zester, grate chocolate over the to to garnish. Chill until serving.


Shared on Mandy's Recipe Box Oct. 30, 2012
Shared on Lady Behind The Curtain Oct. 31, 2012
Shared on Miz Helen's Country Cottage Nov. 1, 2012
Shared on The Country Cook Nov. 2, 2012

 
Mandy‘s Recipe Box
Featured On

 
Adapted from Taste of Home

Friday, June 29, 2012

More Alex In The Kitchen

I say it again and again, all of you ~ my loyal, loving and supporting foodie friends & fans~ are like my family. And since that's how I think of you I love sharing experiences I have in the kitchen with my "real" family, especially Alex. By now you know how much my little man loves to be in the kitchen, helping me and/or creating something yummy himself. While I'm sure someday he will be preparing entire meals alone and surprising us with them, for now, we try to keep it simple, with easy recipes that sometimes resemble "assembly" cooking as I like to put it. Maybe a little chopping, with help from a grown-up helper, but mostly stirring and layering. He has already shared with you two fruit salads, Lemon and Key Lime, that he loves to make, but mostly to eat! Today he has another dish to show you that while I've been making it for years, this past Spring, was his first attempt at it. We love this as a dessert, but it's one of those that many people also see as a side dish, especially during the holidays. For me it's a classic that never goes out of style, and is perfect for a summer picnic or buffet. It's one of those things that people love, but kinda forget about until they eat it again. You will hear them say "Oh yeah, Ambrosia. I love that stuff, but haven't had it for years." If you are looking for another reason to get your kids into the kitchen with you, or maybe need a rainy day activity this summer, this salad is the perfect way to get them "cooking" and feeling great about another culinary accomplishment!

Ambrosia Originally Contributed and Published for RecipeLion
1 1 ( 20oz.) can pineapple tidbits, drained well
1 1 (8 oz.) container Cool Whip, thawed
·  1 ( 15 oz.) can mandarin oranges, drained well
·  1 ( 10 oz.) jar maraschino cherries, drained well, reserve 2 for garnish
·  2 cups mini marshmallows
·  2 cups shredded sweetened coconut

In a large bowl, combine all fruit. Add coconut and marshmallows. Mix well. Carefully fold in Cool Whip. Top with extra cherries.Chill for at least an hour before serving.

Stirring Fruit


Adding Marshmallows

Ready To Eat


Shared on The Country Cook June 29, 2012
Fruit at Very Good Recipes
Pin It

Tuesday, June 5, 2012

Good-Bye First Grade

Back in August I had a very special Guest Blogger share a great recipe for Lemon Fruit Salad with you. That Guest Blogger? Why it was Monkey, of course, to celebrate his 1st day of 1st grade. Well, 180 days of school have passed, and my little man is now going to be a 2nd grader. That's right, today is the last day of school, and we couldn't be happier to finally see summer vacation! As far as him officially being in 2nd grade, well, I'm just going to ignore that until August~ denial is a wonderful thing.

So I thought having him back to share yet another yummy fruit salad recipe would be an awesome way to book-end the school year. Even though he reads at a 4th grade level, writes 10 page long stories, can do math that most kids his age can't touch, he is still my baby who loves to be in the kitchen with Mommy helping and making things he can call all his own!

You've grown up so much this year Monkey, and Daddy and I couldn't be more proud of what you've accomplished and the little person you are growing into each and every day. I love you!

Hi everyone! I am really excited to share this yummy recipe with you today. I think it's perfect for summer lunches, or even breakfasts. I love having fruit for breakfast when it's warm outside. Mommy and I go on picnics a lot too, and I want to take this on those too. If you have kids, they will really like the flavors and being able to help make it too! They can help layer the fruit, add the coconut and pour on the yogurt. If you have plastic knives they can even help slice some of the fruit. I hope you enjoy my recipe and have a wonderful summer! 

Key Lime Fruit Salad Adapted from Kraft
1 c. pineapple chunks, drained
3/4 c. fresh blueberries
1 c. fresh strawberries, sliced                                           
1 banana sliced
1 (6oz) container key lime yogurt
2 TBS key lime juice
1/2 c. sweetened coconut

In a small bowl combine banana slices and key lime juice. Set aside. In a large bowl layer fruit: pineapple, blueberries, strawberries, bananas. Pour yogurt over top of fruit. Sprinkle with 
coconut. 
Layering the fruit.
Adding yogurt.
Sprinkling with coconut.

Shared on Mandy's Recipe Box June 5, 2012
Shared on Chef in Training June 5, 2012 
Shared on Lady Behind The Curtain June 6, 2012 
Shared on Miz Helen's Country Cottage June 7, 2012 
Shared on The Country Cook June 8, 2012

Fruit at Very Good Recipes
Pin It