Everyday Mom's Meals: Green Onions
_____
Showing posts with label Green Onions. Show all posts

Sunday, January 2, 2022

20 Minute Side Dish and New Floors

 As of November, we have owned this house for 19 years. What started out as our "starter home" we would only be in for a few years, has become the place we've built our life. We came here as newlyweds after our honeymoon, where both of our boys came home from the hospital to, and the place Adam recovered after PE in both lungs almost took him from us 7 years ago. These four walls have seen countless birthdays, holiday celebrations, special moments, tears from sorrow...the list goes on and on. 

So why did we end up staying here so long? The simple answer is life. I could go deeper, but we will just leave it at that. But we are finally at a place where we can start to do some things we've wanted to for a very long time, as far as fixing things up a little goes. 

Back in September my dad, along with the hubby's help, laid new vinyl flooring down in our kitchen, forever covering the circa 1970's green linoleum. As I told someone, after almost two decades, I finally had a kitchen floor I loved. 

Then in November, just before Thanksgiving, it was the bathroom's turn. My dad spent a week replacing the tile flooring with beautiful vinyl plank wood; and it is beautiful! 

I can't tell you how much I love walking into both of these rooms now, not only because they are gorgeous, but because they are filled with love. They were truly a family project and I am so grateful dad could take the time and execute what I had dreamed of.

So what does new flooring have to do with this recipe? The day I tested this simple side dish, my dad was knee deep in flooring, trim and paint in the bathroom. I offered him some for lunch, and without any words I knew the dish was 100% successful. His eyes and noises as he chewed said it all. 

Take advantage of the frozen pierogies and this delicious side dish can be on your table in about 20 minutes! I served it with smoked sausage, but it would be so tasty with pork chops, ham, chicken, or burgers. 

Pierogies have quickly becomea favorite dish in our house, after I first started making them just a couple years ago. We love them as is, just sautéed in a little butter, in casseroles or finished off with yummy toppings like this dish.

These are inspired by what we all love on a loaded baked potato. Bacon. Cheese. Green onions. Did I mention bacon? Served with a little sour cream on the side and all the flavors are there!

Loaded Pierogies are not only a simple weeknight side dish, but you could absolutely put out a big platter of them at your next party or game day bash. The Super Bowl will be here before you know it and any football fan would love some pierogie nachos! 

My new flooring is beautiful and makes me smile daily. I share this story with you to show even if things take years to get done, keep working towards the goal. Don't lose sight. Try not to get discouraged. Sometimes the best things come to those who wait! 


Loaded Pierogi Skillet 

1 (16 oz.) box frozen cheese pierogi

1 cup shredded sharp cheddar cheese

1 (2.5 oz) bag real bacon bits

2 green onions chopped

2-3 TBS butter 

In a large skillet over melt butter over medium high heat. Saute pierogies in butter for 3-4 minutes on each side until golden brown. Sprinkle with cheese, bacon and onions. Cover. Reduce heat to low for 5 minutes until cheese begins to melt. Serve immediately.

Shared at Weekend Potluck


Sunday, May 6, 2018

My Asian Boys

No, I don't have children ya'll don't know about. I'm referring to my husband and oldest son. Well, and I guess with his love of all things rice, my baby too. They love Asian cuisine. I can't say much, so do I, but there is no doubt Mr. E could eat it every day and never tire of it. It is by far his favorite, and he has even mastered some dishes on his own that are, shall we say, exotic? 

With warmer weather here, and the hot summer just around the corner, (YAY!!!) our menu is adjusting accordingly. We are those people who like lighter meals on hot days, and even things that aren't necessarily hot when eaten. A lot of salads, fresh veggies and fruit, cold meat sandwiches, etc. are what we live on during the summer. 

There is no doubt this will be showing up on our dinner table over and over this year. Sure, it has cooked components, but it is served cold, but is still super filling. It would be a terrific take along to that neighbor's barbecue, a light supper like we had, or lunches all week long.

Don't let the number of steps or ingredients intimidate you. Everything can be found at your regular grocery store (I'm talking Aldi, Kroger and Walmart where I shop) and a couple of the steps you can actually do ahead of time to save precious minutes at supper time. 

Oh, and if you want to leave the chicken out, no problem! You could even add more veggies instead. I think mushrooms would be delicious! 

I'm so thankful grilling, mowing, play all day, sunscreen and extra baths season is here. We waited so long! Plus, we get to eat some yummy things too!

Sesame Noodle Salad
1 lb. spaghetti
1 lb. boneless chicken thighs
1 (8 oz.) can sliced water chestnuts, drained
1 lb. tri-color coleslaw mix
2 green onions, chopped
1 cup chow mein noodles, extra for garnish
Garlic Powder, to taste
Salt and Pepper to taste 
Vegetable Oil

Dressing
1/2 c. sugar
3/4 c. soy sauce
2 TBS sesame seeds
1/4 tsp. allspice
1/4 c. rice wine vinegar
1/2 c. vegetable oil
3 TBS sesame oil

Preheat oven to 350. Spray a baking sheet with nonstick spray.  Lay chicken on sheet, baste with vegetable oil. Season with garlic powder, salt and pepper. Roast for 30 minutes until juices run clear. Remove to plate and allow to cool. When cooled, chop into bite sized pieces.
For dressing, combine sugar, soy sauce, sesame seeds, allspice and vinegar in a glass jar. Shake well for 2 minutes. Add both oils. Shake for 3 minutes more. Chill at least 2 hours. 

When ready to assemble salad, cook spaghetti until al dente. Rinse with cold water and drain well. In a large bowl combine pasta, chicken, coleslaw, water chestnuts and chow mein noodles. Mix well. Pour dressing over and mix again. Garnish with green onions and extra chow mein noodles. 
*NOTE* The chicken can be made the night before or earlier in the day. Just keep it in the fridge until you're ready to use. I made the chicken and dressing in the morning and chilled until supper time. If you want to make the salad and take it somewhere, add the chow mein noodles right before serving. 


Shared at Weekend Potluck

Inspired by Lil' Luna 


Tuesday, February 20, 2018

Be Adventerous

Before my husband came long, I wasn't the adventurous eater I am today. I was always a good eater, mom and dad made sure of that, but I just didn't have the opportunity to try so many new things until Adam shared them with me. He loved all different cuisines and forced me to try things I had never dreamt of. And for the most part, I discovered I loved them too. Sushi, Calamari, Raw Tuna, just to name a few. Oh, and of course Korean food, which is where today's recipe comes in.

We have this little Korean restaurant here in town, a little "hole in the wall" if you will, and the first time he took me there I was not impressed. That will teach me not to judge a book by its cover! I had NO idea what to order, but he guided me to something he was pretty sure he knew I would love, and he was right! 

If you've never had Bibimbap, it literally means "mixed rice." It is this huge rice, meat, veggie mixture, and then...here is my favorite part...it has an ooey gooey fried egg served on top. Why? Because the minute you cut into it, the warm yolk covers everything making it's own sauce. I know it might sound weird, but you have to take my word for it...one bite and you will be hooked. 

Every time we go, I order the same thing, savor each and every bite and am always sad when it's gone. So it was about time I made a version at home we could enjoy any time. 

You can easily adapt this to include veggies you love, these are what I had on hand. You can also add some sriracha or garlic chili paste if you like it hot! 
And don't get overwhelmed! It really isn't a complicated recipe, it just has a lot of steps. But you can prep the veggies, and even pre-cook the rice too! Then all you have to worry about is the beef and frying up some eggs. Just take your time and take it one step at a time. No lie- I made this on a Monday night, with 1 hour until dinner had to be ready for Alex to eat before Tae Kwon Do, and Max was at my feet the whole time! My point? If I can do it, YOU can too! 
If you aren't a very adventurous eater, or maybe your kids won't touch anything that isn't a chicken nugget or hot dog, I urge you to start small. Try something like this that has things that are familiar, and then go from there!

Korean Beef Bowl
2 lbs. ground beef
6 garlic cloves, minced or grated
1/2 c. packed brown sugar
1/2 c. low sodium soy sauce
4 tsp. sesame oil
1/2 tsp. ground ginger
1/4-1/2 tsp. crushed red pepper flakes
Black Pepper to taste
1 medium cucumber, sliced thin
3 medium carrots, grated*
1 bunch green onions, chopped*
6 cups cooked white rice*
4 eggs, cooked over easy or sunny side up
Sesame Seeds for garnish 

Prep ALL veggies, and set aside. In a large skillet brown beef with garlic until no longer pink. Drain well, return to skillet.  In a medium bowl whisk together brown sugar, soy sauce, sesame oil, ginger, red pepper and black pepper. Pour over beef. Bring to a boil. Reduce heat to low and simmer about 5 minutes until sauce reduces a little. To assemble, place rice in bottom of bowl. Top with beef, cucumber, carrots and green onions. Place 1 cooked egg on each bowl. Sprinkle with sesame seeds. *NOTES* When grating carrots, use the large hole on a box grater. You only want the dark green parts of the green onions. Don't stress over using "fancy" rice. Save yourself some time and energy and use minute rice! Brown can be substituted too. 


Inspired by The Recipe Critic  

 Shared at Weekend Potluck
Shared at Meal Plan Monday

Monday, May 2, 2016

Mother's Day Cookout


Yes, if you haven't been paying attention to the calendar, we are now only 6 days away from Mother's Day. (For you guys out there, I know what you're thinking..."Oh good, I've still got 5 more days to shop!") But some of us are already planning how we will treat mom to a special day; and for many of us, that will include a meal!

If we are lucky here in Indiana, and the weather cooperates, we will actually be having a cookout with my parents to celebrate the day. With this being the first Mother's Day my mom is without hers (Grandma passed away back in March) we wanted to make sure mom has an extra happy day with all of us around.

What type of meal are you planning for Sunday? If it includes any type of grilling out, or barbecuing, have I got a treat for you. Mom love tater salad? Well then, have I got a treat for her!

This was actually a recipe I came up with for my little guy. He LOVES loaded mashed potatoes, and had been asking me to make them for weeks. But to be honest, I'm in total "summer time" foods mode. All I can think about are dishes that show up more when it's warm out. I don't care if the weather hasn't been cooperating, it is what my taste buds are craving.

So, simple solution. Take all the same flavors and put them into a backyard barbecue, picnic in the park, cookout take along, friendly potato salad. After all, potatoes, cheese, onions and bacon are going to be mouth watering delicious any way you serve them!

Rather you're looking for some side dishes for mom's special day, or planning ahead for those graduation parties and family reunions this summer, this will definitely be one you want to keep in mind!

Loaded Potato Salad
7 medium Yukon gold potatoes, peeled and cubed
1 lb. bacon, cooked crispy and chopped, reserve a little for garnish
3 large green onions, chopped
1 c. shredded sharp cheddar cheese, reserve a little for garnish
3/4 c. sour cream
6 TBS mayo
Salt and Pepper to taste
Dried Chives, for garnish

In a large pot, cover potatoes with cold water. Bring to a boil and cook until just fork tender. Drain and rinse with cold water. Set in fridge until completely cool. Mix potatoes, bacon, green onions and cheese in a large bowl. In a medium bowl stir together sour cream, mayo, salt and pepper.  Pour over potato mixture and mix well. Garnish with extra cheese, bacon and chives. Chill at least 2 hours before serving. 


Wednesday, November 11, 2015

New Cookbook

My cookbook collection is becoming a little bit out of control. I barley have enough room to fit anymore into the spot where I keep them. But you know what? That doesn't stop me from buying them! I can't help it. I love a good novel, and to me a terrific cookbook is just as exciting to dive into.

The latest one I brought home, (My $1.99 steal at Ollie's, I might add...) happened to be laying out a couple weeks ago where the boy found it. I came into the room and found him turning the pages, and could see the wheels in his head spinning.

"Mommy, I found a few recipes that sound yummy. Can I mark the pages so you can find them and make them?" Now, how could I refuse that request? "Sure, you pick some out. What one do you want me to start with?"

Well, that was an easy choice. Anything that has the words "pizza" and "burger" in the same title is going to get his attention. But here is the funniest part, he took the original recipe and totally made it his own! "Mommy, we will add this and this, and a little of that..."

Here is his final creation. We served with one of our favorite pizza toppings on top, green olives. But feel free to add your own. Don't groove on mushrooms? That's okay. Maybe add some green peppers instead. Believe me, we did so much adaption, you could too! These would be great for a crowd...maybe those holiday house guests that will be "checking in" before you know it!

What was the last new cookbook you bought? Please share, it might be one I don't have yet!

Crock Pot Pizza Burgers
1 lb. ground beef
 1 (4 oz.) can mushrooms pieces and stems
1 (10 3/4 oz.) can cream of mushroom soup
1 (8 oz.) jar pizza sauce
1 tsp. garlic powder
1 tsp. onion powder
1 tsp. dried basil
1 tsp. dried oregano
1 c. shredded Colby Jack cheese
1/4 c. grated Parmesan cheese, plus more for top
Sliced Green Olives
Buns
Salt and Pepper, to taste

Brown beef  in a large skillet until no pink. Drain if necessary. In bottom of Crock Pot, combine pizza sauce and soup. Add beef. Add seasonings and cheeses. Stir to combine. Cook on LOW for 2 hours. Serve on buns with extra Parmesan and olives.


Shared at Weekend Potluck

Friday, October 9, 2015

Anything Stuffed Is More Fun

So many parents email me and ask how they can get their kids to eat more and be less picky when it comes supper time. As many of you know I have the world's most non-picky eater living in my house, but that doesn't mean I can't empathize and try to help these desperate mom and dads in any way I can.

One thing I've learned about kids is if you can find a way to combine two of their favorite dishes they do eat into one, new meal, you will be a rock star. Pizza Grilled Cheese. Chili Pasta. You gee idea. It's a sure fire way to know they will eat something new, because it is actually two old stand bys.

Another way to ensure kids will run to the supper table is to add the word "stuffed" to anything. For whatever reason, stuffed not only means fun but also yum!

And now I have a dish for you that takes both of these tips into a delicious one. Kids love tacos. Kids love potatoes. Kids love stuffed anything. May I introduce you to taco spuds. Yep, all the taco fixins you love stuffed inside a fluffy baked potato.

These make a terrific simple supper, or serve them "bar" style at your next party! Either way, your kids are going to flip for them!

Taco Spuds
1 lb. ground beef
4 large potatoes, baked
1 packet taco seasoning
2/3 c. water
Diced Tomatoes
Diced Green Onions
Shredded Taco Cheese
Other toppings
Salt and Pepper to taste

In a large skillet skillet brown beef. Season with salt and pepper. Drain if necessary. Add taco seasoning and water. Stir to combine. Bring to a boil. Reduce heat and simmer until slightly thickened. Cut potatoes open and gently squeeze to make opening. Fill with taco meat and add desired toppings.


Shared at Weekend Potluck

Friday, July 31, 2015

Not So Cheap

About 3 years ago, Qdoba came to Fort Wayne. I don't know if I had ever heard of them before that, but being Mexican food, we were certainly happy to have another option, since it's one of our favorites. Oh, and it didn't hurt that Mr. E. actually won FREE meals for a year at their grand opening!

Yep, for an entire year, the three of us could go in there and have a delicious meal, absolutely free. And being at a time when money was a little tight, we were especially grateful for the treat.

But after the year was up, I have to admit our visits became less and less frequent to the point I can't tell you the last time we ate there. Believe me, it's not that we don't still love the food, but the first time we went in and got the same meals we had been getting for free, and had to pay for them we realized just how not so cheap it was. I'm not dissing them in anyway. They have fresh ingredients, delicious food, and ask a fair price. But for a family of 3, I paid about the same as I do for a sit down meal, with a server...and they are a little closer to the fast food category in my opinion, which is totally fine, but if I'm paying that money, I kinda don't want to have to get my won drink. You know what I'm saying?

So a couple weeks ago and when Little Man and I started talking about how badly we were craving one of their burrito bowls, I decided it was time to try to recreate them at home. But instead of doing them individually on an assembly line like they do in the restaurant, I figured why not make a big one. In one pot. Easy peasy.

I adore one pot meals, and I know so many of you do too. Especially with back to school time upon us, those simple meals that can be on the table in about 30 minutes are crucial to moms (and dads) every where not pulling our hair out.

Add your favorite ingredients to this to really make it your own. I think corn would be delicious, and maybe even some hot peppers for those who like it spicy.

I love going out to eat, and when we do, I still want to stay on budget and get the most bang for our buck. So when places have to get scratched off the "to go" list, at least I can recreate our favorites at home.

Chicken Burrito Skillet
Inspired by no. 2 pencil
2 boneless chicken breasts (about 1 lb.) cubed
3 TBS olive oil, divided
1 (15 oz.) can black beans, rinsed and drained
1 (14 oz.) can diced tomatoes, drained
1 c. extra long grain rice
1/2 tsp. garlic powder
1/2 tsp. onion powder
1/2 tsp. chili powder
1 tsp. cumin
2 1/2 c. chicken broth
2 c. shredded taco blend cheese
1 medium tomato, seeded and diced
3 green onions, chopped
Salt and Pepper to taste

Additional Topping Ideas:
Sour Cream
Taco Sauce
Green Chilies
Pickled Jalapenos
Diced Avocado

In a large skillet, heat 2 TBS oil over medium high heat. Season chicken with salt and pepper. Add to hot oil. Cook for about 5-7 minutes until browned on all sides. Move chicken to sides of pan. Add other TBS of oil and allow to come to temp. Add rice, cook and stir for about 2 minutes until just beginning to brown on edges. Stir in chicken broth, beans, tomatoes, and seasonings. Mix well. Bring to a boil. Reduce heat to low, cover and cook for about 20 minutes until rice is tender and liquid has been absorbed. Stir occasionally while cooking. Remove from heat, sprinkle with cheese, cover again and place on warm setting until cheese melts. Garnish with chopped tomatoes and green onions.


Friday, June 26, 2015

Summer Time Boats

Did that title immediately take you to the lake, nice and cool, and yourself riding in a big boat, the wind in your hair? Well...I'm actually talking about a different kind of summer time boat, but I guarantee you, you'll like them!

I'm kind of addicted to finding things to put in lettuce leaves. I think we've discussed this recently. I'm always looking for new dishes, or transforming old ones, so they can be served in their own little "boat" of lettuce. It's fun, healthy and totally hands friendly for all those cookouts and parties popping up this time of year.

I love a good Cobb salad. Especially a California Cobb, with the added avocado. But I I know from when I worked as a waitress, not everyone grooves on all the regular components of a Cobb. I remember these business ladies that would come in for lunch every week, and in the group of 4, not one of them ordered the salad as is. They each had something they wanted left off. And that's fine... to each their own. But I bring it up, because that's where these might be a better option. Set out all the "fixin's" so to speak, and let everyone build their own!

If you're planning a big Independence Day picnic or maybe a day at the lake, these would be a great take along! Simply pack everything up in separate containers and then assemble on site for your eating pleasure!

Boats and summer time go hand in hand, and now they can also go from hand to stomach too!

Cobb Salad Boats
1 1/2 lbs. boneless chicken thighs
Olive Oil
Salt and Pepper to taste
Garlic Powder to taste
3 hearts of Romain, leaves separated
1 pint cherry tomatoes, halved
4 oz. blue cheese crumbles
1 bunch of green onions, chopped, dark greens only
1/2 lb. bacon, cooked crisp and chopped
6 hard boiled eggs, chopped
1 avocado
1 tsp. lemon juice
Favorite dressing

Preheat oven to 350. Drizzle chicken with olive oil and season with salt, pepper and garlic powder. Roast for 30 minutes. Allow to cool and chop. In a small bowl combine avocado, lemon juice and a pinch of salt. Mash until mixed well. To build boats, spoon some avocado mixture into bottom of lettuce leaves. This will act as a barrier and "glue" for the other ingredients. Add other desired toppings. Serve with dressing on the side.


Wednesday, June 10, 2015

Any Reason For Cheese

So this recipe is basically just a vessel to bring more cheese to your life. It's kind of like frosting for me. See, I like cake. But I LOVE frosting, and if the cake wasn't there, I wouldn't be upset. It's simply a vessel to get the frosting in my mouth. And this recipe is kinda like that, but with nacho cheese!

When I found this recipe for homemade nacho cheese sauce, scribbled on a piece of scrap paper, hiding in the back of my recipe box, I couldn't believe I hadn't tried it yet. I can't even tell you where I first got it, but since the paper had started to yellow it was so old, I know it was forever ago.

So I had this amazing cheese recipe I wanted to try; and sure, I could have simply served it up with some tortilla chips for dipping, but I wanted more. To do something with it extra special, extra yummy. Then the light bulb went off. Why not drizzle it over some thick cut steak fries, add some toppings and dig in??!!

I served these as a side dish for some juicy burgers hot off the grill, but I think they would be a huge hit at your next party or cookout if you served them up "nacho" style. Lay them out on a big platter, add all the toppings, and watch your guests gobble them up! And one of the great things about this sauce? As long as you keep it warm, it will stay creamy. Keep in on the stove on warm, or put it in your Crock Pot-- either way, your guests can enjoy it for hours.

We are cheese lovers, and obviously will do anything for any reason to be able to eat it. But truthfully, this delicious sauce really would be yummy with some tortilla chips on the side too.

Loaded Steak Fries
1 (32 oz.) package frozen steak fries, or homemade
Chopped green onions
Real Bacon Bits
French Fry Seasoning, to taste

Homemade Nacho Cheese Sauce
2 TBS butter
2 TBS flour
1 c. milk
1 ( 8 oz.) block sharp cheddar cheese, grated
1/4-1/2 tsp. hot sauce, to taste
Salt to taste

Cook steak fries according to package directions. Add 5-7 minutes of cooking time, under the broiler to brown and crisp. In a large non stick skillet, melt butter over low heat. Add flour and whisk until light blonde roux. Slowly add milk, whisking constantly. Increase heat to high and bring to a boil. Immediately reduce heat to low and stir until thickened. Add salt and hot sauce. Whisk to combine. Add cheese in batches, whisking between each until smooth. Keep over warm until fries are cooked. Once fries done, sprinkle with french fry seasoning. Transfer to a platter, drizzle with cheese sauce and sprinkle with green onions and bacon bits.  *NOTE* French Fry Seasoning is a blend you can find on the spice aisle. If you can't find it, seasoning salt or an all purpose seasoning would work too.


Shared at Weekend Potluck

Friday, May 29, 2015

Sunday Dinner at Grandma's Day 2 {A Gooseberry Patch Review & Giveaway}

If you didn't catch the first recipe I featured from Gooseberry Patch's new book on Wednesday, be sure to click here to see a yummy goulash your family is sure to love!

Today's dish was actually something I've been looking for a great recipe for quite some time now; but I could never find one "just right." Nothing exactly what I was looking for. Exactly what I had in mind. I was actually working on taking a bit from several different ones to make my own when this book came in the mail; and there it was! Like kismet! Fate!

I served this for supper on a chilly night (Yes, chilly in May. It was pathetic.) and it was so comforting! I think it would also make a fantastic Sunday brunch dish too. In fact, add some fresh fruit on the side and no matter what time of day you serve it, it's a meal! With potatoes, ham and cheese, it's an all-in-one casserole they whole family will devour! Think hash brown casserole on steroids! More cheese. Meat. Did I mention more cheese?

Sunday dinners at Grandma's are a tradition so many families enjoy and treasure. And now we have an entire book filled with fantastic, tasty recipes to try at our next one! Don't forget, you can win a copy of this great cookbook for yourself! Just click here for details!

Cheesy Ham and Potato Casserole 
Submitted by Tricia Roberson King George, VA Found on pg. 143
1 (32 oz.) bag frozen diced potatoes
1 lb. ham, chopped
2 green onions, chopped
1 (10 3/4 oz.) can cream of potato soup
1 (10 3/4 oz.) can cream of celery soup
1 c. milk
1 (8 oz.) container sour cream
2 c. shredded sharp cheddar cheese, divided
Salt and Pepper to taste

Preheat oven to 350. Grease a 9 x 13 baking dish. In a large bowl, combine all ingredients, except 1 c. cheese. Mix well to combine. Turn out into prepared dish. Bake uncovered for 1 hour. Sprinkle top with reserved cheese. Bake 30 additional minutes. Allow to stand for a few minutes before serving. *NOTE* I added a little dried parsley on top for some color.


Shared on The Country Cook May 29, 2015

Wednesday, May 20, 2015

Those Hot Summer Nights

It won't be long before all those folks that were just complaining about snow and freezing temps a few months ago are now whining it's too hot and they are melting. But not me. Nope. I refuse to complain about the heat. Even though I am hot blooded by nature and sweat like a Democrat at at GOP party, you will never hear me say it's too hot, or  wish it could cool down. However, I do have to find ways around the heat when I can.

When the temps get to a point where at dinner time, it's still 98 degrees with 110% humidity, nobody in our house wants to eat. A common phrase you will hear in our house during the summer is "It's just too hot to eat right now." But that's not a complaint. It's an observation. So many nights during those dog days supper gets postponed until later in the evening; which is fine, but means we need something a little lighter. One because who wants really heavy food when it's so hot and two, because we don't want a huge meal only a couple hours before bedtime.

When those nights hit, I turn to things like salads and lettuce wraps...a lot. They fill us up, are cool, refreshing and satisfying, but still light too. These are sure to make an appearance on our summer time dinner table again and again. They are so easy to make, have amazing flavor and put some of our favorites things into one hands friendly dish. Oh, and if you're having a party, your guests would go ga-ga for these too! Plus they can be super budget friendly, stretching both seafood and veggies a long way!

I can't wait until it's so hot outside. It's my favorite time of year. I love being in the sunshine, or laying in the pool, or enjoying the heat from inside my nice and cool air conditioned house!

Spicy Shrimp and Noodle Lettuce Wraps
1 (12 oz.) bag small frozen shrimp (deveined and tail off), thawed
2 TBS sriracha sauce
2 TBS olive oil
4 large garlic cloves, minced
Salt to taste
1 package Pork Ramen Noodles
Green Leaf Lettuce, cleaned and separated
1 red bell pepper, diced
3 large carrots, julienned
3 green onions, chopped
4 large radishes, thinly sliced
2-3 TBS soy sauce

In a large plastic storage bag, combine shrimp, sriracha, oil, garlic and salt. Toss to combine. Chill in fridge for several hours before cooking. Cook Ramen noodles according to package directions, drain and allow to cool. Once cool, mix with soy sauce in medium bowl and stir to separate noodles. Set aside. Heat a large skillet over high heat. Add shrimp and cook on both sides, until golden brown, about 5-7 minutes.To build wraps, place some Ramen noodles on lettuce leaf. Add veggies and then shrimp. Serve with extra sriracha and soy on side.


Shared on The Country Cook May 22, 2015

Friday, May 15, 2015

Simple As 1-2-3

Do you have a preference for which type of rice you use? I guess I should word that differently. Do you prefer to use "regular" rice or instant when you cook? For me, it really depends on the recipe. I will use whichever makes the dish the best it can be.

It might shock you to learn just how many questions I get on the subject. When I write a recipe I am always sure to list the specific kind of rice I used when I tested it. Now, that doesn't mean folks aren't welcome to use whichever they are most comfortable with, or happen to have on hand, but I can't guarantee results if substituted. But the #1 question I get asked when I post a dish using rice is "How do I cook non-instant rice?" It's such a convenient item, many have never bought a bag of "real" rice and simply don't know how to prepare it. So, I'm here today with an easy trick to remember how, and a tasty recipe to go with it.

Cooking rice is as simple as 1-2-3. And not, I'm not just being cute. It's a simple way to remember the method in which you use. 1 Cup of Rice Boiled in 2 Cups of Liquid= 3 Cups Cooked Rice. See how easy that is. Oh, and that liquid? It can be water, broth, stock, a combo of both...it doesn't matter, as long as it is 2 cups. Now even if you have always used the instant, you can easily remember how to work with the other stuff too.

Some of you might be asking why even bother? Well, bagged rice is one of the best economical options at your grocery store. A bag of long grain rice will run you about the same as a box of instant (or at least it does at my store) and last forever! Okay, maybe not that long, but you certainly get more product for your money.

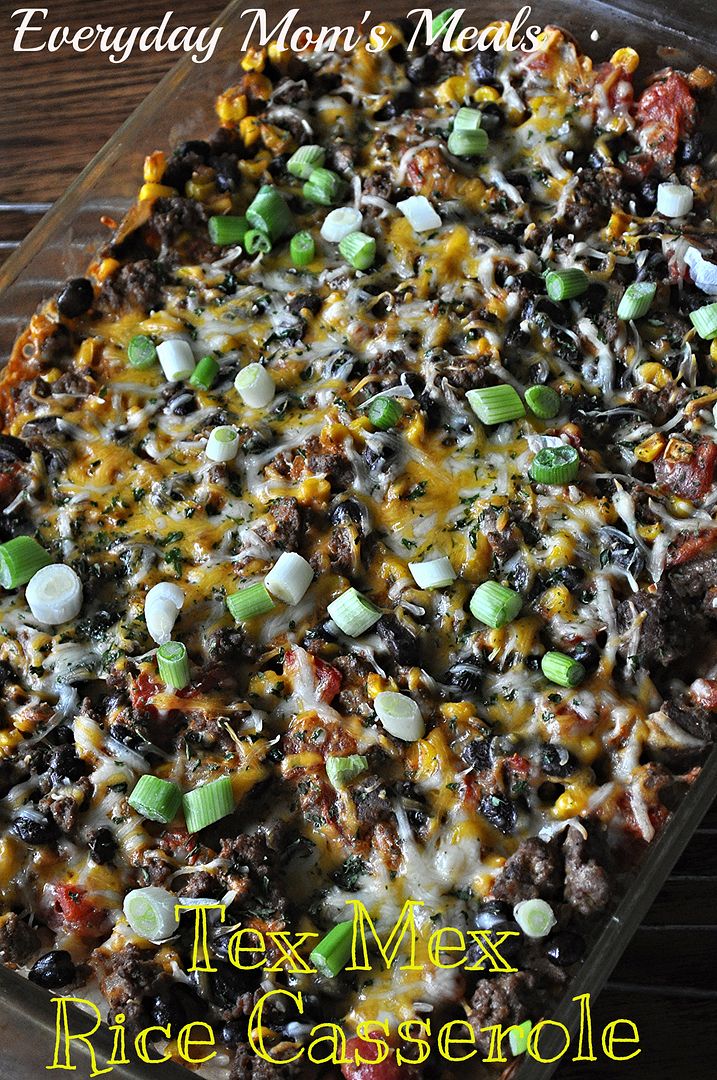
To demonstrate my little trick, I needed a recipe to go along with it. This casserole is sure to become a favorite in your house, just like mine. Rice, meat, veggies, a Tex-Mex flavor...it's got a little bit of everything to satisfy everyone!

When it comes to rice, if you haven't cooked with the real stuff, I encourage you to try. And if you run into a pickle, think 1-2-3...and I'm sure it will be a huge success!

Tex Mex Rice Casserole
1 lb. ground beef
1 c. long grain white rice
2 c. water
2 beef bouillon cubes
1 (15 oz.) black beans, rinsed and drained
1/2 c. frozen corn, thawed
1 (14 1/2 oz.) can diced tomatoes
1 packet taco seasoning
8 oz. cream cheese, softened
1 c. shredded Monterrey Jack cheese
1 small white onion, chopped
5 green onions, chopped, whites and light green only
Salt and Pepper to taste

Preheat oven to 350. Grease a 9 x 13 baking dish. In a small pot, bring water and bouillon cubes to a boil. Add rice. Bring back to a boil. Reduce heat to low, cover and cook 15 minutes, stirring often, until liquid is absorbed. In a large skillet, brown ground beef and white onion, seasoned with salt and pepper, until no longer pink. Drain if necessary. In a small bowl combine cream cheese and taco seasoning. Add tomatoes, black beans, corn and cream cheese mixture to beef. Stir and cook until cheese melts and mixture is slightly thickened. In bottom of prepared dish, mix cooked rice and 1/2 c. shredded cheese. Top with meat mixture and sprinkle with other 1/2 c. cheese. Bake for 30 minutes until bubbly and heated through. Garnish with green onions. 


Shared on The Country Cook May 15, 2015

Monday, April 20, 2015

Less Carbs, Extra Protein

So, ya'll know how much I love pasta. We don't need to discuss this again. But here is the latest update. Did you know a pasta addiction is genetically transferable? Yep, it can go from parental DNA to offspring; and  apparently it's located on the X chromosome because I have passed this obsession onto my son.

I've known for some time he loves his pasta...since about the age of 1 in fact, but I guess I never realized just how much until recently. Any time I ask him what he's hungry for me to make (when planning my menu), 9 times out of 10 he will answer with some sort of pasta. When we let him pick what restaurant to eat it, many times it's our favorite Italian place. When he comes home from school and asks "What's for supper" if I answer with pasta...he doesn't ask for a snack because he wants to save room. And if I tell him I've got a new casserole in the oven his first reaction is "What kind?" to try to see if it includes some sort of noodle.

Yeah...he's my kid. No doubt about it. (Not that there ever was.) But I'm not going to let him eat his favorite as much as he would like. After all, it's hard enough to keep him in clothes that fit, I don't need to have a carb overload make it even harder. So I need to find ways to give him what he loves, just in smaller quantities; and this casserole is the perfect solution!

Only a half pound of pasta to feed a family? Yep! How? By adding so many other things it takes that 8 ounces of pasta and bulks it up to a filling, delicious meal. Plus, some extra protein thrown in with meat and beans. He gets what he wants, and I can feel good about it.

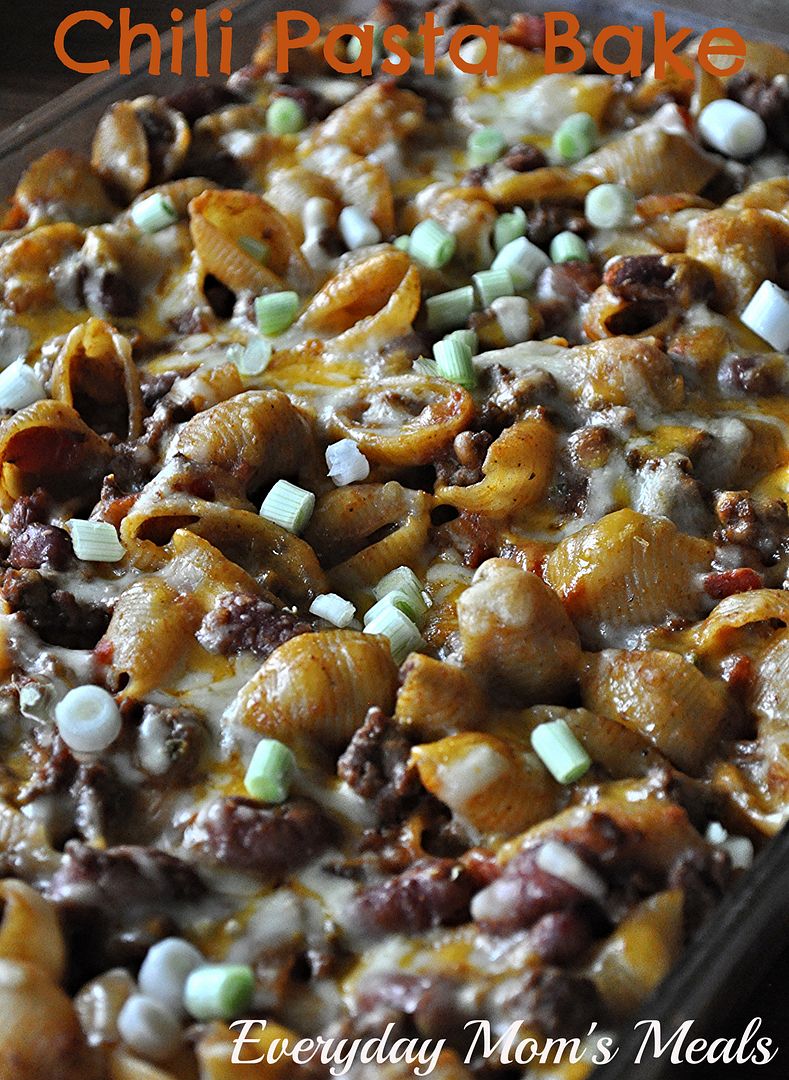
My boys don't eat chili without some pasta on the bottom of the bowl, so this was like a hearty bowl of chili in casserole form. If you are worried about spice level with the cumin and chili powder, don't be. It tastes like it has a packet of taco seasoning in it, with the same heat level. Just a little extra from the green chilies to wake up your taste buds.

If you have little pasta lovers in your house too, give the people what they want. Just do it in a more sneaky way, remembering less is more! 

Chili Pasta Bake
1/2 lb. small shell pasta, cooked and drained well 
1 lb. ground beef
1 medium white onion, chopped
1/2 TBS vegetable oil
1 (14 oz.) can petite diced tomatoes with green chilies, with juice
`1 (15 oz.) can tomato sauce
1 ( 15 oz.) can light red kidney beans, rinsed and drained
2 tsp. cumin
1 1/2 TBS chili powder
1 tsp. garlic powder
1 bunch green onions, chopped
2 c. fiesta blend shredded cheese, divided
Salt and Pepper to taste

Preheat oven to 350. In a large skillet heat oil over medium heat. Add onion and saute until soft. Add ground beef and cook until no pink. Drain if necessary. Add garlic powder, cumin, chili powder, salt and pepper. Stir in tomato sauce, diced tomatoes and kidney beans. Mix to combine. Bring to a boil. Reduce heat to low and cook for 10 minutes. When pasta is drained, add it to meat mixture. Add 1 c. cheese and stir well. Transfer to a greased 9 x 13 baking dish. Bake for 30 minutes. Sprinkle with green onions before serving. 


Shared on The Country Cook April 24, 2015

Monday, February 23, 2015

A Twist On Mexican Night

Do you love making Mexican food at home? Yeah, me too. Do you find yourself falling into a little bit of rut with what you make? Yeah, me too. Tacos, burritos, enchiladas....they seem to get into a rotation at our house, and I have to remind myself to switch things up now and again.

Back at the beginning of the month, the night of the Super Bowl in fact, we were getting dumped on with a foot of snow. Yep, over 12 inches in 24 hours. Needless to say, any plans we had to go to a big game day party were put on hold due to treacherous roads.

So, we were at home, just the three of us, watching the game, and I promised little man I would still make it fun for him since he was bummed we couldn't go anywhere. Well, one way I can usually put a smile on his face is something yummy to eat, especially with a Mexican flare! Add in the fact that it has crushed Doritos on top and I'm going to score extra Mommy points!

However, this night I didn't want to put too much effort into supper. After all, it was supposed to be a party night for me too, and while I was taking some snacks to share, I was going to be off full kitchen duty, so in a way I was kind of protesting cooking a big meal. What to do? Find a way to give him his Mexican meal, in a simple to make casserole! Done!

This is a great weeknight meal, potluck take-a-long, or party food. It's going to feed a crowd, taste great, and oh, be totally budget friendly too!

Don't fall into a rut when comes to Mexican night at home, Switch it up. Put a twist on it. Give them something new, but with so many familiar flavors they will gobble it down! 

Nacho Grande Casserole
2 lbs. ground beef
1 medium white onion, chopped
1 packet taco seasoning
2 (15 oz.) cans chili beans, mild or spicy, undrained
1 (15 oz.) can tomato sauce
16 oz. frozen corn, thawed
3 c. shredded Monterrey Jack cheese, divided 
3 Roma tomatoes, seeded and chopped
1 bunch green onions, finely chopped
1 1/2 c. Doritos, crushed
Salt and Pepper to taste

Preheat oven to 350. Lightly grease a 9 x 13 pan. In a large skillet brown beef and onion until no longer pink. Season with salt and pepper. Drain if necessary. Add chili beans, corn, tomato sauce and taco seasoning. Stir well to combine. Reduce heat to low and simmer for about 10 minutes. Add 1/2 ground beef mixture to bottom of dish. Top with half the cheese. Repeat layers. Top with crushed chips. Bake for 30 minutes until hot and bubbly. Top with tomatoes and green onions before serving.


Wednesday, January 28, 2015

Just A Little Extra Effort

Welcome to day two of what appears to be Super Bowl week on EMM. I didn't plan it that way, but after I shared the Mini Enchilada Cups Monday, it only seemed natural to share the side dish I served with them, and then I realized both would be perfect for any Super Bowl party, so a theme was created.

If you serve refried beans at home, let me ask you this. Do you enhance them in any way, or do you simple take out of the can and heat up? Don't feel bad if you fall into the second category. That's where I usually hang out too. You can buy so many varieties that come pre-seasoned, why not! Well, this recipe is why not!

A friend gave me this a while back, and I'm so happy she did! Seriously, these take maybe an extra 10 minutes of prep time and taste oh so yummy!! Truly like something you find at your favorite Mexican restaurant.

If you saw the recipe on Monday, and are planning on making them, I just gave you a great side dish. Or, if you are looking for something else for your game day menu, grab a bag of tortilla chips, put them next to this, and watch them disappear! See, what you we can do with just a little extra effort? 

Baked Refried Beans
1 (16 oz.) can refried beans
4 oz. cream cheese
1/4 c. finely chopped white onion
3 garlic cloves, minced
2 TBS butter
1/2 c. shredded Colby jack cheese
Chopped green onions for garnish

Preheat oven to 350. In a medium sauce pan, melt better over medium heat. Saute onions and garlic until translucent, about 5-7 minutes. Add beans. Stir well to combine and cook until heated through. Remove from heat. Add cream cheese and stir until melted. Spread into 9 inch pie plate. Top with cheese. Bake for 20 minutes until hot and bubbly. *NOTE* If you like spice, get the spicy variety!


Shared on The Country Cook Jan.30, 2015

Friday, December 5, 2014

You Should Make That

Those infamous words. When someone in your family sees something or hears about something they think would be tasty and immediately inform you it needs to be making an appearance in your kitchen.

Now, I'm lucky and my boys are usually pretty polite about making requests. They know I'm always looking for new things to try, and are more than happy to oblige! But they are never too demanding, so I'm always inclined to make their requests happen.

This recipe came to my attention one weekend when we were watching one of the "special" channels on our Roku player. Yep, Gooseberry Patch has their own YouTube channel that we can stream onto our television. Talk about foodie heaven!

This one came across the screen and my boys were drooling. My husband declared "Oh honey, you have to make that." And I'm so happy I did! Plus, I'm really excited to share it with ya'll today. It is the perfect potato dish for all those holiday gatherings coming our way! It is easy. It can be adapted to feed a few or a lot. And most importantly, it's slap you in the face good!

You're going to love this for everything from a simple weeknight side dish to holiday parties galore. You can even pre-bake the potatoes, and save yourself some time. Either way, everyone is going to gobble it down, and then say to the cooks in their house "Hey, You Should Make That." 


Twice Baked Potato Casserole From Gooseberry Patch
6 potatoes, baked and cooled so can handle
1/4 c. butter, room temperature
2 c. sharp cheddar cheese, shredded and divided
1 c. milk, warmed
1/2 c. sour cream
5 green onions, chopped and divided
1 (2.6 oz.) bag real bacon bits, divided
Salt and pepper to taste

Preheat oven to 375. Slightly grease a 9 x 9 square baking dish. In a large bowl, scoop out potatoes. Mash slightly. Add salt, pepper, butter and 1 cup cheese. Using an electric mixer, beat well. Add milk. Beat until fluffy and cheese is melted. Stir in sour cream, half  the onions and half the bacon bits. Spoon mixture into baking dish. Sprinkle with remaining cheese and bacon. Bake for 15 minutes until cheese melted. Sprinkle with onions before serving. 


Shared on The Country Cook Dec. 5, 2014


Friday, November 28, 2014

Slow Cooker Christmas Favorites Day 1 {A Gooseberry Patch Review}

Good Morning! Happy Black Friday! I hope all of you had a wonderful Thanksgiving! I hope you ate lots, and are still full this morning! 

In our house, today is the official start to the Christmas season. Sure, we've been listening to Christmas music for a month now, but we really try to wait for everything else Christmas related, so Thanksgiving gets the attention and love it deserves. But now we can trim the tree, hang our stockings and get ready for our favorite time of year.

Now ya'll know how much I love Christmas....and Gooseberry Patch...and my slow cooker. So, you know I'm super excited to share their newest cookbook with you...that combines all THREE of those! 


This book has everything you need for your Christmas season. From main dishes, to sides, to candy and cookies, to even condiments that would make great gifts! And they are all for your crock pot! Talk about your new best friend during this busy time of year! 

The first recipe I am sharing gives a little nod to one of my boys' favorite Christmas movies, A Christmas Story. Every year we have to watch, usually multiple times thanks to the 24 hour marathon on TBS, and one of the funniest parts is when on Christmas Day they have to eat in the Chinese restaurant. If you've never seen it, I won't ruin it; but if you have, you know exactly what I am talking about. 

So, when I saw this I had to chuckle to myself. Plus, I know many of you will have a house full of people to feed, and this will get the job done and keep you on budget! Not to mention, it's simple to make and absolutely delicious. 

Plus, you have a chance to win a copy of this new cookbook for yourself. Just scroll down under the recipe to see how!

The Christmas season is finally here. I could not be happier; and I'm happy to kick off the holidays here on EMM with this gift to you. Oh, and come back on Monday to see the next recipe...it's a keeper too! 

Crock Pot Teriyaki Chicken
Submitted By Beth Kramer Port Saint Lucie, FL Found on page 182
1 onion, cut into thin wedges
1 (20 oz.) can pineapple cubes, drained
1 TBS oil
8 chicken thighs, skin removed
1/2-3/4 c. favorite teriyaki basting and glazing sauce
Cooked rice
Green onions sliced, for garnish
Sesame Seeds, for garnish
Salt and Pepper to taste
Garlic Powder to taste (my addition) 

Place onion and pineapple in a greased slow cooker; set aside. Heat oil in large skillet over medium heat. Season chicken with salt, pepper and garlic powder. Brown in skillet for about 4 minutes per side, until golden. Drain. Add chicken to slow cooker. Spoon sauce over chicken. Cover and cook on LOW for 5 hours, or until chicken is no longer pink. Serve chicken, onion and pineapple over cooked rice. Spoon some sauce over top. Sprinkle with green onions and sesame seeds. 


Disclaimer: I received (2) copies of this cookbook in exchange for this review. One to keep, one to giveaway. All thoughts and opinions are my own. 

Wednesday, November 19, 2014

Breakfast For Dinner

By now, most of you know if I share a breakfast recipe with you, I didn't make it for breakfast at all. We are big fans of breakfast dishes, but we enjoy them for dinner more. So when I test out new morning time recipes, it's at the end of my day. But that's okay. One way I know a recipe will be a success is when I can tell it's something that could be enjoyed any time of day, making it even more versatile.

I really wanted to make sure I got this one posted soon because I realize so many of you are preparing for the house guests that are about to descend upon your home. Let's face it, some of them will come for turkey and stay on through until you ring in the New Year. Okay, not really, but it might seem like that. You know, like Cousin Eddie in Christmas Vacation.

If that sounds familiar to you, you're going to love this recipe. It's easy, and can feed a crowd on a budget! Plus, they are perfect for when the household is all getting up at different times. Make them first thing in the morning for the early birds, and the teenagers can reheat them for brunch when they finally roll out of bed at 11.

So many of us concentrate on what we are going to serve for family dinners or entertaining during the evening meal, sometimes remembering you actually have to feed those squatters, err, lovely family members, three meals a day can seem over whelming. Don't fret. I'm here to help, and I've brought along some yummy...and easy... breakfast burritos to help!

Baked Breakfast Burritos
8 eggs
1 package pre-cooked bacon, fried crisp and chopped
1 c. shredded taco cheese
8 oz. button mushrooms, sliced
1/4 c. sour cream
2 TBS butter
6 green onions, chopped, a few reserved for garnish
Salt and Pepper to taste
6 flour tortillas
Salsa

Preheat oven to 350. Grease a 11 x 7 baking dish. In a large skillet saute mushrooms and green onions until soft. Remove from skillet. In a large bowl whisk together eggs and sour cream. Cook in skillet until set to desired consistency. I kept mine just a little soft to allow for extra cooking in the oven. Combine mushrooms and bacon with egg mixture. Stir and cook until heated through. Fill the center of each tortilla with egg mixture. Sprinkle with cheese. Roll tightly. Place seam side down in baking dish. Spray with nonstick spray. Sprinkle with remaining cheese. Bake for 5-10 minutes until browned and cheese melted. Top with salsa and extra green onions.


Shared on The Country Cook Nov. 21, 2014

Friday, August 8, 2014

My First Time

Thai food. Do you love it? Or maybe I should start with, have you ever tried it? I say that because until a few weeks ago, I hadn't. I have been wanting to for a long time, and my hubby has been encouraging me to because of his love of it, but I just never had the opportunity until now. 

I will be honest, I had always been a tad apprehensive to try Thai because I had heard how a lot of it is spicy; and as I've said before, I'm a wimp and while the mister enjoys tears it while he eats, I do not. Now, usually when I am going to try a new cuisine for the very first time, I "leave it to the experts" so to speak. As in, I will go to a restaurant that is known for it, or I will have someone who prepares it on a regular basis treat me. But this time, I found a great recipe on a great blog that I just knew would be the best way for me to stick my toes in the water, so to speak.

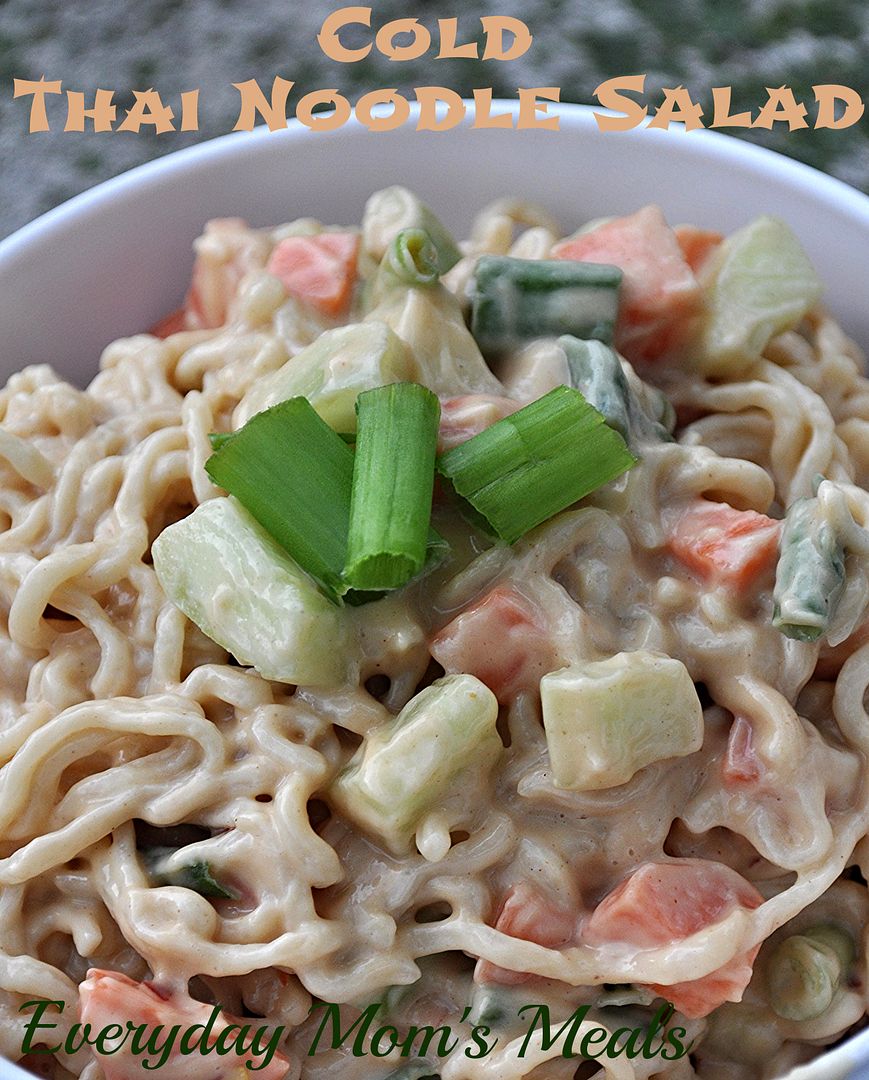
If you love cold noodle salads, this is going to be your new favorite go-to. If you have never made one at home, this is going to be your new favorite period. This makes a great side dish with some egg rolls or hot and sour soup. Or make a double batch and turn it into a light summer, it's too hot to cook, supper. Or, make that same double batch and you have lunch for the week! I think it would be a great dish to take to your next potluck or cook-out too...something new and unique everyone will rave about! You will be the one with the dish everyone wants the recipe for! 

If you are like me and have never tried Thai food, then this should definitely be your first time. This creamy, cool, crunchy, sweet and savory all rolled into one, delicious, simple dish will have you wanting to try even more as soon as possible!

Cold Thai Noodle Salad From Cajun Mama Cooks
2 (3 oz.) packages ramen noodles, any flavor, seasoning packets discarded
3/4 c. coconut milk
3/4 c. peanut butter
1 medium cucumber, seeded and finely diced
6 green onions, chopped
2 medium carrots, peeled and finely diced
1/4 tsp. red pepper flakes
1/4 c. lime juice
1 TBS sugar
3/4 tsp. salt

Bring a medium pot of water to boil. When boiling, break noodles into water. Cover and remove from heat. Let sit until noodles are tender. Drain and rinse with cold water, separating with fork. In a large bowl whisk together peanut butter, coconut milk, lime juice, red pepper flakes, sugar and salt. Add veggies. Stir to coat. Add noodles. Toss gently to coat. Chill until serving. 


Shared on The Country Cook Aug. 8, 2014
Thai at Very Good Recipes

Wednesday, June 25, 2014

FOOLPROOF Family Recipes Day 1 {A Review and Giveaway}

It's time for another debut from my good friends over at Gooseberry Patch! Their newest cookbook, FOOLPROOF Family Recipes is stuffed full of easy to make, never fail, yummy to eat dishes you are going to love cooking and your family is going to love eating!


From breakfast, to salads, to mains, sides, desserts and appetizers, there is literally something simple to make for every meal of the day! Oh, and did I mention I just happen to have not one, but two recipes included in this collection? Yep, on page 98 you'll find Grandma's Baked Mac n Cheese (Everyone loves this no boil version!) and on page 65 you can see my Quick Tomato and Olive Salad, perfect for a busy summer night!


Now, I have to admit, I wasn't even able to get out of the Cool Refreshing Salads section before I was ready to start cooking and eating. And while there are many recipes I have marked to try, both of the ones I will be sharing with you (be sure to come back on Friday for the next) are indeed salads.

When I first say this, I thought what a great way to combine two of our summer times loves. Pasta salad and garden fresh veggies! I'm telling you what, if you garden and are always looking for ways to use those beautiful fresh vegetables, you're going to love this! It's so fresh, so creamy, so crunch and absolutely delicious...the perfect side dish for any backyard barbecue or picnic!

Summer is in full swing, and I think we've all got refreshing salads on the brain, not to mention easy foolproof recipes...so Gooseberry Patch has us totally covered. Oh, and they just happen to have a copy for one lucky EMM winner too. Just scroll down after the recipe to enter!

Garden Macaroni Salad
Submitted by Ellie Brandel Clackamas, OR Found on page 62
8 oz. elbow macaroni, uncooked
3/4 c. mayo
1 tsp. salt
1/4 tsp. dried basil
2 tomatoes, diced
1 c. cucumber, died
1 c. celery, sliced
1/4 c. green pepper, diced
1/4 c. radishes, sliced
2 TBS green onions, sliced

Cook macaroni according to package directions; drain and rinse with cold water. In a large serving bowl, stir together mayo, salt and basil. Add macaroni and remaining ingredients; stir to coat. Cover and chill until serving time. Makes 8 servings.  *NOTE* The only addition I made was black pepper to taste. 


Shared on The Country Cook June 27, 2014


********Giveaway********
Rules:
1. This contest is open to US Residents 18 and older ONLY.

2. The winner will be chosen by Random.org 

3. The winner will be notified by email and Facebook. He/she will have 48 hours to respond or another winner will be chosen. 

4. When leaving comments for entries, they MUST BE SEPARATE ones AND include an email address so it's easy for me to find the winner. If entries are together, it will only count as (1) and if no email, entry will not be considered.

5. If any of the extra entries are items you are already doing, please just remind me!


6. Contest Ends: July 10, 2014

(1) Lucky Winner will receive:
(1) copy of


Mandatory Entry:
1. Leave a comment telling me your favorite foolproof family recipe. 

Extra Entry:
1. Become a Gooseberry Patch fan on Facebook. Leave me a comment when you have.

2.  Follow Gooseberry Patch on Twitter. Leave a comment saying you've done so.

3. Follow Gooseberry Patch on Pinterest. Leave me a comment when you have. 


GOOD LUCK!


Disclaimer: I was given a free cookbook and one to give away to a fan for this review. All thoughts and opinions are my own.