Everyday Mom's Meals: Chocolate
_____
Showing posts with label Chocolate. Show all posts

Sunday, November 27, 2022

Welcome Holiday Season

 If it was up to me, the Christmas tree would go up the minute the clock struck midnight on November 1st, but alas, I have a husband who believes it should stay in the shed until after Thanksgiving. But guess what, the turkey leftovers are in the fridge, all of the fall decor is packed away and I am currently typing in the glow of a beautifully lit balsam fir. 

December arrives this week, and before we have a chance to blink Christmas day will be upon us. We need to make sure to enjoy the next 28 days as much as possible. Sure, the hustle and bustle might stress us out a little, and if you're anything like me your to-do list is a mile long; but finding ways to find the magic and joy in the season are a must. 

After spending 12+ hours putting up the indoor decor on Friday, I was completely exhausted and ready to collapse into my recliner. However, the 6 year old had other plans. "Mommy, I want to put on Christmas jammies, watch Frosty and drink peppermint hot chocolate." 

That declaration resulted in him, daddy and mommy all laying on the floor snuggling, watching the movie while he sipped his holiday drink. (The teenager was at work, or there would have been 4 of us sharing that blanket.) As tired as I was, I wanted to soak in every second of this impromptu memory making moment. 

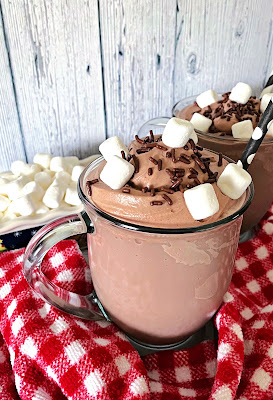
Plus, it reminded me that it was finally time to share a holiday inspired recipe with all of you. Whipped Hot Chocolate takes your hot cocoa game to the next level. It's super easy and the perfect treat to enjoy after building a snowman or while you watch Rudolph or White Christmas. 

The next 4 weeks are going to fly by, but my wish for you are those tiny moments that come out of  nowhere and fill your heart with the Christmas spirit and love. 
 

Whipped Hot Chocolate

1/4 cup milk chocolate hot chocolate powder mix 

2-3 cups chocolate milk, warmed

1/2 cup heavy cream

1/4 cup powdered sugar, sifted

Mini Marshmallows

Chocolate Sprinkles

In a large metal bowl that has been chilled, whisk together hot chocolate mix and powdered sugar. Add heavy cream and whisk just until combined. Using an electric mixer, beat until soft peaks form. Transfer mixture to piping bag. Divide chocolate milk between 2 mugs. Pipe whipped mixture onto each. Garnish with marshmallows and sprinkles. 

 

Shared at Weekend Potluck


Sunday, February 28, 2021

Birthday Sweet Treat

 Yes, we have a special birthday to celebrate in our house. Mommy turned the big 4-0  Saturday! Actually we do birthday months in our family, so I've been celebrating for about 4 weeks now! Plus my mom's birthday is just 8 days before mine, so it's basically been 2 weeks of cake, great food, shopping, balloons, presents, and of course lots of love! 

I am a firm believer that you don't have to have cake on your birthday if you prefer something else. It's your special day and you can choose the sweet treat you get! Alex and I have both been known to ask mom to make us pumpkin pie on our birthdays. One of my favorites (and what I've gotten the past couple years) is mom's peach custard pie. One year Alex asked for root beer floats. We've done cupcakes, cookies, cookie cakes...whatever the birthday boy/girl requests. 

I love fluff salads so much, it was only appropriate to share this with you around my big day. It is super simple for any night of the week but I thought it would be a terrific addition to an Easter menu too. Our holiday tables always include one or two of these "salads" and this new banana split variety is over the top! 

Some fluff salads can definitely be served as a side dish, and that is why my Grammy always made them at the holidays. They were basically a creamy fruit salad, and then you could still eat dessert too. However this one tastes so much like a banana split you will definitely want to save it for the end of your big meal. 

It's got the bananas, the pineapple, the chocolate, the whipped cream, the cherries and the nuts. Every single ingredient in the ice cream shop classic, in every single spoonful! 

I used walnuts but roasted peanuts or pecans would be delicious too! I get a lot of reader comments about wanting to use real whipped cream instead of Cool Whip. First off, you can do whatever you want, I will never know. But in my experience, salads like this don't set up as well with the real stuff. Just MY opinion, not holy grail or anything! 

I thought I would be more bothered by turning 40, but I'm truly not. It's only a number, and like I told someone when they were teasing me about turning 30, each decade comes with blessings! In my 20's I graduated college, got married and become a mom. And then in my 30's I found a career I could do from home while raising my son, become a mommy for the 2nd time when I never thought I would. I was 35 when our miracle baby came to us! So I am excited to see what wonderful things are in store for this next chapter! And you know it will definitely have some delicious food along the way! 

Banana Split Fluff

1 (3 oz.) box instant banana cream pudding

1 (20 oz.) can crushed pineapple, undrained

1 (8 oz.) tub Cool Whip

1 (16 oz.) jar maraschino cherries, drained and halved- save a couple whole for garnish

1/2 c. chopped walnuts, reserve a few for garnish

1 c. mini marshmallows

2 bananas, sliced

Chocolate Syrup 

In a large bowl, combine dry pudding mix and undrained pineapple. Mix well. Fold in Cool Whip, walnuts, marshmallows and cherries. Chill for 2 hours. Fold in bananas. Drizzle with chocolate syrup and top with extra walnuts and cherries. 

Shared at Weekend Potluck

Sunday, October 25, 2020

A Campfire Favorite Indoors

 With only a week left in October, have your evenings outside become too cold to handle? Sure a nice bonfire or campfire can keep everyone warm, but that only lasts so long. Heck, by this time of year here in Indiana, sometimes we've seen our first snowflakes. So for all of you who are missing your campfire experience, have I got a treat for you! 

Once again, I am keeping up my reputation as the "fluff dessert queen". Okay, so that might be a title only uttered in our house, but anytime my name and queen are in the same sentence, I will take it. This time around I've got a tasty twist on a classic you won't be able to resist. 

S'mores Fluff takes all the flavors from the classic and mixes them together in yummy harmony in every single spoonful. Be careful, this stuff is addicting. Be sure to only make it for people you really like. They will keep coming back for more.

Have you decided how you will be celebrating Halloween this year? Maybe your at-home party needs one more sweet treat. Your little ghosts and goblins are sure to love something so familiar but in a brand new fun way. 

 S'mores are such an quintessential summer time treat, but I say no more! With this creamy, fluffy, chocolaty dessert, we can satisfy that craving any time of year. Plus, we can stay inside where it's warm and dry, no fire needed!  

S'mores Fluff

1 (3 oz.) box instant chocolate pudding

1 1/2 c. milk

1 (8 oz.) tub Cool Whip

1 c. mini marshmallows

1 (4 oz.) chocolate candy bar, chopped, reserve a couple for garnish

4 graham crackers, chopped, reserve some large pieces for garnish

Chocolate Sauce

In a large bowl whisk together pudding mix and milk. Chill for 5 minutes to soft set. Fold in Cool Whip until well combined. Add chopped chocolate, graham crackers and marshmallows. Chill for 2 hours. Drizzle with chocolate sauce and garnish before serving. 


Shared at Weekend Potluck

Shared at Meal Plan Monday


Saturday, November 24, 2018

Foodie Christmas Gifts 2018 {Week 1}

Now that Thanksgiving is over, we can officially begin the MOST wonderful time of year! I can't help it. Christmas is my absolute favorite holiday and I treasure each and every second.

When my good friend Bekki asked me if I could spare some blog time for her to share some fantastic homemade foodie gifts, I said "Absolutely!" 

Homemade gifts are so special, and such a great way your loved ones you really put some effort into their gift, and stay on budget too! So, for the next few weeks Bekki is going to be sharing some of her favorites with us! 

Can you believe we just had Thanksgiving? I can still smell Turkey and all the glorious sides wafting around me. If you’re anything like me, sharing food is a favorite thing to do during the holidays. Whether it’s your neighbors, your child’s teacher, your postal carrier, or even your doctor’s food gifts give a sense of warmth. Like giving someone a basket of muffins, isn’t just the sweet treat but love from your kitchen to them. In this recipe we’re dressing up chocolate muffins. How can you dress up chocolate muffins you ask? Well add more chocolate and peppermint of course. Come with me, as we create this dolled up recipe for the upcoming holiday and turn it into a fun gift as well. 
 
 Triple Chocolate Peppermint Muffins
 
Ingredients:
 
1 Fleishmann’s Simply Homemade Double chocolate muffin mix
2/3 c. water
¾ c. vegetable oil
2 eggs
½ c. mini chocolate chips
½ c. peppermint chips
 
Preheat oven to 400 degrees. Line 6 large muffin cups with paper liners OR spray with cooking spray, set aside.
 
Combine mix, water, eggs, and oil in a large mixing bowl with a spoon, stir until blended. Add chips and stir to combine.
 
Fill prepared cups with batter, to ¾ full.
 
Bake muffins for 35 to 45 minutes or until a toothpick inserted in the center comes out clean. Cool on wire rack for 10 minutes then remove from pan.
 
Fill your favorite basket with the cooled muffins and share with someone today! Enjoy! 


Sunday, June 3, 2018

Summer Time Snacking

School is out! Hooray!!! Seriously, those last couple weeks were rough! And then the fact we had to go back after Memorial Day for 1.5 days was almost torture. But we persevered and don't have to set an alarm or pack a lunch until August!

I adore summer vacation. I realize it is different for me because I am at home, and don't have the stress of additional child care, but I cherish every minute he's home with me. And now that Max is old enough to understand "Bruh Bruh" is home with us, well let's just say it even more special.

One of the things that I do recognize has being harder during these months is the fact I have to feed the teenager that extra meal every day, every week! I find myself going to make Max's lunch and saying "Oh that's right. Alex might want something too." Now, to be fair we are only a few days into summer vacation, so I'm still getting into my groove. But it isn't just lunch! He wants snacks too! I swear, these kids...they think they need fed 24/7. LOL

I love making trail mixes because we can all enjoy them. Even Max now! (Sure he likes to pick out the M&Ms, but he does like the pretzels and cheese crackers too) And in the summer, they are perfect for snacking in the car, at the park, beside the pool, or just hanging out in the back yard. True story, if you would have seen us last weekend in our back yard, Max was in his baby pool, and the three of us were sitting around it, watching him, and passing around a huge bowl of this!

Sweet and salty together are one of my favorite things. Even flavor combos you think might not work do. Mr. E made the comment he didn't know how the candy and cheese crackers would taste, but they were really good!

You can always add some other ingredients your family loves too. Make it your own! Let the kids get in on the action too--they could come up with some interesting combos!

Summer break is something I look forward to all school year long. My boys, with me, adventures to be found, and yummy snacking on the way!

Sweet n Salty Trail Mix
4 c. twist pretzels
3 c. cheese crackers
2 c. honey roasted peanuts
1 1/2 c. roasted almonds
1/2 c. M&Ms
1/2 c. Reece's Pieces
1/2 c. raisins

Mix all together in a large bowl and store in an airtight container. 


Shared at Weekend Potluck

Disclaimer: I received free samples from Kroger and MyMagazine Sharing Network for use in this post.

Saturday, October 4, 2014

Soul Food Saturday


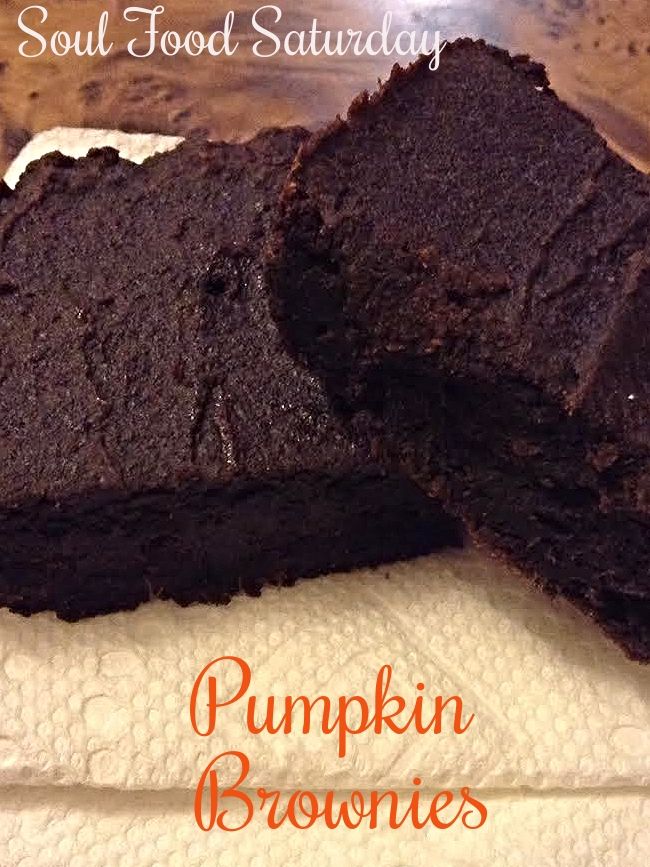
Even though the weather didn’t get the memo that it’s now Fall, surprisingly it is. With this new season; it brings thoughts of warm sweet treats and everything pumpkin. And how could pumpkin ever be made better? Well, how about making a brownie? Now that I have your full attention, grab a glass of milk and try this new recipe with me!
 
 
Pumpkin Brownies 
Adapted from Cookies and Cups
2 boxes Jiffy Brownie mix
1 15 oz. can pumpkin
½ tsp. pumpkin pie spice
¼ tsp. cinnamon
Preheat oven to 350°.  In a bowl mix together brownie mix, spices, and pumpkin until smooth. Spread batter into a lightly sprayed 9x9 pan and bake for 25-30 minutes until set. Let cool completely, before slicing. 

Welcome Fall with these sweet treats, find a buddy to share with. Enjoy! 


Saturday, August 16, 2014

Soul Food Saturday


In this family there aren't many things better than a hot pan of freshly made gooey chocolate brownies to lift your spirit, or be the perfect fix for the biggest sweet tooth. I found a recipe online; months ago that I decided I needed to tweak a bit. Not because it wasn't good, but only to not have to use the stove at all.
 
Gooey Chocolate Brownies 
½ c. white sugar
2 tbs. unsalted butter
2 tbs. water
1 small package approx 1 ¾ c. semisweet chocolate chips
2 eggs
½ tsp. vanilla extract
2/3 c. all-purpose flour
¼ tsp. baking soda
½ tsp. salt

Preheat the oven to 325 degrees F. Grease or spray with butter non stick spray an 8x8 inch square pan.

In a medium sized microwave safe bowl, combine the sugar, butter and water. Microwave until boiling, approx 1 ½ minutes on high power. In another medium bowl sift flour, baking soda and salt. Set aside. Remove hot bowl very carefully from microwave and stir in chocolate chips until melted and smooth. Mix in the eggs and vanilla. Add the flour, baking soda and salt mixture; into the chocolate mixture just until combined.  Spread evenly into the prepared pan. Bake for 25 to 30 minutes in the preheated oven, until brownies set up. Do not over bake! Cool in pan and cut into squares.


Saturday, July 12, 2014

Soul Food Saturday


Especially in the middle of summer you just want a sweet treat right now. As in mix it up and eat it, am I right? This one is just that. Some yummy chocolate and crunchy granola in a cup just for you! Sound good? Grab a spoon, it's time for dessert! 

Quick Pudding Parfaits 
2 small boxes chocolate pudding 
4 c. Half and half
4 c. Granola

In a medium bowl add pudding and milk. Mix to combine, until begins to thicken. Cover top of pudding with cling wrap to prevent skin from forming.(Directly on top) Refrigerate until set, approximately 5 minutes. Remove from chilling, remove cling wrap and stir to combine. Add approx. 1/4 c. of pudding to bottom of cup, then 1/4 c. of granola. Repeat with pudding, more granola, and final layer of pudding. Sprinkle top with granola. Repeat with remaining pudding and granola. 

Makes 4 very satisfying dessert cups. Use up the last of your granola and get creative with dried fruit or even whipped topping! Enjoy! 


Saturday, April 26, 2014

Soul Food Saturday


Today we are celebrating the birthday of Soul Food Saturday. That’s right. One year ago, (April 27, 2013) I shared the first recipe with you, and haven’t looked back. Along with Mrs. Everyday by my side we've celebrated, shared memories, and toasted along the way. So I wanted to celebrate our first big milestone with a quick dessert you're going to love. So, let's toast SFS and to another yummy year!

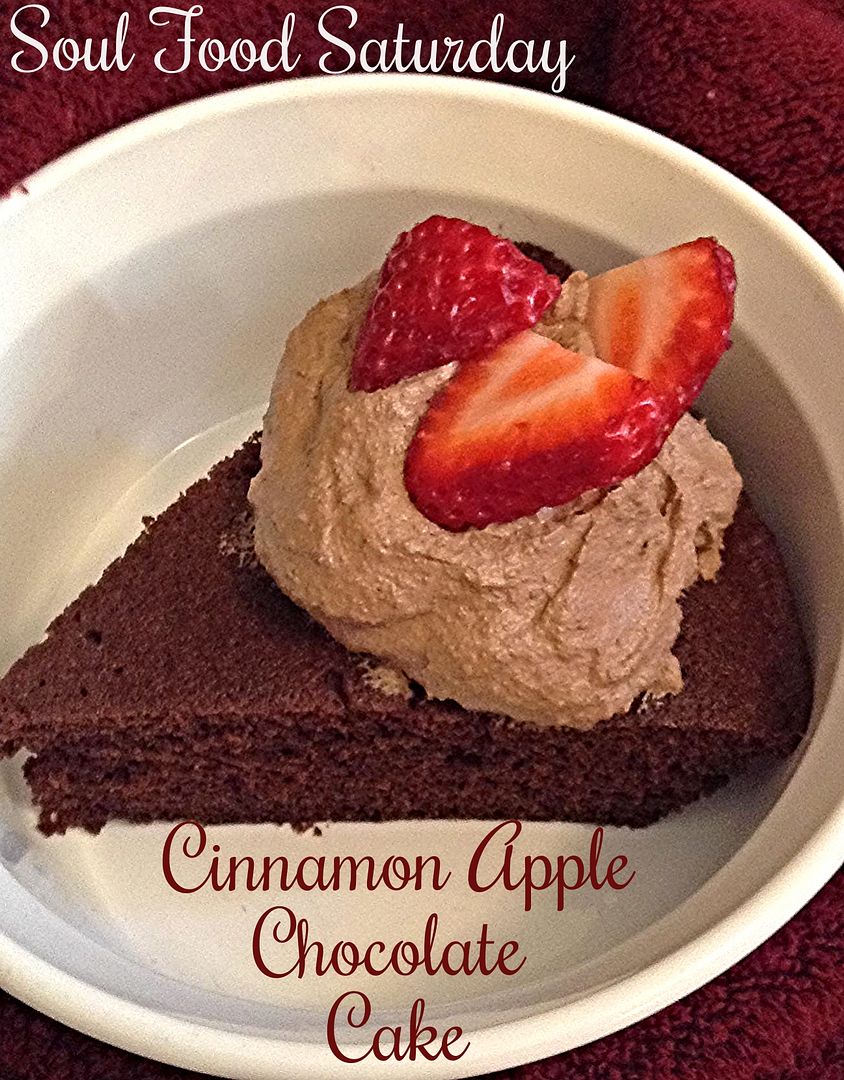
Cinnamon Apple Chocolate Cake in a Flash!
1 box devils food cake mix
1¼ c. water
½ c. unsweetened apple sauce
3 eggs
½ tbs. ground cinnamon
Butter spray for pans

In a large bowl add cake mix, apple sauce, water, cinnamon and eggs. With an electric mixer beat on low for 30 seconds to combine, and then a few minutes to get everything completely incorporated. Batter will be lumpy. Coat two 9 inch pie plates with butter spray. Divide batter between both. Microwave on high power for 7 minutes, test with toothpick for doneness.
Remove from the microwave. Allow to cool on a rack before adding topping. Repeat with 2nd pie pan.

Chocolate Whipped Topping
1 tub whipped topping
2 tbs. cocoa powder
1 tsp Vanilla

In a medium bowl add whipped topping, cocoa and vanilla. Mix until combined.
*Note: We enjoyed the sweetness that the whipped topping already had without adding additional sugar. If you prefer sweeter whipped topping, add powdered sugar by the teaspoon until desired sweetness is acquired.

Our favorite way to enjoy this cake is warm, minutes from being done. Top with whipped topping and your favorite fruit. We love strawberries so that’s how we enjoyed it here.


Monday, March 31, 2014

Easter Dessert with 3 Musketeers® {#EatMoreBites #shop}


I am a member of the Collective Bias®  Social Fabric® Community. This shop has been compensated as part of a social shopper amplification for Collective Bias and its advertiser.

It's the end of March, and for those who haven't been paying attention to your calendars, Easter is right around the corner! So, if you've started to plan your menu and are looking for a little inspiration, I am here to share a fantastic, simple dessert recipe that everyone from young to old will love. Oh, and it just happens to include chocolate too...the ambassador of Easter fun! 


I think every one's sweet tooth goes into over drive around Easter. So many yummy treats to be enjoyed. Every where you look it's another chocolate indulgence. But I got to thinking why not incorporate that indulgence into an actual dessert course for a big Easter meal that is easy, delicious and fun for everyone of all ages. 

And when I heard about the new MARS bites  I knew they would be the perfect way to get my chocolate fix this Easter holiday, with ease and satisfaction! So, when I was at Walmart on my weekly grocery run, I was super excited to find them in the bagged candy aisle, just waiting for me to snatch them up! 


At the end of a that big holiday meal filled with the traditional fare, why not surprise your family with something whimsical, hands friendly and scrumptious for dessert? Something they can dip perhaps? Let's face it. Any time you can dip something, it is 10 times more fun! Plus, this way the adults can have their candy too, without having to rummage through the kids' Easter baskets! 

3 Musketeers Dip
8 oz. cream cheese, softened
1 stick butter, softened
3/4 c. powdered sugar
2 TBS brown sugar
1 tsp. vanilla
1 (6 oz.) bag 3 Musketeers Bites, coarsely chopped, a few reserved for garnish
Vanilla Wafers
Graham Sticks

Combine cream cheese, butter, powdered sugar, brown sugar and vanilla in the bowl of a stand mixer with the paddle attachment. Mix on low speed until creamy. 


Increase speed to medium and mix for 1 additional minute until well incorporated. Add chopped chocolate and mix on medium speed for 2 minutes. 


Scrape sides of bowl with rubber spatula. Transfer to serving dish. Garnish with extra chocolate. Serve with vanilla wafers and graham sticks. 


Shared on The Country Cook April 4, 2014

Oh, and now you can try MARS Bites and save a little money too! Be sure to grab your coupon for when you make this! You can save $0.75 off (2) 2.83 oz. bags or $3 off (2) 6 oz. bags or larger. And remember to #EatMoreBites with #CollectiveBias! 

#shop


Saturday, February 22, 2014

Soul Food Saturday #44


This recipe came about because like I mentioned before I have incorporated paleo friendly things into my cooking. But, just because it's healthy doesn't mean it has to be boring or tasteless. These yummy treats are pack with fudge flavor with a hint of caramel hints in the background. These are one of my newest favorites.

Paleo Perfect Brownies
1/2 c. Ghee or butter
1 c. Coconut sugar
2 eggs
1 teaspoon vanilla extract
1/3 cup unsweetened cocoa powder, sifted
1/2 c. coconut flour, sifted
1/4 tsp. salt
1/4 tsp. baking powder

Preheat oven to 350 degrees. Grease an 8 inch square pan. In a large bowl add melted butter and stir in sugar, eggs, and vanilla. Beat in cocoa, flour, salt, and baking powder. Spread batter into prepared pan. Bake for 25 to 30 minutes. Do not over cook.


Friday, February 7, 2014

After School Delight

Whenever I hear the words "after school snack" my mind goes to one image. Cookies, fresh from the oven, and a tall glass of milk. Why this picture pops into my head I'm not sure. I can't remember that being my after school snack one time growing up. Ha. Ha. I was more of a fan of salty snacks, and have never been a huge milk drinker. But for whatever reason, that's what pops into my head every single time.

And while we are on the subject of things we can't explain? Why exactly are kids so stinkin' hungry when they get home? The minute, and I mean very second, their feet hit the front door, their stomachs are screaming to be fed. How many moms hear on a daily basis, "Can I have a snack? I'm starving." It doesn't seem to matter when they eat lunch, or even how much they eat, by around 3 o'clock, they act as if they are malnourished and haven't ate for days.

If you were a kid who was treated to warm cookies and cold milk or not, I think we can all agree they are a match made in heaven; and a favorite treat for most of us. In fact, this dessert is a tribute to anybody that has ever taken a cookie, dipped it into their milk, savoring every single bite.

We're talking a no bake dessert. That uses cookies....dipped in milk! Let me say that again for those of you who are now coming too from fainting at just the thought of such bliss. An entire dessert of milk soaked cookies! Oh, and did I mention they are layered with Cool Whip? I know, you need a moment....

Your kids are going to flip for this. But I'm not going to lie, adults can't get enough either. My husband and son were literally fighting over the last piece. They licked the baking dish clean! In fact, this would be a great one to make for Valentine's Day! Something extra sweet for your sweeties!

Cookies and milk...something so simple can be so perfect and delicious. That's exactly how I would describe this recipe too!

Cookies and Milk No Bake Dessert From Gooseberry Patch
1 (13 oz.) package crunchy chocolate chip cookies
3/4 c. milk
1 ( 8 oz.) tub Cool Whip
Chocolate Chips

Dip each cookie in milk, coating whole surface. In a 9x13 pan layer cookies and Cool Whip, ending with Cool Whip. Top with chocolate chips. Cover and chill overnight.


Shared on The Country Cook Feb. 7, 2014

Chocolate at Very Good Recipes

Tuesday, January 28, 2014

31 Days of Dark Chocolate Dreams {A Review & Giveaway}

Do you love peanut butter? Do you love trying new flavors of peanut butter? Do you love making yummy snacks for your kids to enjoy after school or maybe packed in their lunch? If you answered "Yes" to any of those, then boy have I got a treat for you!

My good friends over at Peanut Butter & Co. are so excited to announce the release of a new cookbook, 31 Days of Dark Chocolate Dreams, featuring  a month's worth of recipes using their Dark Chocolate Dreams all natural peanut butter, written by Founder and President, Lee Zalben.

This cookbook is page after page of delicious treats, the one only more exciting than the last. Containing recipes for everything from breakfast to snacks, to desserts and candy...it has a little something for everyone.

When I received my advanced copy and started flipping through the pages, I only made it to #15 before I found the first thing I wanted to try. Reading the description of "These bears are a marriage of differences-sweet and salty, chewy and crispy, and smooth and crunchy" had my mouth watering! I love all of those combinations, and in one tasty snack I could make for my son, how exciting!

These would be perfect for after school, packed lunches, or an on-the-go treat. Heck, throw a couple in your gym bag for a pick me up after a long workout. However or whenever you make them, they are sure to please everyone in your house young to old.

Now, here is the greatest part! The kind folks at Peanut Butter & Co. also want to send one lucky EMM reader a copy 31 Days of Dark Chocolate Dreams and a jar to play around with in your kitchen too. Just keep reading after the recipe for all the details and follow the instructions to enter!


Dark Chocolate Dreams Trail Mix Bars
1 c. firmly packed brown sugar
2/3 c. Dark Chocolate Dreams peanut butter
1 large egg
5 TBS unsalted butter, melted
1 c. flour
1/2 tsp. baking soda
1/8 tsp. cinnamon
1/4 tsp. salt
2 1/4 c. rolled oats
3/4 c. roasted peanuts
3/4 c. chopped pretzels

Preheat oven to 350. Spray a 9x13 baking dish with nonstick spray. In a large bowl, whisk together brown sugar, peanut butter, egg and butter until smooth and creamy. Whisk in flour, baking soda, cinnamon, and salt until well combined. Fold in oats, peanuts and pretzels. Turn out into baking dish. Cover the mixture with plastic wrap and press down, packing the bars into the dish and removing air pockets. Discard plastic wrap and bake for 20 minutes, just until they begin to turn a slightly darker color. Let cool 2 hours before cutting. Store in airtight container for up to 10 days.


Disclaimer: I received (1) cookbook and (1) sample for this review. Plus an additional set to giveaway. All thoughts and opinions are my own.

Tuesday, December 24, 2013

Merry Christmas Eve!!

Today, since it's Tuesday, normally I would not have a new recipe for you. However, being a special day, I wanted to have something yummy to share. So, I asked my dear sweet friend Bekki (whom you usually see on Saturday with Soul Food Saturday) to come into the EMM kitchen and whip something up. But, what she has to share is actually something I made years ago that I shared with her and she decided to try too.

About 7 years ago I hosted Adam's family for the first time on Christmas Eve. It was actually a last minute type of thing due to illness, and while I wasn't responsible for all the food, I wanted to make dessert something truly yummy and festive for my first holiday party in our home! This recipe was so incredibly easy and was a huge hit with everyone. Bekki took the original and has made it her own. If you're looking for something for tonight or tomorrow, there is still time to make this!

Happy Christmas Eve to all of you, thank you for sharing some of your day with me.
Today I am sharing a recipe that is now part of our family table, and has graced the Everyday family table as well. During my childhood every Christmas Eve was spent at my Mama Lupe’s house. Her home was always warm, and smelled of spices, and delicious food. It always started with dinner and continued through the night. There was always a big pot of home made hot chocolate on the stove, and big pots waiting for the mountain of tamales being made by all aunts, uncles, and cousins. The younger of us were shuffled out of the small kitchen with mugs full of chocolate that warmed our hands and our bellies. But no matter the amount of times we were asked to please step out we were back nosing in discussion or stealing “tastes” of the delectable meat fillings lining the counter top. The house was filled with music and Christmas movies always had a place in part of our evening. The fireplace reminded us children that Santa would be coming, but it never seemed soon enough. We often thought if we laid close enough to it that maybe, just maybe we’d catch a glimpse of that snow white beard and hear the reindeer bells. Now that we have all grown up, many of us with families of our own are making new memories. 2 of my husband’s absolute favorite treats are ice cream and cookies. I haven’t found any that didn’t make him happy. So this recipe had to be tested in our house, and shared with ones we love. Peppermint ice cream with an Oreo crust, how could that be bad? With whipped topping and white chocolate peppermint bark pieces on top. Yes it really is that good! Grab a spoon and a friend this one is best shared!

Peppermint Oreo Pie Adapted from Taste of Home
2 Oreo cookie crusts
1 half gallon peppermint Ice Cream, softened
2-8oz Cool Whip, thawed
1 package White chocolate peppermint bark pieces
1 jar hot fudge sauce for drizzle on top
Plastic wrap for wrapping before freezing
Thaw cool whip in the fridge completely before using. Place ice cream on a plate on your counter to soften, enough to scoop easily with a large spoon. Remove wrapping from pre-made Oreo pie shells and set aside. Take cool whip out and mix containers to ensure they are completely thawed and free of lumps, then set aside. When ice cream has softened just enough, scoop half of container into first pie shell. And repeat with the second half into the second shell. Top each with cool whip and sprinkle peppermint bark pieces to finish. Wrap in each in plastic wrap and place in the freezer.
Remove just before serving and allow at least 10 minutes before slicing.
 *Being frozen it could be difficult to slice through, so care and patience is necessary here* 
Drizzle hot fudge over each slice as desired. Enjoy! Merry Christmas, and let them eat Peppermint Oreo Pie!


Friday, August 16, 2013

Last Hurrah Of Summer

That's right, our world is going to be shocked back into reality come Monday morning. From the sound of the alarm, which we haven't heard for 2 months, to the fact my favorite side kick won't be with me all day, to the fact we have to get up on Tuesday and do it all over again, it's not going to be easy!

I'm very lucky that Monkey loves school, and I'm sure by the second week, he will be happy to be there, but for right now, he isn't ready for summer break to end, and I can't say I blame him. I feel like we barely got a summer, and now it's time for school which means autumn can't be far behind. I just want to find the pause button! But I'm sure some of that is the fact my baby is going to be a 3rd grader, and thus far I simply can't wrap my mind around it.

So we aren't quite ready to let summer go yet, and one of the things we've really enjoyed this year is making homemade ice cream in the new machine I got back in May. We've definitely put it to good use over the past few months, and this is our newest concoction. In fact, this was our dessert last week when we grilled some steaks and I had fresh corn on the cob too. As I told my friends "Summer mind be winding down, but it isn't over yet!!" And with a meal like that, it truly felt like it.

If you love mint...you are going to love this. It has such a smooth flavor and creamy texture. The combination of milk and cream give it a tad different texture than the other ice creams we've made thus far. And the tiny chocolate chips are like finding little treasures in every bite!

The school year is quickly approaching, but I'm determined to squeeze every little bit of fun, and deliciousness, out of this summer as I possibly can!

Mint Chocolate Chip Ice Cream 
2 c. 2 % milk
2 c.heavy cream
1 c. sugar
1/2 tsp. salt
1 tsp. vanilla
1 tsp. mint extract
1 c. mini chocolate chips
5 drops green food coloring

In a large bowl combine all ingredients and stir well, until sugar is dissolved. Pour into ice cream maker and freeze according to directions. For a harder ice cream, remove to a large bowl, cover and freeze for at least 2 hours. *NOTE* Mine is served in waffle bowls, which you can find with the other ice cream novelties.


Shared on Mandy's Recipe Box Aug. 20, 2013
Shared on Lady Behind The Curtain Aug. 21, 2013
Ice Cream at Very Good Recipes

Saturday, July 6, 2013

Soul Food Saturday #12

Happy Saturday! I hope your holiday weekend is bringing you sun, fun and some relaxation too. Today Bekki is celebrating a special day in her family by jazzing up a store bought cake mix into a chocolate lover's dream dessert!


Tomorrow is my parents' 40th wedding anniversary! Its so amazing to see how beautiful marriage can be through the eyes of the ones that brought me into this world. It inspires me to give everything I've got to my marriage, and to everything I hold close to my heart. For this big celebration I am sharing my Daddy’s absolute favorite cake. Believe it or not it’s a box cake dolled up, just like I did for my wedding cupcakes. But this one goes over the top with a big side of vanilla ice cream on the side. 
Be careful who you share this cake with, because they will definitely be back for more! Happy Anniversary to the best parents on the planet, I pray that God gives you 50 more anniversaries just as beautiful as your hearts!!!! This one is just for you!!!
Daddy’s Ultimate German Chocolate Cake
Pillsbury German chocolate cake mix
3 eggs
½ c. apple sauce
1 c. water
1 can Pillsbury coconut pecan frosting
Preheat over to 350 degrees

Spray 13x9 inch pan with non stick cooking spray and set aside
Blend cake mix, eggs, apple sauce and water until moistened. Then blend on medium speed for several minutes or until completely combined.
Pour mixture into prepared pan, and bake for 34-38 minutes. Toothpick will come out clean when inserted in the cake’s center. Cool 10-15 minutes before removing from pan. Cool completely before frosting.
You can frost this beauty however you like, but for Daddy’s ultimate cake I used the store bought frosting. The entire can for one 13x9 cake. Don’t forget the ice cream on the side. That’s mom’s favorite part. Whether its natural vanilla or rocky road, I hope you enjoy this as much as my parents always have!

“Let them all be merry and eat cake”!!!!


Pin It