Everyday Mom's Meals: Bread
_____
Showing posts with label Bread. Show all posts

Sunday, May 19, 2019

Give Them Bread

If you are planning a summer cookout, any time over the next few months, you will want to keep the ingredients for this on stand by!

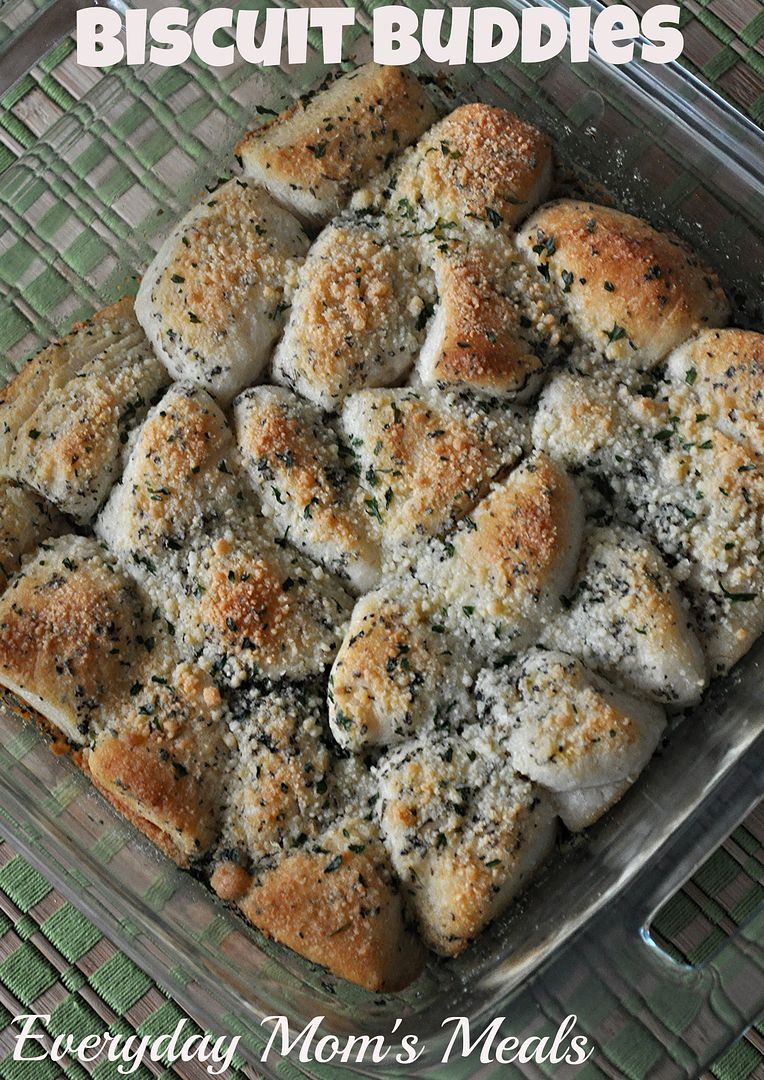
We are bread loving people. We are the ones at a restaurant that are usually half full by the time the entree' comes because we've snacked on so much bread. And if I can find something to put on that bread that makes it even yummier, that's the icing on the cake so to speak.

When I'm entertaining, I try to find ways to have dishes made ahead of time that I can put out and let my guests serve themselves. Appetizers are of course the best way to do this; and keep people from starving before the big meal is ready. Happy guests mean a happy host!

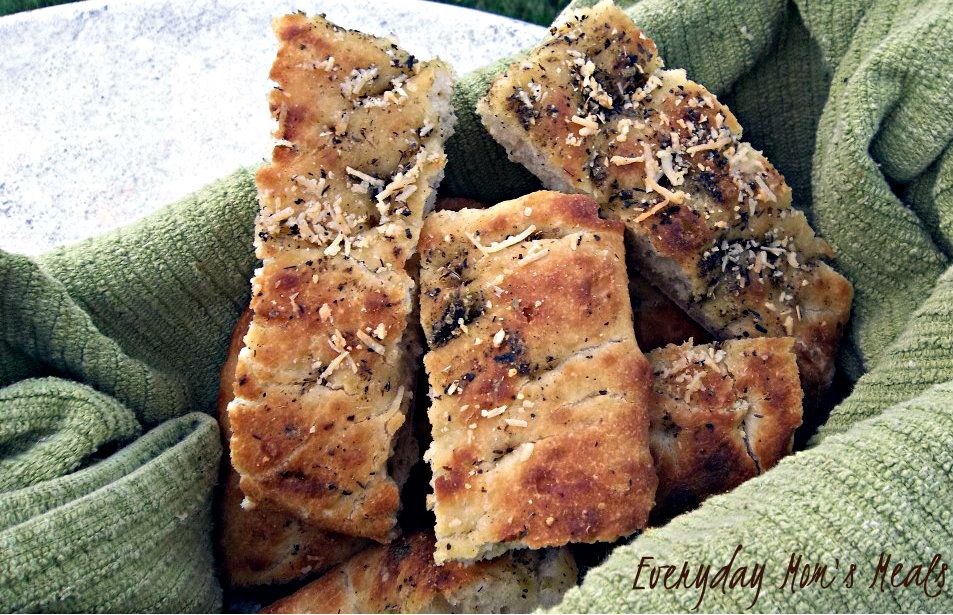
Honestly though, the day I made this it was raining, and we weren't even thinking about grilling. I served it as a side to a pasta supper...and it was perfect that way too. So, you're really getting a double duty recipe!

Summer time is when we want to have people over, spend hours outside in the sun, catching up, having fun, and of course eating some great dishes to share!

Olive Caper Spread
1 (5 oz) jar green olives, drained
1 (3 oz.) jar capers, drained
2 tsp. lemon juice
1 large garlic clove, peeled
Salt and Pepper to taste

Put all ingredients in food processor. Pulse until fine. Chill. Serve with baguette, crackers, pita chips, etc. 


Shared at Weekend Potluck

Sunday, March 10, 2019

You MADE Biscuits??!!

Yes, honey. I did. Don't act so shocked. 

I guess I shouldn't take it as an insult. After all, I am the first to admit I'm not a baker. I've said it many times. It's just not my thing. But every once in a while I put on my big girl pants and give it a whirl. 

I've actually been wanting to make these for literally years. When I first saw the recipe my first thought was "Wow I could do that." No rolling. No shaping. Mixing and baking. That's my kind of biscuit. 

My boys immediately fell in love with them. To the point, I made them twice in one week. Now, let's be honest here. These are homemade. They are not going to look perfect; and that's okay. Mine always come out with a couple dark spots. Nobody seemed to care! Believe me when I say, the flavor makes up for any blemishes!

These are thick, delicious biscuits. I think the next time I make them, there will have to be some sausage gravy for on top! 

I might not be the best baker, or even the most enthusiastic. But look at me....I made some down home, yummy biscuits and my boys were in love at first bite! The moral of the story being, if I can do it, so can you!

Butter Dip Biscuits
2 1/2 c. flour
4 tsp. sugar
4 tsp. baking powder
1 stick butter, melted
2 tsp. salt
1 3/4 c. buttermilk

Preheat oven to 450. Spray a 8x8 baking dish with nonstick spray. Pour melted butter in bottom of dish. In a large bowl mix flour, sugar, baking powder, and salt. Add buttermilk and mix well until sticky dough forms. Transfer to dish...RIGHT ON TOP of melted butter. Using fingers, spread dough out as evenly as possible. With a sharp knife, score dough into 9 biscuits, making sure to cut the entire way through. Bake for 25-35 minutes until golden brown and biscuits bounce back when touched.

A Few Notes...
1. If some of the batter comes to the top of the dough before baking, it's fine.
2. I spray my fingers with nonstick spray to help spread the dough easily without sticking.
3. If some of the tops start to brown too quickly, add a piece of foil to the top while finishing.
4. I've made these a few times. My oven has hot spots. I've had varied cooking times, so check after 25 minutes and then add 5 minute increments until done.


Inspired by The Country Cook

Friday, March 13, 2015

Mom Knows Best Day 2 {A Review and Giveaway from Gooseberry Patch}

If you didn't have time to log on Wednesday, you missed the debut of the newest cookbook from Gooseberry Patch. You can read all about it here, and see the yummy soup I made too!

For the second recipe I wanted to share with all of you, I didn't even have to turn the page from the soup recipe. Yep, they are on the same one in the book. And it was a genius move because they go so well together. When I make soup, we have to have what I call a "dipper" on the side. That can be a sandwich, sliced bread, biscuits, rolls...anything along those lines. So, it was as if the folks at Gooseberry Patch read my mind when they featured this recipe right under that minestrone one I wanted to try.

Plus, both of these were in the section Kids in the Kitchen. Well, ya'll know how much my little man loves to my sous chef! And you've heard me say it 100 times. Get your little ones into the kitchen, cooking, exploring, helping, and learning. It's a great way to curb some of their picky eating habits. Why? Because if they help to prepare dinner, they will be much less likely to complain about it because of the sense of pride they will feel!

Anyway, back to these tasty little biscuits. If you've ever had pull-apart bread, this is very similar. It would be great for parties or holidays too...easy to adapt to feed more. Double the recipe and put them in a 9 x 13 pan. I think they would be very tasty with your Easter ham!

I love finding new ways to serve bread with soup. The combination if such a staple in our house, and I don't like to fall into food ruts! Oh, and you have a chance to win a copy of Mom Knows Best for yourself. Just click here to enter!

Biscuit Buddies
1 (12 oz.) can refrigerated biscuits, each quartered
1/4 c. butter, melted and divided
2 TBS Italian seasoning, divided
1/4 c. grated Parmesan cheese

Preheat oven to 350. Mix half the butter and Italian seasoning together. Pour into bottom of 8 x 8 baking dish. Add biscuit quarters in single layer. Mix other half of butter and Italian seasoning together and pour over biscuits. Sprinkle with cheese. Bake for 15-18 minutes until golden. *NOTE* I added some dried parsley to the top, after the cheese, for extra color. 


Shared on The Country Cook Mar. 13, 2015


Saturday, December 20, 2014

Soul Food Saturday


On days like these we are scrabbling for ideas for what to bring to the office for everyone to have with morning coffee, food gift ideas to bring to our children’s teachers, and goodies for our family postal carriers. Am I right? Well this sweet treat can be all of those things and more if you like. Chocolate Chip and pumpkin, what can beat that? Well me! This recipe makes 2 loaves of bread, so you have 1 to give and one to keep. Sounds like a great deal to me. Grab your favorite hot drink and cozy up with me; we’re making goodies to give. 
 
 
Chocolate Chip Pumpkin Bread
Inspired by Taste of Home
 3 c. all-purpose flour
3 tsp. ground cinnamon
1 tsp. salt
1 tsp. baking soda
4 eggs
1 c. sugar
3 ½ c. canned pumpkin
1 ½ c. semisweet chocolate chips

In a large bowl, add flour, cinnamon, salt and baking soda. Set aside. In a medium bowl, beat eggs, sugar, and pumpkin until smooth. Add dry ingredients a third at a time, and mix just until moistened, then fold in chocolate chips. Pour batter into 2 (8x4) loaf pans that have been sprayed generously with non stick spray. Bake at 350 for 1 hour to 1 hour and 15 minutes. Or until a toothpick comes out clean when inserted near the center. Cool for 10 minutes before removing for the pans, and transferring to wire racks to cool completely. 
Whether you package it up or not your friends will love this recipe and appreciate the effort you put into it. Enjoy!


Monday, December 8, 2014

The Miracle of Baking Soda

So, there are a few things left in the kitchen that will still surprise me...even when I already know about them. One of them is this trick. Did you know that baking soda can turn regular dough into pretzel dough? Yep! It's like magic! Now, if you have made my Pretzel Dogs, you already knew about this nifty trick; but if you're like me, even after making those, the wonderment of what happens in a 30 second process is still awe inspiring! 

If you've never tried this fake out before, this recipe is the best way to start! With so many holiday meals and parties coming up, you could really impress your family and guests with this one! Imagine the mad respect you will get when they think you slaved away in the kitchen all day making pretzel rolls! (And don't worry, I'll keep your secret!) 

These would be perfect with a big sit down meal, but my little man actually gave me an even better idea the night I served these. He informed me they would be perfect with some nacho cheese to dip them in, as a "nibbly bit"...his name for appetizers. In fact, he has already requested that exact combo for our annual New Year's Eve buffet. So, feel free to steal that idea too. 

With the busy holidays and so many yummy things coming out of your kitchen, isn't it nice to have a couple tricks up your sleeve to save some time and nerves? These will not only do that, but satisfy your taste buds too! 

Easy Pretzel Rolls
From Pillsbury
1 can crescent rolls
10 c. water
1/4 c. baking soda
1 egg
1 TBS water
Sesame seeds
Kosher Salt

Preheat oven to 400. Spray a baking sheet with nonstick spray. In a large stock pot or dutch oven, bring water and baking soda to a boil. Meanwhile, separate rolls into 8 triangles. Starting at the short end, stretch dough a bit. Roll short side to other, and then bring ends together forming pretzel shape. Press slightly to adhere. When water is boiling, carefully add 2 rolls to water at a time, and cook for 30 seconds. Gently remove with a slotted spoon and drain slightly on paper towel. Using a metal scraper, transfer to baking pan. Repeat for all rolls. Beat egg with water. Brush rolls with egg mixture. Sprinkle with sesame seeds and salt. Bake for 11-13 minutes until golden brown. 


Shared on The Country Cook Dec. 12, 2014

Saturday, October 11, 2014

Soul Food Saturday


There is something I can't quite put my finger on about beer bread. It tastes so good I want to have it all the time. So what do you do on the days "your favorite mix" is out of stock? I found a candidate, that worked out great!
Grab a napkin, you've gotta taste this!

 Beer Bread
3 c. All purpose flour
3 3/4 tsp. baking powder
1/4 c. Brown sugar
1/2 tsp. salt
1 (12 oz.) can beer
1/4 c. butter, melted


Preheat oven to 375 degrees. Spray 9x5 lightly with non stick cooking spray. Set aside. In a medium bowl add flour, sugar, baking powder, and salt. Stir to combine. Add beer and mix until just moistened. Add to prepared pan. Top with melted butter. Bake 45-55 minutes until toothpick inserted into the center comes out clean.
Remove from pan and cool on a rack. Serve hot or room temperature.

Whether you serve this with a bowl of chili or a pot of soup, this one is sure to be a winner!


Monday, August 11, 2014

America's Better Sandwich with Brownberry ® Bread {A Review and Giveaway}

I love a good sandwich. Like really love. Like kind of obsessed! Especially in the summer months. There are so many evenings when it's supper time, and still scorching outside, too hot too cook, that a sandwich piled high with our favorite meats, cheeses and veggies really hits the spot; and makes for a filling, yet still light supper. Great sandwiches are made better with Brownberry® Bread, and now they have a contest to prove it! 


Brownberry® Bread is some of the best you can find in your grocery store. It's soft, delicious and everything you want in a good quality bread, while being something you can feel good about giving your family. Just look at some of these facts:


All of Brownberry® Whole Grain Sliced Breads and Brownberry® Sandwich Thins® Rolls contain/are:

3 to 4 grams of fiber per slice or thin

Zero grams of Trans Fat

No High Fructose Corn Syrup
Cholesterol free

Health authorities recommend munching on 25-38 grams of fiber and 48 grams of whole grains per day, much of which may come from whole grain products like Brownberry® Whole Grain Sliced Breads or Brownberry® Sandwich Thins® Rolls varieties.

If you’re not sure of how  many grams of whole grains you are getting, look for the Whole Grain Stamp found on all of Brownberry® Whole Grain Sliced Breads and Brownberry® Sandwich Thins® Rolls.


And now, the folks at Brownberry® want to see your best sandwich! In their  “America’s Better Sandwich” Contest, the sandwich artist whose filling best matches the goodness of Brownberry® bread  will win the grand prize of $25,000!!


Here are more details about the contest:
Before entering a better sandwich in the Contest, the entrant should make sure it includes any of the Brownberry®Whole Grain Sliced Breads or Brownberry® Sandwich Thins® Rolls varieties.

There are four (4) sandwich categories in the Brownberry®  “America’s Better Sandwich” Contest including: “Creative Classic” (a healthful twist on a sandwich that has been around for more than two generations, such as a Reuben, BLT or club sandwich), “Stealthily Simple” (maximum of five (5) ingredients), “Fueling Good” (ingredients that help boost your energy such as healthful fats, protein, fiber and iron), and “Meatless Marvel” (no animal products including land and sea animals may be included in the recipe).

The recipe in each sandwich category with the highest score will receive a $5,000 category prize.

Entries will be accepted July 23rd - August 22nd, online consumer voting will take place September 22nd - October 17th, and the winners will be announced on National Sandwich Day- November 3rd.

To submit a recipe, receive tips on creating a better sandwich or learn more about the Official Rules visit:www.americasbettersandwich.com.

For more info and fun, be sure to check them out on Facebook too!

Now, it's time to see what I did with my Brownberry® Bread. That's easy. I let the summer time garden inspire me. Some tasty bread filled with loads of fresh veggies and a flavored mayo that takes it to the next level! This sandwich is one of my favorites and I'm so excited to share it with you! 

Plus, the great folks at Brownberry® want you to try their fantastic bread in your kitchen. They are giving (1) lucky EMM reader coupons for free bread  and a $25 Visa gift card! Just scroll down past the recipe to enter! 


Garden Delight Sandwich with Herb Mayo
Brownberry® Oat Nut Bread
Spinach, washed and dried
Tomatoes, sliced thin
Cucumbers, peeled and sliced thin
Provolone Cheese
Banana Peppers, well drained
1 c. mayo
1 tsp. dried parsley
1 tsp. dried oregano
1 tsp. dried basil
1 tsp. freeze dried chives
Salt and pepper to taste

In a small bowl whisk together mayo, herbs and salt and pepper. Chill until ready to serve. To build sandwich, spread both slices of bread with mayo. Start with cheese on bottom, then spinach, tomatoes, cucumbers and finish with banana peppers. 


Shared on The Country Cook Aug. 15, 2014


To Enter: Leave a comment telling me what sandwich you would love to try with Brownberry® Bread. 
(1) Winner will receive coupons for free product and a $25 Visa Gift Card
Contest Ends Aug. 15, 2014


Disclaimer: The coupons for product redemption, information, and gift card have been provided by Brownberry® Bread so that I could try the product and share my thoughts and information about Brownberry®. The opinions expressed in this post are my own and do not reflect the opinions of Brownberry® Bread.

Saturday, July 26, 2014

Soul Food Saturday


What is it about banana bread that makes us think, something healthy? Is it all the times we have heard the health benefits of bananas; or just one more reason to have an extra slice without any of the guilt? I don’t really need many; I love banana bread any way I can get it. So here is one more recipe to add to your collection, and we are calling it “healthy” because the oil has been replaced in this recipe. But the flavor hasn’t been altered one bit, promise! Grab a cup of coffee, and a friend. This one is best when shared with ones we hold dear.

No-Oil Banana Bread
2 eggs, beaten
1/3 c. half and half
1/2 c. unsweetened applesauce
1 c. mashed bananas
1 c. sugar
 1 3/4 c. flour
1 tsp. baking soda
1/2 tsp. salt
1/2 tsp. cinnamon
1/2 c. chopped walnuts, optional

 Preheat oven to 325 degrees F. Spray one 9x5 inch loaf pan with non-stick spray coating. Set aside. In a medium bowl add eggs, half and half, apple sauce, and bananas. Mix until combined. Sift together sugar, flour, baking soda, cinnamon, and salt. Add to banana mixture a third at a time, stirring to combine. With last addition add in walnuts. Stir to combine, completely. Pour into prepared pan and bake 1 hour and 20 minutes, or until toothpick inserted in the center comes out clean.


Friday, April 4, 2014

Even Better Biscuits

Do you eat with three utensils or four? I know many of you are thinking...pondering...counting on your fingers. Don't worry. I haven't created a new piece of cutlery. What I'm referring to is bread. See, in our family, you have the knife, fork, spoon, and with 99% of meals, some sort of bread product. Biscuits, rolls, sliced bread, muffins, etc...they show up so often we just consider them another utensil to get the food in our mouths.

Even when we go out to eat, some of our favorite go-to places are those we know we will be served complimentary rolls or bread before the meal. What can I say? We are carb lovin' people. And one of those which we enjoy the most are the rolls and butter at a certain steak house. I probably don't even have to say the name. Ya'll know exactly which one I'm talking about. The warm, butter topped rolls with this amazing flavored butter that only makes them "more melt in your mouth" fantastic.

This is so simple, the food processor does all the work for you! Plus, it holds up in the fridge really well. I think it would make a great addition to your Easter table as well. Sure, your guests will be excited with fresh baked rolls, but imagine how giddy they will be when they find this to top them with!

If your family has to have some variety of bread with almost every meal, almost more than they need that spoon, give them a little something extra special to go with it!

Cinnamon Honey Butter
1 stick butter, room temp
1/4 c. honey
1/2 tsp. cinnamon

Combine all ingredients in food processor. Pulse until creamy and combined. Use on biscuits, rolls, bread, toast, etc. Refrigerate leftovers.


Shared on The Country Cook April 4, 2014
 

Saturday, March 15, 2014

Soul Food Saturday #47


I saw this recipe for the first time on Facebook, and had to give it a try. The perfect combination of garlic bread and pizza. How could that be wrong? Now that I have your full attention. This would be perfect for movie night, or a quick after school snack. This combinations are endless. Grab the kids because pizza bread is what's for dinner!

Pull Apart Pepperoni and Extra Cheese Pizza Bread 
1 Can Grands buttery Biscuits
½ c. Mozzarella /cheddar cheese blend
2 tsp. dried parsley flakes
1/4 c. olive oil
4 oz pepperoni
½ c. Parmesan cheese
½ tsp. granulated garlic powder

Preheat the oven to 350 degrees. Cut biscuits into quarters. Cut the pepperoni into smaller pieces. Mix all the ingredients in a bowl and toss so that the oil is spread evenly on each piece of dough. In a 9 inch pie plate, bake for about 20 minutes (or until the top is brown and the center is thoroughly cooked)
TIP: Be sure to check it in the middle before you pull it out. If the middle is still not cooked through allow another 5 minutes at a time until center is done. 


Monday, January 20, 2014

Another Re-Do

Today's recipe is another that I first posted almost 3 years ago! It's funny when I find these previous posts because I can't believe it's been that long since I first shared it. But too, for some of them, I haven't made them since, and I can't imagine we've went that long without enjoying the dish. I mean, the reason I'm going back and "re-blogging" most of them is because 1. only a handful of people would have seen them back then and 2. the photos are...how shall I say....less than up to my current standards, so I want to reintroduce them looking pretty! But that neither of those have anything to do with how great the recipes were, or how much we liked them, so it amazes me that I haven't went back and found them before now. 

I came across this recipe when I was first discovering a food blogger my friends were raving about...Ree Drummond. Yep, ya'll know I'm talking about the Pioneer Woman. So many of my fellow moms/home cooks were making her recipes and loving them; and I have to admit I had never heard of her. Well, that quickly changed! In fact, not long after I "found" her, she became a big star on the Food Network. (I don't think one had any influence on the other though.)

We are olive fiends, so I knew we would love this. It reminded me of a cross between a good olive tapenade and garlic bread. That first time I served it, I was actually entertaining my in-laws, and had it with a baked pasta dish. But we all agreed, it was so filling by itself, it could really stand alone as a pizza like meal. So, this time, when my son requested it, I did exactly that. I served it with my Easy Caesar Salad and it made the perfect meal. It really was like a French bread pizza, or loaded open faced sandwich and with the salad, was just the right amount for an easy weeknight meal.

If you love olives on your pizza, I really recommend making this and using it as a main dish like I did. Or, if you are looking for something new for your next party (the Super Bowl is just around the corner!) you could easily slice this into small pieces for a great appetizer. Either way, it's a re-do I think everyone will enjoy!

Olive Cheese Bread From The Pioneer Woman
1 loaf French bread, cut lengthwise into 2 halves
1 (6 oz.) can black olives, drained
1 (6 oz.) jar stuffed green olives, drained
2 green onions, chopped
1 stick butter, room temperature
1/2 c. mayo
8 oz. shredded Monterrey Jack cheese

Preheat oven to 325. In a food processor, add green and black olives. Pulse until chopped very fine. In a medium bowl combine chopped olives, green onions, butter, mayo and cheese. Stir very well to combine. Spread evenly onto bread. Using hands, press gently to adhere to bread. Bake for 25-30 minutes until cheese is bubbly. Slice into large pieces to serve. 


Shared on The Country Cook January 24, 2014

Olives at Very Good Recipes

Wednesday, November 27, 2013

Party Planning Time

Are you ready for tomorrow? Have you started prepping your meal? Do you still have some last minute additions needed to your party/meal plan? Maybe an appetizer? If so, you've come to the right place. I've got you covered with the most simple, but absolutely delicious "nibbly bit" (as my Monkey calls them) perfect for your party table!

Now to be honest, when I decided to post this, I wasn't even thinking appetizers for your Thanksgiving celebration. I actually tested this recipe a couple weeks ago, already thinking ahead to our annual New Year's Eve appetizer blow out. As many of you know, each year the 3 of us stay in, I make a big spread of appetizers and fun foods, we eat all night, watch movies and ring in the New Year! So about this time of year I begin to look for new things to offer on my table that night, and this will definitely make the list this year!

But then I got to thinking, I shouldn't wait to share this with you. I know many of you need appetizers for your Turkey Day weekend, all of the holiday parties coming our way, Christmas celebrations, so many parties, so little time. So, all of us can always use something quick, simple and yummy to throw together, maybe even at the last minute!

How much better can you get than olives, cream cheese and bacon. Yes, BACON! These are especially nice because you can make batches of them throughout your party, without having to be in the kitchen too long, so your guests always have fresh ones to enjoy.

Party planning time is here people. This time of year we all have so many to attend, and I hope like me, you're looking forward to each and every one. But that doesn't mean we still don't need easy ideas to make the holidays just a little less stressful on ourselves!

Bacon and Olive Toasts
Pumpernickel Cocktail Bread or Large pieces cut into squares
Green olives, sliced
Bacon, cooked crispy
Whipped Cream Cheese

Preheat oven to 375. Lay bread pieces on baking sheet. Toast for 6 minutes. Remove. Spread evenly with cream cheese. Top with bacon and green olives.


Appetizers at Very Good Recipes

Saturday, May 11, 2013

Soul Food Saturday #4

Good Morning! I hope you had a great week and your weekend is off to a good start. And to all the moms out there, a very Happy Mother's Day tomorrow. I hope your day is as special as each and every one of you are! Being a mommy is the biggest pleasure of my life, and I'm so lucky to have this little boy to love and take care of. 

Bekki is back with something that would be perfect for Mother's Day brunch, lunch or dinner! A great copycat recipe that most of us will all recognize! 


There is something really fun about the idea of making food into a holiday. I have realized there are many more reasons to celebrate and I am quite alright with that. I know many of us have decided to eat healthier and make better choices. But keeping our favorites for those celebrations is a treat we all need! Taking our food holiday one step further today is “Eat anything you want day”! With that said who doesn't love those amazing cheddar bay biscuits they serve at every Red Lobster? Bottomless baskets of cheesy garlic, piping hot, little balls of oh my goodness! We need a moment of silence for these little guys, because wow, YES friends they are just that good!

I came across this recipe after talking with a staff member at the restaurant and dying to learn the secret. I tell you what the recipe I found was good. But I wanted GREAT! So after some tweaking here and there, this is what our family felt was certainly in the running for those days you just couldn't make it out to get piping hot biscuits from their source.  


Copycat Cheddar Bay Biscuits Adapted from Top Secret Recipes
2 ½ c. baking mix
4 tbs. cold butter
1 ½ c. grated cheddar cheese
¾ c. cold whole milk
¼ tsp. granulated garlic
Garlic butter for tops:
2 tbs. butter, melted
½ tsp. granulated garlic
¼ tsp. parsley salt
Instructions:
1. Preheat oven to 375 degrees.
2. Combine baking mix with cold butter in a medium bowl with a pastry cutter or large fork. There should be small chunks of butter in there that are that are about the size of peas. Add cheddar cheese, milk, and granulated garlic. Mix by hand until combined, but don’t over mix.
3. Measure approximately ¼ c. portions of dough using an ice cream scoop, or measuring cup. Then form into a ball by squeezing gently until dough is the shape you desire. Place onto an un-greased cookie sheet leaving an inch between each dough ball. Bake for 10-12 minutes or until the tops of biscuits are light brown.
4. When you take the biscuits out of the oven, melt 2 tbs. butter in a small bowl in the microwave. Stir in ½ tsp. granulated garlic and parsley salt. Mix to combine seasonings and butter. Top each biscuit with the garlic butter.
Makes a dozen biscuits
Serve with your favorite meal.  Whether its breakfast, lunch or dinner these will be gone quick and they will all be asking for more. Let’s celebrate “Eat whatever you want day” and eat these with whatever YOU want! Blessings and happy eating!


Pin It

Wednesday, April 17, 2013

Copycat Breakfast For Dinner

Breakfast for supper. It's an American institution. Okay, so maybe not, but it's definitely something many families across the country enjoy. When I was growing up, it was always such a huge treat when my dad would make a big breakfast spread for dinner (Yes, it was always dad when it came to eggs and pancakes) and now it's a treat when I make it for my son. 

Now most of the time when I plan a morning time meal for our dinner, I tend to go the eggs route. Eggs cooked to order, bacon, toast. Or maybe a quiche or baked omelet. Maybe some corn beef hash. (Okay, now I'm hungry again.) But then I remember my sweet tooth and decide to do a meal based on a batter item...pancakes usually. However, for our most recent breakfast supper, I decided to recreate a restaurant favorite at home, and satisfy that sweet craving a different way.

French Toast. I know many of you are drooling at just the words. But what if I add Cracker Barrel to the those words? Have you had it? Do you love it? Is it the best or at least one of the best versions you've ever had? Well, all of these statements ring true for us. In fact, I can honestly say I was never much of a French Toast fan until I had Cracker Barrel's...and then I was hooked. 

For those of you who have never indulged, if you frequent their restaurants, I encourage you to try the original. For those of you who have, I think you will be pleasantly  surprised at just how my copycat it is. The only difference we could notice was the bread. They are famous for using sourdough for their delicious version, but I prefer a little thicker variety, so I chose thick cut Texas toast. (If you've never seen it at your store, look in the bread aisle. I find my at Kroger.) But if you want it to be exact, go ahead and go with sourdough. It's definitely yummy!

If your family loves breakfast for supper too, maybe this French Toast can be on your table soon. Or if your family prefers their breakfast foods for breakfast...try this tomorrow morning!

Copycat Cracker Barrel French Toast
4 eggs
1 c. milk
2 TBS sugar
2 tsp. vanilla
2 pinches salt
8 slices Texas toast

In a large bowl whisk eggs, milk, sugar, vanilla and salt well. Preheat griddle to 350. (Or a skillet to medium) Grease griddle with margarine or cooking spray. Dip bread in egg mixture for 30 seconds on each side. Place on griddle and cook for 4-5 minutes per side until golden brown. 
*NOTE* The first few slices will take a little longer to cook, but after the griddle is heated completely, it might take less time.


Shared on Lady Behind The Curtain Apr. 17, 2013
Shared on Miz Helen's Country Cottage  Apr. 18, 2013
Shared on The Country Cook Apr. 19, 2013

Wednesday, December 5, 2012

It's A Must

I have told you before how some type of bread is almost always included in our dinner. From rolls to garlic bread to simple sandwich bread, the bread portion of our meal is kind of like an extra utensil! And this does not end on the holidays! I remember a couple years ago when my mom was going over our Christmas Day menu with my dad. He asked "What about rolls?" She explained to him she didn't think we needed them with everything else we were having, and how the past couple years she made them and there were many leftover. His answer was "Yeah, so. We have to have them; and if there are leftovers, I will eat those too." Seriously, you would have thought Santa himself had cancelled Christmas with his level of disappointment!  So, needless to say, there were indeed rolls on the Christmas table that year, and every year since! Mom would never even consider omitting them after that reaction! So, if your family is like ours and need those extra holiday carbs (Diets are for the new year!), these easy rolls might be just the answer. Right from the oven, warm with a little butter...mmm...mmm...good! And if you are having a buffet style meal, they are great made ahead and either served room temperature, or rewarmed closer to dinner. Whatever you are serving for your holiday meal, be sure to include rolls or bread of some sort. You never know who is going to show up...and if it's my dad...watch out if you don't!

Easy Yeast Rolls
1 c. warm water
1 pkg. yeast
1/4 c. sugar
1 tsp. salt
1 egg
1/3 c. oil
3 c. flour


Combine first 4 ingredients. Blend egg and oil and add to first mixture. Mix well. Add flour. Mix well. Place in a greased bowl, and cover with greased plastic wrap. Allow to rise in a warm place 1.5-2 hours until doubled in size. Empty dough onto a well floured surface. Knead well. Pinch off about 2 inch portions and roll into balls. Place in a well oiled 9x13 pan . Cover with greased plastic wrap. Allow to double in size. Bake at 375 for 15-20 minutes until golden brown. Makes 16-20 rolls (You will probably have to make more than one batch if using a 9x13 pan.) 


Shared on Lady Behind The Curtain Dec. 5, 2012
Shared on Miz Helen's Country Cottage Dec. 6, 2012
Shared on The Country Cook Dec. 7, 2012
Rolls at Very Good Recipes
Pin It

Monday, November 5, 2012

Talk About A Mind Lapse

I have always been one to have a great memory; and I'm not bragging, it's just a fact. Ask anyone who knows me really well. My mom has always said "She's got the memory of an elephant." And I tend to remember things in a weird way. Give me an event in my life, big or small and there is a very good chance I can tell you what I was wearing. I know, crazy! And the only person I know in our family that has even close to as good of memory is my son! Yep, I passed this trait onto him, and he seems to remember things even his mommy can't. So you can imagine my horror a few weeks ago when someone asked me if I had a recipe for dipping oil for bread; and upon answering "Yes", giving her the link I realized something. I never got around to sharing the recipe for the foccacia bread I served with it. When I shared the oil I had all intentions of going back to blog the bread too, and evidently my brain was in sleep mode because I totally forgot! I literally sat and stared at my computer screen for at least 5 minutes in disbelief! So, I had to make some, simply so I could blog it! This is a great bread for any busy night, and the perfect compliment to any Italian meal. Serve it will the dipping oil (link above), with a little butter or plain. I guess my memory, like me, is not immune to aging. Or maybe I just need to start remembering what I'm wearing every time I cook!

Italian Foccacia Adapted from Allrecipes.com
3 1/4 c. flour
1 envelope rapid rise yeast
1 TBS sugar
1 tsp salt
1/4 c. olive oil, divided
1 2/3 c. very warm water (between 120-130 degrees)
3 TBS shredded Parmesan, divided
2 TBS Italian Seasoning

Mix flour, undissolved yeast, sugar and salt in a large mixing bowl. Add 2 TBS olive oil and water, stirring until well mixed. Spread dough on 9x13 pan. Cover and let rise until doubled, about 30 minutes. Using a wooden spoon handle, poke holes into bread. Drizzle 2 TBS oil over and sprinkle with Parmesan and Italian seasoning. Cover. Let rise 15 more minutes, while you preheat oven to 375. Bake 30-35 minutes until slightly browned. Allow to cool slightly before slicing. If desired, serve with dipping oil, recipe link above.


Shared on Make Ahead Meals Nov. 5, 2012
Shared on Mandy's Recipe Box Nov. 6, 2012
Shared on Lady Behind The Curtain Nov. 7, 2012
Shared on Miz Helen's Country Cottage Nov. 8, 2012
Shared on The Country Cook Nov. 9, 2012

Bread at Very Good Recipes
Pin It

Monday, October 22, 2012

Ground Beef Overload

All of you have heard me say that we are so incredibly lucky to always have a side of beef (and various other meats too) in our deep freezer. There was a day we weren't as lucky and I remember the cost of buying meat each week, and it wasn't cheap. And with a growing boy to feed, our family, even though there are only 3 of us, goes through a lot of meat! Last month, just as we were nearing the end of our supply it was time for another cow to be butchered and we were once again bringing home enough meat to fill our chest freezer to the brim once again. Each time we "refill" alongside the roasts and steaks, there is always an abundance of hamburger. Package after package, it is definitely what we end up with the most. So when I know there are more than enough packages to go around, I start to come up with as many recipes as I can using ground beef. Let's face it, it's kind of the "go-to" meat for busy moms. From burgers and sloppy joes, to casseroles and tacos, there are an infinite possibilities to what a mom with hungry eyes staring at her can do with a pound of ground beef. These sandwiches are a great new twist on a classic loose meat (basically a sloppy joe without the sloppy) and are just as easy to make. They would also be terrific cut into smaller portions for a tailgate party! If you have ground beef "coming out of your ears" too, maybe I just helped you use some it!!

Cheesy Hot Beef Sandwiches Adapted from Pillsbury
1 1/2 lbs. ground beef
1 small green bell pepper, finely diced
8 oz. Cheddar-Monterey Jack Cheese
2 tsp. dried parsley
1 envelope French onion soup mix
1/4 c. water
1 large loaf French bread
Salt and Pepper to taste

Preheat oven to 350. In a large skillet, brown beef seasoned with salt and pepper until no longer pink. Drain if necessary. Return to skillet. Add green pepper, parsley, water and soup mix. Stir well to combine. Add cheese a little at at time allowing it to melt and combine. Cut bread lengthwise. Carefully remove inner part of both halves, leaving 1/2 inch around edges. (Basically make 2 bread "boats".) Carefully spoon meat mixture into both halves, pressing down. Gently flip top half onto bottom and wrap in double layer of foil. Place on baking sheet and cook 20-25 minutes. Cut into sections to serve.


Shared on Make Ahead Meals Oct. 22, 2012
Shared on Mandy's Recipe Box Oct.  23, 2012
Shared on Lady Behind The Curtain Oct. 24, 2012
Shared on Miz Helen's Country Cottage Oct. 25, 2012
Shared on The Country Cook Oct. 26, 2012

Ground Beef at Very Good Recipes
Pin It

Saturday, September 15, 2012

Weekend Company {Guest Blogger Tricia}

Good Morning and welcome to another Saturday! This is a very special weekend in our house, for it's Monkey's birthday weekend. That's right, my baby, and now little man, turns 8 tomorrow! We'll be celebrating all weekend long with his Avengers party today and Chuck E Cheese for the 3 of us tomorrow. I'm so happy my loving cousin is joining us today in the kitchen sharing something in honor of this special birthday! I love you Tricia, and am so blessed to have you in my life! Please welcome her back to EMM~


I want to thank Krista for inviting me to guest blog on the eve of a very special day! I can't believe that it was 8 years ago that her little monkey made his entrance into the world. Unfortunately we don't get to see him as often as we'd like but it has been a blessing to watch him grow and change from an infant to a toddler to a little boy. He is on his way to becoming a young man and what an amazing young man he is! We are so proud of him and especially blessed to be able to call him our cousin.

When Krista asked me if I would be interested in being her guest today I knew right away I wanted to make Monkey Muffins in honor of her Monkey. 

I grew up eating Monkey Bread and absolutely love it. If you are not familiar with Monkey Bread, it is little balls of dough rolled in cinnamon sugar placed in a bundt pan, topped with a caramel sauce. The finished product is sweet, ooey, gooey deliciousness!  The Monkey Bread I grew up with was made with homemade bread dough or frozen bread dough. I much prefer it with either of those, however, I've grown to enjoy this simplified version. 

Traditionally, Monkey Bread is made in a bundt pan. This version, made in muffin pans makes for a quick breakfast. I also love the individual portions because it helps with portion control which is always a problem when it comes to Monkey Bread.

Again, traditionally, I've had cinnamon Monkey Bread. However, there are many versions: cheese herb, garlic &cheese, pumpkin, etc. I have been really into Fall o I decided to go with an Apple Monkey Muffin. I added a cream cheese glaze and decided after that I am definitely doing a Pumpkin version with pumpkin pie spice and a cream cheese glaze. Yum! 

Apple Monkey Muffins

1 tsp apple pie spice
1/4 cup white sugar
1 12 oz. can refrigerated biscuits
1/2 cup brown sugar
3 Tbsp butter
1 tsp water
1/2 tsp vanilla
1 apple (such as Golden Delicious or Granny Smith)


Preheat oven to 350. Spray 6 cup muffin tin. Separate dough and cut each biscuit into 6 pieces. Roll pieces into balls. In a small bowl combine apple pie spice and white sugar. Roll dough ball in sugar mixture then place in pan. Approximately 6 pieces in each muffin cup. 

Combine brown sugar, butter, water and vanilla in a small saucepan. Over medium heat, bring sugar mixture to a boil stirring continually until sugar is dissolved, about 2-3 minutes. Spoon mixture evenly over biscuit pieces .

Bake until golden brown and tops spring back when touched; approximately 8-12 minutes. Remove from oven and let cool in pan for 2 minutes. Don't let cool in pan longer than 5 minutes or you won't be able to get them out of the pan! 


Cream Cheese Glaze

3 oz cream cheese, softened
3 Tbsp powdered sugar
2 Tbsp milk
1/4 tsp vanilla

Beat sugar and cream cheese and sugar then add milk and vanilla.  Drizzle over warm muffins. 


Happy Birthday, Alex!!!!! We love you bunches and bunches!!


Pin It