Everyday Mom's Meals: Peanut Butter
_____
Showing posts with label Peanut Butter. Show all posts

Sunday, June 3, 2018

Summer Time Snacking

School is out! Hooray!!! Seriously, those last couple weeks were rough! And then the fact we had to go back after Memorial Day for 1.5 days was almost torture. But we persevered and don't have to set an alarm or pack a lunch until August!

I adore summer vacation. I realize it is different for me because I am at home, and don't have the stress of additional child care, but I cherish every minute he's home with me. And now that Max is old enough to understand "Bruh Bruh" is home with us, well let's just say it even more special.

One of the things that I do recognize has being harder during these months is the fact I have to feed the teenager that extra meal every day, every week! I find myself going to make Max's lunch and saying "Oh that's right. Alex might want something too." Now, to be fair we are only a few days into summer vacation, so I'm still getting into my groove. But it isn't just lunch! He wants snacks too! I swear, these kids...they think they need fed 24/7. LOL

I love making trail mixes because we can all enjoy them. Even Max now! (Sure he likes to pick out the M&Ms, but he does like the pretzels and cheese crackers too) And in the summer, they are perfect for snacking in the car, at the park, beside the pool, or just hanging out in the back yard. True story, if you would have seen us last weekend in our back yard, Max was in his baby pool, and the three of us were sitting around it, watching him, and passing around a huge bowl of this!

Sweet and salty together are one of my favorite things. Even flavor combos you think might not work do. Mr. E made the comment he didn't know how the candy and cheese crackers would taste, but they were really good!

You can always add some other ingredients your family loves too. Make it your own! Let the kids get in on the action too--they could come up with some interesting combos!

Summer break is something I look forward to all school year long. My boys, with me, adventures to be found, and yummy snacking on the way!

Sweet n Salty Trail Mix
4 c. twist pretzels
3 c. cheese crackers
2 c. honey roasted peanuts
1 1/2 c. roasted almonds
1/2 c. M&Ms
1/2 c. Reece's Pieces
1/2 c. raisins

Mix all together in a large bowl and store in an airtight container. 


Shared at Weekend Potluck

Disclaimer: I received free samples from Kroger and MyMagazine Sharing Network for use in this post.

Monday, July 18, 2016

Another Recipe Contest

Yep, once again I am trying to see if a recipe I create can be named "best in show." I have to admit, I really enjoy entering recipe contests, but just don't have as much time to do them right now as I would like. (For those of you keeping track, I am almost 9 months pregnant...hence the short on time issue!)

But when I heard about this one from JSL Foods, I decided to make the time to enter one more before my days are completely full of bottles, diapers and cooing!

The idea was simple. They would send me whichever of their products I wanted to incorporate into a recipe and then I got to play and create in my kitchen. How cool!

I decided to use their Teriyaki Yakisoba Noodles, but in a different way than I normally would.


We are Asian food fanatics, but in the summer time, we are also salad ones too. We like eating lighter, cooler and more refreshing meals when the sun is beating down and it's too hot to move. So I decided I could take these tasty noodles, add some fresh ingredients, a tasty sauce and create a salad that is both filling and light at the same time.

This makes a terrific main dish, with some fresh fruit on the side. Or whip up a big batch of it for your next cookout. Feel free to add whatever veggies you think you would be delicious, I think I might add zucchini next time.

If you want to learn more about JSL Foods and all the great products they have to offer, check them out online, on Facebook and Twitter. Or, look for them at your local Safeway or Target store. Oh, and wish me Good Luck!!

Sweet n Spicy Asian Noodles Salad
3 packages Fortune Teriyaki Yakisoba Noodles, sauce packets discarded
1 (12 oz.) bag frozen cooked medium shrimp, thawed and tails removed
1 (8 oz.) bag frozen shelled edamame, thawed
1 lb. fresh broccoli crowns, cut into florets
1 red bell pepper, julienned
1/4-1/3 c. creamy peanut butter
1/4 c. soy sauce, extra for serving
1/4 c. lemon juice
1/2 c. chicken broth
3 TBS sesame seeds, extra for garnish
1-3 tsp. sriracha, to taste

Bring 2 large pots of water to a boil. When they are rapidly boiling, add noodles to one, and broccoli to the other. Cook EACH 2 minutes total. Immediately transfer both the noodles and broccoli to a large bowl of ice water to stop the cooking process. Drain well.  In a medium bowl whisk together soy sauce, lemon juice, chicken broth, peanut butter, sriracha and sesame seeds. Transfer noodles and broccoli to a large bowl. Pour sauce over. Add shrimp, peppers and edamame. Toss to combine. Chill for at least an hour before serving. Stir well again. Sprinkle with extra sesame seeds. Serve with extra soy sauce on the side. *NOTES* I use 2 teaspoons of sriracha, because I can't take much heat. Feel free to use less or more depending on the heat level your family enjoys. Or, you can always serve extra on the side. When you pour the sauce down over the noodles, you will notice extra. This is fine because it will absorb a lot while chilling. 

Wednesday, October 7, 2015

Celebrate #Oatober with Peanut Butter & Co.

Just in time for Halloween, and all the sweetness that goes with it, I've teamed up with my good friends at Peanut Butter & Co. and Bob's Red Mill to transform October into "Oatober"!

I've got something that the little ones can not only enjoy for an after school snack, lunchbox treat, or Halloween party dish, but can also help make! They will love getting their hands sticky and messy, and then maybe even licking them when done!

So many schools don't allow homemade treats at classroom parties, but if yours is okay with it, these would be perfect! So yummy and a perfect little sweet bite.

We love peanut butter. Like eat from the jar with a spoon love, so the double peanut butter punch in these, with the Reese's candies, makes them extra special.

If you're looking for something fun to make with your kids, or maybe something to feed all those little goblins and witches that come to your big Halloween bash, I've got you covered!

No Bake Halloween Balls
2 1/2 c. old fashion oats ( I used Bob's Red Mill)
1 c. creamy peanut butter (I used PB & Co. Smooth Operator)
1/2 c. honey
1 tsp. vanilla
1/2 c. mini chocolate chips
1/2 c. Reese's pieces

Combine all ingredients in a large bowl. Mix well. Roll into balls. Chill for 30 minutes to set. Store in fridge in airtight container. *NOTE* When rolling, some of the candies will want to fall out. Just keeping pressing. 


Shared at Weekend Potluck

Disclaimer: As part of Yum Squad I received product in exchange for this post. All thoughts, opinions and the recipe are all mine.

Friday, April 10, 2015

Easter Treat Withdrawal

So, we have amazing friends. No doubt. But in the past week, one of those friends definitely scored extra bonus points with us. (Okay, that's not how it really works, but she really did treat us!)

Starting quite a few years ago, this friend would get us the same Easter treat every year. A giant, homemade peanut butter egg chocolate. I'm talking big enough for several portions. This started back before we even had Alex. And I'm not joking when I said Mr. E and I would fight over this egg every year. It became a joke between us her, because I would always tell her about us chasing each other around the kitchen for the last bite. Don't judge. You have no idea how delicious this egg is.

Then little man came along, and we realized we were going to have to share our egg with him. Well, not for the first few years. When he was really little, we just hid it from him. He had no idea it even existed. Again, don't judge. This egg is the best thing ever. But then he got old enough to know about the egg, and after one bite was as hooked as we were. So now we had to split this egg three ways. Sigh...

Then there were a couple years we had to do without our egg. Gasp! I know! So sad. Each Easter we would talk about the egg. Dream about the egg. Lament we didn't have the egg. Then last week this friend told me she had something for us. "An Easter treat." Could it be? Could we be that lucky? YES! We got our egg! Oh, it was just how we remembered it too!

And now, here we are a week later, and the egg is gone. We are trying to keep our chins up. But in the meantime, I needed to satisfy our withdrawal symptoms. These muffins were our answer! Oh my gosh, they are so yummy! They taste just like a peanut butter cup, and are the perfect bite size for snacking! Use them for breakfast, after school snacks or packed lunches.

If you love peanut butter and chocolate as much as we do, you will flip for these as much as we did. And now, we can have our favorite flavors the other 11 months of the year too! 

Peanut Butter Cup Mini Muffins 
Makes 36 mini muffins 
1 3/4 c, flour
2/3 c. packed brown sugar
2 1/2 tsp. baking powder
1/4 tsp. salt
1 egg
3/4 c. milk
2/3 c. chunky peanut butter
1/4 c. vegetable oil
1 1/2 tsp. vanilla
2/3 c. miniature chocolate chips

Preheat oven to 350. Line a mini muffin tin with papers. In a large bowl combine flour, brown sugar, baking powder and salt. Mix well. In a medium bowl whisk together egg, milk, oil, peanut butter and vanilla. Add to dry ingredients and mix just until moistened. Fold in chocolate chips. Fill each muffin well 2/3rd full. Bake for 15-17 minutes until toothpick comes out clean. *NOTE* This batter is VERY thick. If you think it's a little too thick when you are stirring, add a splash more milk to make it easier to combine.


Shared on The Country Cook April 10, 2015


Friday, August 8, 2014

My First Time

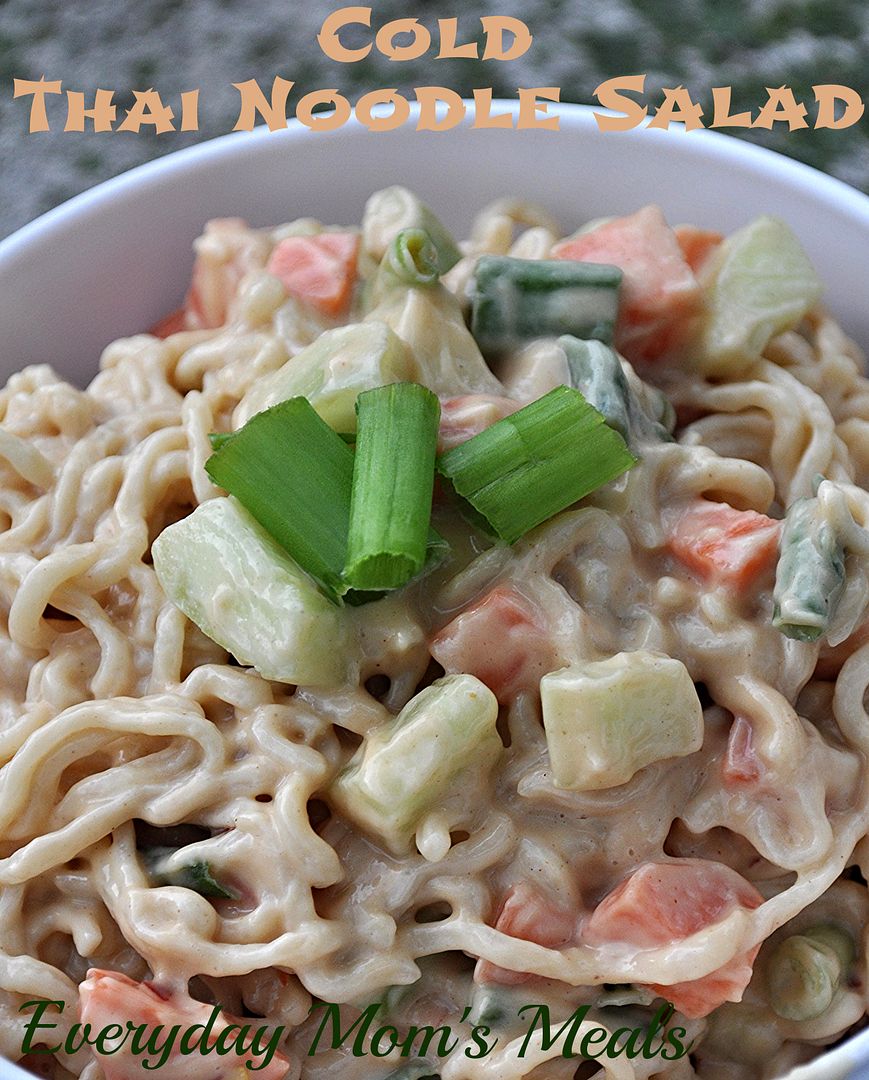
Thai food. Do you love it? Or maybe I should start with, have you ever tried it? I say that because until a few weeks ago, I hadn't. I have been wanting to for a long time, and my hubby has been encouraging me to because of his love of it, but I just never had the opportunity until now. 

I will be honest, I had always been a tad apprehensive to try Thai because I had heard how a lot of it is spicy; and as I've said before, I'm a wimp and while the mister enjoys tears it while he eats, I do not. Now, usually when I am going to try a new cuisine for the very first time, I "leave it to the experts" so to speak. As in, I will go to a restaurant that is known for it, or I will have someone who prepares it on a regular basis treat me. But this time, I found a great recipe on a great blog that I just knew would be the best way for me to stick my toes in the water, so to speak.

If you love cold noodle salads, this is going to be your new favorite go-to. If you have never made one at home, this is going to be your new favorite period. This makes a great side dish with some egg rolls or hot and sour soup. Or make a double batch and turn it into a light summer, it's too hot to cook, supper. Or, make that same double batch and you have lunch for the week! I think it would be a great dish to take to your next potluck or cook-out too...something new and unique everyone will rave about! You will be the one with the dish everyone wants the recipe for! 

If you are like me and have never tried Thai food, then this should definitely be your first time. This creamy, cool, crunchy, sweet and savory all rolled into one, delicious, simple dish will have you wanting to try even more as soon as possible!

Cold Thai Noodle Salad From Cajun Mama Cooks
2 (3 oz.) packages ramen noodles, any flavor, seasoning packets discarded
3/4 c. coconut milk
3/4 c. peanut butter
1 medium cucumber, seeded and finely diced
6 green onions, chopped
2 medium carrots, peeled and finely diced
1/4 tsp. red pepper flakes
1/4 c. lime juice
1 TBS sugar
3/4 tsp. salt

Bring a medium pot of water to boil. When boiling, break noodles into water. Cover and remove from heat. Let sit until noodles are tender. Drain and rinse with cold water, separating with fork. In a large bowl whisk together peanut butter, coconut milk, lime juice, red pepper flakes, sugar and salt. Add veggies. Stir to coat. Add noodles. Toss gently to coat. Chill until serving. 


Shared on The Country Cook Aug. 8, 2014
Thai at Very Good Recipes

Wednesday, May 14, 2014

Springtime Snack with Peanut Butter & Co. {A Giveaway}

I don't know how it is in your house, but when the temps start to rise, and we are spending more and more time outdoors, our appetites begin to rise with them. I guess we're so busy and doing so many fun activities outside, instead of sitting inside avoiding the cold of winter, we burn more calories and need to refuel more often. 

And then when summer vacation arrives (In this house, that's in 17 days...not that I'm counting or anything!) it takes me a few days to remember I'm responsible for feeding this little person lunch every.single.day. until school starts again! Not to mention snacks while he is enjoying time outside, or while we are on the go doing all the things we love to during summer. 

Needless to say, easy, effortless, yummy snacks are a must in this house! They have to be something you can eat with your hands, no matter what you're doing, and they need to give us the energy we need to suck every last drop of fun out of summer we can! 

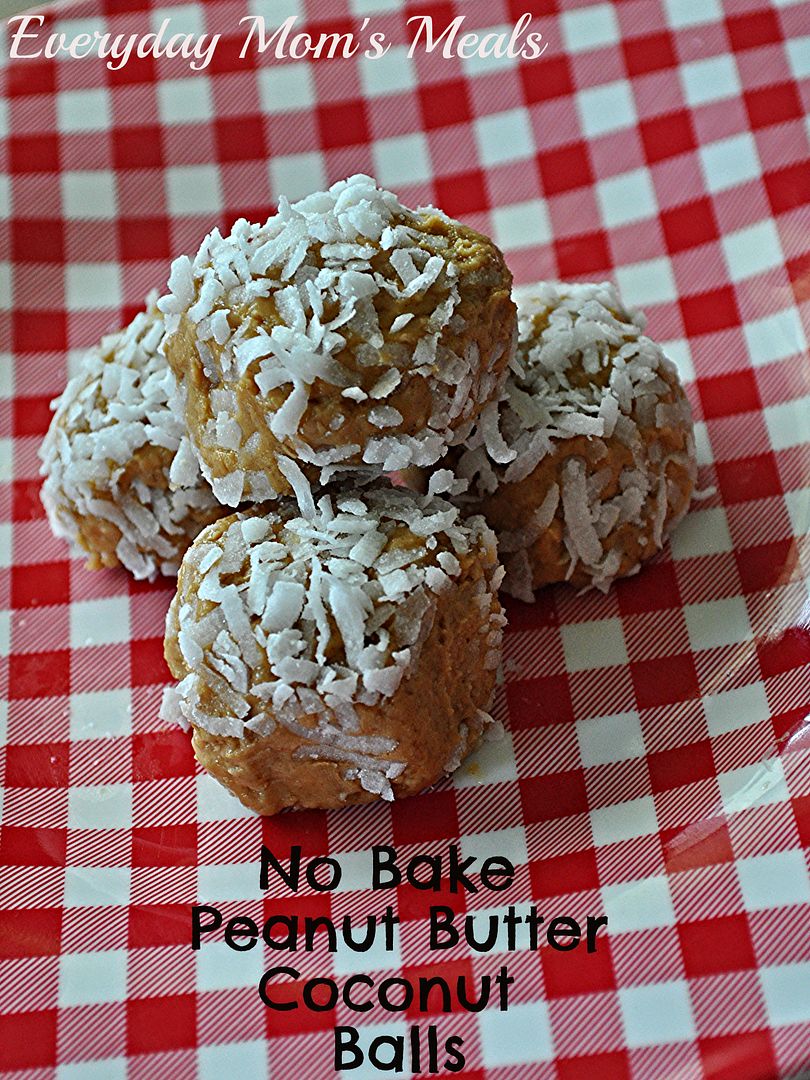
That's exactly what I had in mind when I created these using my buddy's Peanut Butter & Co's The Bees Knees Peanut Butter! My son loves the flavor of peanut butter and honey. In fact, during the school year, it's one of his favorite sandwiches for me to pack in his lunch. So when I remembered a friend telling me about these no bake peanut butter balls she makes for snacks after her trip to the gym, I knew this peanut butter would be perfect in them! 

If you love peanut butter, you're going to flip for these. If you love no bake sweets, you're going to flip for these. If you love coconut, you're going to flip for these. (Oh, and if you don't, you can easily roll them in something else. Chopped nuts perhaps!) These are so easy, even the kids can get in the kitchen and help make them. Yet another thing we love to do during summer vacation...usually on rainy days! 

The summer months are just around the corner, and your family is going to need extra energy to stay ahead of the sun. So be sure to make a big batch of these for them to nibble on while around the pool, enjoying a ball game, having a picnic, whatever summer means to you. Oh, and Peanut Butter & Co. wants to send (1) lucky winner 2 jars of The Bee's Knees to try in your kitchen! Just scroll down for the giveaway!! 

No Bake Peanut Butter Coconut Balls 
1/2 c. old fashioned oats
1 c. Peanut Butter & Co. Bee's Knees Honey
1 tsp. vanilla
2 pinches salt
1/3 c. sweetened flaked coconut

Place oats in a food processor and pulse until very fine. (Think flour consistency) In a large bowl add ground oats, peanut butter, vanilla and salt. Stir well. Using a cookie scoop, form balls, about 1 inch in diameter. Roll in coconut. Place in fridge for 1 hour to set. Refrigerate leftovers.


Shared on The Country Cook May 16, 2014


a Rafflecopter giveaway
Disclaimer: As a member of Peanut Butter & Co.’s Yum Squad food blogger club, I received product in exchange for this post. All opinions expressed are my own.

Friday, February 14, 2014

A Snow Day and Fractions Lesson

So, yeah, I'm that mom. The one who takes "fun" snow days and turns them into "you can still learn days." But before you chastise me too much, let me explain.

Since the beginning of January, our schools have been closed more than they have been in session. I'm not exaggerating. These kids have barely been in the classroom! Now, I'm not complaining. The weather has been insane this winter, dumping more snow on Indiana than we've seen in almost 30 years. Then add in the days where the temps didn't reach 0 and wind chills were as low as -40, and it has been down right too dangerous for kids to be in school. As much as I don't enjoy having to make up these days off come June when the weather is beautiful and we are ready to begin summer vacation, I am always happy to know my baby is home with me, safe and warm.

But when the snow days start to pile up and you can see the brain cells being withered away from not being in the classroom, a mom has to do what a mom has to do. Sure, we can still have fun and enjoy all the things a snow day was made for, but along the way we can learn a little something too.

One of our favorite things to do on a snow day, of course, is be in the kitchen together. So on this snowy, cold day I figured we could do just that, but at the same time have a little math lesson along with our fun. So I found a recipe that I could easily half and have Monkey work on some fractions while we were having fun baking something yummy. They had just started working on fractions in class, so I figured this was a hands-on lesson he could really benefit from!

These are so simple, making them perfect for little hands to help measure, mix, and make. And they come out sweet, chewy and absolutely yummy! What a perfect snow day treat, lunchbox dessert, after school snack, or weeknight dessert.

Now the recipe I'm sharing with you is the halved one we made. If you wish to make more, simply double it and follow the baking instructions in the note below. And if you do, maybe you can teach your kids about fractions too, especially if they are like my son, and only in school once or twice a week thanks to Mother Nature!


Chewy Peanut Butter Bars From Taste of Home
1/4 c. creamy peanut butter
1/4 c. butter, cubed
3/4 c. sugar
1/2 c. flour
1 egg, slightly beaten
1/2 tsp. vanilla

Preheat oven to 350. Lightly grease a 8 x 8 baking pan. In a microwave safe bowl cook butter and peanut butter for 1 minute, or until melted. Stir until creamy. In another bowl combine flour and sugar. Transfer butter mixture to a medium mixing bowl. Gradually add flour mixture to butter mixture and stir. Add vanilla to egg. Using an electric mixer, beat egg mixture into flour mixture until smooth. Spread into greased pan and bake for 20 minutes or until lightly golden and edges pull away from pan. Cool on wire rack for 1 hour. Cut into bars. *NOTE* If you choose to double this recipe, use a 9 x 13 pan and bake for about 30 minutes.


Shared on The Country Cook Feb. 14, 2014
 
Disclaimer: As a Field Editor of Taste of Home, I share my own thoughts and opinions of this recipe. I am not a paid employee. 

Tuesday, January 28, 2014

31 Days of Dark Chocolate Dreams {A Review & Giveaway}

Do you love peanut butter? Do you love trying new flavors of peanut butter? Do you love making yummy snacks for your kids to enjoy after school or maybe packed in their lunch? If you answered "Yes" to any of those, then boy have I got a treat for you!

My good friends over at Peanut Butter & Co. are so excited to announce the release of a new cookbook, 31 Days of Dark Chocolate Dreams, featuring  a month's worth of recipes using their Dark Chocolate Dreams all natural peanut butter, written by Founder and President, Lee Zalben.

This cookbook is page after page of delicious treats, the one only more exciting than the last. Containing recipes for everything from breakfast to snacks, to desserts and candy...it has a little something for everyone.

When I received my advanced copy and started flipping through the pages, I only made it to #15 before I found the first thing I wanted to try. Reading the description of "These bears are a marriage of differences-sweet and salty, chewy and crispy, and smooth and crunchy" had my mouth watering! I love all of those combinations, and in one tasty snack I could make for my son, how exciting!

These would be perfect for after school, packed lunches, or an on-the-go treat. Heck, throw a couple in your gym bag for a pick me up after a long workout. However or whenever you make them, they are sure to please everyone in your house young to old.

Now, here is the greatest part! The kind folks at Peanut Butter & Co. also want to send one lucky EMM reader a copy 31 Days of Dark Chocolate Dreams and a jar to play around with in your kitchen too. Just keep reading after the recipe for all the details and follow the instructions to enter!


Dark Chocolate Dreams Trail Mix Bars
1 c. firmly packed brown sugar
2/3 c. Dark Chocolate Dreams peanut butter
1 large egg
5 TBS unsalted butter, melted
1 c. flour
1/2 tsp. baking soda
1/8 tsp. cinnamon
1/4 tsp. salt
2 1/4 c. rolled oats
3/4 c. roasted peanuts
3/4 c. chopped pretzels

Preheat oven to 350. Spray a 9x13 baking dish with nonstick spray. In a large bowl, whisk together brown sugar, peanut butter, egg and butter until smooth and creamy. Whisk in flour, baking soda, cinnamon, and salt until well combined. Fold in oats, peanuts and pretzels. Turn out into baking dish. Cover the mixture with plastic wrap and press down, packing the bars into the dish and removing air pockets. Discard plastic wrap and bake for 20 minutes, just until they begin to turn a slightly darker color. Let cool 2 hours before cutting. Store in airtight container for up to 10 days.


Disclaimer: I received (1) cookbook and (1) sample for this review. Plus an additional set to giveaway. All thoughts and opinions are my own.

Saturday, January 4, 2014

Soul Food Saturday #37

Good Morning, and welcome to the first weekend of 2014! I hope you had a wonderful holiday and rang in the New Year with those you love the most. If you're keeping with tradition and want one more pork meal to add some luck to your new year, Bekki has something I think you'll enjoy!


One night all I could think about was lo mien noodles in spicy peanut sauce. I don’t eat much pasta now days and didn't have any to cook even if I had thought about it a few minutes longer. So I decided why not take it another way? Add meat to the peanut sauce and some shredded cabbage. I’d get the sauce and veggies at the same time. Who doesn't need one more one pot meal? If you’re like me, I can never have enough new ones. Grab a pen you’re going to want to jot this one down. Enjoy!
Pork with Cabbage and Spicy Peanut Sauce
2 lb. boneless pork roast, chopped
1 large onion, sliced
1 small head of cabbage, shredded
2 tbs. crunchy natural peanut butter
¾ c. soy sauce
1 tbs. red pepper flakes
3 tsp. granulated garlic
Salt to taste
1 tbs. olive oil
In a large pan add oil and onions. Cook until onions are clear. Add pork, season with salt garlic and half of red pepper flakes. Stir to combine. Cook until pork is cooked through. Make a small space in the middle of the pan by pushing pork back against edges of pan. Add peanut butter and allow it to melt slightly. Add 1/3 of soy sauce and stir into peanut butter to begin to thin it. As it bubbles it will thicken and continue to melt. Add the second third and continue to stir. Then the final addition, it will be loose enough to distribute throughout the pork. Add the remaining red pepper flakes, and then stir to combine with pork with the sauce. Add shredded cabbage and stir to coat with the sauce. Cover and cook until cabbage is tender, stirring often.


Monday, October 28, 2013

After School Snack Inspiration

After school snacks. We all had our favorites, and our children have theirs. But there have always been stand-bys that moms everywhere depend on, knowing they will be loved no matter how many times the little ones come home to them. Cookies and milk. Veggies with dip. Apple slices and caramel. Peanut Butter and bananas. They are what we turn to when the child walks through the door starving, and you want to make sure they get a little nosh, but don't ruin their supper. And the last one in that list was the inspiration for this dessert.

Oh, and have you seen the mini graham cracker pie shells in the baking aisle? They were also inspiration for this recipe. I've used them several times now and love them. They allow me to make mini desserts that are cute, simple and the perfect serving size! If you haven't, they are right there next to the other pre-made crusts!

Basically I had bought these mini pie shells but had no idea what I was going to do with them yet. Then I started thinking of new flavor combinations for pies, and with my brainstorming, this happened. If you love the flavors of banana and peanut butter together, you're gonna flip for this! Plus, something magical happens when the pudding meets the peanut butter and then they both meet the Cool Whip. It's a wonderful thing.

Now, I know some out there are going to look at this recipe and be critical of just how much help I took from the store. That's fine, go ahead and hate. But I'm okay with it, and I know many of my fellow crazy busy moms out there will appreciate it. If you have the time to make fresh banana pie filling, go for it! Or if you prefer to use a box of instant pie filling, go ahead. I actually probably would have done that myself had I not been able to find the canned variety.

These would be perfect if you're hosting a Halloween party later this week. Kids will enjoy the flavor and size. Adults will love the flavors reminding them of their childhood. It's a win win dessert...

Mini Peanut Butter and Banana Pies
12 mini graham cracker pie shells
1 (21 oz.) can banana cream pie filling
1 (4 serving) box instant vanilla pudding
1 c. cold milk
1 tub Cool Whip
1/2 c. creamy peanut butter
Roasted Peanuts, chopped, for garnish

In a medium bowl combine pudding mix and milk. Whisk for 2 minutes. It will be thick. Stir in peanut butter. Mix well. Gently fold in Cool Whip. Divide pie filling among pie shells, about 2 TBS each. Add peanut butter mixture to a gallon sized plastic bag. Cut off tip, creating a pastry bag. Pipe peanut butter mixture evenly over each pie. Top with chopped peanut. Chill to set, about an hour. Refrigerate any leftovers. *NOTE* When measuring out the peanut butter, first run the measuring cup under hot water. This will allow the peanut butter to slide out easily.


Shared on The Country Cook November 1, 2013


Peanut Butter at Very Good Recipes

Monday, April 22, 2013

Perfect (Asian) Side Dish

When I plan an Asian inspired meal, sometimes the main dish is just the beginning. I want sides that match the "star" of the meal in deliciousness, bite for bite. And sometimes, that is a challenge in itself. Not because I can't find anything to make, but because I find myself making the same things over and over because we enjoy them so much. So when can take something I know we love, like noodles, and switch them up a little bit with a new recipe, I am almost insured a success.

I have never had Thai food, but I've been wanting to try it for quite some time now. And one of the things I hear about over and over in Thai cuisine are "peanut noodles." But usual, those two words are preceded by another which doesn't go well into my vocabulary....spicy. I've shared with you before how Mr. Everyday loves spicy food. In fact the hotter, the better. And yes, Little Everyday definitely inherited the "hot" gene from his Daddy. Which is funny because Adam inherited it from his grandpa, so I guess the tradition lives on. But mama just can't handle it...at all!

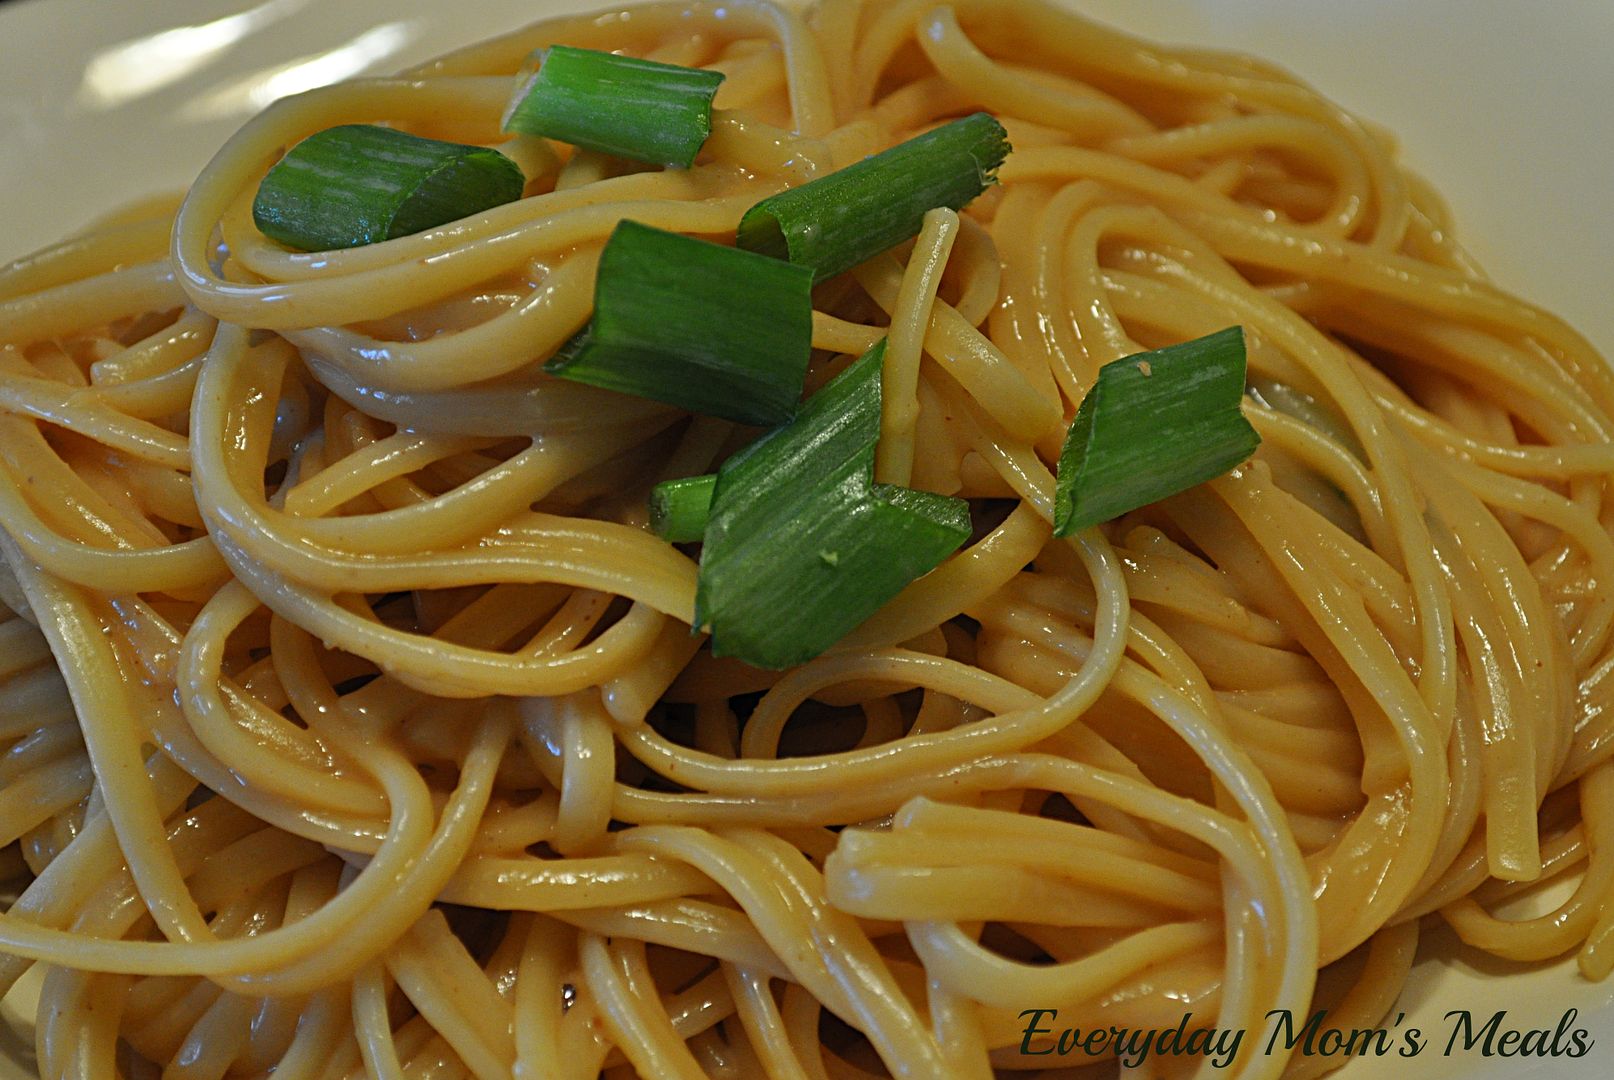
So you can understand how excited I was when I found a peanut noodle recipe that in no way included the word spicy, or after looking at the ingredient list, anything that could even be considered spicy! This recipe couldn't be easier. We're talking boiling water, stirring pasta, making a quick sauce and wah-lah...a side dish is born.

If your family loves Asian food, I know they will adore these noodles. Such great flavor, and the perfect compliment to any Asian inspired meal!

Easy Peanut Noodles Adapted from Food Network
12 oz. linguine, cooked and drained
1/4 c. creamy peanut butter
2 TBS rice vinegar
3 TBS soy sauce
1 TBS vegetable oil
1 TBS honey
1 TBS grated fresh ginger
4 green onions, chopped on a diagonal, a few left for garnish

While pasta is cooking, add peanut butter to medium glass bowl. Microwave for 15 seconds until soft. Whisk in vinegar, soy, oil, honey and ginger. Mix until well combined. Before draining pasta, add 2 TBS starchy cooking water to peanut sauce. (It should be thick but pourable) Stir well. Add noodles to a large bowl. Add green onions. Pour sauce over. Combine well, coating all noodles with sauce. Garnish with green onions. Serve warm, room temp or cold!
*NOTE* When measuring ingredients, use the same TBS for the oil, and then the honey, it will slide right out!


Shared on Make Ahead Meals Apr. 22, 2013
Shared on Mandy's Recipe Box Apr. 23. 2013
Shared on Lady Behind The Curtain Apr. 24, 2013
Shared on Miz Helen's Country Cottage Apr. 25, 2013
Shared on The Country Cook Apr. 26, 2013
Asian at Very Good Recipes
Pin It

Saturday, October 20, 2012

Weekend Company {Guest Blogger Erin}

Good Morning! Are you as happy as I am that the weekend is once again upon us? Did you have a good week? I hope so. We actually get a 3 day weekend this week because Monkey had Fall Break yesterday, and believe me, the extra day was much appreciated!  It seems like the weeks are going by faster and faster, with us already into the last half of October already!

Today I have a real treat for you. My dear friend Erin is back once again with such a decadent recipe the pictures had me drooling the minute they showed up in my inbox.

For those who don't know, Erin and I have been friends for over 20 years now, and while life may get in the way of us seeing each other as much as we would like to, we always find a way to catch up, and immediately pick up right where we left on. So, when she is kind enough to drop by EMM to share something delicious, it's extra special for me because it's as if we are sitting down over a cup of coffee, sharing something we both love...food.

~So please welcome her back, sit down, and stay a bit~


Good Morning!  Happy Saturday to all!  I am so honored to be guest blogging again here on Everyday Mom’s Meals.  Krista and I have been friends for over twenty years now and I can honestly say, without a doubt, we will be friends for the rest of our lives.  I love watching her blog grow and develop and I am always impressed with the new and exciting things she has to offer!


Today I would like to share with you a recipe that is near to my heart.  You see, I was born and raised in Indiana and I love my cornfields!  I would have been perfectly content to spend my days on familiar ground; but God had bigger plans for me, and in 2004 I graduated from college, got married and moved to Ohio.  I love Indiana and I always will; but now my life is in Ohio.  I’m not a Hoosier and I’m not a Buckeye, so what am I?  I’m a Hoosier-Hioan!  That is what inspired me to create this cake.  I have been to a lot of church suppers in my life, and there was always a sheet cake.  Always.  At least in Indiana!  The sheet cake was a novel concept to all my new church friends here in Ohio.  I’ve made lots of sheet cakes, white ones, chocolate ones, all good in their own right.  I’m always looking for ways to improve on favorite recipes, so when I made my chocolate sheet cake recipe, I decided to kick it up a notch.  I started by adding whipped cream – good, but common.  Then it came to me…..BUCKEYES!  I make buckeyes at least once a year.  Yummy peanut butter and chocolate bites no one can resist.  My cake had the chocolate; it just needed the peanut butter!  I tinkered with a basic peanut butter sauce until I got it just right.  Served on my rich chocolate sheet cake, with whipped cream on top, the sauce was PERFECT.  And so the Hoosier-Hio cake was born, a Hoosier cake at heart with a little bit of Buckeye for excitement.  Enjoy!


Hoosier-Hio Cake
by Mrs. Erin King

Preheat oven to 350 degrees.  Grease 18 x 13 inch rimmed baking sheet. 

Cake:

2 c. flour
2 c. sugar
½ tsp baking soda
½ tsp salt
2 eggs, plus 2 yolks
2 tsp vanilla
¼ c. sour cream
8 ounces semisweet chocolate, chopped
4 Tbs unsalted butter
¾ c. vegetable oil
¾ c. water
½ c. dutch-processed cocoa powder

Chocolate Icing:

8 Tbs (1 stick) butter
½ c. heavy cream
½ c. dutch-processed cocoa powder
1 Tbs light corn syrup
3 c. powdered sugar
1 Tbs vanilla

Peanut Butter Sauce (recipe follows)
Whipped Cream

In a large bowl, combine flour, sugar, baking soda and salt.  In another bowl, whisk egg yolks, vanilla and sour cream until smooth. 


Heat chocolate, butter, oil, water and cocoa in a large sauce pan over medium heat, stirring occasionally, until smooth, about 3-5 minutes.  Whisk chocolate mixture into flour mixture until incorporated.  Whisk egg mixture into batter, then pour into prepared baking pan.  Bake until toothpick inserted comes out clean, 18 to 20 minutes. 

About 5 minutes before the cake is done, heat butter, cream, cocoa and corn syrup in a large saucepan over medium heat, stirring occasionally, until smooth.  Off heat, whisk in powdered sugar and vanilla.  Spread warm icing over hot cake.  Let cake cool to room temperature, for about an hour, then refrigerate until icing is set, about 2 hours.  Bring back to room temperature before serving. 

Peanut Butter Sauce:

1 c. peanut butter (I only use Jiff.)
splash vanilla
2 tsp heavy cream

Mix together in a microwave safe dish.  Microwave on high for about 2 minutes, stirring after first minute.  Drizzle warm sauce on cake right before serving, garnish with whipped cream.


Wednesday, July 18, 2012

32 Days And Counting

Why the countdown you ask? Well, on August 20th the day Monkey is dreading (and truthfully me too) will be here...The First Day of School. Now to be honest, as of right now Alex is not looking forward to it, but he loves school so much that by the time that morning rolls around he is always super excited and ready to see his friends, learn and have another great year. But between now and then I am constantly on the lookout for ideas both for school lunches and/or after school snacks. This is an idea I saw on Pinterest and I knew it would be perfect for my Monkey any day after school when at 3:30pm he declares "Mommy, I'm starving!!" After all, what's more of a match made in heaven than a monkey and bananas? I love finding new, fun and easy things to treat him with after a long day of reading, writing and arithmetic!

Banana Bites
Banana
Peanut Butter
Crisped Rice Cereal
Chocolate Syrup, optional

Cut each banana into 3-4 small sections. With a butter knife, spread peanut butter on all sides. Pour rice cereal into a small dish. Roll each banana section in cereal, covering it. Drizzle chocolate syrup over top. Chill for about 10 minutes to set.


Shared on Lady Behind The Curtain July 18, 2012
Shared on The Country Cook July 21, 2012

Bananas at Very Good Recipes
Pin It

Friday, November 4, 2011

Sweet Treat For One

During the summer, my cousin Tricia over at Recipe Roundup posted a recipe she used for her little sister's bridal shower, Individual Fruit Pizzas. They were so cute, and looked so yummy I immediately wrote them on my "must make" list. Well....to be honest....that list is very long, and I never got around to making them w/ all the fresh fruit of summer, which was my initial plan. So I decided to switch them up a little bit, and turn them into an after school snack for the Monkey, or a cute individual dessert any time. These are a great use for the Peanut Butter cookies I posted last week, if you are like me and always make too many cookies and either have to share them, or "recycle" them in a different way! They are easily adapted to fit any toppings your family may enjoy, and would be perfect for little hands to help with. I also think they would be a hit at your next get together, party or holiday gathering. Something sweet for each person, w/ no need to share! Thanks Trish, for the inspiration, and your fruit ones are still on that list.....coming in June or July!

Mini Dessert Pizzas

Peanut Butter Cookies, frozen
Nutella
Small Bag "Nut Topping" (finely chopped peanuts)
Small Bag Sweetened Coconut
Raisins

Using frozen cookies, makes them much easier to top. Using a butter knife, spread Nutella over each cookies, as "sauce".  Sprinkle coconut on each, as "cheese". Add nut topping and Craisins. Allow to thaw before serving.


Shared on Bacon Time Nov. 4, 2011
Shared on Six Sisters' Stuff Nov. 5, 2011
Shared on Sweet as Sugar Cookies Nov. 5, 2011
Shared on Everyday Sisters Nov. 6, 2011
Shared on Make Ahead Meals Nov. 7, 2011
Shared on Home Savvy Nov. 7, 2011
Desserts at Very Good Recipes
Pin It

Friday, October 28, 2011

Classic Cookie

Sometimes making something that is a "stand by", a family tradition, or favorite is just what the cook ordered! Of all the dessert choices I have at my fingertips through cookbooks, blogs, cooking sites, etc, every once in a while I enjoy making something that is both simple and 99% never fail. A classic cookie recipe that my grandma, my mom and now myself have all made sounds just about right. (If that many women agree on something, it's got to be a good thing!) Peanut butter cookies are one of those things most people like, most people know how to make, and most people have their own favorite version. So I thought it was about time I shared mine w/ you. Nothing fancy. Nothing unusual. Just a down home cookie that goes perfectly w/ a cold glass of milk. But if you enjoy these like we do, come back next Friday to see something new and fun you can do w/ the extra ones, if there are any. But there usually are in my house b/c I always make too many! Huh, I guess the classics can be new again!

Peanut Butter Cookies


1/2 c. shortening
1/2 c. peanut butter
1/2 c. sugar
1/2 c. packed brown sugar
1 egg
1 1/4 c. flour
1/2 tsp. baking powder
3/4 tsp. baking soda
1/4 tsp. salt

Mix shortening, peanut butter, sugars and egg thoroughly. Blend all dry ingredients and stir into shortening mixture. Roll dough into 1 1/4 " balls. Place 3 inches apart on lightly greased cookie sheets. Flatten w/ a fork to make crisscross pattern. Bake at 375 for 10-12 minutes.


Shared on Jane Deere Oct. 28, 2011
Shared on Simply Sweet Home Oct. 28, 2011
Shared on Sweet as Sugar Cookies Oct. 29, 2011
Desserts at Very Good Recipes
Pin It

Thursday, October 20, 2011

Can't Eat Just One

Nope, I'm talking about potato chips. There aren't very many things in this world that I can't walk away from eating. Yes I love food, and many things tempt me, but when I'm full I'm full. But there are a few select things that if left alone in the house w/ I am in T-R-O-U-B-L-E. Serious trouble. And one of those? Peanut Butter Fudge. No chocolate fudge. In fact, I don't really even like the "original" chocolate flavor, and only make it for others to snack on.  But peanut butter....ooohhhhh.....how sweet it is! If there is a plate of it within a 10 mile radius, I'm dangerous! My favorite version, like so many other things, is my Grammy's. Every Christmas she would make 2 or 3 kinds, and she always made extra peanut butter b/c it was not only my favorite, but my dad's. She still makes it and sends it to us around the holidays, but when I get a craving, I can't wait until December! I found this simple recipe in Taste of Home the first Christmas Adam and I were married and was so excited to try it, being a newlywed wanting to make the holiday extra special, and hoped it would come close to Grammy's. Well, it did....hallelujah. I still make this every Christmas, even if Grammy does send some of her own....you can never have enough peanut butter fudge. Especially if you live in my house, w/ me, the fiend, and have to distract me w/ new purses and shoes just to have a fighting chance at enjoying some too!

Peanut Butter Fudge
1 c. packed brown sugar
1 c. white sugar
1/2 c. milk
5 large marshmallows
1 1/2 c. creamy peanut butter

In a heavy 2 qt. saucepan, combine sugars, milk and marshmallows. Bring to a boil over medium heat stirring until sugar dissolves and marshmallows melt. Remove from heat and stir in peanut butter. Pour into a greased 8x8 square baking dish. Cool. When firm, but into squares.


Shared on Around My Family Table Oct. 20, 2011
Shared on It's A Keeper Oct. 20, 2011
Shared on Something Swanky Oct. 20, 2011
Shared on Gooseberry Patch Oct. 20, 2011
Shared on Six Sisters' Stuff Oct. 22, 2011
Shared on Sweet as Sugar Cookies Oct. 22, 2011
Shared on The Saturday Evening Pot Oct. 23, 2011
Shared on Make Ahead Meals Oct. 24, 2011
Shared on Sweetology Oct. 25, 2011
Pin It

Thursday, September 1, 2011

Better Late Than Never

A few weeks ago a member of this blogging family I am so honored to be a part of suffered a great loss, a tragedy beyond my comprehension. Jennie Perillo of  In Jennie's Kitchen suddenly found herself a widow. Her husband Mikey passed away unexpectedly, therefore changing her life forever. In the days after her loss, Jennie's only request to her fellow bloggers and fans, was to make a Peanut Butter Pie b/c it was Mikey's favorite. The amount of  support, sympathy and genuine love I witnessed pouring out of people simply by making a pie was overwhelming. I was so proud to be associated w/ so many people who walked into their kitchen, made something beautiful and w/o even speaking paid tribute to a man, and his wife, whom they have never met. However, I was unable to make a pie the day she had asked us to. So while I expressed my condolences to Jennie and her family I made a promise to myself to make my own peanut butter pie very very soon. I was looking online for one I wanted to try, and about half way down the page something caught my eye. "Alex's Peanut Butter Pie". Well, that's like kismet! What better recipe to try to honor another wife and mother than one named after the most precious thing in my life? I can't even begin to try to understand Jennie's loss. But what I can understand is the love of a wife and a mother and how empty my world would feel if this happened to me. My husband and I are a team. And if he was gone, it would feel as if half my soul had been ripped out of my body. So I will never attempt to say "I know what you're going through" b/c I don't. I've lost people in my life, some very recently, but nothing compares to losing your soul mate, your best friend. So this is my memorial to Mikey. May his spirit forever live in Jennie's heart, and may God wrap His loving arms around her and her family and bring them peace when they feel they can't go on; and light on their darkest days. And may the rest of us remember how precious each second is and always tell those we love how much they mean to us.

Monkey's Peanut Butter Pie Adapted from Original Recipe

8 oz cream cheese, softened
3/4 c. peanut butter
1 c. powdered sugar
1/4 c. peanut butter chips
1 chocolate pie crust
16 oz. Cool Whip, thawed
Chocolate Syrup

In a large bowl, mix cream cheese, powdered sugar and peanut butter until well combined. Fold in Cool Whip. Add in peanut butter chips and mix well.  Pour into prepared crust. Drizzle w/ chocolate syrup. Chill

To make the design on my pie, drizzle syrup in shape of a target. Then w/ a toothpick, draw lines from center of pie outward.


Shared on Around My Family Table Sept. 1, 2011
Shared on Something Swanky Sept. 1, 2011
Shared on Sweet as Sugar Cookies Sept. 3, 2011
Shared on Sweetology Sept. 5, 2011
Shared on Hugs & Cookies Sept. 6, 2011
Shared on Gooseberry Patch Sept. 7, 2011


Pin It

Thursday, July 14, 2011

Feels Like The First Time

The year is 1994. A very bright and talented 7th grader sits at a table w/ 3 other girls her age, waiting. What for you ask? A recipe. I just took you back to my Junior High School and my first week in Home Ec class :) I remember all of us being so excited we were going to bake something all by ourselves. The funny thing was we wouldn't be baking at all! Our first recipe to experiment w/ was No Bake Cookies :) I think that is pretty standard in Home Education classes across the country. Get kids used to recipes and measuring before introducing heat and fire, as to avoid distraction and possibly save the school from burning down! While I had helped my mom and grandmas in the kitchen numerous times, I remember feeling so "grown up" making something on my own and seeing the results---not to mention getting to eat them! Now here's the sad part of the tale......Adam never got this experience. First off, when I was in Junior High, he was a sophomore in college---cradle robber, ha ha--- but I'm talking about the fact that as a child he was allergic to chocolate! So his mom, wanting to make a dessert the whole family could enjoy, took the basic no bake recipe, omitted the cocoa and wah-lah--no bake peanut butter cookies!! Genius, right?? And to this day, they are one of the family's favorites sweet treats, myself included and now Alex too. And the funniest part?? Even though Adam's allergy to chocolate ended almost 30 years ago, she still makes them w/o every time! If it ain't broke, don't fix it! This is my version of those, and the only reason it's a tad different is b/c the first time I made them I was out of white sugar and had to use brown instead:) That's okay though--maybe someday years down the road, my daughter- in- law will be using my recipe b/c my grandkids love it so much, and they will tell the story of when grandma was a 7th grader, and it will feel like the first time all over again!

No Bake Peanut Butter Cookies
3 cups old fashioned rolled oats (sometimes takes a little more)
2 tsp vanilla
5 TBS peanut butter
1/2 c. milk
2 cups brown sugar
1/4 c. butter

Combine first  3 ingredients. Set aside. In a small sauce pan, combine milk, brown sugar and butter. Bring to a boil over medium heat stirring often. Let hard boil for 1 minute. (Rapid, rolling boil). Add to oatmeal mixutre stirring well and rapidly. Spoon (heaping TBS) onto wax paper or plastic wrap and let set.


Shared On Around My Family Table July 14, 2011
Shared on It's A Keeper July 14, 2011
Shared on Simply Delish July 15, 2011
Shared on Lovely Little Snippets July 17, 2011
Shared on Make Ahead Meals July 18, 2011
Shared on Celebrating Family July 19, 2011
Shared on This Chick Cooks July 20, 2011
Shared on Hugs & Cookies Aug. 17, 2011
Shared on Everyday Sisters Nov. 6, 2011