Everyday Mom's Meals: 2022
_____

Sunday, December 18, 2022

Merry Christmas From The EMM Familyl

 EEEEEEKKKKK! Christmas is only a week away! Are you ready? That shriek from me is 100% one of joy. Yes, I am the 40+ woman who gets just as excited as kids; and it is almost here!

I honestly hope you are able to enjoy the next 7 days and find magic of the season in the small moments. However, if you are still trying to plan a holiday menu, needing just one more dish to round the meal, you've come to the right place! 

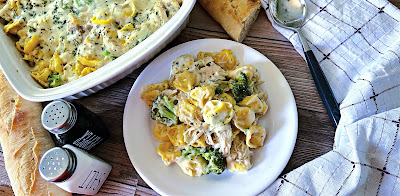
I actually made this for the first time back on Thanksgiving and it was a huge hit! Everyone couldn't get enough and if I do say so myself, raved about it! I loved the fact it could be made-ahead! I actually baked it on Tuesday, popped it in the fridge and then reheated it when the turkey was almost done.

With as delicious as this was served with a big beautiful roasted bird, it would be excellent next to your glazed Christmas ham too! 

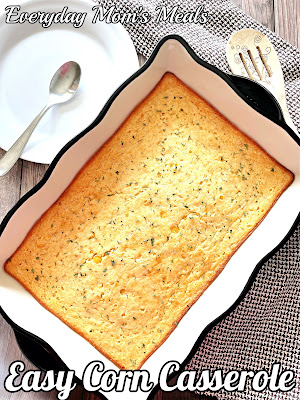
To make this epic corn casserole, you literally just dump, stir and bake. That's it! Nothing complicated here. If you're wondering what it tastes like, think a little sweet, a little savory and oh so good. It's very close to corn spoon bread if you've ever had that! 

If corn casserole makes it to your table, that makes me so happy. To know something you saw on my blog becomes part of your Christmas celebration fills my heart with such gratefulness and joy. 

From our family to yours, we wish you a very Merry Christmas! May the spirit of the season fill your life and the love that came down in a tiny baby boy surround you and yours. 
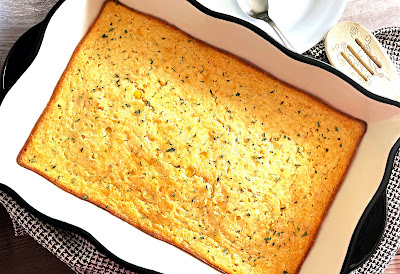
Corn Casserole

Easy Corn Casserole

1 box Jiffy cornbread mix

2 eggs

2 cups frozen corn, thawed

1 can creamed corn

1j/2 cup butter, melted

1 cup sour cream

Dried parsley, for garnish

Preheat oven to 350. Grease 9x13 baking dish. In a large bowl combine all ingredients except parsley. Stir well to combine. Pour into baking dish. Bake 50-55 minutes until golden brown. Garnish with parsley and serve. To make ahead: Prepare as directed, cool completely and cover. Keep in fridge for up to 2 days. When ready, uncover, let come to room temp for 30 minutes and bake at 350 for 20 minutes. 

Easy Corn Casserole


Sunday, December 11, 2022

Not a TikTok Fan

 So let me clarify that title. I am not here to bash anyone who loves TikTok, it just isn't something I get into. I'm not saying I never see anything from there- I don't live under a rock- but I don't have the app, and I don't seek TikTok videos out. If others share them with me, or I happen to see them in my social feeds, that's fine. 

In fact, that is exactly how I stumbled upon this recipe, which went viral on TikTok, and after eating it I know why. 

Raise your hand if you can always use new chicken recipes! Yep, me too! Even now that chicken can be pricey at the store, I want to be ready when it goes on sale because I'm going to stock up, and if I'm going to be cooking with it from the freezer for a while, I want some new dishes to play with. 

This is one of those dinners that looks fancy, but is super easy. Boneless chicken breasts in a creamy sauce flavored with sun-dried tomatoes, garlic and Parmesan cheese. It is so delicious, the rumor is if you make it for a date, you might just get proposed to-hence the "marry me" title. 

We love this served with some buttered pasta on the side to soak up the extra sauce from the chicken, but it would be just as yummy with rice or mashed potatoes too. 

Marry Me Chicken is simple enough for a weeknight supper, but if you are hosting a dinner party during this holiday season, this will wow your guests; and can be doubled pretty easily if you've got a crowd coming. 

The lesson here? Just because you don't enjoy something that seems to be all the rage, that doesn't mean you can't still take something away from it and learn something new! I won't be a TikTok subscriber any time soon, but if you see a great recipe over there, send it my way!

Marry Me Chicken

Marry Me Chicken

4 boneless chicken breasts

1 cup heavy cream

1/2 cup chicken broth

1 chicken bouillon cube

3 garlic cloves, minced

1 (8 oz.) jar sun-dried tomatoes, drained and chopped

1 tsp. Italian seasoning

1/2 cup grated Parmesan/Romano cheese

2 TBS olive oil

Salt and Pepper  

Fresh parsley, for garnish

Pat chicken dry with paper towels and season with salt and pepper. Heat oil in large skillet or Dutch oven over medium high heat. Brown chicken well on both sides, about 5 minutes. Remove chicken to plate. In the same pan, sauté garlic for 30 seconds, stirring the entire time. Add cream, bouillon, broth, tomatoes, Italian seasoning, cheese, salt and pepper. Stir well until combined. Add chicken back to pan. Spoon some sauce over the chicken. Reduce heat to medium and cook until internal temp of chicken is 165, about 10 minutes. Garnish with parsley and serve immediately with pasta, potatoes or rice.

Marry Me Chicken

Shared at Weekend Potluck


Sunday, December 4, 2022

Perfect With Holiday Ham

 Today we are going back to the beginning of EMM. When I started this blog almost 12 years ago, this was one of the first recipes I shared. A family member had asked for the recipe, shared the dish, and then all her friends wanted the recipe too. Since that was the main reason I had began blogging, to share my recipes with those who kept asking for them, it was the perfect dish to debut on my brand new site.

Over the years I have heard from so many how much they enjoy this recipe, and how it has become part of their family gatherings and holidays. There is nothing that warms a food blogger's heart more than to know their food is now part of another family's memories and story.

If you've never heard the story behind this dish, it was a recipe my grandma gave my mom, and quickly became her go-to for potlucks at church. Many ladies were known for always taking the same dish for those carry-in meals after Sunday service, and this was mom's. It never failed- it was one of the first dishes to to and everyone wanted the recipe.

Baked Pineapple is warm, sweet, savory and so easy nobody will ever guess it takes almost no time at all. It is the perfect take-along to those holiday parties quickly approaching; and tastes so good with a beautiful glazed ham. 

This is one of those dishes you have the option of what course you serve it with. For our family, it has always been a side dish, but many fans have told me they like to serve it as dessert with a scoop of ice cream on top. Whichever way you choose, it is sure to be the new hit on your holiday menu.

I hope you're off to a good start planning your big Christmas meal. If you're looking for just one more thing to put your menu over the top, baked pineapple could definitely do the job!

Baked Pineapple Casserole
  

Baked Pineapple Casserole

1 (20 oz.) can crushed pineapple, slightly drained

5 slices white sandwich bread, cubed

4 eggs

6 TBS butter, at room temperature

1 cup sugar

Preheat oven to 350. Grease 2-3 quart baking dish. In a large bowl, use an electric mixture to cream together butter and sugar. Add eggs and beat well until smooth. Add bread and pineapple. Mix well. Transfer to prepared baking dish. Bake for 1 hour until brown and bubbly.

Baked Pineapple Casserole


Sunday, November 27, 2022

Welcome Holiday Season

 If it was up to me, the Christmas tree would go up the minute the clock struck midnight on November 1st, but alas, I have a husband who believes it should stay in the shed until after Thanksgiving. But guess what, the turkey leftovers are in the fridge, all of the fall decor is packed away and I am currently typing in the glow of a beautifully lit balsam fir. 

December arrives this week, and before we have a chance to blink Christmas day will be upon us. We need to make sure to enjoy the next 28 days as much as possible. Sure, the hustle and bustle might stress us out a little, and if you're anything like me your to-do list is a mile long; but finding ways to find the magic and joy in the season are a must. 

After spending 12+ hours putting up the indoor decor on Friday, I was completely exhausted and ready to collapse into my recliner. However, the 6 year old had other plans. "Mommy, I want to put on Christmas jammies, watch Frosty and drink peppermint hot chocolate." 

That declaration resulted in him, daddy and mommy all laying on the floor snuggling, watching the movie while he sipped his holiday drink. (The teenager was at work, or there would have been 4 of us sharing that blanket.) As tired as I was, I wanted to soak in every second of this impromptu memory making moment. 

Plus, it reminded me that it was finally time to share a holiday inspired recipe with all of you. Whipped Hot Chocolate takes your hot cocoa game to the next level. It's super easy and the perfect treat to enjoy after building a snowman or while you watch Rudolph or White Christmas. 

The next 4 weeks are going to fly by, but my wish for you are those tiny moments that come out of  nowhere and fill your heart with the Christmas spirit and love. 


Whipped Hot Chocolate

1/4 cup milk chocolate hot chocolate powder mix 

2-3 cups chocolate milk, warmed

1/2 cup heavy cream

1/4 cup powdered sugar, sifted

Mini Marshmallows

Chocolate Sprinkles

In a large metal bowl that has been chilled, whisk together hot chocolate mix and powdered sugar. Add heavy cream and whisk just until combined. Using an electric mixer, beat until soft peaks form. Transfer mixture to piping bag. Divide chocolate milk between 2 mugs. Pipe whipped mixture onto each. Garnish with marshmallows and sprinkles. 


Shared at Weekend Potluck


Sunday, November 13, 2022

Thanksgiving Leftovers

 With just a little over a week left before the biggest foodie holiday of the year, I hope you are putting the final touches on your menu. I can almost smell the turkey roasting and taste the pumpkin pie. It is officially time to get excited.

With the big meal planned, maybe it is time we start to look past Thanksgiving itself, and begin to brainstorm what we are going to do with all those leftovers. 

Sure there will be turkey sandwiches and other dishes made from what was cooked and enjoyed. But what about leftover ingredients? The stuff you bought too much of and didn't use? This year I decided to focus on those for leftover inspiration.

This copycat soup recipe comes from a dish Panera customers look forward to every fall. Their Autumn Squash Soup is filled with flavor and a menu favorite. 

If you find yourself with an extra butternut squash laying around after all the holiday guests go home, or maybe you need to feed a few lingering ones, this tasty soup would be the perfect way to use it up.

Or if you are serving a multiple course Thanksgiving meal, this could also be a great addition to your menu as a first course. 

Squash soup is a thick, stick to your ribs meals perfect for a cold night. If you are looking for a thinner soup, simply add a little extra broth and/or cream. I garnished with crunchy croutons, but pumpkin seeds or other nuts would be delicious too. 

I hope you and yours have a very Happy Thanksgiving, filled with those you love most, sharing a tasty meal and making memories to last a lifetime. 

Copycat Panera Autumn Squash Soup

1 large butternut squash, peeled and cubed

3 large carrots, peeled and chopped

2 apples, peeled and chopped

1 medium yellow onion, chopped

3 garlic cloves, minced

1 (15 oz.) can pumpkin puree

3 TBS vegetable oil

3 cups chicken broth, more if desired

1/2 cup heavy cream, more if desired

1 tsp. ground ginger

1 tsp. cinnamon

2 TBS brown sugar

Salt and pepper 

Preheat oven to 425. Line two large baking sheets with parchment paper. Place squash on one baking sheet and onions and carrots on the other. Mix 1 TBS oil with carrots and onions and 2 TBS over squash. Roast for 20-30 minutes until fork tender. While veggies cook, mix apples and garlic with 2 TBS water in a large stock pot or Dutch oven. Cook over medium heat for about 10 minutes, stirring constantly until tender. Set aside. When vegetables are cooked, add to pot. Add chicken broth and mix well. Using an immersion blender, puree mixture until smooth. Place pot over medium heat. Add cream, ginger, cinnamon, brown sugar and pumpkin. Stir well. Cook about 15 minutes until heated through. Season with salt and pepper. If too thick, add extra broth or cream to desired consistency. 


Sunday, November 6, 2022

Here Comes Cousin Eddie

Every year during the weeks leading up to Thanksgiving, I begin to think about all those families who will be traveling to see loved ones during the holiday season. From Turkey Day right up until Christmas, houses will fill up with holiday guests, and let's be honest, some might just camp out for the month between the two holidays! 

When I think of holiday house guests, thoughts of Cousin Eddie begin to conjure in my head. The infamous character from National Lampoon's Christmas Vacation gives a whole new meaning to "make yourself at home." He shows up uninvited, with the family and the ugliest RV known to man in tow, and declares they will be staying until the New Year. 

Obviously, most holiday company doesn't act like Eddie, but having extra people in the house, no matter how many or for how long, means more mouths to feed; and not just for the big holiday meal. If you're hosting, you will likely need to plan meals for a few days.

In that spirit, I always try to post "normal" meal ideas, making that planning just a little bit easier. Things to feed that crowd once the leftovers run out but don't keep you busy in the kitchen missing out on the fun. 

This Easy Baked Ziti is a pasta casserole that will wow the pickiest of eaters, is filled with layers of flavor, but still super simple to make. Perfect for a weeknight meal, or for those who like to do pasta during the holidays too.

If you have holiday company coming, start planning now so you aren't scrambling when they want to know "what's for supper" every day, for their extended stay!


Easy Baked Ziti

1 lb. ziti

1 lb. Italian sausage

1 medium yellow onion, finely chopped

2 garlic cloves, minced

1 (15 oz.) container whole milk ricotta cheese

1 egg

1/4 cup + 1 TBS grated Parmesan cheese

3 TBS chopped fresh parsley

1 (24 oz.) jar tomato basil pasta sauce

1 (4 oz.) can tomato sauce

1 (14 oz.) can petite diced tomatoes, with juice

2 tsp. Italian seasoning

1/2 cup water

2 cups shredded Mozzarella cheese

Salt and Pepper

Preheat oven to 375. In a large skillet, brown sausage with onion and garlic until no longer pink. Drain if necessary. Add diced tomatoes, water, pasta sauce and tomato sauce. Stir well. Add Italian seasoning, salt and pepper. Reduce heat and simmer for 10 minutes until thickened. While sauce simmers, cook pasta to al dente and drain well. In a medium bowl combine ricotta, egg, 1 cup mozzarella, 1/4 cup Parmesan, 2 TBS parsley, salt and pepper. Stir well. 

To assemble: Lightly grease 9x13 baking dish. Add 1 cup sauce to bottom of dish and spread evenly. Top with half ziti. Top with all ricotta mixture and spread evenly. Top with half sauce. Sprinkle with 1 TBS Parmesan cheese. Add other half ziti, top with remaining sauce and mozzarella. Bake for 30 minutes. Garnish with fresh parsley. 


Shared at Weekend Potluck


Sunday, October 30, 2022

No More Potato Rut

 Does anyone feel like you are rotating the same potato side dishes over and over again? I hope it's not just me! Mashed, baked, scalloped, roasted, fries, tots, hashbrowns, repeat. 

Thankfully there are enough ways to make a potato, it does take a while to feel like I've fallen in a rut, but it does still happen. Lately, this feeling has reared its ugly head mostly when I want to make some tasty roasted potatoes. 

When you think about it, there are a thousand (or more) different flavor combos to come up with when seasoning potatoes to roast in the oven, but when you're in the middle of a busy week, tired and just want to eat, inspiration doesn't always come easy. 

Thankfully, you have a friendly food blogger to do the brainstorming for you and come up with a delicious new way to roast that bag of taters hanging out in the kitchen right now. 

Roasted potatoes can go with literally almost any meal, making them a go-to for so many of us for busy weeknights. 

I used red for these, but yellow would be delicious too. With garlic, onion and Parmesan cheese, use pantry staples to create big flavor in every bite. Crispy on the outside, buttery and creamy inside-everything you want in a tasty tater.

If you are working on your meal plan for this week, you just stumbled upon the perfect side dish to add immediately!


Garlic Parmesan Potatoes-Everyday Mom's Meals


Garlic Parmesan Roasted Potatoes

3 lbs. red potatoes, quartered

3 TBS olive oil

1/2 tsp. paprika

1/2 tsp. onion powder

1 tsp. garlic powder

1 tsp. Italian seasoning

1/4 cup grated Parmesan cheese

Salt and Pepper

Fresh Parsley, garnish

Preheat oven to 375. Lightly grease a large rimmed baking sheet. In a large bowl combine potatoes and oil. Add seasonings. Stir well. Transfer to baking sheet. Roast for 45-50 minutes until fork tender. Garnish with fresh parsley. 

Garlic Parmesan Potatoes-Everyday Mom's Meals


Sunday, October 23, 2022

Lower Temperatures Mean Hearty Meals

 The past week has been quite the weather roller coaster here in northern Indiana. Last Monday we had temps in the 30's with the wind chill making it feel in the 20's. Oh, and we had snow. Not just flurries. Stick to the ground, have to scrape the car, measurable snow. So depressing. Fast forward to this weekend and we are looking at sunny skies and almost 80 degrees. (I'm not complaining since it is Trunk or Treat at our church/school and not having to wear 3 layers is a welcome change!)

When those temps took a nosedive though, I saw so many friends on Facebook talk about how they were craving something hearty and comforting for supper. Those two requirements always bring to mind pasta bakes to me, so I knew it was time to share this new one, so the next time mother nature decides to skip ahead on the seasons, we are ready!

This simple casserole is pretty effortless and can be on the table in under an hour after you get home and in out of the cold. Froze tortellini combined with fresh mushrooms and spinach in a creamy cheese sauce and baked to perfection. 

If your kids don't groove on spinach and mushrooms, switch out the veggies! It would be just as delicious with broccoli, asparagus or peas! 

If you're worried about no meat meaning not filling, don't be! I have some major eaters in this house and not one of them even noticed it was meat-free. They gobbled it down, asked for some more crusty bread and were full in no time. 

We are going into winter much quicker than I am ready for, but at least it gives me an excuse to cook more meals like this and enjoy every bite!


Spinach & Mushroom Tortellini Bake

1 (19 oz.) package frozen cheese tortellini

1 lb. button mushrooms, sliced

1 (6-8 oz.) bag fresh spinach, coarsely chopped

2 garlic cloves, minced

1/4 tsp. onion powder

1 stick butter, divided use

1 (12 oz.) can evaporated milk 

8 oz. Italian blend shredded cheese

8 oz. shredded mozzarella cheese

Salt and Pepper

Preheat oven to 350. Cook tortellini according to package directions and drain well. In a large skillet over medium high heat, heat 4 TBS butter and sauté mushrooms until brown. Season with garlic, salt and pepper. Add spinach and continue to sauté until spinach is wilted. Remove from skillet and set aside. In same skillet over medium heat combine remaining butter and milk. Bring to a gentle boil. Stir in Italian cheese until melted and smooth. Transfer cooked pasta to a large bowl. Add mushroom mixture and cheese sauce. Stir very well. Transfer to a greased 9x13 baking dish. Sprinkle with mozzarella cheese. Cover with foil and bake for 15 minutes. Uncover and bake for 10-15 minutes until cheese has melted and slightly browned. 


Sunday, October 16, 2022

Take Out Woes

 It has been a busy day, you're exhausted, want something delicious for supper, but don't want to lift a finger. Oh look, that take-out menu from your favorite Chinese restaurant is staring at you from where it hangs on the fridge. Yes! Problem solved. 

So you get everyone's orders, call it in and tell the hubby to pick it up on his way home from work (This is how it works in my house, you can mold the details to fit your story...) Yay! He's home! Bring on the hot and sour soup, noodles, crab ragoon....oh I'm drooling just thinking about it. 

But you know what takes the joy out of this tale? The total! Whew...even our "hole in the wall" Chinese place has had to raise their prices in today's economy and the cheap take-out isn't so cheap anymore. 

I am in no way complaining about them having to do what they need to, we are all feeling the pinch in our wallets. The price of everything is going up every single day, and nobody is immune. I completely understand why that container of Pad Thai is a few dollars more than it was just a few months ago; but it makes me sad. Sad for the restaurant, because you know they are probably struggling, still feeling the effect of the pandemic on top of everything else. Sad for us because we can't support them as much as we would like to. Sad for my stomach because I can't fill that craving as often as I want! 

One way to enjoy the take-out dishes we love and stay on budget is to make them at home. It's not a new concept, just something many people are getting back to lately. I know the restaurant copycat recipes on this blog have been getting a LOT of views! 

My Shrimp Fried Rice has always been a popular recipe, so I know this sweet version will be a hit too! Pineapple Fried Rice is a great side dish with some store bough frozen egg rolls, or add some protein (chicken, shrimp or pork) for a full meal. 

The sweetness of the pineapple really adds a depth of flavor to a savory dish. If you're a fan of sweet and salty, you know what I'm talking about!

Put that take-out menu back in the junk drawer. I promise this is almost as easy as picking up the phone, and will definitely save you a few bucks in the long run. 

Pineapple Fried Rice

3 cups cooked brown rice

1 medium yellow onion, finely chopped

3 garlic cloves, minced

3 green onions, chopped

1 (12 oz.) bag frozen peas and carrots, partially thawed

1-2 TBS sesame oil

3 TBS soy sauce

1/2 tsp dried ginger

2 TBS olive oil

1 (20 oz.) can pineapple tidbits, well drained

Black Pepper, to taste

In a small bowl whisk together soy, sesame oil, ginger and black pepper. Set aside. In a large skillet or wok over medium hit heat, sauté onions and garlic in oil until soft, about 4 minutes, stirring constantly. Add peas and carrots and cook 2-3 minutes. Add cooked rice and soy sauce mixture. Stir well and cook 7 minutes until flavors combine. Lower heat to medium low. Add pineapple and green onions. Stir gently to combine. Serve immediately with extra soy on the side. 


Sunday, October 9, 2022

Sniffles and Soup

If your family hasn't run into all the yuck that is going around right now, consider yourself lucky! I know, we've all spent the last 2.5 years worrying about Covid lurking around every corner, but let's not forget about all the other germs that are still fighting their way into our homes.

We knew with Max going into Kindergarten the fall illness was inevitable. Let's call it how it is. Schools are petri dishes and kids are going to get sick. And we knew with Max never being in a classroom before, his immune system was going to be tested. Boy is it ever!

This poor little guy has been sick twice in 3 weeks. In September it was an ear infection that kept him home for two days. But this past week? He has been the sickest he has ever been in 6 years. He missed three more days of school, and is still not 100%. We've hit the point that he's better by the technical terms- no fever, eating better, playing...but he sounds awful! He has almost no voice and a nasty cough, but fingers crossed will be going back to school Monday. 

The doctor told me there is some nasty stuff going around right now, and it just isn't affecting little kids- he has been seeing all ages in the office for all sorts of sickness. 

So when I was decided which recipe to share this week, I figured soup was a safe bet because nothing tastes better when you're feeling a little under the weather. 

Creamy Sausage Tortellini Soup has rich, cooked all day flavor, but can be on your table in under an hour. When you come home after a long day or come inside out of the cold, a bowl of this what you want to sit down to.

Using frozen tortellini makes this perfect for busy weeknights because it cooks right in the soup, no need to thaw before. I use mild Italian sausage, but if you like things spicy, grab a package of hot. Fresh spinach gives the soup a pop of color and of course nutrients, but you could use kale too. 

When the sniffles find their way into your house, be ready with some delicious soup recipes to help everyone feel better! 


Creamy Sausage and Tortellini Soup

1 (19 oz) bag frozen cheese tortellini

1 lb. mild or hot Italian sausage

1 medium yellow onion, finely chopped

3 carrots, finely chopped 

4 cloves garlic, minced

6 oz. fresh spinach, coarsely chopped

1/4 cup flour

1/2 tsp Italian seasoning

4 cups chicken broth

1 cup water

2 cups half-and-half

Salt and Pepper 

In a large stock pot or Dutch oven, brown sausage over medium high heat until no longer pink. Remove to a paper towel lined plate. Sauté carrots, onion and garlic in sausage drippings until soft. Sprinkle with flour and cook 2 minutes, stirring constantly. Slowly add chicken broth and water, whisking constantly until smooth. Bring to a simmer and cook about 8 minutes until slightly thickened. Add half-and-half, cooked sausage, Italian seasoning, tortellini, salt and pepper. Simmer until pasta is cooked-it will float to the top. Serve immediately with grated Parmesan on the side if desired. 


Sunday, September 25, 2022

Welcome Soup Season With A New Copycat Recipe

 How has your September been going? It's been so busy around here, the month kind of flashed before my eyes. We celebrated an 18th birthday, our first school-related illness resulting in the little guy missing two days, attended our homecoming football game, took Max's very first field trip to an apple orchard (which Bubbie took the day off school to join us), I went to my first PTL (think PTA) meeting, and more I can't even remember right now. You can understand why I blinked and now it's almost October. 

When does soup season begin in your house? For us, the minute Labor Day was over, I started putting more soups on our weekly menu. Even though we had some summer-like hot days, it was time! Now that the temps have indeed fallen to more autumn like highs, and October knocking on the door, I'm sure more families are ready to celebrate all things soup, chowder and stew. 

I'm sure this will be the first of many new soup recipes over the next several months, as we enter into even colder weather, but I wanted this to be the debut because it has quickly become one of our favorites.

A copycat of an Olive Garden classic, this Chicken Gnocchi Soup can be on your table in about 30 minutes! Perfect during the crazy busy week when you're exhausted and just need to eat before heading out the door again. 

Let's stop here for a minute and talk about the chicken in this soup. I can't believe the price of fresh chicken these days at the store, so I decided to use canned instead. Leftover rotisserie or roasted would be great too, but I didn't have any on hand, and didn't want to spend the $$$ on a package of boneless breasts. Sure, canned chicken won't work in certain recipes that call for cooked chicken, but I have found that in many soups, it's perfect and much easier on the budget. 

This creamy, hearty soup will fill you up and thaw you out at the same time. It is filled with so much flavor, it tastes like it cooked all day, and not quickly on the stove top. Add a big bowl of copycat Olive Garden Salad and you have a complete meal; and don't forget some crusty bread too! 

However you decide to welcome fall, and with it, soup season, I hope you're finding ways to put some fun into your busy days and yummy things to come home to after!


Copycat Olive Garden Chicken Gnocchi Soup

2 (12 oz.) cans chicken, drained and broken up

1 (16 oz.) package gnocchi

1 TBS olive oil

1/4 cup butter

1 quart half-and-half

3 1/2 cups chicken broth

1/4 cup flour

1 cup matchstick carrots, rough chopped

2 stalks celery, diced

1 medium yellow onion, finely chopped

1 heaping cup spinach, rough chopped

2 garlic cloves, minced

1/2 tsp dried parsley

1/2 tsp dried thyme

Salt and pepper  

In a large pot, melt butter with olive oil over medium high heat. Sauté onion, celery and garlic for 5 minutes until soft. Sprinkle with flour and cook 1-2 minutes more. Whisk in half-and-half and bring to a simmer. Cook for 5 minutes until slightly thickened. Whisk in chicken broth and simmer 5 minutes. Reduce heat to medium. Add carrots, chicken, thyme, parsley, and gnocchi. Simmer until gnocchi float to the top. Season with salt and pepper. Add spinach and cook 5-10 minutes to heat through. Serve immediately. 


Sunday, September 11, 2022

Welcome Fall and Milestone Birthdays

I know, I know, fall isn't officially here, but once September comes and Labor Day passes, it kind of feels like it is. Even on those summer-like hot days, autumn is still in the air. All things pumpkin and apple are every where you look and it's only a matter of time before the leaves begin to fall.

I've spent the last week decorating both inside and outside the house will all of my favorite fall things. This lover of all things summer isn't ready to say goodbye to hot, sunny days, but I do adore fall decor. There is a chance I *might* be addicted to pumpkins...is there a support group for that?

Why decorate so early? It's a tradition that goes back to when Alex was little. In those days I did more Halloween decor, while today it's general fall. But every year he would ask for the house to be "spooky" by the time his birthday came on 9/16. That timing got chiseled into my internal clock, so all these years later, the house tends to be decorated in the first couple weeks of September. 

Speaking of the big birthday coming up, this year we celebrate Alex turning 18. I can't even type that number without tearing up. When they say don't blink, it's 100% true. I'm positive we just brought him home from the hospital, new parents driving 5 mph because we were terrified of every bump. Wasn't he just turning 1, loving all things Blue's Clues? Or 5 riding a school bus for the first time during a preschool field trip? Or 7, 10 and 13? It's been 2 years since he turned 16 and was thrilled to start driving? 

18 years, 6,570 days, 157,680 hours, and 9,460,800 minutes since this precious boy made me a mommy-truly the only thing I ever wanted to be. I loved him the minute I knew he was growing inside of me, but the second they placed him into my arms, he looked into my eyes and my soul was complete. My first born. My pride and joy. He finds ways to make us proud every single day and the privilege of being his parents is a blessing from God above. 

This Apple Crisp recipe is one I saved to share as a way to welcome autumn, but it's also appropriate for the week of my Alex's birthday because apple desserts are some of his favorite.  

This is a super easy sweet treat celebrating fall's favorite fruit, apples! You will want to use tart ones for best results. I had Granny Smith, from a neighbor's tree, but Golden Delicious would work too! They just stand up to baking the best and don't turn into applesauce in the oven. The buttery crumb topping takes the flavor and texture over the top of yummy goodness. 

This week is a big one in our house with a very special reason to celebrate, come Friday. Happy Birthday Alex!! Your mom loves you more than words can say, and it's been my honor doing so for the last 18 years!


Easy Apple Crisp

10 medium Granny Smith apples, peeled, cored and sliced

2 tsp. white sugar

1 TBS brown sugar

2 tsp. cinnamon

1 TBS butter

1 TBS lemon juice

Topping:

1 cup flour

1 cup sugar

1 stick butter, softened

1/2 tsp cinnamon

Preheat oven to 350. Lightly grease a 9x13 baking dish. Arrange apple slices in bottom of dish. Toss with lemon juice. Sprinkle with white sugar, brown sugar and cinnamon. Mix well. Slice 1 TBS butter and arrange over apple mixture. In a medium bowl combine flour, sugar and cinnamon. Cut in the butter until coarse crumbs form. Sprinkle topping over apples and pat down slightly. Bake 50-60 minutes until golden brown and apples are soft. *NOTE* You need enough apples slices to cover bottom of baking dish. The number will depend on the size of apple.


Sunday, August 21, 2022

Second Week Busy Week

 Have you settled back into the school year routine? Are you struggling to find your groove? Either way, I see you. I feel you. I would say we are somewhere in the middle. 

Having one entering his senior year and all that comes with that, and the other beginning Kindergarten and the immense changes that brings has made the past two weeks especially busy and hectic.

For those wondering, the little guy rocked his first week of Kindergarten, and was more brave than we could have ever imagines. Yes, there were some tears (from both him and mommy) but at the end of every single day when I picked him up, he was smiling and full of stories. We couldn't be more proud of him!

His big brother is filling his days with classes, studying, theater and working. I keep telling him to try to savor as much of senior year as he can because it will go at the speed of light. 

This week we add in two meetings at the school, picture day, and a few other things. Like I've said before, I don't anticipate our schedules slowing down any time soon. 

Enter a simple, hearty pasta bake supper that can be on the table in about an hour. It is filled with cooked chicken (use some leftover or make it the day before!) Alfredo sauce, and broccoli. Yep, making sure the kids get some green stuff on their plate for that brain food they need! Oh, and let me make your day even more! The pasta and broccoli both go in the casserole frozen, saving you even more time on a busy day.

Baked Chicken Tortellini Alfredo will be one of those meals you make now because it's quick, and then again and again during the fall and winter months for comfort food on a cold day. 

If your back to school schedule has you pulling your hair out, stop stressing when it comes to dinner time. Take a breath and know you can still get a delicious meal on the table to enjoy while listening to all those stories from their day!


Baked Chicken Tortellini Alfredo

1 (19 oz.) bag frozen cheese tortellini

2 (15 oz.) jars Alfredo

1 (12 oz.) bag frozen broccoli florets

2 cups cooked, shredded chicken

1/2 cup chicken broth

1/2 cup shredded mozzarella cheese

1/2 tsp. Italian seasoning

1 tsp. dried parsley

Salt and pepper

Preheat oven to 425. Lightly grease 9x13 baking dish. In a large bowl combine chicken, frozen pasta and frozen broccoli. Add Alfredo sauce, broth, Italian seasoning, salt, pepper and stir well. Transfer to baking dish and cover tightly with foil. Bake for 45 minutes. Remove cover, top with mozzarella cheese and sprinkle with dried parsley. Bake 10 minutes until cheese melted and top is lightly browned.


Sunday, August 7, 2022

Back To School

As much as I have tried to ignore it for weeks, the joy that is summer vacation is coming to an end and back to school time is officially here. For our family, it's actually a two week process, and mommy is not handling any of it well.

This week my first baby embarks on his Senior year of high school. I'm pretty sure we just went to freshman orientation last week, so it's not quite clear how that happened.

The next day my little baby turns 6! Again, we just brought him home from the hospital, so that went quickly. Then the following week, he is off to Kindergarten, which is going to be a huge adjustment for both of us. 

We are so happy with our school choice, his teacher is amazing, and I get the joy of being classroom mom. All of these things make sending him off a little easier, but the fact that my sidekick won't be here every day is a bit hard to swallow. For him too. During his check up at the doctor last week, when asked if he was excited about school, he replied with "Not really. I don't want to leave mommy." 

That sums it up for Max. He has spent the last 6 years with me, all day, every day, for the most part. We can tell him how much fun he's going to have, how much he is going to learn, and how awesome Kindergarten will be; but right now he can't see past having to leave my side. 

Like all hard things, this too shall past. We will get him through the anxiety of the first few days, or even weeks, but for now, I'm going to keep snuggling, hugging and enjoying these last few moments of just us time. 

And don't think for one minute by going on and on about the little one, seeing the 17 year old leave for his last year of high school is any easier on this mommy's heart. Oh, and did I mention he turns 18 next month? Seriously, it is a lot, all at once. I burst with pride for the man he is becoming, but melt inside knowing he is getting closer and closer to leaving the nest. 

Anyway, enough blubbering on, the whole point of me diving into the back to school saga was to share this super simple, 3 ingredient, Crock Pot recipe that is perfect for those busy school nights filled with sports, meetings, activities and more. 

Crock Pot Salsa Chicken is filled with flavor and can be used for tacos, enchiladas, burritos, nachos or just served over some cooked rice! On those evenings when everyone has to eat at different times, it is as good for the last person as the first. 

If you are dreading sending your kids back to school like me, I send you love and hugs. We can get through this...one day at a time...and count the days until fall break! 


Crock Pot Salsa Chicken

4 boneless chicken breasts

2 cups mild, chunky salsa, divided use

2 1/2 tsp. taco seasoning

Fresh parsley, if desired, for garnish

Grease Crock Pot insert with nonstick spray. Lay chicken inside and sprinkle with seasoning. Pour 1 cup of salsa over top. Cook on LOW 6-8 hours. Shred chicken and mix with remaining cup of salsa. Cook 10 minutes until heated through. Serve or keep on warm. Garnish with parsley if desired.


Sunday, July 24, 2022

Neighbors and Peaches

Last week our sweet neighbor lady came to us and said "if you guys want some peaches, help yourself to some off my tree." So, Max and Daddy walked next door and found this beautiful peach tree overflowing with big, juicy, ripe summer peaches. 

They came back with a huge bowl because they know how much mommy loves them. I would have been perfectly content to leave them on the counter and just snack on them, but they were so ripe they needed to be used quickly. So, I made peach cobbler, and it was delicious, but was gone so quickly I didn't get a chance to blog it. 

The next day I used some in a fruit salad that was raved about. Peaches. Strawberries. Blueberries. It was like summer in a bowl. 

That same night she told them to come pick more because there were still a ton! Well, they came home with another huge bowl full. I knew I needed to use some up so they didn't go bad, so I decided on peach crisp, but this time I would make sure I could share it with you!

Now, that peach cobbler was tasty, don't get me wrong, but this? This was UH-mazing! Like, I wanted to sit down with a spoon and finish off the whole dish myself. I am a sucker for a crumble topping, and this one was fantastic. 

One of the best things about this recipe is you don't have to peel the peaches! Sure, you can if you want, but the skin cooks down and is perfectly fine in the crisp. 

When I say I am not a huge baker, I'm not exaggerating. So you know if I can make this and have it turn out 100% scrumptious, anyone can! 

If you are a peach lover like me, this simple sweet treat will add a little something extra to your summer baking!

Peach Crisp

6-8 peaches, sliced (about 2.5 lbs)

1/4 cup white sugar

Juice of 1/2 lemon

1/2-1 tsp. cinnamon, depending on flavor

Pinch of salt

 Topping:

1 1/2 cup flour

1 cup packed light brown sugar

1/2 tsp. salt

1/4 tsp. cinnamon

1 stick butter, melted

Preheat oven to 375. Lightly grease a 2 quart baking dish In a large bowl combine peaches, white sugar, lemon juice, cinnamon and salt. Mix well. In a medium bowl mix flour, brown sugar, salt and cinnamon. Add melted butter and stir until mixture resembles coarse crumbles. Pour peaches into a 3 quart baking dish. Sprinkle with crumb topping. Bake for 50 minutes until bubbling. *NOTE* I  think it's easiest to use my hands to make the crumb topping.


Sunday, July 17, 2022

Does Your Summer Schedule Need A 30-Minute Meal?

Have you gotten the school supplies list yet? If not, it is coming! I got Max's this week and the reality that school is coming started to set in hard. As much as I try to ignore it, deny it and pretend it isn't happening, we only have about a month left before he will be off to Kindergarten, abandoning Mommy, all day, every day. 

Sorry, was that a little dramatic? I won't lie, I am struggling with the thought of having a Kindergartner and a Senior. I've told people for years the 12 year age difference is perfection, a true gift from God, but for this ONE week when they both head off to school, one for the very first time, and one for the very last time...Mommy is going to shed some tears. Big, crocodile, sobbing tears. 

But you know what? Summer is still here for now, and I am hanging on to it with my fingers and toes. I am trying to find ways to suck all the fun we can out of summer as long as we can. 

So what does that have to do with food? Plenty! We are so busy right now, I need quick and easy meals so that I'm not wasting a bunch of time in the kitchen instead of outside in the sun playing! Plus, we are gearing up for VBS at church this week, which means I need suppers that we can all eat at different times. Max before we leave, the big boys while we are gone and then me when we get home. 

This Smoked Sausage and Sauerkraut is perfect because it can stay warm on the stove, or I could even make it in the slow cooker if I wanted to. It can be ready to serve in about 30 minutes so it fits right into the crazy that is my life right now.

If your summer isn't slowing down any time soon, only to be closely followed by the hectic start to a school year, this 30 minutes meal might just save a little bit of your sanity too!

Smoked Sausage and Sauerkraut

3 (9 oz.) packages smoked sausage, cut into rounds

1 (32 oz.) bag sauerkraut, rinsed and drained well

2 TBS brown sugar

2 garlic cloves, minced

2 TBS butter, divided use

Black Pepper

Fresh Parsley

Whole Grain Mustard

In a Dutch oven melt 1 TBS butter over medium heat. Sauté sausage until brown on all sides. Remove with a slotted spoon and set aside. In same Dutch oven, melt remaining butter. Sauté garlic, just until fragrant, about 1 minute. Add brown sugar and sauerkraut and mix well. Reduce heat to low and cook for 10 minutes until some liquid has evaporated and flavors have melded. Season with black pepper. Add sausage back in and stir to combine. Cook 10 additional minutes. Transfer to serving bowl and serve with chopped fresh parsley. Serve mustard on side at the table. 


Sunday, July 10, 2022

Hold On Summer

 Anyone else feel like the days are passing at supersonic speed and summer 2022 is on course to be one of the quickest ones yet? 

July 4th came and went, and now I'm sure it is only a matter of days before school supplies show up in the store aisles where the fireworks and Americana displays were just a week ago. 

I am sure part of my need for a pause button is the fact that once August comes, I have to face the reality of my babies going back to school. If you don't know, Max will start Kindergarten this year, about a week after his big brother begins his Senior year of high school. Yeah, that week is going to be a tear-filled, blubbering, Mommy is a wreck time. I've always said the 12 year age difference has been perfect, allowing me the best of both worlds, except for this one week when I have to send them both off for BIG years and sit alone in the house wondering what to do with myself. 

But enough about what isn't coming for another month (see, I can totally be in denial just a bit longer). In reality, there is still plenty of summer left and absolutely plenty of reasons to gather in the backyard for a cookout, barbecue or pool party. 

If I have being honest, I wanted to post this recipe as an idea for your Independence Day celebration, but with the whole "tree fell into our house" ordeal, I am a little behind on my work. 

So instead you are getting a tasty, easy, side dish idea perfect for that next cookout, or just for supper this week. 

Broccoli Slaw is one of those dishes that takes a classic summer dish and puts just enough of a twist on it that makes it new and fresh. Coleslaw just isn't for cabbage anymore! 

This is a great summer take-along too because you can make it ahead and leave it in the fridge until you're ready to eat. 

If the summer gods are reading this, I beg you to make time slow down a little. Please. From a mommy who wants to suck every last bit out of this summer as she can before some big changes come our way. 


 Broccoli Slaw 

2 (12 oz.) bags broccoli slaw mix

1/2 cup + 2 TBS mayonnaise

1 cup sliced almonds

1 cup dried cranberries

2 TBS white vinegar

1/4 cup sugar

1/4 cup lemon juice

1 TBS celery seed

Salt and Pepper

In a small bowl whisk together mayo, vinegar, lemon juice, sugar, celery seed, salt and pepper. In a large bowl mix slaw mix, cranberries and nuts. Pour dressing over and fold gently to combine. Chill at least 1 hour before serving. Stir before serving and garnish with extra nuts and cranberries if desired. 


Sunday, June 26, 2022

Storms, Casseroles and Gratitude

 If your Summer 2022 is anything like mine, it is flying by, the days are busier than ever and when it is time for bed you wonder where all the minutes and hours went. 

The last two weeks in our house have been especially busy, and might I say, stressful. On the night of June 13th, a massive thunderstorm went through our area wreaking havoc in it's path. We now know it was actually a "derecho" with sustained winds of 98mph, the same as a Cat 2 hurricane. 

We were some of the unlucky ones who sustained damage in the storm. Our huge maple tree in the front yard, the one that was there long before we moved in almost 20 years ago, couldn't withstand the strong winds. It crashed down onto our house, right above where the 5 year old was sleeping. I wish I had the words to describe the level of fear, and then instant gratitude we felt because it could have been so much worse.

The next morning the tree was removed and we could assess the damage. Let's just say we have some major repairs that have to be done to both the exterior and interior of our house. It has been a stressful two weeks and we continue to pray we have success with the insurance and repair process.

As you can imagine, this situation only added to an already busy summer schedule. Between days of fun, and now days of planning and scheduling, you know I need some easy suppers to satisfy these hungry boys of mine. 

What could be more perfect than a hearty casserole filled with meat, cheese and noodles? A retro one our grandmas and moms probably made because it is pretty budget friendly too! 

Hamburger Casserole is one of those meals you might just have everything on hand for and will feed a crowd. It is also a great "take to" meal for those new babies, loss of a loved one, or your neighbors who have storm damage! 

Summer time doesn't mean the calendar opens up at all. More things to do and a shorter amount of time to do them in. Fun in the sun is the goal as much as possible, with some stress-free suppers to end the day with!


Retro Hamburger Casserole

1 lb. ground beef

2 cans tomato soup

1 lb. rotini pasta

1 small yellow onion, diced

1/2 cup beef broth

1 cup shredded mozzarella cheese

2 cups shredded cheddar cheese

1 tsp. garlic powder

Salt and Pepper

Dried Parsley

Preheat oven to 375. Grease a 9x13 baking dish. Boil pasta according to package directions. In a large skillet over medium high heat, brown beef with onion until no longer pink. Drain if needed. Season with garlic powder, salt and pepper. Drain pasta well. Add pasta, beef broth, soup and half of both cheeses to skillet. Stir well to combine. Transfer to baking dish. Top with remaining cheeses. Cover tightly with foil and bake for 20 minutes. Uncover and sprinkle with a little dried parsley. Bake for 10 additional minutes until bubbly and brown. 


Monday, June 20, 2022

Summer Time Crock Pot

 If you are anything like me, when you think of Crock Pot food, summer isn't the first season that comes to mind. Most of us reserve our best slow cooked recipes for fall and winter. Those soups, stews and comfort food meals we all crave when the temperatures drop and there is a crispness in the air. 

BUT...and that's a big but...your Crock Pot can absolutely be super handy during the dog days of summer. You can make so many dinners that will fill you up, without heating up the house, or have your standing over a hot burner sweating more than you already are. 

Sure, we are like most families and when the temperatures soar, we start to crave lighter and cooler meals. However, I live in the house with three boys, two of which are still growing. So you know I am still putting out some filling, hearty meals during the summer because they are always starving, no matter what the thermometer says. So a great way for me to do that is turning to my slow cooker. 

I've talked before about my love of frozen meatballs for the convenience, flavor and value. I always have a bag in the freezer and when they go on sale or I have a coupon I stock up. From my Italian version perfect for pasta to my Hawaiian ones that can be a tasty party appetizer or easy supper, there is always something I can do with a bag of meatballs. 

Now we can add another region of world to our list of meatballs flavor inspiration! Calling all Asian cuisine lovers! That's right, we are adding some teriyaki flare to meatballs, serving them over rice and savoring every single bite! 

These make for an easy, tastes like take-out meal! We love them served over hot white rice and steamed broccoli on the side. They would be delicious set out at your next get together too. Just put a box of toothpicks next to the Crock Pot (on the warm setting) and let your guests serve themselves! 

Summer time is definitely a great time to put your Crock Pot to work more than what you might have in the past! Delicious meals your family will love, and you don't even have to turn on a fan!

Crock Pot Teriyaki Meatballs

1 (32 oz) bag frozen homestyle meatballs

1/4 cup soy sauce

1/3 cup beef broth

1/2 cup pineapple juice

1/3 cup packed brown sugar

1 TBS honey

2 garlic cloves, minced

1/4 tsp. ground ginger

2 tsp. sesame oil 

1 TBS cornstarch

Sesame seeds, optional

Cooked rice

Spray Crock Pot insert with nonstick spray. Place frozen meatballs in bottom. In a medium bowl, mix remaining ingredients. Pour sauce over meatballs and stir well. Cook on LOW for 4-6 hours. Stir well before serving over cooked rice with steamed broccoli on side if desired. 

Inspired by Let's Dish

Shared at Weekend Potluck


Monday, June 13, 2022

Put Down The Jar! Homemade Alfredo Is Super Easy

 Let me preface this post by saying, I will never throw shade on someone who is using jarred pasta sauce in their house. We've all been there. We've all done it. We all still do it! In no way am I being critical, or sitting on my food blogger pedestal being all pious about how homemade is the way to go. I am simply showing you how easy making your own can be, if you want to and time allows, since I spent too many years thinking it was complicated. 

When I first shared homemade Alfredo years ago, it was like a revelation to me. I couldn't believe I had made it from scratch and it actually worked! More recently, when I posted a Copycat Olive Garden Alfredo I pointed out it was a little different than ones I had prepared in the past because it was thickened with a roux- a mixture of butter and flour. This one is s a little different yet again, with the addition of cream cheese! It's nice to have variety and each one is as tasty as anything an Italian restaurant is serving up.

One reason why I love this recipe, besides being absolutely delicious is the use of frozen tortellini. Let's face it prices at the grocery store are enough to make anyone scream, but this is a great way to stretch a big bag of frozen pasta. I used 2 of the 19 ounce bags which were under $3 each. Even adding in the ingredients for the sauce, that is still less than one plate of pasta at our favorite Italian place. 

Making the sauce might seem like quite a few steps, but I promise it comes together quickly and simply, and you won't have to stand over a hot stove for long. (If you are in for triple digits like we are this week, that is something to be thankful for!)

Throw a quick green salad and maybe some crusty bread with this and you have a pasta supper any Nona would be proud of! 

Making homemade Alfredo might be easier than you might think, but don't think you have to hide those jarred ones in the back of the pantry. Believe me, there are currently jars of both red sauce and Alfredo in my kitchen right, and I am 100% here for it! 


Cheese Tortellini Alfredo

2 (19 oz.) bags frozen cheese tortellini

1 cups half-and-half

2 cups milk

1/4 cup butter

1/4 cup flour

6 garlic cloves, minced

1/2 cup grated Parmesan Romano cheese

4 oz. cream cheese, broken into small chunks

Salt and Pepper

Fresh Parsley, chopped

Cook pasta according to package directions. Meanwhile, melt butter in a large skillet over medium heat. Cook garlic for 1 minute, stirring constantly. Whisk in flour and cook for 1-2 minutes, until smooth. Slowly pour in milk and half-and-half, whisking constantly. Bring to a simmer and cook 5 minutes, until slightly thickened. Add cream cheese and stir until smooth. Add grated cheese and stir until smooth. Reduce heat to low and cook until thickened, about 5 minutes. Season with salt and pepper. Keep warm until pasta is done. When pasta is cooked, drain well. Add to skillet and gently stir into sauce. Transfer to serving bowl or plates and garnish with fresh parsley, if desired. 


Shared at Weekend Potluck


Tuesday, June 7, 2022

The Peach Truck Is Coming

 If you love peaches like I do, then you are going to be so excited to learn The Peach Truck might be headed to a city near you this summer! 

Celebrating its 10 year anniversary in 2022, The Peach Truck is hitting the road once again, delivering fresh, delicious produce to all of their loyal customers. Founders Jessica and Stephen Rose are happy to share their passion with 60+ booths across Nashville, 25 state tours or delivered to your front door with nationwide shipping! 

To find out if The Peach Truck will be in your area this summer, simply use their easy locator tool to find out where you can visit the truck, or in some cases you can pre-order now for easy pick up! 


For those of you in my neck of the woods, here are the locations & dates they will be in Fort Wayne!
  • Connolly's Do It Best Hardware-Dupont Rd- 7/13 and 8/7
  • Menard's Southtown- 8/7
  • Menard's Illinois Rd.- 7/13 and 8/7
  • Menard's Meijer Dr.- 7/13
I was lucky enough to get some peaches to sample last week and I can honestly say, they were some of the juiciest, sweetest ones we've ever had. I can't even lie, I didn't have time to bake anything with them, because we were eating them so fast! However, my plan to was to make this amazing recipe from The Peach Truck Cookbook, had they not disappeared from the counter so quickly! 
 
If The Peach Truck ends up in your hometown, I hope you will take the opportunity to support their business and taste the difference in their peaches for yourself! 
 
 
Peaches and Cream Bars
 
1 ½ cups graham cracker crumbs
1 stick (½ cup) butter, melted
⅓ cup sugar
1 14-ounce can sweetened condensed milk
1 cup white chocolate chips
5 peaches, pitted and cubed (about 4 cups)
2 T all-purpose flour
 
Preheat oven to 350. Prepare a 9x13 straight-sided baking dish by lining it with parchment or waxed paper.Mix together the graham cracker crumbs, melted butter and sugar until thoroughly combined. Spread evenly across the bottom of the baking dish and, using the back of measuring cup or other smooth surface, press the mixture down firmly to form the crust. Spread the sweetened condensed milk evenly over the prepared crust. In a mixing bowl, combine the cubed peaches, white chocolate chips and flour and toss until coated. Distribute evenly across the surface. Bake on center rack for 45 minutes. 


All photos and recipe were provided by The Peach Truck. The thoughts and opinions are all mine.