Everyday Mom's Meals: Weekend Company
_____
Showing posts with label Weekend Company. Show all posts

Saturday, February 23, 2013

Weekend Company {Guest Blogger Bekki}

Happy Saturday! I hope this week treated you well, and you have a fun and/or relaxing weekend ahead of you. Today I'm welcoming a great EMM friend back into my kitchen to share yet another tasty recipe with all of us. So, grab a cup of coffee and see what Bekki has cooking...


I am married to my wonderful husband Josh, have a beautiful 12 year old step daughter Amy and 2 fur baby sweethearts Minnie and Shadow. I am a self taught baker/cook. I taught Wilton cake decorating for a while, worked in a grocery store bakery and have even spent time baking wedding/birthday cakes as a hobby on the side. My love for cooking has been since childhood. Spending time with my mother, aunts, and grandmothers. Aiding in their recipes or just being there for the conversation. Its always been a source of calm, peace, and ultimate fulfillment. The idea that you add your love to each recipe and share it with the people you care about is such an amazing blessing to me in more ways then I can ever put on paper. I have decided writing a cookbook was something I could do to share my love of food with family, friends, and whomever else comes my way. I hope your day is blessed with all your favorite things. 


With Mardi Gras just passing this is a tribute to one of my favorite dishes. Gumbo!!! But now that I have revamped my eating , it isn't always easy to just do away with the things we enjoy, So this file gumbo filled me heart and soul. Typically I use some kind of seafood (usually shrimp) in my gumbo recipes, but this time I didn't have what I wanted to add already in the fridge so I went with the next best thing! 

Bekki's Gumbo
Pkg. Chicken breasts 4-5, chopped
1 TB. Ground file
Salt to taste
1 TB. Granulated garlic
3 stalks celery, chopped
1 large onion, chopped
1 LB. Andouji sausage, chopped
2 C. Frozen cut Okra
6 C. Water

In s large pot add water, chicken, seasonings, celery, onions, and peppers. Cook until chicken is cooked through and veggies have softened. Add sausages, and okra. Cook until okra is to desired doneness. Check seasoning before serving, add additional if desired.


Pin It

Saturday, January 12, 2013

Weekend Company {Guest Blogger Jean}


Good morning and welcome to another weekend! This week, I'm happy to have a brand new guest in my kitchen. I love that so many EMM Fans are getting in on the blogging fun! So if you are reading this, thinking you can't do it...YOU can! If you are interested, just email me at everydaymomsmeals@gmail.com and I can send you more details.

So grab a seat, pour yourself a cup of coffee (or even a bloody Mary) and welcome Jean to EMM~

Hello, my name is Jean Hurley.  I have never blogged before but enjoy cooking for family and friends.  Thanks Krista for giving me this opportunity.
I am a nurse by profession, also a wife, mother, and now a grandmother. I am from Massachusetts, but am currently living in Georgia.
This is a recipe that I used to make for my kids when they were young. It’s quick and easy. I usually served it with either French fries or a salad and they loved it.  It is also great for parties and even school lunches.  Feel free to play with the ingredients and change them to what your family loves.  I hope you enjoy it!

Meat Pie Sliders
Ingredients:
1 green pepper, diced
1 onion, diced
1 small pkg fresh mushrooms, diced
1 teaspoon minced garlic
1 lb ground beef
1 (15 oz) can of tomato sauce
½ (14.5 oz) can of diced tomatoes
1 cup shredded mozzarella
2-3 cans pop n’ fresh biscuits, I use Pillsbury Simply Biscuits
Salt and pepper
Garlic salt
Olive oil

    Preheat oven to 375.  In a large frying pan, sauté peppers, onions, mushrooms, and garlic in a Tablespoon of olive oil until tender.  Add ground beef and cook until crumbly and brown.  Add tomato sauce and diced tomatoes, salt and pepper, stirring until mixed. Remove from heat and stir in the mozzarella.
    Lightly grease a baking sheet.  Take one biscuit and flatten it out with your fingers, keeping the round shape. Place it onto the baking sheet.  Place a spoonful of filling mixture onto the biscuit, then take another biscuit, flatten it out and cover the first one, making sure to pinch the edges tightly.  Poke a hole in the top with a sharp knife. Lightly brush the top with olive oil and sprinkle with garlic salt.  Repeat with all the biscuits.
    Bake for 18-22 minutes at 375, until golden brown.  Serve with salad or French fries.
You can change the ingredients to suit your family,sometimes I add pepperoni and black olives.  You can also make them as big or small as you choose, dividing the biscuits in two for smaller appetizers or using Grands for teens.  I have also made this with pizza dough and cut into squares for a large crowd.


Pin It

Saturday, December 1, 2012

Weekend Company {Guest Blogger Colleen}

Whew....it's December 1st! Can you believe it? I am still in disbelief myself, because I'm pretty sure Labor Day was just yesterday, but alas the calendar doesn't lie. However, I will say with the hustle and bustle of the holiday season upon us, it's nice to know ALL of my Christmas shopping is not only DONE, but also WRAPPED!!! (I realize some of you are leaving now in disgust, and I apologize.)

I hope you had a great week, and are ready for something yummy for the weekend. The is perfect for a brunch, or keep it bookmarked (or pinned) for those family visits that are just around the corner! Please welcome Colleen back to EMM~


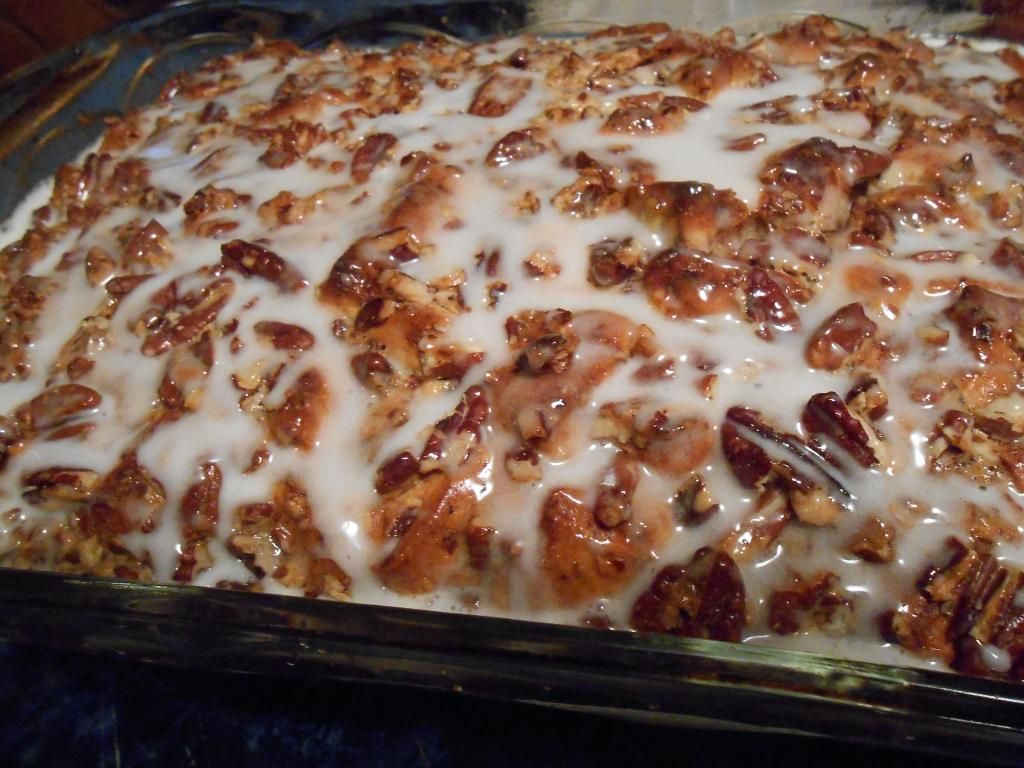
Hi Everyone! I'm Colleen and I'm so happy to be back doing a guest spot at my favorite foodie blog. The recipe I'm going to share with you was given to me fairly recently by my dear friend, Shawna. When I told her that we were going to have a wedding rehearsal brunch for my son's upcoming wedding, she said "I've got just the recipe for you!" I was so impressed with this one that I immediately took pictures knowing that I would one day want to share it. This dish got rave reviews for the rehearsal brunch. I hope you all give it a try and enjoy it as much as we all did. I think it would make a great holiday brunch item, as well. Or maybe you could just liven up your weekend and serve this to your family one morning! They'd be thanking you all day.   

By the way, just in case you're wondering, the wedding rehearsal went great and was followed a couple days later by a beautiful wedding. The newlyweds have been married almost 2 months now and are doing very well. I'm happy to have them living just down the street from me and enjoy having them pop in now and then ... even though it's mostly to raid my refrigerator. LOL! The picture I'm including is of me with the happy new couple on their wedding day. :)

French Toast Casserole
2 tubes of refrigerated cinnamon rolls
1 cup maple syrup
6 eggs
1/2 c. heavy whipping cream
2 tsp. vanilla
1 tsp cinnamon (or to taste)
1 - 2 cups chopped nuts (optional)

Preheat oven to the temp listed on the package of cinnamon rolls (they can sometimes be different) and grease a 9 x 13 casserole dish.

Cut the cinnamon rolls into bite size pieces, reserving the icing packets for later. Place all the cut up pieces of cinnamon rolls into the buttered casserole dish. Pour the maple syrup over top of the cinnamon rolls covering as much area as you can.

In a bowl, beat the eggs and whipping cream just until it all comes together nicely. Add in the vanilla and cinnamon and mix thoroughly. Pour this mixture over the cinnamon roll mixture.
Add the chopped nuts to the top, if you are using.
Bake for about 35-40 minutes until the mixture doesn't jiggle when you shake the pan slightly.  When you take it out of the oven, open the reserved packets of icing mixture and drizzle them over the casserole. Serve warm.

Notes: This is best done in a glass casserole dish but if you do bake it in a metal or foil pan, don't add the nuts to the top until halfway through the baking process to avoid burning them. You can also bake this the day before you want to eat it. Just leave off the icing and refrigerate the casserole overnight. The next morning, heat it in a moderate oven just to re-warm it and then top with the icing after warming.


Thanks to Mrs. Everyday for allowing me to come by and share with you all once again. I hope you all have a very happy weekend full of family, love and good food. :)  


Pin It

Saturday, November 17, 2012

Weekend Company {Guest Blogger Bekki}

Good Morning and Happy Saturday! It's so hard to believe Thanksgiving is only 5 days away! The days are flying by, so I hope you are starting to narrow down those menus and are looking forward to a happy, healthy and yummy holiday.

Today we welcome back into the EMM kitchen a great friend to this blog, and someone who is quickly become a wonderful personal friend too. So, please grab a cup of coffee, or a Mimosa (after all it is the weekend) and say hello to Bekki~


Good Morning EMM Fans! I hope this recipe greets all of you with the warmth and the love surrounding every holiday season. I want to thank Mrs. Everyday for inviting me to share another recipe from my celebration table. With Thanksgiving just next week I thought I'd share a recipe for one of my favorite pies. I love anything pumpkin! With this no bake pie it allows you to prepare dessert without the worries of managing your oven's time. A large scoop of eggnog ice cream or classic whipped cream compliments a slice perfectly.


I am married to my wonderful husband Josh, have a beautiful 12 year old step daughter Amy and 2 furbaby sweethearts Minnie and Shadow. I am a self taught baker/cook. I taught Wilton cake decorating for a while, worked in a grocery store bakery and have even spent time baking wedding/birthday cakes as a hobby on the side. My love for cooking has been since childhood. Spending time with my mother, aunts, and grandmothers. Aiding in their recipes or just being there for the conversation. Its always been a source of calm, peace, and ultimate fulfillment. The idea that you add your love to each recipe and share it with the people you care about is such an amazing blessing to me in more ways then I can ever put on paper. I have decided writing a cookbook was something I could do to share my love of food with family, friends, and whomever else comes my way. I hope your day is blessed with all your favorite things.


Holiday Hostess Pumpkin Pudding Pie 
Adapted from A Family Christmas

1 (4-serving size) package instant butterscotch pudding mix
1/2 c. ice cold milk
1/2 c. ice cold light cream
1/2 tsp. ginger
1/4 tsp finely chopped candied ginger
1/4 tsp. nutmeg
1/4 tsp. salt
1/4 tsp. vanilla
1 1/2 c. canned pumpkin
1/3 c. sugar
1 tbs flour
1 (9-inch) ready made chocolate wafer or graham cracker crust

In large mixing bowl, combine pudding mix, milk and light cream. Beat for 3 minutes, or until well blended. Add ginger, candied ginger, nutmeg, salt, and vanilla mix to combine. Blend in pumpkin sugar and flour.
Pour filling into pie crust. Chill for 3 hours before cutting and serving. 

Happy Thanksgiving!!! Much love and blessings to you and yours! 

*This photo is directly from A Family Christmas Cookbook, It looked so beautiful and decadent I couldn't help but share it with you all. 


Pin It

Saturday, November 10, 2012

Weekend Company {Guest Blogger Katrin}

Good Morning. Welcome to another weekend. We are enjoying a 3 day weekend due to Fall Break at Monkey's school, and for that we are very thankful!

Today's guest is a fellow blogger, and the first time I saw her Blog name I couldn't stop laughing. It's just too cute, and so incredibly clever! So, grab a cup of coffee, or hot cocoa, and please welcome Katrin to EMM~


Katrin, or Betty Martha as her close friends like to call her is the lady behind Running with the Deviled Eggs blog. Running With the Deviled Eggs is a food diary with everyday recipes for the novice to advanced cooks with a little tune to keep you dancing in the kitchen.

A recent newlywed and mother of 1 fabulous teenager (Little Ugh), Katrin spends her time in her kitchen dancing around to music from all genres while trying to prepare healthy and tasty dishes for her family. She tries to keep her ingredients as fresh and as local as possible, keeping frozen or pre packaged foods out of her cupboards.
When she is not in her own kitchen she spends her time at work, in another kitchen, baking cakes, cupcakes, and other various desserts.
Her mantra - Food for your mouth, Fuel for your soul!
Please feel free to check out her blog at your leisure or over on her fan page on Facebook.


Chicken and Broccoli Mac n Cheese

2 pre cooked chicken breasts, cubed
1/2 head broccoli cut into small florets
Small pasta shells
11/2 c. shredded sharp cheddar & 1/2 c. mozzarella
2 tbsp. butter
2 tbsp. flour
1/2 c. milk
1 c. chicken stock
1 tbsp. fresh thyme
2 tsp. cumin
salt & fresh cracked pepper

A few steps are avoided if you have leftover chicken breasts, you could use a quick pick up rotisserie chicken from the store too or simply bake some chicken off ahead of time.

Wash and chop your broccoli into small florets, you want them to be slightly larger than your shells.
Set aside.
Chop your cooked chicken breasts into 1 inch cubes (I find it easier to chop chicken if it has been chilled)

Next, have a large pot of water boiling and add a few pinches of sea salt.
Add in your pasta (I didn't give an amount because it is really a matter of how much you plan to make - the sauce will make enough to serve 4-6) and stir right away to make sure the pasta doesn't stick.
Note - since you will finish in the sauce you cook to the instructions on your package less 2 minutes.
About 4-5 minutes in you are going to add your broccoli to the pasta to cook alongside.

The sauce only takes a few minutes to prepare so you can start that step just before you add the broccoli to the pasta.
In a saucepan melt butter on medium heat. Whisk in the flour, which will then form a paste. Cook this for a minute or two to get rid of the flour taste. Add in the cumin and thyme. Slowly stir in half of the chicken stock (mixing with a whisk is easier than a spoon to achieve a smooth consistency) and the milk and bring to a boil - it will start to thicken. Add in more of the stock as you see fit - some like it really thick, some a more thinner sauce.
Finally add in your cheeses and stir to combine.
Season with salt and fresh cracked pepper.

Drain pasta and broccoli and then return to the pot, spoon in the sauce and add chicken.
Serve hot.


Pin It

Saturday, October 6, 2012

Weekend Company {Guest Blogger Brandie}

Happy Weekend to all of you! I this finds you at the end of another great week and heading into a fun fall weekend. Today's Weekend Company recipe couldn't be more perfect because we're heading out to our favorite fall festival today, The Apple Festival. We're ready for hot apple cider, warm apple fritters,  hay rides, crafts and more!

I can't even put into words how excited I am to have my guest join me in the kitchen today. Back in June 2011 when I was expanding the blog and creating my Facebook Fan page, she was one of the first bloggers to welcome me into the foodie world, and even invited me to do my very first guest post on her site. Then as we talked more and more we discovered we might have just been separated at birth! We both focus on family style cooking, are both wives and mothers to one child, both boys...both named Alex! She is a dear sweet friend whom I respect so much and am so honored to have in my life. Ya'll know her as The Country Cook, so please welcome, for the first of what I hope is many times, Brandie to EMM~


 First, let me say a special thank you to the lovely Krista for inviting me here today! I just love so many of Krista's recipes and she is such a sweet gal! I'm so thrilled to be here and to be sharing a favorite recipe of mine. 
For those of you who are new to my site, let me introduce myself. My name is Brandie and I publish TheCountryCook.net, a website dedicated to classic American recipes and quick and easy family favorites. I'm also a momma and a wife.   I understand the challenges of today's busy families and I try to share many recipes that use readily available ingredients and are easy to prepare so families have more time to enjoy each other (and a tasty meal) together at the supper table.

 I am so glad Krista invited me to share a recipe during the fall season.  There are just so many wonderful recipes I like to make this time of year. One of my favorites (and of course, easy!) recipes to make are these Apple Dumplings. 
For this recipe, you only need one apple for 4 servings or two apples for 8 servings.  And the crescent rolls take on a whole other flavor when combined with the cinnamon and butter.  And like many good desserts, a little bit of soda really makes this dish come together. No one would ever guess you used crescent rolls to make these dumplings. My family just loves this dessert because they love apples and I love it because it is easy peasy!

Easy Apple Dumplings   
Ingredients:
1 Green Apple (Granny Smith or Golden Delicious)
1 tube (8 oz.) Crescent Rolls
1 stick unsalted butter, melted
3/4 cup sugar
1/2 teaspoon vanilla extract
Ground Cinnamon (to taste)
1/2 cup lemon lime soda (Sprite or Mountain Dew work good)


Directions:
Preheat oven to 350F degrees

Peel and core apples. Cut apple into 8 slices.

Unroll tube of crescent rolls and separate into 8 pieces.

On each roll, sprinkle with a bit of cinnamon.

Add one apple slice.

Roll it up in a nice little bundle. Continue with next 7 rolls the same way.

Spray an 8-inch square pan with nonstick spray.

Place all 8 dumplings into baking dish.

Mix together melted butter with sugar and vanilla.

Pour butter mixture on top of crescent rolls.

Now take soda and pour it around the edges of the crescent rolls.

Sprinkle tops with a bit more cinnamon.

Bake in preheated oven for about 35-40 minutes.

Serve with whipped cream or ice cream.

Cook's Notes: Just double the recipe and use a 13x9 pan for 8 servings.


Pin It

Saturday, September 29, 2012

Weekend Company {Guest Blogger Kristi}

Good Morning and Happy Saturday. I hope this week was kind to you and your weekend plans include some rest, relaxation, and even some autumn fun! Oh and maybe yummy food too!

My guest today is a fellow blogger who always has something delicious cooking in her kitchen. So please welcome back to Kristi to EMM...


Hi everyone!  My name is Kristi and I’m the author of Kristi’s Recipe Box.  I just finished up my first year of blogging and I’m looking forward to another great year.  I was a teacher for fifteen years and now I am currently a stay at home mom.  I live in central Illinois with my husband Danny and our two children.  My daughter Madelyn just turned two this summer and we welcomed a son to our family in May.  Morgan is now nearing 5 months old!  Where does the time go?  
The recipe I’m going to share with you today is one I started making this summer.  I’ve been working so hard to shed some baby weight and was looking for a quick, healthy breakfast that was relatively low in carbs.  This was a marriage of two recipes- one I’d tried several years ago and another that was shared with me by a friend!  I shared this with KRB readers this summer and have been making them weekly since.  These are great fresh out of the oven or reheated from the fridge or freezer!  I typically leave a couple of days’ worth of cups in the fridge and put the rest in the freezer in Zip-loc bags.  From the fridge, I heat for about 30 seconds in the microwave.  From the freezer, it takes a minute.  Such a quick and healthy breakfast for busy mornings!  I hope you enjoy these as much as I have!


Quiche Cups

  • 1 cup frozen onion seasoning blend (This is found with the frozen vegetables and consists of onion, celery, red pepper and parsley)
  • 1 T. butter
  • 4 slices deli ham, chopped
  • 6 eggs
  • 1/2 t. Italian seasoning
  • black pepper to taste
  • 1 cup mozzarella cheese

Cook onion blend in butter in skillet over medium heat until onions are tender.  Add in ham and cook another minute.  Cool mixture for 5-10 minutes.  In the meantime, preheat oven to 350 degrees.  In a mixing bowl, combine eggs, Italian seasoning, black pepper, and mozzarella cheese.  Add in ham/onion mixture and stir until combined.  Ladle 1/8 cup of mixture into each cup of a prepared standard 12-cup muffin tin.  I usually have a little mixture left so I just distribute it evenly among the cups.  Bake at 350 degrees for about 20 minutes or until eggs are set.  Cool completely before storing.


Freeze in zip-loc bags.  Reheat for about 60 seconds in microwave.


Thanks to Krista for allowing me to share a favorite recipe with you today!  Hope you’ll stop by and visit me at www.kristisrecipebox.blogspot.com.


Pin It

Saturday, September 8, 2012

Weekend Company {Guest Blogger Phyllis}

Good Morning! I hope this past week treated you well and you have welcomed Saturday with hopes of rest, relaxation and fun. Today's guest had a great recipe to share with us, and I'm so excited to have her here. Phyllis Salmons is originally from Winston-Salem, NC and now resides in Daytona Beach, FL. Grab a cup of coffee, join us in the kitchen and please welcome her to EMM~


Revenge of the Chronic Dieter
By Phyllis Salmons
The older I get, the more I look back to the early years of my life. It has probably been accentuated by the death of my mother in 2005 – there are so many things she knew about our lives and now she is unavailable to enlighten me. Adding to it, a little over two years ago, my sister Vera started a Facebook group called Vintage Vera. On that page, we sit on our virtual “front porch” and talk about things of the past. You see, when we were kids, the adults sat on the real front porch and visited while the kids played in the yard nearby. Naturally, one of the favorite memories of Mama and Granny is the delicious food they cooked. Come by and check us out sometime!

Unknown to us, Mama struggled to write down many of her recipes before she passed. Vera was on the verge of tossing out the composition book that Mama wrote in, but something told her to look again before discarding the book. Eventually, Vera decided to create a cookbook for the family and a few friends.  In late 2010, Vera and I published the Vintage Vera Cookbook to document those early recipes we have always loved. When I think of Mama’s hard work rearing five kids, I am amazed. How in the world she found the time and the energy to cook is beyond me.
As Vera and I were typing many of the recipes, I frequently commented on the calorie and fat content. As children we burned off the calories. Adults worked so hard on the farms, on their jobs, and in the home, that they would never think of joining a gym. No one agonized over butter and whole milk being used in favorite recipes.
What a wimp I am today. My job is not nearly as physically demanding as my ancestors. I have succumbed to paying big bucks for the accessibility to a gym. My weight has always been an issue. With my lifestyle filled with time saving and energy saving devices, a less demanding job, and an aging metabolism, my thoughts are frequently on calories, fat content, and portion control.
Alas, if I ever get my body whipped into shape, I will always have to be very careful about what I eat. This realization caused a great depression when considering that I will never again truly enjoy delights such as Mama’s Sliced Sweet Potato Pie. How sad.


Here is her recipe from the Vintage Vera Cookbook

Mama’s Sliced Sweet Potato Pie
3 medium sweet potatoes
1 large can evaporated milk
2 cups sugar
1 stick of butter or margarine
1 Tbsp. Cinnamon
1 tsp. flour
Crust for two-crust pie (homemade or store bought)

Boil sweet potatoes until fork tender, cool and peel. In a deep dish baking dish, line the bottom crust and sprinkle with flour. Slice the sweet potatoes into slabs and layer into dish until about three layers deep. Sprinkle with cinnamon. Mix evaporated milk with water to make about two cups of liquid.  Pour the liquid over the potatoes, sugar and cinnamon. Cube butter and dot over the top. Use the second pie crust to cover the filling, making slits in the crust (or construct a lattice top). Bake at 350 degrees for about 45 minutes to an hour until the crust is brown and the pie filling is bubbling. It may be wise to place a baking sheet under the dish prior to baking to avoid boil over. Good served hot or cold.
_________

Now you can see why I lamented. How could I ever again delight in this delicious treat? To tell you the truth, I always loved to dollop a hearty serving a Breyer’s Vanilla Ice Cream on a hearty serving of the pie. Guess you know now why I have a weight problem.

Now don’t get me wrong – I am trying. In 2009 I lost a significant amount of weight. Since then, I have struggled to keep it off.

I’m depressed, I tell you. Oh, the sadness when I remembered the taste of Mama’s pie and the thought that I can never afford to have it again.

Or maybe…

A few months ago, it occurred to me that a good number of the calories in pie are in the crust. Now Mama’s pie was great, but I do not make my own crust because of having cats in the house – there is a fear of finding a cat hair in the crust. So, back when I did cook these delights, I used store-bought crusts – not as good, but I felt an appropriate substitute under the circumstances.

Now, I love the crust as much as anyone, but it occurred to me that I should invent a “low-cal, low-fat” pie filling and omit the crust. Being that portion control is also my downfall, it is important to attempt small amounts so as not to overeat.

So I tried to make my lifestyle friendly version of Mama’s sliced sweet potato pie.
I purchased some of the 4”x6” foil pans so I would not make too much (probably three servings) and I made the following substitutions:

  • About ¼ cup of Splenda Brown Sugar instead of the Granulated Sugar.
  • 1 Tbsp. Smart Balance Light Buttery Spread instead of the butter.
  • Two sweet potatoes boiled or baked
  • ½  c. fat-free evaporated milk
  • Having no crust, I did not use the spoon of flour


I figured per serving that:
Mama’s version My no-crust version
312 per serving + calories in the crust 215 per serving


According to Google, pie crust is like to have at least 82 calories for 1/8th of the pie. Now take into account that I was eating a double serving of Mama’s pie WITH Breyer’s Vanilla and yikes – I figure I would likely put away 600 of so calories!


Upon tasting of my tasting my Crustless Sweet Potato Pie, truly I was doing a happy dance! 


Now this has not solved my weight problems – that will be a daily battle. But at least once in a while, I can have a serving of Sweet Tater Pie – ALMOST like Mama made it. How can you adapt a favorite recipe to be more 2012-friendly with your lifestyle? Think about it!


Pin It

Saturday, August 25, 2012

Weekend Company {Guest Blogger Kristin}

Good Saturday Morning! Thank goodness, we made it to the weekend! We survived the first week of school, and are looking forward to some down time over the next 2 days, and actually some major family time too!

Today's guest is another fan who is so kind to share a family recipe with us, and you're going to be so happy she did. I have 3 words for you: Mac and Cheese!! As I told her when she sent me this, we love mac and cheese and I can never have enough recipes for it. Plus, I love that hers uses shell macaroni and Colby cheese! YUM!

So please welcome Kristin to EMM~


Hi! My name is Kristin. I am a wife to a wonderful man, Tim. I have 2 wonderful children Dominic is 8, and Brooklyn is 6. The dish I chose to share is homemade mac n cheese. It was past down from my great-grandma and is always a hit when its made. 

Homemade Mac n Cheese
1 lb. medium salad shells
1 1/2 lbs. Colby cheese
1/4 cup milk
3 tbsp butter, cubed

Pre-heat oven to 350 degrees.Cook noodles according to package. Drain noodles and in a roasting pan with lid, put half the noodles , half the cubed butter, and milk in bottom of pan. Layer with 1/2 Colby cheese. Top with remaining noodles, butter and cheese. Top with salt and pepper to taste. Cover with lid and cook on 350 degrees for 30 mins.
We serve ours with green beans and French bread. It's super easy and quick. Once you get it in the oven, we always set a timer and do something fun as a family!!! Not only do you get dinner you also spend quality time together, and if your life is like ours...sometimes its hard to get QUALITY TIME!!!! I hope you enjoy it as much as we do:) 


Pin It

Saturday, July 21, 2012

Weekend Company {Guest Blogger Alison}

Welcome to the weekend! Was the week good to you? Ours was yet another busy one, but good. In fact, we even fit in a day trip on Friday. We went with Adam's aunt and uncle to Chicago and took a tour of Wrigley Field, ate at the Hard Rock Cafe and shopped on Michigan Avenue til we dropped! It was an early birthday celebration for someone very special! We have some celebrating to do because today is an extra fun day in our house. A BIG Happy Birthday from my heart to my favorite guy in the world...Mr. Everyday!! That's right Adam turns 38 today and we're going to try to make it a GREAT day for him! You know, growing up I always knew there would be dates in my life that would hold significance, but little did I know that one of the most important dates, actually came 7 years before I was even on this earth. Because I give thanks that on 07-21-74 God created my soul mate, the love of my life, and his birthday is one of my favorite days because the day I met him, 23 years later, is the day my life began. So, Happy Birthday to my husband and best friend! I love you more now than the first time you said those 3 words to me, and there is nobody else I can imagine sharing my life with!

Today's guest is a fellow blogger whom I met through Facebook. I'm excited to have her with us today, so grab a cup of coffee and join us. Please welcome Alison from Under the Big Oak Tree...

Hello, Everyday Mom's Meals readers!  I'm so happy to be posting here today!  Thanks so much, Krista for allowing me to be your guest here today!


My name is Alison.  I'm a former city-girl now enjoying life in the country as a stay at home mom.  Our small family consists of me (of course), my husband, our 3 year old daughter Grace, and our spoiled dog Remmy. After becoming a single-income family, we've had to alter our spending habits.  While I'm not an extreme coupon-er, we do shop sales, enjoy low-cost (or even free) family activities, and prepare frugal and healthy meals through out the week.  I also enjoy sharing recipes, tips, family stories, and even my weight loss struggles on my blog, Under the Big Oak Tree!


Since the birth of our daughter, we rarely go out to eat.  It's just easier, cheaper, and most times, healthier to eat at home.  But, that can start to get a bit boring if I'm not careful.  So, I like to try new recipes here and there to help switch things up a bit.  I don't get too fancy though, since I don't want the meal to get too pricey.

I like to use a lot of fresh vegetables when I cook and try to use ingredients that are currently in-season, this helps keep our grocery bill low.

Today, I want to share with you one of my favorite vegetable dishes.  It's relatively new to our family, but was a hit right away (with the adults anyway)!  In fact, I'm planning on preparing it again this weekend!  The recipe below is for a large single portion or 2 smaller portions and can be served over rice or noodles or even on it's own!


Vegetable Stir Fry


Ingredients:
  • 1Tbs. Olive Oil
  • 1/4 head cabbage, sliced
  • 1/2 cup carrots, sliced
  • 1/2 large onion
  • few shakes of crushed red pepper flakes
  • 2 Tbs. La Choy Original Stir Fry Sauce
  • 85grams frozen broccoli*
  • 2-4 Tbs. water
Directions: 
  • In a hot pan or wok, heat oil.  
  • Add cabbage, carrots and onion.  
  • Cook until vegetables are tender, stirring often. 
  • Stir in a few shakes of crushed red pepper flakes.  (more or less depending on if you like some heat added to your stir fry)
  • When vegetables are just about tender, add stir fry sauce. Stir to combine. 
  • Add broccoli and water, stirring to scrape browned bits from bottom/sides of wok.  
  • Cook until broccoli is heated through.  
  • Serve over cooked rice or noodles for a heartier meal, or serve alone as a low-calorie meal.  
Notes:  
  • Since I'm counting calories, I weighed the broccoli before adding it to my stir fry.  The bag stated that one serving of broccoli was 4 florets (85 grams) but the size of the florets in the bag varied, so I weighed it to be more accurate.  If you're not counting calories, just add as much as you want.  
  • The first time I made this, I ate the entire pan full as a single serving!  I was really hungry!!!  This works well as 2 smaller portions, especially if serving over rice or noodles.    
  • I liked keeping the cabbage in longer slices rather than chopping.  Since I wasn't planning on serving over rice or noodles, the slices of cabbage made me feel like I was eating noodles.  
  • When I made this a second time, I added some peas that were leftover from a previous meal.  About a 1/4 cup (34 additional calories).  Yum!  
  • Be sure to add calories if serving over rice or noodles or adding additional vegetables.  
  • If you don't think an all-vegetable dinner would go over well with you or your family, check out my recipe for Cabbage Chicken Stir Fry.  

Total calories:  326* 
Calories if divided into 2 servings:  163*


There you go!  A healthy, low-calorie and low-cost meal that is quick and easy, too!  I hope you'll try it and enjoy it as much as we do!  I also hope you'll stop by and visit me over at Under the Big Oak Tree!


Pin It

Saturday, July 14, 2012

Weekend Company {Guest Blogger Angie}

Happy weekend to you! Are you as happy as I am to see this week done? I think the minute our feet hit Indiana soil I started "running" and I haven't stopped yet. Whew...I need another vacation! (So, Mr. Everyday if you are reading this...another 2 weeks on the beach would be wonderful! Just kidding!!)

Today's guest is now on her 3rd post here on EMM and her recipes are always big hits! Grab a glass of iced tea or if your week was as busy as mine, a margarita (it's 5 o'clock somewhere) and join Angie and I in the kitchen...

My name is Angie Cupp from Northeast Indiana.  I love spending time in the kitchen creating meals and yummy treats for my hubby & children.  Wife to Daron and momma to 3 blessings.  I want to thank Krista for having me on EMM once again!  This recipe is one that I got from a free handout at the store back in the late 1990's.  I love how it is so versatile.  If you prefer chicken over ham, change it.  Cheddar over Swiss, change it. It is just that simple.   I hope you enjoy this yummy favorite of mine!   


Ham & Broccoli Braid
2 1/4 cup (3/4 lb.) Ham, diced
1 cup Broccoli, chopped
1 cup Swiss Cheese, shredded                                
1/2 cup Hellmann's mayonnaise
1 TBS Honey Mustard
2 (8oz) cans of Pillsbury Crescent Rolls
1 Egg white, beaten
2 TBS Almonds, slivered (optional) 


Heat oven to 375 degrees.  Spray cookie sheet with Pam.  Unroll the crescent rolls to cover the entire cookie sheet.  Cut 2 inch slits down the side of the cookie sheet. This will be so you can braid the crescent roll once filling is made. Mix together in a bowl the ham, broccoli, cheese, mayo, and mustard.  Once mixed together scoop mixture out and place it lengthwise down crescent roll that is on the cookie sheet.  Braid the crescent roll.  In a small cup beat the egg white and mix in just a tad bit of water to make an egg wash, baste over the raw braided crescent.   Sprinkle almonds over the braid.  Bake at 375 degrees for 28-33 minutes until deep golden brown.


Pin It

Saturday, July 7, 2012

Weekend Company {Guest Blogger Bekki}

Happy Saturday to all of you. I hope your weekend is off to a good start. Maybe you're still enjoying some time off for the holiday, and if that's the case, lucky you! If you are in the part(s) of the country that are melting, I hope you're finding fun ways to stay cool. However you plan on spending the next 2 days, I'm so glad you decided to make EMM a part of it. This week's guest is a faithful and loyal EMM fan here to share a fantastic cookie recipe with all of us. Please welcome Bekki back to EMM~


Hello EMM foodies! I hope you had a blessed Independence day, that was filled with all your favorite dishes, and hopefully some fun new ones. I want to thank Mrs. Everyday for inviting me back to share another recipe with all of you. So grab a tall glass of milk for this one, your really going to enjoy it with this cookie recipe. And don't forget the different flavors of chips to mix with the butterscotch, or use another entirely.

I am married to my wonderful husband Josh, have a beautiful 12 year old step daughter Amy and 2 furbaby sweethearts Minnie and Shadow. I am a self taught baker/cook. I taught Wilton cake decorating for a while, worked in a grocery store bakery and have even spent time baking wedding/birthday cakes as a hobby on the side. My love for cooking has been since childhood. Spending time with my mother, aunts, and grandmothers. Aiding in their recipes or just being there for the conversation. Its always been a source of calm, peace, and ultimate fulfillment. The idea that you add your love to each recipe and share it with the people you care about is such an amazing blessing to me in more ways then I can ever put on paper. I have decided writing a cookbook was something I could do to share my love of food with family, friends, and whomever else comes my way. I hope your day is blessed with all your favorite things.

This recipe came from a favorite cookie cookbook of mine. Called Incredibly Easy Cookies. It has been changed here and there depending on what ingredients I have on hand. I've used butterscotch with chocolate and even peanut butter chips. Feel free to experiment as I did. They are always a crowd pleaser.

Oatmeal butterscotch cookies
3/4 c. butter or margarine, softened
3/4 c. granulated sugar
3/4c. packed light brown sugar
2 eggs
1 tsp. vanilla extract
1  c. all purpose flour
1 tsp.  baking soda1/2 tsp. salt
1/2 tsp ground cinnamon
3 c. quick cooking or regular rolled oats, uncooked
1 c. (11oz package) Hershey's Butterscotch chips

1 Heat oven to  375

2.Beat butter, granulated sugar, and brown sugar with electric mixer on medium speed in large bowl until well blended. Add eggs, and vanilla; blend thoroughly. Stir together flour, baking soda, salt and cinnamon; gradually add to butter mixture, beating until well blended. Stir in oats and butterscotch chips; mix well. Drop by teaspoons onto ungreased cookie sheet.

3. Bake 8 to 10 minutes or until golden brown. Cool slightly. Remove to wire rack and  cool completely.


Pin It